


For the most part, giant applique is the same as regular applique – trace, rough cut, fuse, clean cut, fuse again.
If you’re new to applique with fusible adhesive, do NOT start with a giant block. There’s a post here with very detailed instructions, and you can follow along with one of my free patterns. Make at least one “normal-sized” block, and then come back and tackle giant blocks. 😁
In this lesson I’m going to show you how to handle the quirks of giant applique.
Tracing Your Enlarged Pattern
There are two things different with this step.
One – you’ll need to “explode” the pattern yourself. That is – separate the pieces and mark where any extra seam allowance for underlap is.
Two – when you enlarge the pattern, you also enlarge the lines of the pattern. Depending on how thick the lines were to start with and how much you enlarged it – the lines can get to be 1/4 inch thick – or even more! Where do you trace and cut?
This video shows you how to tackle both of those issues.
Not hard – just a couple of things you need to think about. 🙂
What If the Pattern Piece Is Bigger than the Biggest Fusible Adhesive You Can Buy?
Post it notes are my secret weapon. 🙂
The Heat & Bond Lite that I prefer is available by the bolt – so the length is unlimited, but the width is just 17 inches. That will work for a lot of patterns – but not all of them. And who knows how big you’ll make future projects? Maybe you’ll make a king-size quilt with one enormous applique in the middle. It’s possible! 🙂
How to Position and Fuse Your Applique When It’s Bigger than Your Ironing Board
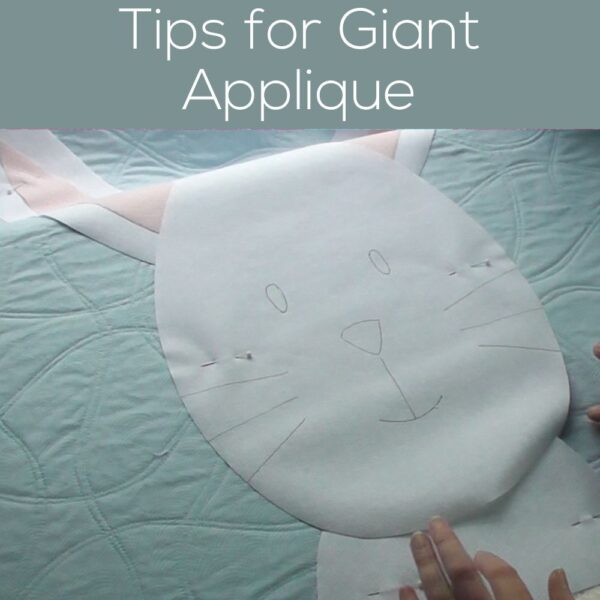
There are two possibilities here.
If your image is symmetrical, it’s possible to build it from the neck up – bit by bit. That’s how I did this giant fox block.
If your image isn’t symmetrical, you’ll need to position everything on a flat surface, pin it, move it to your ironing board, and then fuse it section by section. That’s what I do with this bunny block.
So that’s the applique itself. What about the next step?
Using Thicker Thread
In addition to scaling up the applique pieces, I also like to scale up the stitching that outlines them. I do that by using thicker thread.
12 weight is the thickest thread you can use in a standard sewing machine, so that’s what I use. I almost always use Sulky 12 wt. thread in black. On the rare occasion when I outline in a color, I use smaller Sulky Petites spools.
Outlining with thick thread is pretty much the same as outlining with regular thread, with just a couple of exceptions.
One – you need to use a needle with a larger eye. I use 90/14 topstitching needles and they work great.
Two – do NOT use the thicker thread in your bobbin. Use a regular weight thread for the bobbin.
Since your thread weight doesn’t match your bobbin weight, you may need to adjust your tension a bit. Stitch up a quick row of stitching using the same weight batting you’ll be using and different color threads in the top and the bobbin. Adjust the tension as needed until the bobbin thread doesn’t show on the top and the top thread doesn’t show on the bottom. Make a note of the new tension and use that every time you’re topstitching with your heavy threads and you won’t need to test it again. (I recommend writing it right on the spool.)
There’s a post here with more detail about stitching with thicker thread.
Using Multiple Lines of Stitching
If you don’t want to mess with using thicker thread, you can always go around all the shapes more than once for a thicker line. I find that three passes with regular thread gives about the same definition as one pass with the thicker thread. I actually like the sketchy look of multiple lines, but I don’t always want to go around all the pieces three times. It really just depends on my mood. 🙂
This post has more info (and a video) about scribbly outlining.

Here are links to all the Think BIG lessons. . .
- Intro and Tools and Supplies – a look some samples of projects made with giant applique, plus an overview of any special tools and supplies you’ll need
- Enlarging Your Pattern – how to figure out how big you’ll need it to be, and how to print giant template pieces
- Tips and Tricks for Giant Applique – what do you do if the pattern piece is bigger than your fusible adhesive, if it won’t fit on your ironing board, and how to scale up your outline stitching
Pingback: Think BIG! – Tools and Supplies - Shiny Happy World