Front Post Double Crochet – video tutorial

Front Post Double Crochet is a nifty technique that you can use to create raised ribs on the front of your fabric.

And it’s easy!

Alyssa Voznak shows how to do it in this video.

See? Isn’t that pretty?

You can use front post double crochet on hats and scarves – but it can also be a handy skill for amigurumi too! You could use it to create textured seashells, fins on a fish’s fins or tail, veins in a leaf, the look of corduroy pants, a ribbed-looking hat – the possibilities are endless!

I used this stitch to add raised ridges on the hair on this doll.

Becky - a crocheted doll pattern from Shiny Happy World

Here’s a view of the hair before I attached it to the doll – shown from the top down so you can see the ridges. It adds a nice extra texture that I really like.

crocheted doll and her crocheted hair (before attaching) showing the ridges created using front post double crochet

(I also really like that you don’t have to permanently attach the hair to the doll – make the same “wig” in a few different colors and lengths so kids can swap it out as they play. Fun!)

Related videos. . .

Here are handy links to all the posts teaching more fancy crochet stitches. . .

Return to the main table of contents for Let’s Learn to Crochet Amigurumi.

Move on to the posts about working with crochet patterns.

Happy stitching!

How to Single Crochet One Row Below – video tutorial

How to Crochet One Row Below - showing a crocheted elephant trunk with a bend in it

Did you know you can crochet one row below where you would normally crochet?

It’s a nifty little trick that can create a neat new texture on the surface of your fabric – but it can have an extra benefit for amigurumi.

It can make your shape bend!

In this terrific video, Stacey shows you how to do it.

Specifically, she shows how to single crochet in the front loop, one row below – but you can use the general idea to do lots of other stitches one row below.

Here’s how.

See how that makes the fabric bend? Isn’t that cool?

Stacey used this technique to get the perfect bend in the truck for her Ellie the Elephant amigurumi pattern.

But that’s not all!

I use the same technique to give Maxwell Monster his adorable underbite.

green crocheted monster head with hairy ears

Get the Maxwell Monster pattern here, and watch the video showing how to use “crochet one row below” to create an underbite here.

I crocheted one row below to get the silly lips on this free squishy monster pattern.

And crochet one row below is one of the skills you build on to be able to front post double crochet – the skill I used to create the ridged lines in this doll’s hair.

How to Crochet Doll Hair using front post double crochet

Crochet one row below. Pretty nifty – eh?

Here are handy links to all the posts about crocheting more advanced shapes. . .

Return to the main table of contents for Let’s Learn to Crochet Amigurumi.

Move on to the posts about troubleshooting common problems.

Happy stitching!

How to Double Crochet – video tutorial

How to Double Crochet - a video tutorial from Shiny Happy World

You may be wondering why you need to learn double crochet. After all, amigurumi are mostly single crochet. That gives the tightest fabric with the smallest holes for the stuffing to peek through.

But sometimes we need some slightly taller stitches (like on the convex side of a bendy piece) so we use half double crochet.

And sometimes we need something even taller, so we use double crochet.

In this video I show you a swatch where you can see (and compare height) between the three most basic crochet stitches – single, half-double, and double.

And, of course, I show you how to do it. 🙂

See how easy that is?

And how much taller it is than single crochet?

That height means bigger holes, so you’ll never see this in amigurumi bodies that need to be stuffed.

But sometimes we’ll use it for special amigurumi details, like the feet on Russ the reversible chick and egg.

reversible chick and egg crocheted toy - it uses double crochet for the feet

One row of single crochet made the feet too small, and two rows was too big. These are just right.

You also see it here in the eye-brow rings on Nelson the Owl.

crocheted owl with double-crochet eyebrow ridges - made with the Nelson the Owl pattern

See how nice and tall they stand up to make elegant eyebrows?

You might also see double crochet as a part of other stitches, like these scallops along the edge of Flit the Fairy‘s hair and wings.

Crocheted fairy doll made with the Flit the Fairy pattern

There’s a video here showing how to crochet scallops.

See? Even though amigurumi are mostly single crochet, there are lots of ways to slip in a little bit of double crochet for special touches.

Bonus – double crochet works great for scarves and hats. It’s a little more drapey than single crochet – and extra drapey if you go up a hook size from what the yarn label recommends. It gives scarves and slouchy hats just the right softness.

Here are handy links to all the posts teaching the basic crochet stitches. . .

Return to the main table of contents for Let’s Learn to Crochet Amigurumi.

Move on to the lessons for more advanced crochet stitches.

Happy stitching!

How to Half Double Crochet – video tutorial

Half Double Crochet is a great crochet stitch.

It’s easy to do, a little taller than single crochet.

It’s great for hats and afghans – but we don’t use it very often for amigurumi. Ami are mostly single crochet.

So why am I posting it here?

Well, next month’s Ami Club pattern uses a tiny bit of double crochet, so I wanted to make sure to have a double crochet tutorial video ready on the blog.

And it’s kind of silly to teach double crochet without teaching half double crochet first, so here’s a half double crochet video!

Just a heads up for our friends across the pond – this stitch is called half treble crochet in British patterns. I don’t know why. 🙂

Here are handy links to all the posts teaching the basic crochet stitches. . .

Return to the main table of contents for Let’s Learn to Crochet Amigurumi.

Move on to the lessons for more advanced crochet stitches.

Happy stitching!

How to Add a Door (that opens!) to a Quilt Block

How to Add a Door (that opens!) to your quilt block - a tutorial from Shiny Happy World

That house doesn’t look very special – right?

Look closer!

How to Add a Door (that opens!) to your quilt block - a tutorial from Shiny Happy World

Peekaboo!

The door opens!

Here’s how to do it.

I’m using an example of one block from the Shiny Happy Houses quilt pattern, but you could adapt this idea in all kind of ways! I list a few possibilities at the end of the tutorial.

How to Add a Door (that opens!) to your quilt block - a tutorial from Shiny Happy World

Step 1

Trace or print all your pattern pieces as usual. You’re going to do three things with your door piece.

  1. Print or trace your door onto the fusible adhesive – just like normal.
  2. Also trace your door onto a piece of freezer paper.
  3. Also trace your door onto the fusible adhesive house piece – right where you want it to go.

Step 2

We’ll start with making the door itself.

Cut the door piece out of the freezer paper a little bit bigger all the way around. Do this neatly – it’s just to make the door a smidge bigger than the door opening. Mine is a little bit more than an extra 1/8″ all the way around.

Layer two pieces of door fabric right sides together and fuse the freezer paper door piece to the wrong side of the top layer.

How to Add a Door (that opens!) to your quilt block - a tutorial from Shiny Happy World

Use the edge of the freezer paper as a guide and stitch almost all the way around the door, leaving a little bit open for turning on the side where the “hinges” would be. Don’t forget to backstitch at the beginning and end of your stitching.

Step 3

Trim around the door, leaving a small seam allowance.

How to Add a Door (that opens!) to your quilt block - a tutorial from Shiny Happy World

Clip away the excess completely at the corners.

Step 4

Turn the door right side out through the opening. Smooth your curves, poke out your corners, and tuck the seam allowance at the opening inside and press the whole thing nice and flat.

How to Add a Door (that opens!) to your quilt block - a tutorial from Shiny Happy World

I’ve got my turning stick going into the opening here so you can see where it is. 🙂

Now set the door aside for a bit.

Step 5

Fuse the house piece and the “behind the door” piece to the back of their fabrics.

How to Add a Door (that opens!) to your quilt block - a tutorial from Shiny Happy World

Cut out the house piece right on the line – including cutting away the door that you traced.

Cut the “behind the door” piece right on the line at the bottom of the door. Leave a little extra fabric at the top and sides.

How to Add a Door (that opens!) to your quilt block - a tutorial from Shiny Happy World

Here they are from the front after cutting them out. It’s fun to fussy cut something cute for the “behind the door” piece. 🙂

Step 6

Peel off the paper backings, layer all the pieces together, and fuse.

How to Add a Door (that opens!) to your quilt block - a tutorial from Shiny Happy World

The “behind the door” piece should be tucked behind the door opening so that it peeks out.

Step 7

Outline all the pieces as usual.

How to Add a Door (that opens!) to your quilt block - a tutorial from Shiny Happy World

You’ll only need to stitch around the door opening on the house piece – that stitching also secures the unicorn piece behind it.

Step 8

Sew the door in place by stitching down the side with the turning opening.

How to Add a Door (that opens!) to your quilt block - a tutorial from Shiny Happy World

No hand sewing needed!

Finished!

How to Add a Door (that opens!) to your quilt block - a tutorial from Shiny Happy World

Add a button doorknob if you like. 🙂

You can play with this idea in so many ways! Add shutters to the windows! Make a camouflaged “door” in a treetop (using the same fabric as the rest of the treetop) and hide a little bird or squirrel in there! I know someone out there has used the Shiny Happy Houses pattern to make a castle. Add a functioning drawbridge!

The possibilities are endless, and I can’t wait to see what you all make!

Here are links to all the posts showing how to applique with fusible adhesive – my favorite method. It’s fast and easy and (with the right materials) it holds up beautifully to rough use and repeated washing.

Here are links to special posts about eyes.

Here are links to some extra fun things you can do with your applique.

Other Applique Methods

Finished with this topic?

Return to the Let’s Make a Quilt main Table of Contents.

Move on to the lessons about outline stitching.

Happy stitching!

My Week at Puppet Fantasy Camp

Beyond the Sock puppetry workshop

I just got back from the best vacation ever.

My husband and I went to the Beyond the Sock Puppetry Workshop where we spent a week learning how to make – and perform – hand and rod puppets.

So! Much! Fun!

Here we are with our instructors (and our finished puppets).

Beyond the Sock - our teachers

From left to right that’s Peter Linz, Noel MacNeal (both puppeteers for Sesame Street and lots of other shows/movies) and Pasha Romanowski (puppet-builder and pattern-designer extraordinaire).

What an incredible week! We spent every morning working on our puppets, and every afternoon learning how to perform them.

I’ll start with the making – the part that was definitely my happy place. 🙂

Everyone worked from the same pattern – which was a great way to learn. This year it was a cute cat. 🙂

Beyond the Sock 2018 - cat pattern

Previous years have been rats, monkeys, chickens, penguins, and pirates.

Even though we all worked from the same pattern, we all used different materials and ended up with wildly different puppets. And we didn’t get to choose our materials – we got mystery boxes like on Master Chef.

Beyond the Sock 2018 - mystery boxes

I got this really thick, lush, grey fur.

Beyond the Sock 2018 - my fur

And the fur my husband got may look familiar to some of you!

Beyond the Sock 2018 - Alan's fur

I used it for one of these monsters and in this tutorial showing how to cut fur. It’s one of my favorites!

We built a foam structure, staring with the mouthplate and basically building out from there.

Beyond the Sock - building the mouthplate

After the foam structure was finished, we sewed all the fur and everything into a skin and slipped it over the foam – a very tight fit!

Then it was time to add eyes and accessories and all that and I forgot to take pictures because I was totally engrossed. 😉

But take a look at some of the finished puppets!

Here are mine and Alan’s.

Beyond the Sock - finished puppets

I love his bowler hat and mustache!

Mine has a little gemstone stud in her nose and she was supposed to get purple feather streaks in her hair, but I ran out of time. I’ll add them later. 🙂

Here are some others. . .

Beyond the Sock - finished puppets

Beyond the Sock - finished puppets

Aren’t they awesome?

Now – the performing.

This was the part that was WAAAY out of my comfort zone – but I still loved it!

Beyond the Sock - learning to puppeteer

We were learning how to puppeteer on TV – not live – and that’s a very different thing. You have to make sure your puppet is standing up straight (a constant problem for me) and moving/looking in the right direction. For those of you who have watched my “welcome to the new month” videos where I show the new Ami Club pattern – you know I’m very directionally challenged when it comes to recording! 🙂

In that shot above, we’re trying to make all our puppets look in the same direction – which is surprisingly hard!

And in this one, you can see what we look like performing, and on the monitor.

Beyond the Sock - learning to puppeteer

We were trying to get our group of three centered on the screen, filling the screen, not showing our rods, and all looking at the camera. 🙂

And then they had us acting and lip synching and doing improv on top of all the puppeteering! So many things to remember!

We did a bunch of performances on the last night, including a big song and dance number that had over twenty of us packed into that space below our puppets. Crazy!

Really – it was a totally incredible week and we want to go back next year.

If any of you are interested in making puppets, Pasha has a terrific website with video tutorials and sells really well-designed patterns. It’s called Project Puppet and I can’t wait to make my next one!

Happy stitching!
Best,
Wendi

How to Crochet with Eyelash Yarn – video tutorial

How to Crochet with Eyelash Yarn without Crying, Swearing, or Throwing Away Your Crochet Hooks - video tutorial from Shiny Happy World

I’ve used eyelash yarn on exactly one project before.

The process was so awful that I didn’t pick up my crochet hooks again for a year.

Yes – I hated it that much. The finished result was adorable – but I couldn’t see my stitches while I was working. I couldn’t even find my loop again if my hook fell out!

That project was just using eyelash yarn on the bottom border of a toddler dress – straight crochet with no shaping. The thought of using the stuff to crochet an amigurumi was unthinkable.

Except that I’ve been thinking about it for a few years. 🙂

You see, I had this idea for a little hedgehog. A really cute little hedgehog with soft prickles made of eyelash yarn.

For years I set the idea aside because – eyelash yarn! *shudders*

Counting stitches? Increasing and decreasing? With eyelash yarn?

Nope. Nope. Nope.

But I kept coming back to it and thinking there has to be a way to crochet with this stuff without going crazy.

I looked at all the tutorials. Most of them suggest crocheting it together with a smooth yarn to help you see your stitches, like this. . .

crocheting with eyelash yarn and regular yarn at the same time

That’s what I did on the dress, and while that made the project possible, it wasn’t even a little bit fun.

I think this suggestion works a lot better for knitting, where the knitting needle tells you right where your stitch is.

Some of the tutorials suggested using a bigger hook. I tried that and it was still impossible to see the stitches. The thought of counting rows and doing increases and decreases was not going to happen.

Inconceivably – The Internet was no help.

So I got out some yarns and hooks and started to play.

And I came up with a solution!

At one point I was thinking about Turkey work embroidery (that’s the stitch I used to make the mane on this lion) and how the finished effect is similar to what I was trying to achieve with this yarn. For Turkey work on stuffed animals you make the animal first and then embroider onto the surface.

That’s it!

Instead of crocheting the actual body of the project with the eyelash yarn – where you have to be accurate with your counts and it’s really important to be able to see your stitches – I decided to crochet the body with smooth yarn and then surface crochet the prickles on top of that using eyelash yarn.

It worked!

Not only was it painless – it was fun! And easier and faster than Turkey work embroidery, for what it’s worth. 🙂

Here’s how.

Now you can add furry yarn to any crochet project! Just make the body first in regular yarn and then add the fur later.

And – it works with other specialty yarns too! I used it with a bouclé yarn to make the fuzzy pajamas that Pippa Puppy is wearing.

crocheted dog hugging a crocheted cat

Handy dandy links. . .

  • I tried a few different yarns, and by far my favorite was Lion Brand Fun Fur. My Joann’s had a pretty limited selection of colors, but if you buy online directly from Lion Brand you can get the full range. Look at all the fun colors!
  • That hedgehog I show in the video is a great pattern to start with – very simple and fast to make. Get the pattern here.

You can also use this method to add little accents using eyelash yarn – like Maxwell Monster‘s hairy ears.

green crocheted monster head with hairy ears

I can’t wait to see what you make!

Happy stitching!
Here are handy links to all the posts about yarn. . .

Return to the main table of contents for Let’s Learn to Crochet Amigurumi.

Move on to the lessons for the basic crochet stitches.

Happy stitching!
Make a Wall Hanging! Add a Wonky Churn Dash Frame to Your Favorite Quilt Block

Make a Wall Hanging - How to Add a Wonky Churn Dash Frame to Your Favorite Quilt Block - tutorial from Shiny Happy World

If you’re like most quilters – you have a LOT of patterns. 🙂

It’s always great to come up with another use for one of your favorites – especially if you can make an accessory to go WITH one of your best quilts.

You can turn a single block into a wall hanging and hang it just as it is. But it’s extra fun to give that block a special frame to really set it off and make it into a piece of art. 🙂

And it’s even more fun if that frame uses a wonky version of a traditional quilt pattern.

For this wall hanging I used one of my favorite blocks from the Cuddly Cats quilt pattern – no resizing. So it’s a 10 inch block in the center, with a wonky churn dash frame around it. The entire wall hanging is 16 inches square.

Here’s what you need. . .

  • 18 inch square piece of batting (I use Warm & Natural cotton batting.)
  • 10 1/2 inch square background block
  • scraps (less than 1/4 yard of each color) for the cat applique, the churn dash frame, and the second background around the frame
  • fat quarter for back of wall hanging

Here’s how to make it using Quilt As You Go. . .

Step 1 – Quilt Your Background Square

Press your batting square. Center your background block in the center of the batting.

grey square quilted to batting

Quilt the square to the batting.

I used double wavy stripes on mine. You can find a tutorial for that here.

Step 2 – Applique the Face

Applique the design to the block – being sure to line the lower edge of the applique up with the lower edge of the background block.

cat face and shoulders - appliqued to grey background square

Add a backing to your wall hanging (I used spray adhesive to baste it to the batting) and outline your applique. Here’s a closer look at the placement and the outlining.

Make a Wall Hanging - How to Add a Wonky Churn Dash Frame to Your Favorite Quilt Block - tutorial from Shiny Happy World

You can find a complete video showing how I applique with fusible adhesive here.

Set that block aside while you make the pieces for the churn dash frame.

(That adorable fabric I used for the cat is Hash Dot in Lime from Michael Miller Fabrics, available here.)

Step 3 – Sew Churn Dash Corner Triangles

Cut four background corner pieces each 5 inches square. I used dark grey for mine.

Cut four right triangles with the legs (not the hypotenuse) anywhere between 4 and 5 inches long. The triangles should all be a little different.

Lay one triangle face down over the corner of one square, so that the points of the triangle (at each end of the hypotenuse) just hang over the edges of the square, as shown.

Triangle sewn unevenly to a grey square - making one corner of a wonky churn dash block

Sew the triangle to the square. Your seam allowance doesn’t need to be exactly 1/4 inch.

Step 4 – Open and Press Triangles

Trim away the excess fabric from the corner.

Make a Wall Hanging - How to Add a Wonky Churn Dash Frame to Your Favorite Quilt Block - tutorial from Shiny Happy World

Fold the triangle out and press.

Make a Wall Hanging - How to Add a Wonky Churn Dash Frame to Your Favorite Quilt Block - tutorial from Shiny Happy World

Step 5 – Trim Churn Dash Triangles

Trim the triangle down to a 3 inch square. (There’s a tutorial here showing how to use a square ruler for easy trimming.)

Triangle block for corner of wonky churn dash square - labeled to show required dimensions

Make sure there is more than 1/4 inch between the points of the triangle and the edge of the background fabric square. That will make it impossible to accidentally chop off the points when you assemble the whole frame. 🙂 Yay for foolproof tricks!

Repeat for the other three squares, so you have the four corners of your churn dash block. The sizes and angles of the triangles should all be a little different.

Set them aside.

Step 6 – Preparing Background Rectangles

Cut four background strips 12 inches x 3 inches.

Cut four frame strips 12 inches x 2 1/2 inches.

Sew the frame strips to the background strips and then trim those rectangles down to 10 1/2 inches x 3 inches. Make the seam between the two strips go at a slight angle – and make all the angles a little different to make your finished block more interesting.

You can see my finished rectangles in the next step. See how some are wider than others? And they all slant a bit?

Step 7 – Laying Out the Churn Dash Block

Lay out all the churn dash components as shown.

Laying out the pieces for a churn dash frame around a cute applique cat

Play around with the placement of the frame pieces until you’re happy with how things look.

Step 8 – Sew the Side Rectangles

Sew the side pieces of the frame to the sides of the block, sewing through the batting and backing too. For this and the rest of the project it’s important to use an accurate 1/4 inch seam allowance.

Applique cat with side pieces of frame sewn in place

Press the side pieces open.

Step 9 – Sew the Top and Bottom Strips

Sew together the corners and strips for the top and bottom rows of the frame.

applique cat with top and bottom strips of frame sewn together

Press your seams in toward the strips – away from the corner triangles.

Step 10 – Finich Sewing the Churn Dash Block

Sew the top and bottom rows to the center of the block, being careful to line up the seams.

Applique cat with a wonky churn dash frame - all finished except the final trimming and binding

Press the whole block flat.

Step 11 – Quilt, Trim, and Bind

Quilt the frame if you want to. (It doesn’t need it structurally, so just do it for looks if you like.) I stitched in the ditch around the outside edge of the frame and that’s it.

Trim away the excess batting around the edges and bind your mini quilt.

Make a Wall Hanging - How to Add a Wonky Churn Dash Frame to Your Favorite Quilt Block - tutorial from Shiny Happy World

This video shows my favorite binding method.

If you like, there’s a tutorial here showing how to add a hanging sleeve to the back.

Finished!

Hang it on the wall and enjoy!

You can use the same method to make a fancy framed pillow cover. 🙂

Want to see more ideas for things you can do with a quilt pattern? Check out this round-up.

Here are several free patterns that work with my basic 10-inch applique squares – no resizing needed!

Here are several free patterns that work with just some simple resizing. This post about making coasters has info about resizing an applique pattern that can be applied to any of these projects.

Return to the main Let’s Make a Quilt Table of Contents.

Happy stitching!
The Big Bag – a free large tote bag pattern

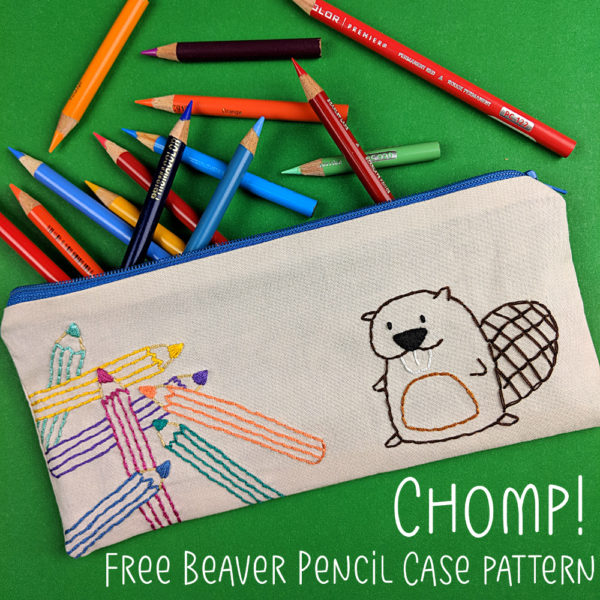
The Big Bag - a free large tote bag pattern from Shiny Happy World

Here’s a free pattern for my favorite large tote bag.

I LOVE this roomy bag!

This one hangs in my studio to hold packages ready to ship, but I also have a few that I take grocery shopping and to the farmer’s market.

I’m a big fan of reusable bags for grocery shopping, but a lot of them are on the small side. I need something that will hold more than one bag of chips! Or one of those big bags of grapefruit! This large tote bag fits the bill exactly – and you can’t beat a free pattern!

Materials

  • two fat quarters of the main fabric
  • two fat quarters of the lining fabric
  • 1/3 yard fabric for straps
  • scraps of fabric for pocket and pocket binding

Cut Out All the Pieces

These straight edges are great to cut with a rotary cutter. If you’ve never used these tools before, here’s a video showing how.

  • Main bag – cut two pieces, each 21 inches wide x 18 inches tall
  • Lining ­- cut two pieces, each 21 inches wide x 18 inches tall
  • Straps -­ cut two strips 6 inches wide x 28 inches long
  • Pocket ­- cut one piece 11 inches wide x 6 1/2 inches tall
  • Pocket binding ­- cut one piece 1 1/2 inches wide x 40 inches long

Ready? Let’s sew!

Step 1

We’ll start by prepping the straps. These are essentially double­fold strips -­ you can watch a video showing how to make them here.

sewing the straps for a tote bag

Fold one of the fabric strips in half the long way, right sides facing out. Press. Open the strip back up and fold each long edge in toward the center fold. Press. Fold in half again along the center fold so that you have one long strip, four layers of fabric thick. This makes a nice, sturdy strap. Press.

Topstitch along both long edges, about 1/8 inch from the edge.

Repeat for the second strap. Set them aside for now.

Step 2

Now to prep the pocket. Fold and press your pocket binding fabric into double­fold tape – just like the straps, but don’t topstitch the edges. Here’s that video again.

large tote bag pocket made with Ed Emberley crocodile fabric

Now we’re going to fold the bias tape around the raw edge of the pocket. Start in the bottom corner of the pocket.

Step 3

Stitch down the binding right up to the edge of where the pocket fabric ends. Don’t keep stitching! If you need to stop a stitch or two before the edge that’s ok, but don’t stitch farther.

binding a tote bag pocket with double fold tape

Stop. Backstitch a bit. Take it out of the machine.

Step 4

Open up the binding and fold it into a neat miter, wrapping it right around the corner of the fabric. Slide it back under the presser foot, backstitch a bit, then stitch down to the next corner.

Mitered corner - close up

This video shows how to miter those corners.

Repeat steps 3 and 4 until you’re back where you started.

Step 5

Trim off the excess binding, leaving about 1/4 inch extra to finish the raw edge.

The Big Bag - a free tote bag pattern from Shiny Happy World

Stop stitching a few inches before the end so you have room to open up a bit of the binding at the end.

Step 6

Open up the last bit of the binding and fold that extra raw edge under.

folding over the edge of the binding

Make it so it’s even with the edge of the pocket.

Step 7

Wrap the folded end back around the edge of the pocket piece and stitch it in place.

pocket for a tote bag - edges bound in contrasting fabric

The pocket should be bound on all four sides and ready to attach to the bag.

The Big Bag - a free tote bag pattern from Shiny Happy World

The binding is especially nice to have at the top edge of the pocket to help reinforce it and keep it from stretching over time.

You’re almost done!

Want to add a cute applique face to that pocket? You can use any of my single block patterns here. Just print the pattern at 60% of the normal size and it will be a perfect fit.

Step 8

Fold the top edge of one bag piece in half and mark the halfway point with a pin. Do the same thing with the pocket.

The Big Bag - a free tote bag pattern from Shiny Happy World

Use a clear ruler to position the pocket 5 1/2 inches from the top raw edge of the bag. Line the 5 1/2 inch mark along the top of the bag, and make one of the vertical marks line up with the center pin on the bag. Line the center mark on the pocket up on the same line and your pocket will be perfectly centered -­ with no measuring or math. :-­)

Detail

Here’s a closer look showing how to use the pin markers to center the pocket.

The Big Bag - a free tote bag pattern from Shiny Happy World

See how both the pins are lined up at the 13 inch mark?

Step 9

Stitch the pocket in place down one side, across the bottom, and up the other side. Make sure you backstitch a couple of times at the stop and start of your stitching to give extra reinforcement to the stress points at the top corners of your pocket.

finished pocket attached to a large tote bag made with a free sewing pattern from Shiny Happy World

Done! You’re ready to put the bag together!

Step 10

Let’s start with the outside of the bag. Pin the two main fabric squares right sides together. Using 1/4 inch seam allowance, stitch around both sides and the bottom of the bag. Repeat with the two lining pieces.

Now we’re going to box the corners of the main and lining bags­ so that your bag will have depth. A free pattern for a large tote bag is much more useful when the base of the bag is wide enough to hold those bulky items you need to carry.

 Watch a video demonstrating how to box corners here.

Step 11

Open out one bottom corner of the bag so that the side seam and center bottom seam line up, and the corner of the bag makes a point.

Measure down 2 1/2 inches from the tip of the stitching (NOT the tip of the fabric triangle -­ ignore that flap of seam allowance) and draw a line perpendicular to the side seam.

Boxing the corners of a tote bag

Step 12

Stitch right on the line you drew. Trim away the excess fabric.

boxing the corner of a tote bag

Repeat for the other corner, and for both corners of the lining.

Step 13

Turn the main bag right side out. Leave the lining inside out.

Pin the edge of one strap to the top edge of the bag, 4 1/2 inches in from the side seam.

measuring for strap placement on a tote bag

Repeat for the other end of the strap.

Repeat with the second strap on the other side of the bag.

Step 14

Put the main bag inside the lining, with the straps sandwiched between the two layers. Since the lining is inside out and the main bag is right side out, you should end up with the right sides together. Line up the side seams and pin the layers together around the top edge of the bag.

Step 15

Using 1/4 inch seam allowance, stitch almost all the way around the top edge of the bag. Leave the space between the two ends of one handle unstitched, so you can pull the bag through the opening. Be sure to backstitch at the beginning and end of your stitching. There will be some pressure on the edges as you pull the bag through.

Step 16

Reach into the opening and pull the main bag through. Pull through the handles, then pull the lining right side out and tuck it down into the bag. Press around the top edge, being especially careful to press the open edges evenly.

Step 17

Topstitch around the bag, about 1/8 inch from the top edge. Be sure that the folded edges of the opening you used for turning are lined up and that you catch both layers in the topstitching to hold them together. No hand stitching!

I wanted the topstitching thread to match the fabric of the main bag AND the lining, so I used green thread as my main thread and blue thread as my bobbin thread. The stitching is green on top and blue on the bottom. Neato!

Finished! One large tote bag made with a free pattern.

The Big Bag - a free large tote bag pattern from Shiny Happy World

The handles are the perfect length for throwing over your shoulder and the bag is roomy enough to hold three big bags of chips, or a bunch of veggies from the farmers market – including lots of healthy but bulky green leafies!

Maybe you don’t want such a large tote bag? I’ve got two more free patterns!

The Trick or Treat Tote Bag is great for trick or treating – but also for carrying library books, lunch, and more.

Trick or Treat Bag - a free pattern from Shiny Happy World

The Mini Tote Bag is quite a bit smaller. It’s great for small toys and snacks. When my daughter was very little we kept a few of these packed with “special” toys that we only played with on outings – like at a restaurant. One had a few trucks and cars, another had crayons and a cute notepad, another had a handful of action figures. They were great grab and go bags. 🙂

Mini Tote Bag pattern - free from Shiny Happy World

Here are several free patterns that work with my basic 10-inch applique squares – no resizing needed!

Here are several free patterns that work with just some simple resizing. This post about making coasters has info about resizing an applique pattern that can be applied to any of these projects.

Return to the main Let’s Make a Quilt Table of Contents.

Happy stitching!
Scribbly Outlining Your Applique Pieces

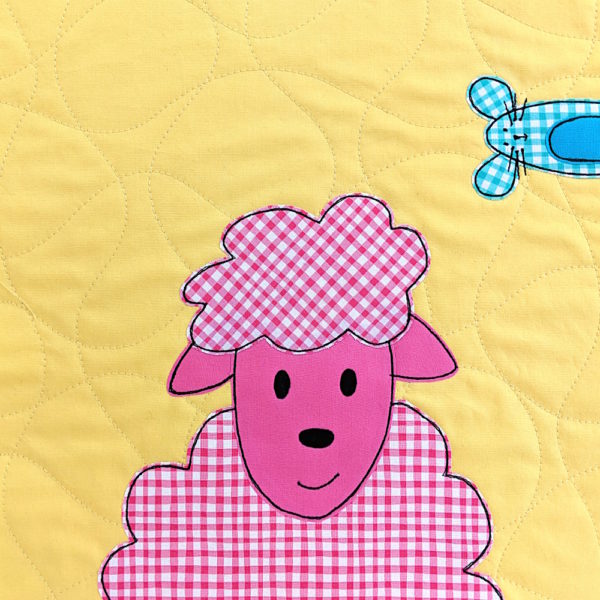
Scribbly Outlining Applique Pieces - tips from Shiny Happy World

There are SO MANY different ways to outline applique pieces – and scribbly outlining is one of my favorites!
A lot of people applique with satin stitch or decorative stitching like blanket stitch. I demonstrate how to use decorative stitches in one of the lessons in my Fusible Applique Made Easy Class on Craftsy. Here’s an example of some of that stitching.

Owl block from parliament of Owls quilt pattern from Shiny Happy World

There’s blanket stitch around the bottom of the eyes, another stitch around the belly patch, and straight stitching everywhere else.

You can see lots more examples of this in the Parliament of Owls quilt pattern.

Fancy stitching can be fun, but I usually outline with a simple straight stitch and black thread. I love the cartoony look it gives and I think it really suits my applique designs. Plus it’s super easy!

(A lot of people worry that their fabric will fray if they just do a straight stitch outline. I posted a photo of one of my daughter’s quilts after over a year of constant use and many trips through the washer and dryer. Click here to see how it holds up.)

Sometimes, if I want a thicker line, I use a thicker thread. I like using 12 wt. thread from Sulky Petites and I’ve got a post here where I talk about what you need to do to work with thicker thread – what needle to use, what to use in the bobbin, etc.

Sometimes when I want a thicker line but I’m too lazy to change my needle (like maybe just on cat whiskers) I’ll use regular thread and go over the stitching two to three times, being careful to stitch right over the previous stitching so it looks like one solid, thicker line. You can see that in this cat.

Maurice block from the Cuddly Cats quilt pattern from Shiny Happy World

I did most of the outlining with regular thread, but you can see the line is thicker on the whiskers and the mouth. That’s where I went over it a few times.

Lately I’ve been wanting to play around a bit with scribbly outlining, more like the lines in my sketchbook.

So I tried it! It took me a few blocks to get just the look I was trying for.

Scribbly Outlining Applique Pieces - tips from Shiny Happy World

It took three rounds of stitching to get this look. Two just looked like a mistake – three looked intentional.

It’s kind of hard to deliberately go off the line! I’ve made hundreds of these blocks and by now it’s kind of automatic to follow the line as closely as possible. 🙂 I found it helped to deliberately ignore the line on pass two, to just pretend it wasn’t there and outline again as if it was a blank piece. Then on round three, if the first two lines were still too much on top of each other, I would deliberately veer off line. Make sure you cross over the line when you veer – you don’t want another line consistently inside or outside your original line. You want to cross over so sometimes it’s inside and sometimes it’s outside. That gives the best sketchy look.

Bonus! Four lines of scribbly outlining looks pretty much exactly like three. That means there’s no real benefit to doing four trips around the whole thing, but you can use that extra trip in some places to avoid having to start and stop to go around pieces like ears and muzzles and necks. For that snippet you see above, there are three rows of stitching around everything except the bit of the head that overlaps the ear. I went over that bit four times so I could stitch the ear without ever having to stop and tie a knot.

Here are links to all my posts about outline stitching.

Finished with this topic?

Return to the Let’s Make a Quilt main Table of Contents.

Move on to the lessons about how to trim and assemble your blocks.

Happy stitching!