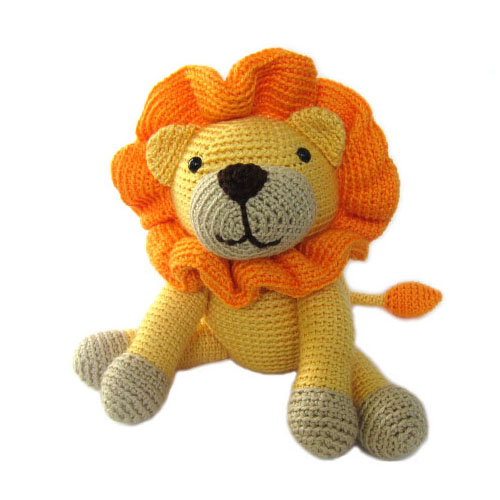
The trickiest part about this pattern is the mane. And although the pattern has step-by-step photos, I thought you might enjoy a little video that demonstrates the hardest part: planning and doing the first round of single crochets for the mane.
(Tip – you can use this skill in lots of different ways – like attaching a skirt to a doll, a foot to a slug, petals to a flower, and more.)
For this technique, I begin by attaching with a single crochet (read more about how to do that, here!) Why? This is an easy way to join a new yarn, and because you’re doing a single crochet, you’ve actually started the work! No need to get confused by a slip stitch or extra knots.
Don’t forget to share how your lion is coming along!
Here are handy links to all the posts about crocheting more advanced shapes. . .
I don’t like the envelope backs. They’re easy to sew, but they don’t cover the pillow as snugly as I like.
I like zippered covers, so they cover tightly and can be removed for washing – but I don’t like when the zipper is in one of the side seams. They never “sit” the same way as the other seams, so the finished pillow shape is always a little distorted.
I like the zipper to be somewhere in the pillow back (it doesn’t have to be the exact center) but I don’t like it to extend all the way to the edges, because the stiffness of the zipper again can distort the overall look of the pillow.
So here’s how I sew a pillow with a zipper in the back.
I make the cover a little small. If the pillow is 18 inches square, I cut my fabric 18 inches square. When I sew the front to the back using a 1/2 inch seam allowance, the pillow cover ends up 17 inches square – perfect for the nice snug fit I like.
I make the zipper a little short. Specifically – two inches shorter than the cut fabric. So for an 18 inch pillow, I buy a 16 inch zipper.
My daughter doesn’t like using regular rectangular bed pillows. Instead she has an enormous pile of square pillows – mostly with quilted and applique designs on them. 🙂 She doesn’t like the inexpensive “hard” pillow forms. She likes these Fairfield brand Home Elegance pillows. They feel like down pillows, but they’re a LOT less expensive and they’re machine washable. Win!
You can use any quilt block pattern to make a pillow cover.
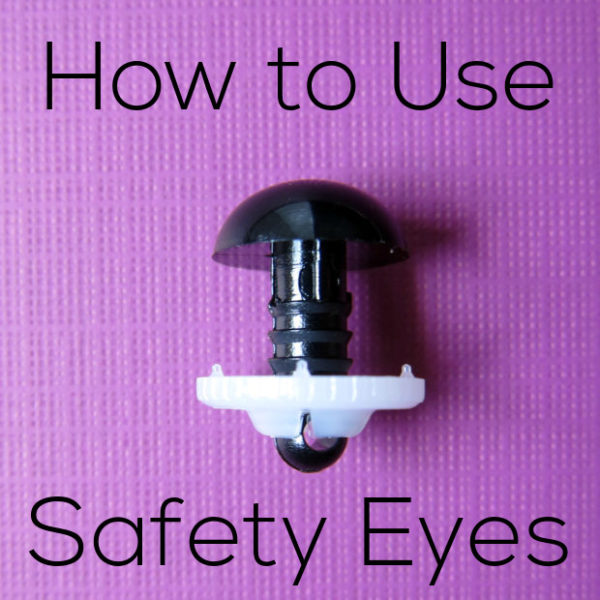
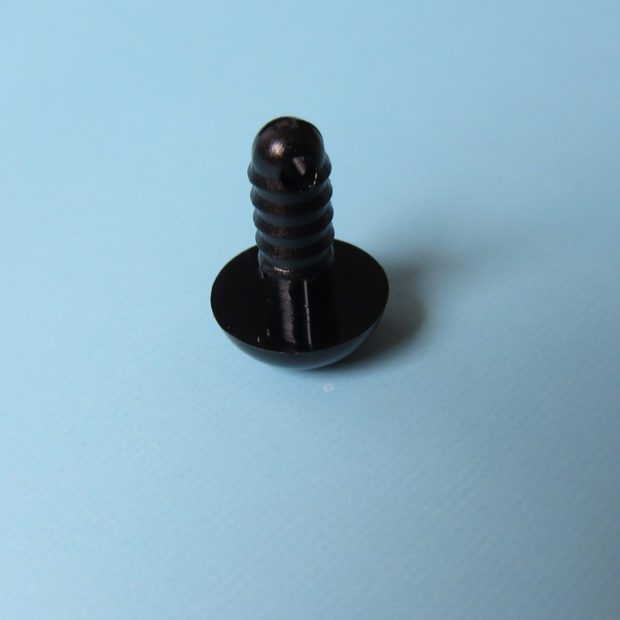
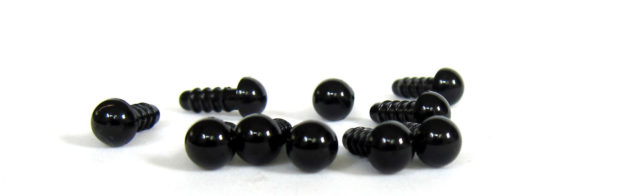
Craft eyes. Plastic eyes. Safety eyes. Animal eyes. They’re called lots of different things!
You can use them for both sewn and crocheted softies. I’ve even used them in applique wall hangings. I just use a pair of wire cutters to snip off the post that sticks out after you attach the washers.
I’ve made a video (below) that shows you how to install them. In the video I’m demonstrating on a crocheted stuffed animal, but you can use these eyes in sewn softies as well. You just need to poke a hole! I like to use a ball point awl. It creates a hole by stretching the fibers around the opening instead of by cutting any of the threads. If you cut a hole in stretchy knit fabric, that hole can run over time, just like a ladder in your stockings.
I prefer eyes with ridged shanks and plastic washers. I feel like they hold the best BUT they’re harder to use with smaller size eyes. It’s just really hard to hold such tiny pieces straight while you push the very tight washer on! So for the smallest eyes (4.5 mm) you’ll get smooth shanks and metal washers instead. They’re still small, fussy pieces, but they’re not nearly as hard to work with. Also – 4.5 mm eyes are so small that I really only use them for small felt softies – the kind of softies that stand on a shelf instead of being played with a lot.
Speaking of safety – just because they’re called “safety eyes” doesn’t make them safe for babies. The eyes themselves will never come apart (here’s a video showing how to remove safety eyes – you’ll see how hard it is to do). But babies can chew through the fabric around the eye, which then frees the eye (along with the still-attached washer) which is a choking hazard. So only use these on toys for kids over three, or toys that will be played with under supervision.
Below the video I’ve also included a quickie photo tutorial for those of you who want to get ‘straight to the point’ as well as some other links you might like!
Video Tutorial for Craft Eyes
This is a little 5 minute video. Enjoy!
How to install craft eyes
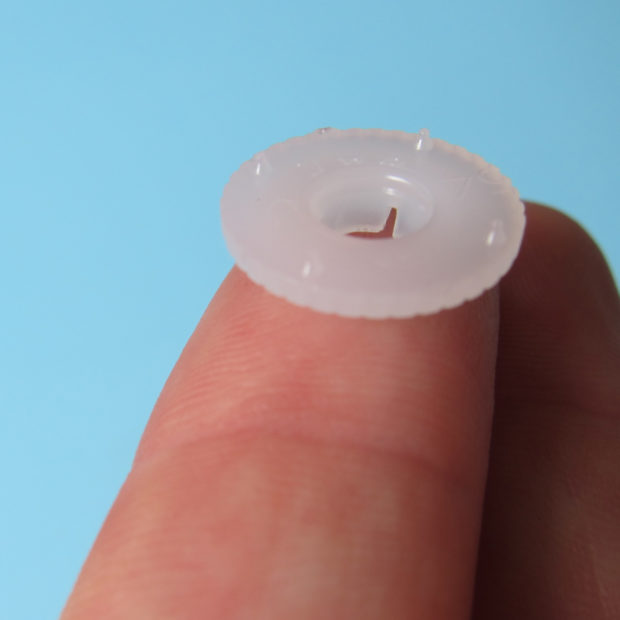
Do you see those little points?
Those little ‘barbs’ dig into the fabric and keep the eye from rotating. Which isn’t a big deal if you’re just using a black craft eye, but is crucial if you’re using a comic eye. You don’t want them twisting and giving you googly eyes!
The ridges on the posts of craft eyes help the washer click on (and stay on!) securely. I love hearing the ‘click’ as I press the washer on! The ridges also help to make sure the washer presses on evenly.
So, let me show you how to install a craft eye with a plastic washer.
First, insert the post of the craft eye between the stitches on your piece where you want it to go. For sewn softies, use a ball-point awl or a small knitting needle to poke a hole. I recommend that you place the eyes first, before pressing on the washers, just to see if you like the look.
Once your eyes are positioned how you’d like, press the flat side of the washer (that’s the one with the tiny barbs!) onto the post.
Here’s a photo of how it will look (but without the fabric getting in the way… obviously, your piece doesn’t really look like this!):
I don’t want you to stress too much about this, because if you try to put the washer on backwards, it just won’t go.
Now, push! You’ll hear that click, and it’s on!
A note about smaller eyes
Most 6 mm craft eyes, because they are SO tiny, have smaller plastic washers without the ‘barbs’. And most 4.5 mm eyes (as mentioned above) have metal washers. But don’t worry, the same rule applies: flat side towards the fabric.
This post was originally published April 28, 2015… but it’s so popular that I’ve updated it and added a video!
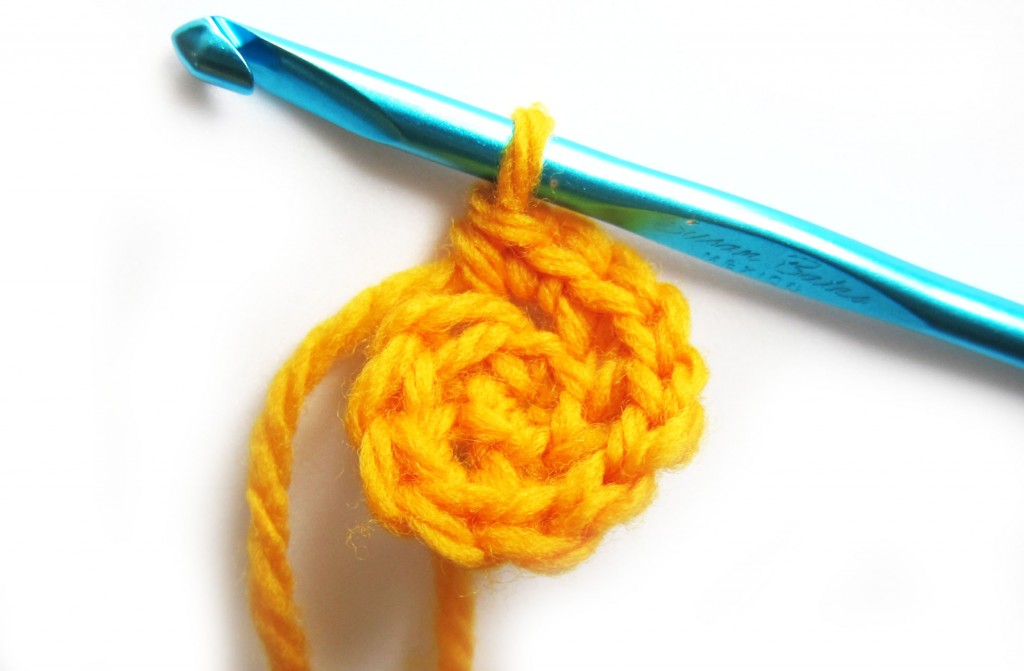
Crocheting is so much fun because there are so many options! Even a simple single crochet gives you the option of crocheting through the front loop, both loops or the back loop!
Today, I’ll show you where to insert your hook for the most two popular techniques: the back and both loops. I’ll also link to some posts that you might find helpful… and included a video tutorial at the end!
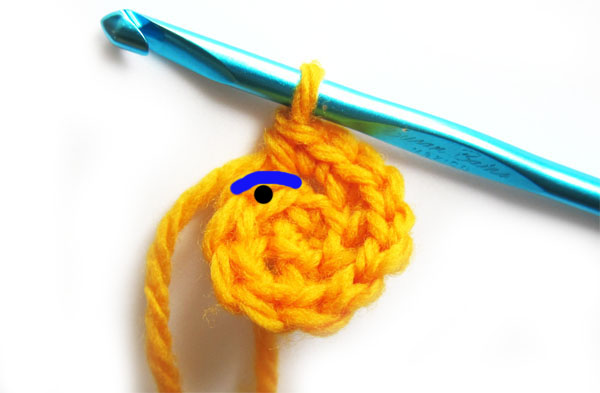
The Back Loop
Every stitch is a V laying on its side. Do you see the V in the above photo? The back loop refers to the top leg of this V.
To use this technique, insert your hook where I’ve put a black dot in this photo:
Why the back loop?
Crocheting through the back loop is my favorite! You’ll want to read this blog post that outlines all of the advantages!
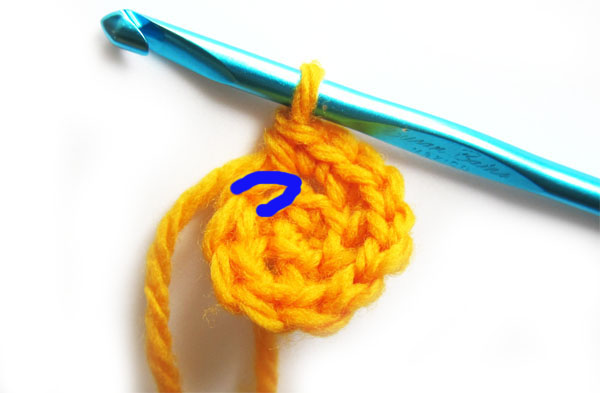
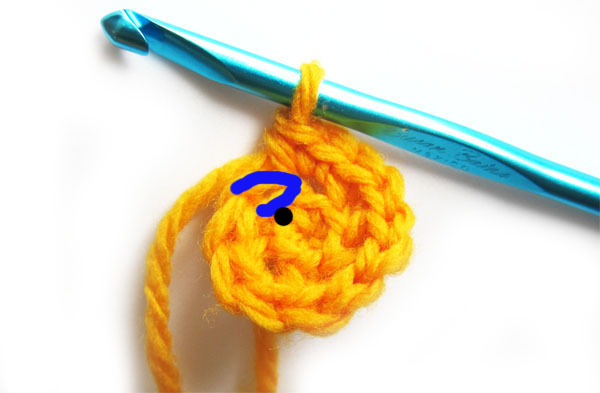
Both Loops
The term ‘both loops’ refers to both the back and front loops. This is the ‘standard’ when a pattern doesn’t specifically reference any loops. This is the entire V:
To use this technique, insert your hook where I’ve put a black dot in this photo:
Video
I know it can be hard to picture what these variations look like when you’re actually crocheting, so I’ve recorded a video for you!
What’s it look like in the end?
You’ll want to have a look at this blog post where I show you photos of how each technique looks, in the round and in rows!
This post is originally from November 2013. I updated it in July 2017 to add the quilted batik tablet cover I made for my iPad Pro.
The day before I left for Quilt Market I decided that a really efficient use of my time would be to make myself a tablet cover using some of my new patterns. 😛
Here’s the result.
I posted it on Facebook and I got a bunch of requests for a pattern.
How about a free tutorial instead?
First you’ll need to measure your tablet. Of course, they’re all just a little bit different.
Add one inch to each dimension – length and width. This is your cutting size. If your tablet is 8″ x 11″ your cutting size is 9″ x 12″.
Cut four pieces of fabric to your cutting size. Two are for the outside and two are for the lining.
Or just make it out of the most fabulous fabric you can find!
For the new iPad cover, I used a fabulous hand-dyed batik fabric from Malka Dubrawsky of Stitch in Dye and added Big Stitch quilting around all the circles.
These are the tablet cover front and back, all quilted, trimmed to size, and ready to assemble.
Back the outside layers with some thin cotton batting and hold the layers together with some machine quilting (if you didn’t already quilt it as part of your embellishment). For the cat/dog cover, I just followed the line of the zigzags in the fabric. Easy peasy! Since the tablet is lined you don’t even need to back the batting.
So. You’ve cut your pieces, added any fanciness you like, and quilted in some padding. Time to start sewing it all together. This is super easy.
Sew your front to your back, right sides together, using 1/4″ seam allowance. Sew down one side, across the bottom, and up the other side. Don’t forget to backstitch at the beginning and end of your stitching.
Do the same thing with your two lining pieces except leave a 3-4 inch opening in the bottom for turning the whole thing right side out later.
Turn both the outside and the lining right side out and press.
I’ve got my turning stick poked through the opening I left in the lining. See how I pressed that too? That’ll make it a cinch to sew up when you’re done.
Now turn the outside inside out again. Leave the lining right side out.
Measure a strip of elastic 3 inches long. I used soft fold-over elastic in a pretty color but you can really use any elastic in any size or color.
Fold the elastic in half and pin it to the center of the front of your cover. (Fold the cover in half to quickly find the center.)
I like to leave a little extra hanging over the raw edge.
Slip the lining (right side out) inside the cover (inside out). Line up the side seams and pin or clip the layers together around the top. The elastic loop should be sandwiched between the two layers.
You can really see my quilting lines here on the batting.
Sew the outside to the lining all the way around the top using 1/4″ seam allowance.
I go back and forth over the elastic a couple of extra times. It’s a stress spot and I like to reinforce it.
Now comes the fun part.
Pull the lining out of the bag. Then pull the whole thing through the opening in the bottom of the lining. Sew up the opening in the lining using either whipstitch or ladder stitch and tuck the lining down into the bag.
Flip down the elastic loop to see where you need to position your button and sew the button in place.
Done!
Here’s the back of my cover. Of course I had to decorate the back too!
And here’s a full view of the batik cover.
It’s the same font and back. 🙂
Here are several free patterns that work with my basic 10-inch applique squares – no resizing needed!
Here are several free patterns that work with just some simple resizing. This post about making coasters has info about resizing an applique pattern that can be applied to any of these projects.
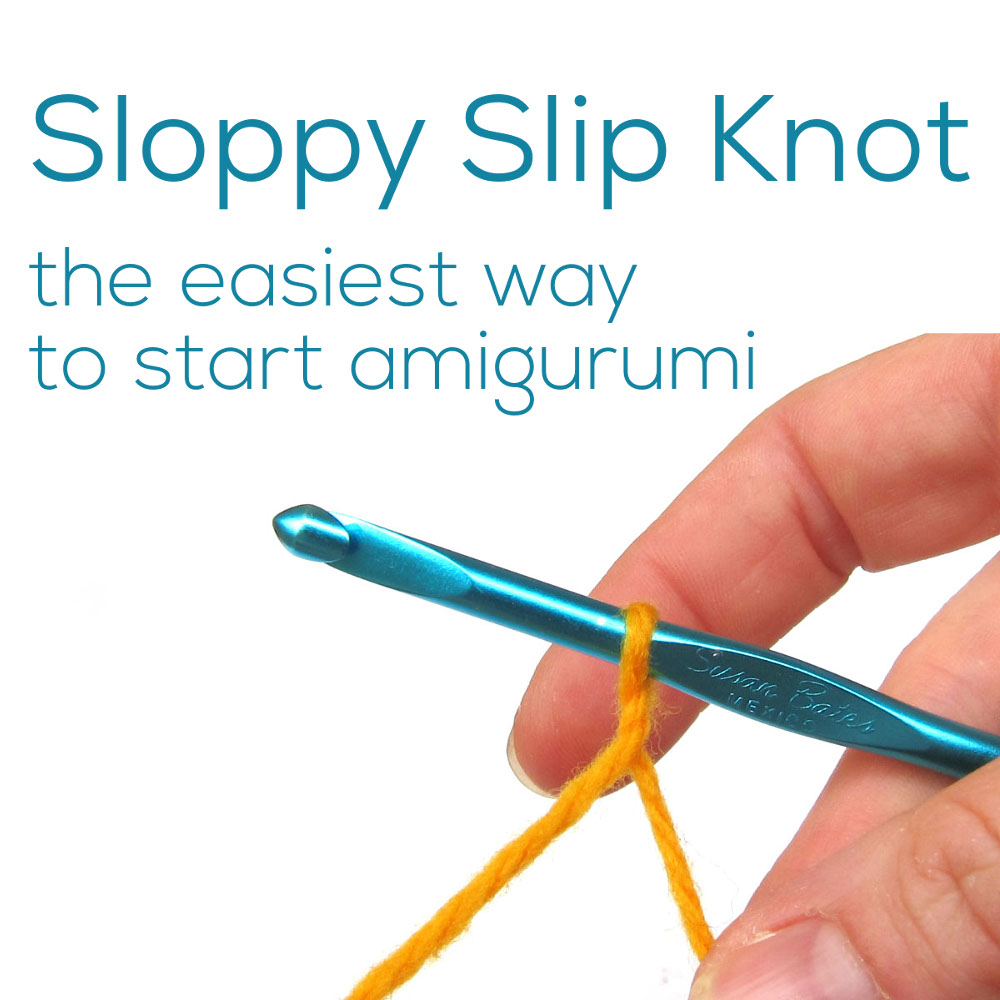
Today I’m going to show you my favorite way to begin crocheting amigurumi: using the sloppy slip knot. I find it easier to do than the magic ring, and it closes up nicely so that you don’t have a hole at the start of your work. I’ve included a photo tutorial and a video tutorial.
(If you really want to use a Magic Ring, I’ve got a tutorial here. But trust me – the sloppy slipknot is soooooo much easier. Once I learned it I never looked back.)
Sloppy Slip Knot Photo Tutorial
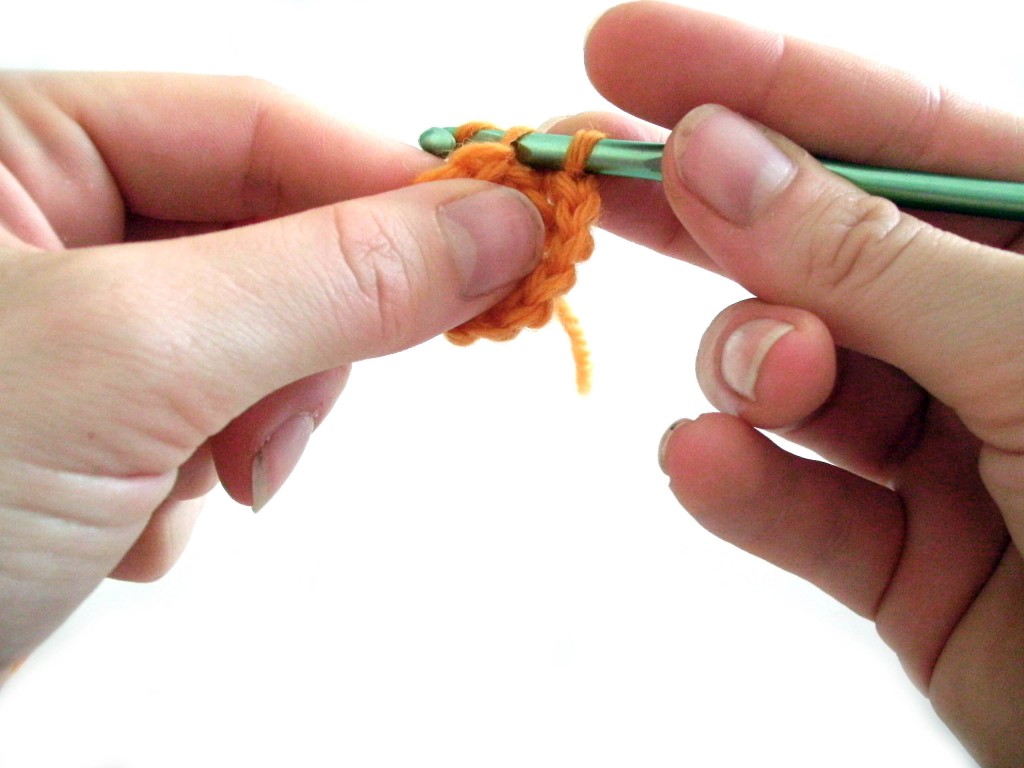
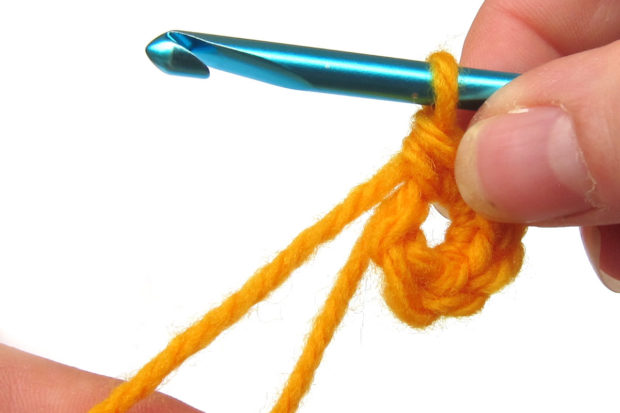
Step one: To begin, don’t make a slip knot. Instead, simply twist the yarn once around your crochet hook.
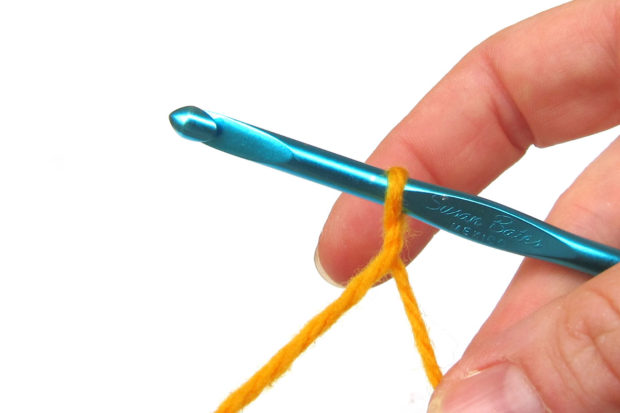
Step two: Chain two stitches.
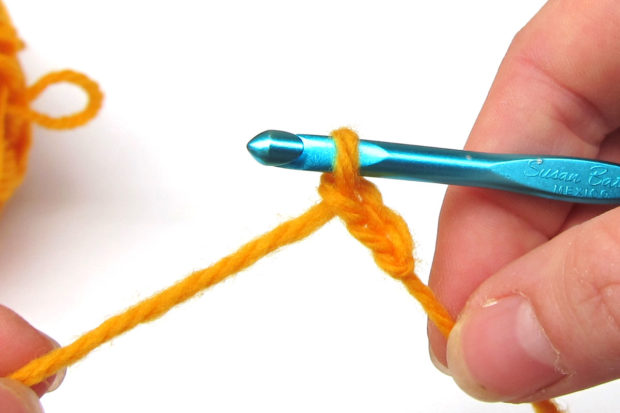
Step three: Single crochet 6 times in the second chain from hook. Not sure which one is the second chain? Check out where this arrow is pointing!
It’s important to note that you go into the second chain away from the hook, not the second chain that you crocheted. The loop on the hook doesn’t count as a stitch.
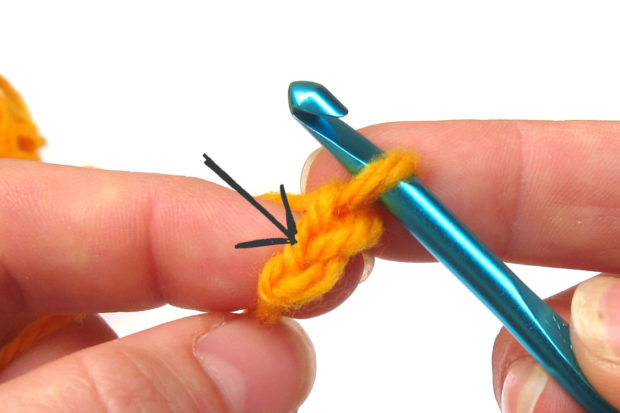
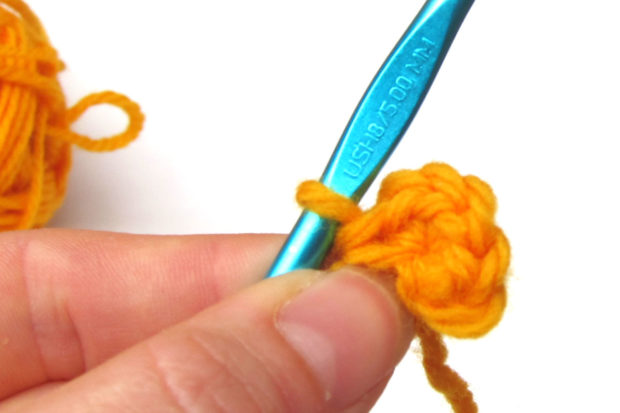
This is what your piece will look like when you have done your 6 single crochets. There’s a hole in the middle.
Step four: Here’s the magic part. Just pull the tail, and your hole closes up! And don’t worry, the hole won’t slip open over time.
It’s easy!
If the hole doesn’t pull closed, this probably means that you crocheted your 6 stitches into the incorrect stitch. No worries, try again!
The summer holidays are just starting here in the northern hemisphere, which means it’s time for me to start getting a lot more questions about teaching kids to sew. 🙂
Summer vacation is a great time for some sewing lessons!
Kids love to learn from other kids – so I’m rerunning here a video my daughter made with me a few years ago. (She was 11 at the time.) In it she shows how the machine works, how to sew wavy, straight, and parallel lines, how to use decorative stitches, how to turn corners, and more.
It’s a no-pressure way for kids to get a feel for how the machine pulls the fabric through on its own, how (and how much) they need to steer, how fast and slow they can make it go and more. And they’re not just practicing on random scraps of fabric that they’ll throw out! They’ll use these fancy fabric strips to sew up a horde of slithery snakes!
Every time I teach a group of kids – those snakes are the #1 favorite project. They make so many of them!
If you have a kid just starting out on the machine this is a great way to practice some basic skills. It’s also a good (sneaky) way to see if they’re ready for a book like Creature Camp! Set them loose with this project. It uses a lot of the same skills they’ll learn in the very first project in the book, so if they can handle these snakes they can jump into the book!
Here’s the video. . .
Jo used the same color thread for all her stitching just to keep the pace of the video going. But encourage your kids to change threads as often as they like! It’s a great way to practice re-threading the machine. 🙂
Making those snakes is easy!
Get the Snake Charmers pattern here. It’s a free pattern that’s usually made with regular fabric – but follow the special instructions below to use your practice pieces to make your snakes extra special.
Cut strips of fabric 3 inches wide and 10 inches long. That’s a little bigger than what the instructions call for. All the stitching on the fabric can make it shrink up a bit, so the extra is good. It also can be hard for kids to sew right up to the edges, so this gives them some extra room.
Stitch all over the fabric in any design and colors you like. There’s no right or wrong way to do it so this is a totally no-pressure way to practice. Have fun!
When you’re happy with the stitching, press the fabric nice and flat.
Using the Snake Charmers instructions, trim the pieces to size and sew up some snakes.
Every once in a while a fabric company asks me to work with them on a project – usually for a booth at Quilt Market. When it’s the right company and the right project these collaborations can be really fun. Every once in a while lightning strikes and they’re so perfect that it’s almost magical.
Be sure to listen with the sound on for maximum cuteness. 🙂
I’m in the middle of another magical partnership – this time with Michael Miller Fabrics.
Maybe you saw some of their posts tagged #mmfpets during Quilt Market?
I had SO MUCH FUN making these guys!
Did I mention they’re BIG?
Really big.
Each block is about a yard wide!
When Michael Miller approached me about the project and shared a sketch of their booth, I actually squealed out loud. The concept was just so cute!
They had a bunch of BIG paper doll blocks, with outfits made in soon-to-be-released fabric collections. I would be making their pets – also in brand new fabrics. 🙂
It’s so much fun (and feels so sneaky) to play with new fabrics before they’re even released! Here are some of my favorites from this project. Each image links back to the Michael Miller site if you want more info. (Maybe you want to ask your local fabric store to be sure to bring in your favorite.)
So the whole booth concept was super cute, the fabrics were super cute, and their idea to incorporate my applique patterns was super cute. Of course I said yes!
Before I even started the project, I was already thinking of ways that YOU might want to use some big applique patterns. My plan was just to tell you to enlarge the blocks and then make some suggestions for what you could do with those supersized cuties.
But once I got into actually making the blocks, I realized it wasn’t quite as simple as that. It’s still pretty easy – and boy do they come together quickly! But there were a few Problems To Solve and Quirks To Work Out – so I decided to put it all together in a new online workshop.
No – those aren’t miniature scissors. Those are my regular shears, put in there for scale. 🙂
Update – this class is no longer available, but I’m working on bringing many of the lessons over here as free tutorials.
But that’s not all!
Since the purpose of the blocks was to show off new fabrics, I needed to add some extra doodads and accessories for the pets. That way I could incorporate more fabrics!
That was so much fun that I KNEW you guys would want to play too.
I decided to create a new applique pattern with loads of different hats and eyeglasses and bows and mustaches and speech bubbles and more. I just finished my drawings and I’m going to start making up some sample blocks soon so you can see how they work with all the applique patterns you already have.
So there it is. A perfect partnership – one where every step of the process is a joy and takes me in directions I never even thought of – including back to you. Many thanks to Michael Miller Fabrics for making it fun!
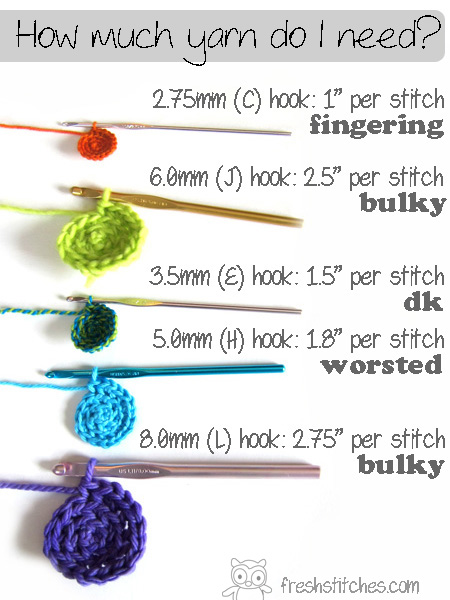
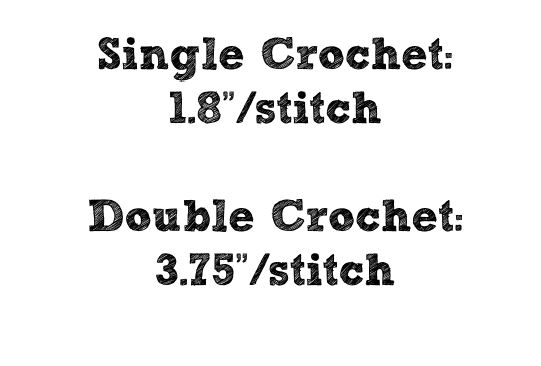
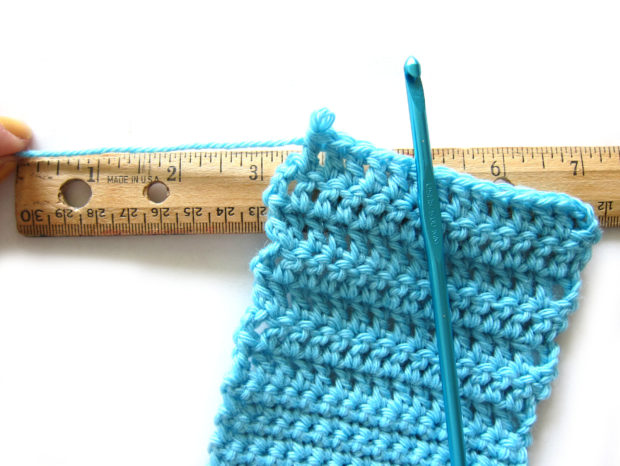
My previous post, how much yarn do I need? has been so popular that I wanted to expand on it a little bit today by looking at adding another stitch into the mix, the double crochet.
Double Crochet vs. Single Crochet
The measurements above show you how much yarn you’ll use for a single crochet stitch for different thicknesses of yarn.
Did you know that different stitches use different amounts of yarn, too?
For my measurement, I measured single crochet and double crochet, both using a size H (5.0mm) hook, worsted weight yarn and crocheting through both loops.
You can use this number to calculate how much yarn your project will use or how many rows you can work on your blanket before you run out of yarn. Cool, right?
Which stitch should I use?
It looks like the double crochet uses more yarn, but keep in mind that it’s also a bigger stitch, too… so one stitch covers more surface area.
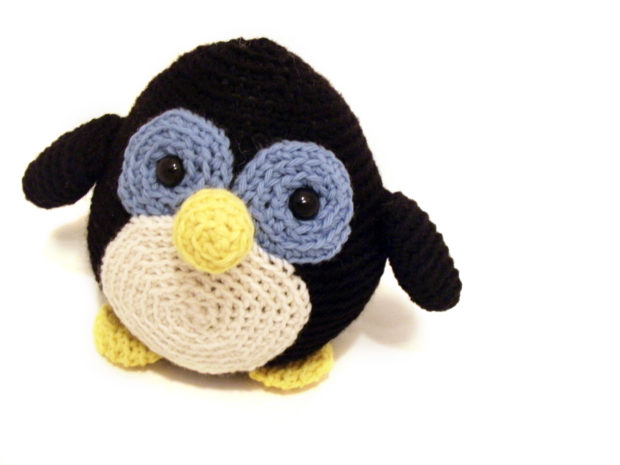
(If you haven’t checked out the free Howie pattern, what are you waiting for?)
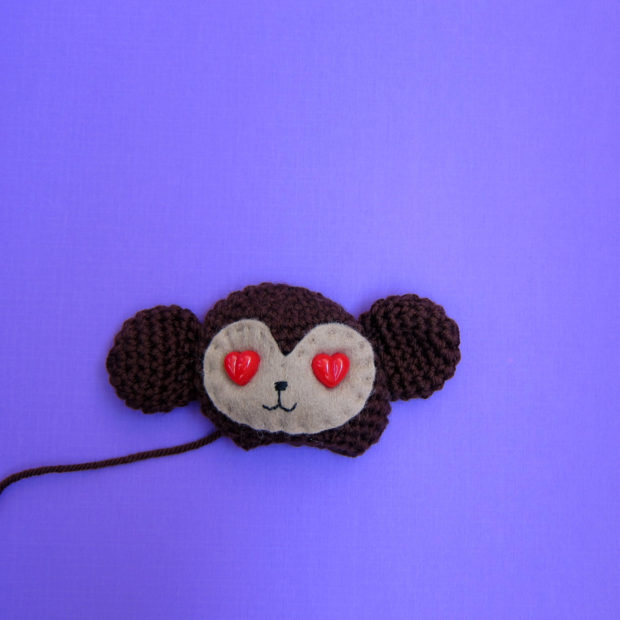
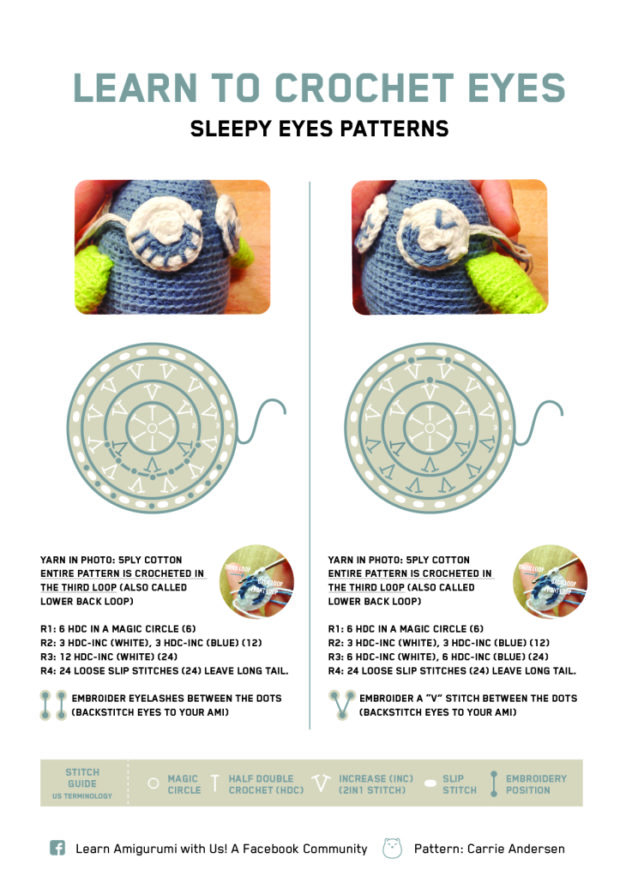
Carrie (one of the group leaders) designed sleepy eyes for crocheters who didn’t want to use plastic craft eyes… and she’s sharing her pattern with us!
Aren’t they adorable?!?
Maybe you’d like to add sleepy eyes to your next amigurumi!