I love, love LOVE my new project bag! It makes me smile every time I use it – and I’ve been using it steadily for about two months now.
It’s made with the Stitch & Stash Project Bag pattern from Betz White – reversible, with no zippers or velcro to snag on my work, and with a handy pocket inside to hold my tools. Such a well-designed bag for crafters!
Of course, I had to add some appliqué to the front. Give me a flat surface in a pattern and I will add some appliqué. Guaranteed. 🙂
I only made a couple of simple changes to the project.
The original pattern has snaps on the sides, but I decided not to add them because I know I will never actually snap them and I like the shape without tucking in the sides.
I quilted the outer bag fabric instead of just staystitching the batting around the edges. I love the little bit of extra texture the swoopy quilted waves add to the front. I just quilted the batting to the main fabric – no need to add a backing fabric since the bag is lined. This is how I quilt all my quilts, too.
You might worry that that will make the seams too bulky, but if you use 100% cotton batting (I love Warm & Natural) and press the seams open, it’ll squish nice and flat.
When I work with batting like this I also use sewing clips instead of pins. They’re great for holding bulky fabrics in place with no distortion!
Of course, the main change I made was adding the cute kitty. 🙂
After I did the quilting, I appliquéd the cat in place with fusible adhesive and stitched around all the pieces with black thread. I love the cartoony pop that gives.
The cat is one of the blocks in my Cuddly Cats quilt pattern, shrunk down a bit. I made the small bag and resized the cat image to be 5 inches tall and 4 inches wide. That left plenty of breathing room between the top of the cat and that awesome big grommet, and fit from side to side nicely. I wouldn’t go any bigger than that in either direction for whatever image you’re adding.
I love it! Mine is holding my current EPP project (to be shared soon – it’s almost finished!) and Jo has already requested a larger one with a monster on it, and a tall, skinny pocket inside especially for holding a few crochet hooks. My plan is to make a few more in different sizes (the pattern includes three sizes) to hold various works in progress and hang them on some hooks on my studio walls. Cute AND functional. I see a lot more of these in my future. 🙂
Really enjoying working on these blocks and this quilt. Kind of glad now that I’m so far behind in the blocks, I don’t know if I could wait for the next block to come out. Thanks so much for the tutorials they are very helpful. I love sewing and feel so happy I can finally use the fabric pieces I have saved for something other than taking up space.
I made a small pillow for a friend who’d just lost her orange tabby. I added two mice to balance the design. I used wool felt because I liked the colors I had in my sewing room.
I’m so touched by the people using the dog and cat patterns to memorialize their beloved pets.
Deborah writes. . .
I never thought about sending a picture of my quilt until I read your newsletter. I did a blue backing to finish it. It was dedicated to our Lab, Jake, who passed away in November.
Thanks for your Charity Quilt pattern–I tried it and it was so fun and easy and a terrific way to use up all those scraps I can’t seem to throw out… Also, thanks sooo much for your Quilt As You Go tutorial…now I finally get it and what a difference!
I’m sure it’s not perfect by any means but it’s not too bad for my first attempt at a quilt!
Thanks so much for the beautiful pattern, I loved using it and have had loads of friends ask me where I got it! I’ll have to find something else to do with my time now…..maybe some matching cushions??!!!
Thanks to your lovely pattern, clear instructions and hints about the sticky stuff (whatever it is called) we finished our quilt for baby Lucia Rosalie Sharpe. We embroidered the dog’s names and some contributors made up their own dogs names, hence the inclusion of “Lulu” and “Karl.”
I love it! And for those wondering – the “sticky stuff” is Sulky Sticky Fabri-solvy and it’s terrific for adding embroidered details like these sweet puppy names. 🙂
I really enjoyed this method of quilting. But I had to play around with the pattern just a little. I always do. I made all the ears floppy. And rather than make a one dog more than once I took pits from one dog and matched it with another to make a true mutt. And of course I added borders. Thanks so much for the pattern and tutorials. All very helpful.
Here is the dog/cat quilt I made to donate to a local animal shelter as part of their fundraiser. It was raffled off and made some nice $$$ for our furry friends.
Two of my favorite things – people mixing and matching blocks from different quilts, and quilts made for animal shelter fundraisers!
I learned loads of techniques from the book Bead Crochet Jewelry, and I highly recommend it as a starting place for learning!
But what if you want to do more? Today I’m going to show you how to read bead crochet patterns, of the type you’ll find on Pinterest and online!
Finding a Bead Crochet Pattern
Much of the bead crocheting comes out of Eastern Europe, so it’s a good thing that patterns don’t use a lot of words! If you search Pinterest for ‘bead crochet pattern’, you’ll find oodles! You can also search Etsy and you’ll discover a number of patterns.
They vary greatly in complexity and size, but don’t worry… I’ll talk about all of that!
Today, I’ll be using this pattern by Snow Mirna that I found on Pinterest. It’s the pattern I used to make this ombre chevron necklace:
The Anatomy of a Bead Crochet Pattern
If you’re familiar with regular crochet patterns, you’ll find a bead crochet pattern very short! They’re about a half of a page and look like this:
There are essentially 4 parts:
A description of the pattern (top right)
A list of the materials you will need (middle right)
A sequence instructing how to place the beads on the string (bottom right)
A view of how the pattern will look when crocheted (left)
I’ll explain each of these sections in turn!
How to select a pattern
All of the information you need about selecting a pattern is in the upper right hand corner:
One of the most important dimensions is the circumference. This tells you how many beads need to be in the circumference to get the required pattern. You’ll see that this pattern has 6. I personally like patterns with 4 or 6 beads. The larger the circumference, the larger thickness your finished piece will be. A larger circumference will give you more pattern options, but will produce that a thicker piece that may be difficult to find notions and findings for.
Purchasing Materials
Now, have a look at the middle right:
This tells you not only how many beads you need, but how many you need of each color.
This particular pattern uses equal amounts of beads, but other patterns will vary.
You often purchase beads by the gram.
Stringing beads
The hardest part of following a pattern is stringing the beads in order!
Begin at the top left, and work your way down, stringing the number of specified beads for each color. You’ll see that this chart mostly instructs you to string one or two beads of each color, but that too, can vary.
You will repeat this chart according to how long you want your finished piece to be!
Then, crochet!
Once your beads are strung, the crocheting is the same no matter which pattern you’ve chosen to follow. The chart on the left will show you what your finished piece will look like:
The leftmost view is what the piece would look like flat, and the one on the right (which is optional) gives an idea of how the piece will look in the round.
Ready to try?
With such a variety of patterns, these simple tips will open up a whole new world of bead crochet to you!
Jo wanted to make a Totoro stuffed animal for a friend from school – and she had a pretty brilliant idea of how to do it without drafting a whole new pattern.
Start with Franklin the Fat Cat! It’s one of her favorites and she’s made it a few times, so she knew it was an easy pattern to work with.
She used Cuddle Fleece in charcoal and camel for the body, plus some felt scraps in black, white, and smoky marble.
She drafted new patterns for the ears, eyes, nose and those things on his chest. (There’s a link to download those pieces at the end of this post.)
She used the tail pattern from Eddie the Teddy Bear to give him a stubby little tail.
And she gave him no feet/legs.
Want to make your own? It’s pretty easy. The only part that’s really different from Franklin (as far as construction goes) is the ears.
Jo wanted them to stand up really well, so she used Soft & Stable foam inside.
Stack a piece of foam, then one ear piece right side up, followed by one ear piece facing down. Sew up and around the top of the ear, leaving the flat bottom open for turning.
Sewing through the foam is super easy. Here’s what that piece looks like from the bottom.
Reach in between the two fleece layers to turn it right side out – the foam will end up between the two layers. Neat!
Fold the sides of the bottom of the ear in to the center and stitch it across the bottom to secure the folds.
Now it has some shape.
Repeat for the second ear and then treat them just like the cat ears in the pattern instructions.
Applique the eyes, nose and chest thingies onto the body front. Jo stuck them down with a glue stick to hold them while she sewed. Clever!
After you stitch around the edges of all the pieces, insert 9 mm safety eyes into the middle of the whites. (If you do that sooner, the shanks of the safety eyes will make it impossible to sew around the whites.)
After that, the assembly is just like Franklin. Easy peasy!
One cute Totoro stuffed animal and his maker, ready for delivery to a friend. 🙂
If you want to make your own, here’s what you’ll need. . .
Add a name, a birth date, a gift date, animal sounds – even a poem or quote!
I especially love this version of the Wild Flowers pattern that adds a quote from The Secret Garden by Frances Hodgson Burnett.
Let your imagination run wild!
These letters are skinny-ish, allowing you to fit more letters in a standard block. They’re also very irregular so you can easily just shave a smidge off individual letters if you need to skinny them up just a touch to fit in a block and don’t want to go to the hassle of resizing them.
Also – after many requests – this alphabet includes capital letters, numbers, and some punctuation. Yay!
There’s a post here with more info about adding half-size blocks to your quilts – perfect for adding words. The nutshell version is to cut your blocks 6 x 11 inches, then trim them down to 5 1/2 x 10 1/2 inches so that when you sew them together with a quarter inch seam allowance they finish at 5 x 10 inches – exactly half the size of one of my square blocks.
If you need more than six letters, I recommend cutting a larger block. That’s what I did for cock-a-doodle-doo up in the corner of this quilt. (This sample uses an old, chunkier alphabet that I don’t use anymore – but you get the idea.)
Trace the reversed image of the letter onto the paper side of your fusible adhesive. Roughly cut around it.
Follow the manufacturer’s instructions and fuse it to the back of the fabric.
Cut it out as neatly as you can.
Peel off the paper and fuse the letter to your finished piece. Stitch around it if you like. Some adhesives require stitching – so read the label before you decide to skip it.
Use this free applique alphabet pattern to add words to your quilts, pillows, tote bags and more. Add your kids’ names to everything they own. Have fun with it!
If you like this pattern, sign up for the Shiny Happy News! Members get a weekly email with tutorials, patterns, sewing news, fun stuff and things to make you smile. 🙂
Okay, so here’s a question I get often: when making a stuffed animal, is it important to weave in ends?
I’ll tell you!
Weaving in ends
What is weaving in ends? When you change colors (or start a new skein of yarn), you’ll have little tails left behind. Those are called ‘ends’. Weaving in ends just means using a tapestry needle to hide those ends.
What about stuffed animals?
Are you ready for some good news? Because the ends of a stuffed animal are on the inside of the body, you don’t need to weave the ends in!
That means, no matter how many messy tails there are on the inside of the stuffed animal, you’ll never see them!
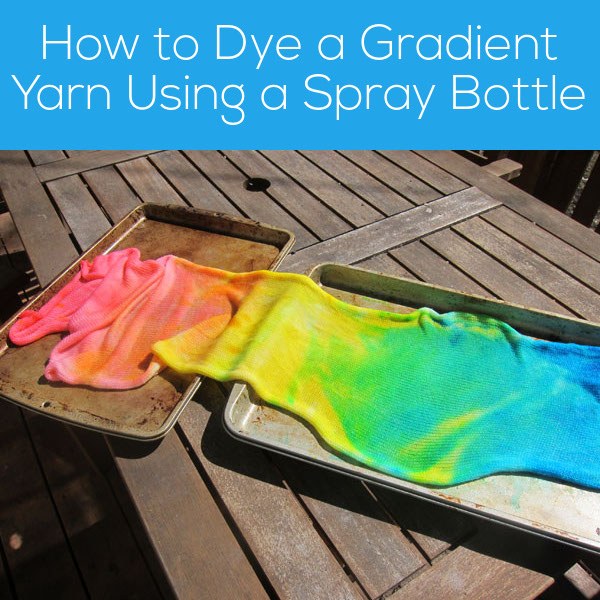
Okay, now here’s the technique: I rolled out my sock blank and dunked each end and the center in one color, leaving a lot of white space in between. See?
Ignore my ugly cooking sheet in the background. Actually, don’t ignore it (it’s crucial for keeping your counters clean in this project!)… just pretend it’s prettier!
Now, load up your spray bottle with the dye.
You want to use the spray bottle to direct your dye exactly where you want it. With this blue, I’m going to spray more towards the blue dyed portion of the yarn, and then spritz less to blend it into the yellow.
Now wash your bottle really well and repeat with the other two colors. You’ll get a very blended effect!
See how the colors blend? Because the dye is wet when you’re spraying, the blue mixes with the yellow and makes green… it’s an effect that’s hard to get if you’re just dipping the blank in dye.
I let it dry, and then wound it on a niddy noddy. Here’s the hank:
The gradient-ness doesn’t show up too well in a hank. But no worries, I’ll show you what I’m knitting. Here’s a little shawl I’m working on:
Isn’t the gradient fantastic? I can’t wait to wear this one!
My initial thought was to make a sleeping bag almost exactly like a “real” one. The zipper was going to go down the side and across the bottom, so that you could open up the sleeping bag entirely. Here’s my first prototype. . .
And here it is zipped up. . .
Looks pretty good, right?
I loved the look of it – but sewing the zipper around the corner was not fun. Like – really, really unfun.
I try to make my patterns as easy and fun as possible – so I wanted to fix that.
I tried rounding the corner more and more, through a few different tries, but it was still pretty dang hard to wrangle. And it was starting to look ugly and not as sleeping-bag-ish.
Back to the drawing board.
Sewing a zipper around a corner was out, so I tried just a zipper going down the side.
My first attempt at sewing it inside out was kind of a mess because I didn’t use a separating zipper and I needed to sew it in a tube and it was hard to sew from top to bottom that way.
Next I tried a separating zipper so I could sew the two sides separately.
Much, MUCH easier!
I sewed it flat and sewed all the way around (leaving a little opening for turning) and it looked awesome. And then I zipped it up and realized I had made a nicely finished tube. 🙂 The bottom wasn’t closed!
Forehead smack.
I picked the bottom open and realized now I could sew the top and sides without needing any hand-sewing. The whole bottom became the turning opening.
Score!
I folded the sleeping bag closed and sewed up the bottom.
Terrific!
But then I realized it was impossible to zip it up. With the sleeping bag sewn up it was pretty much impossible to start the separating zipper. Just about impossible for me – definitely impossible for any kids trying to work it.
Aaargh.
Oooh – but then I realized that I could zip it closed first and then sew up the bottom. Now the zipper is together and it can’t come apart – a terrific bonus because separating zippers can be tricky for some little kids. I had planned to hand stitch the zipper permanently together as the final construction step, but now that wasn’t necessary!
Done! (Almost.)
I added a couple of elastic loops so it could be rolled up and secured without having to tie anything, and the design is finished!
Sometimes I get a design right on the first prototype, but usually it works like this – a series of attempts and revisions that get closer and closer to the final design – one that looks good AND is easy to make. 🙂
If you crochet amigurumi, you have probably heard of the Invisible Decrease. The Invisible Decrease is another name for slip stitching 2 together through the front loop.
The result is a decrease that is thinner (and less bumpy) than a regular decrease.
Is it right for you?
I often get asked if I recommend the Invisible Decrease. And my answer is, “it depends”.
The Invisible Decrease is designed to reduce the thickness in fabric when you’re crocheting through both loops.
As you may know, I prefer crocheting through the back loop only. This creates a less-dense fabric than crocheting through both loops.
When you crochet through the back loop, the ‘extra bulk’ of the decrease isn’t a problem! You should happily do your normal decrease!
Alternatives
If you’re still looking to cut down on bulk while crocheting through the back loop, you can slip stitch 2 together as your decrease, but just don’t do it through the front loop.
Just be aware that because the Sl St2tog is ‘smaller’ than a normal Sc2tog, this could change the appearance of your final piece if your decreases are stacked.
Have I shown you the beautiful afghan that my mom made Maddie?
I just love it! It’s in my favorite colors!
She used Knit Picks (either Brava or Comfy Worsted… I can’t tell because it looks like the aqua color has been discontinued!) and a size I hook. I bought her a Caspian Crochet hook (because she was wearing the paint off of her aluminum hook) and she loved it!
My mom doesn’t read crochet patterns (yes, I fully appreciate the irony in that- given that my job is to teach people to read crochet patterns!), but the stitch she used is very similar to the classic back loop ripple stitch.
There are lots more inspirational chevron photos on my Crochet Afghan Pinterest board… so many color combinations you can do with this stitch to get a great blanket!