Spooky – a free cat applique pattern

Spooky - free cat applique pattern from Shiny Happy World

You can add this free cat applique pattern to your Cuddly Cats quilt pattern if you like. I designed it especially to have really terrific eyes for a black cat – but you can make it any color you like.

I love black cats! I grew up with two of them – Nasty and Gandalf. But it can be tricky to applique the eyes on a black cat. Almost all of my animals in all of my applique patterns have simple black oval eyes. That helps give all my designs a cohesive look – and they’re also simple to applique. But what if the animal you’re making is black? Black bears, black panda eyes, black raccoon eyes, black penguin eyes, and, of course, black cat eyes.

This post shows you a quick and easy trick to applique dark eyes on dark faces. But I really love black cats and I really wanted to make a free cat applique pattern with big, glowy cat eyes.

So I did!

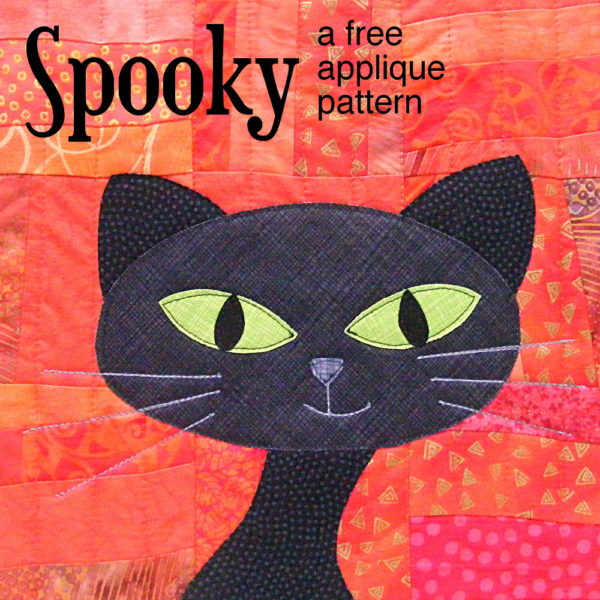
Especially for Halloween, I created this spooky black cat applique – a single block applique pattern – with huge luminous green eyes. I love her! And the pattern is the same size as the blocks in the Cuddly Cats quilt so you can mix and match if you like. 🙂

There’s a tutorial here with instructions for making a hanging sleeve so you can make your block into a Halloween wall decoration. It’s easy!

Here’s how to make the block. (This video shows all the steps for working with fusible adhesive – if you’ve never done it before you’ll find it helpful.)

Step 1

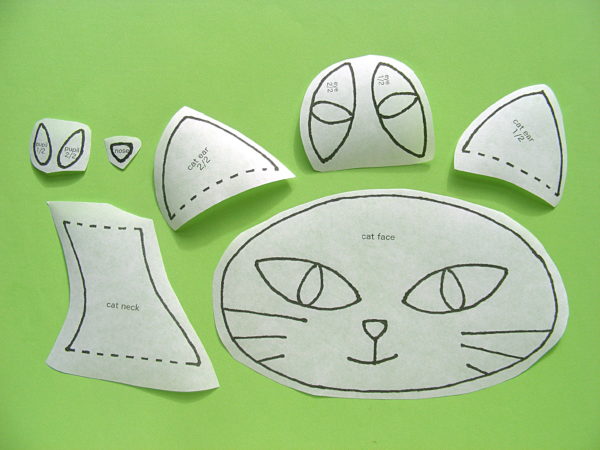
Download the template pieces here.

Step 2

Trace or print the pattern onto the paper side of the fusible adhesive.

Spooky - free cat applique pattern from Shiny Happy World

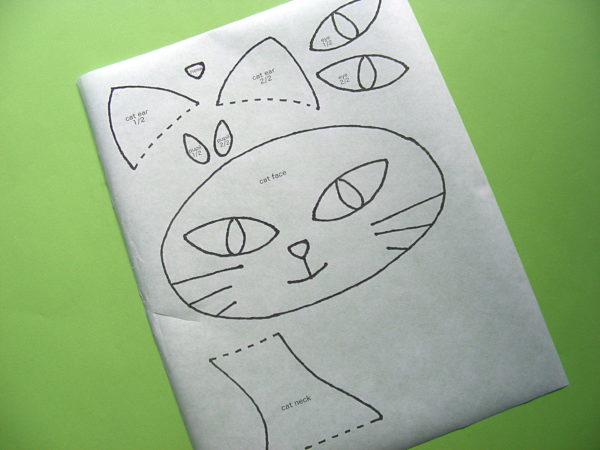
I use Heat & Bond Lite printable fusible adhesive sheets so I just printed out the page. No tracing!

The image has already been reversed, so just trace or print. If you’re tracing, be sure to trace the facial features too. You’ll need those for Step 5.

Step 3

Rough cut around each shape and fuse it to the back of your fabric.

applique pattern pieces cut out - from the Spooky free cat applique pattern from Shiny Happy World

Leave a little bit extra all the way around ­- a little extra extra (at least 1/4 inch) where there’s a dotted line, like the top of neck shoulders and the base of the ears.

Step 4

Cut around each piece neatly. Cut directly on the solid lines.

Spooky - free cat applique pattern from Shiny Happy World

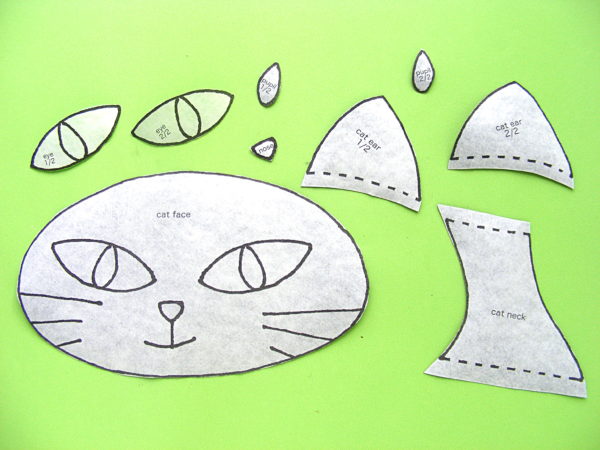
Leave a little seam allowance on the dotted lines ­- the top of the neck and the base of the ears will tuck behind the head.
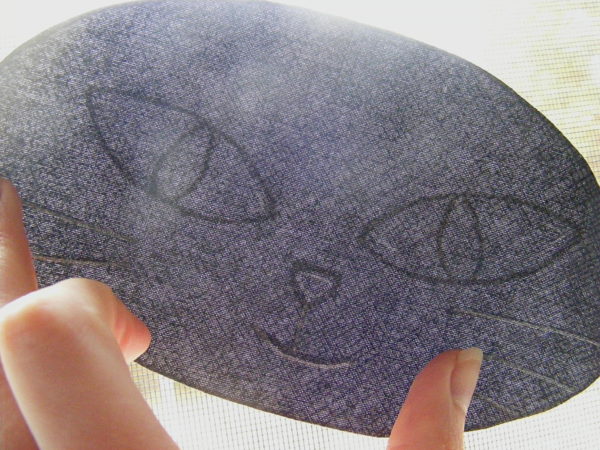
Step 5

Remember when I told you to make sure you traced the facial features in Step 1? Now you’re going to use that. Hold the face up to a window so the light shines through it. You’ll be able to see the lines, and the adhesive will stabilize the fabric so you can trace on it without it crinkling up.

Spooky - free cat applique pattern from Shiny Happy World

Since this is a dark fabric, I traced with a white chalk pencil.

Here you can see all the tracing I did – without the light shining through.

Spooky - free cat applique pattern from Shiny Happy World

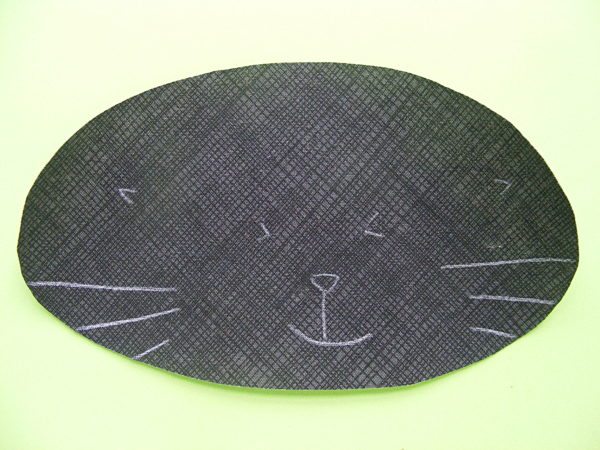
I traced the whiskers and mouth exactly, since I’ll be stitching over those lines. I traced the nose a little smaller, and just marked the corners of the eyes to help me position the applique pieces later.

Step 6

If you’re doing Quilt As You Go (I did) then you can quilt your block before adding the applique. So easy!

Spooky - free cat applique pattern from Shiny Happy World

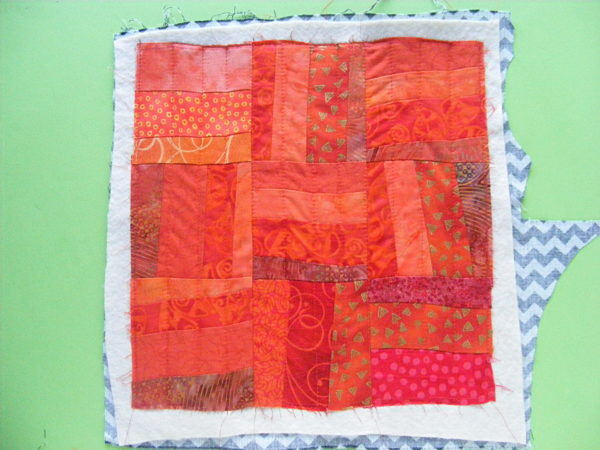
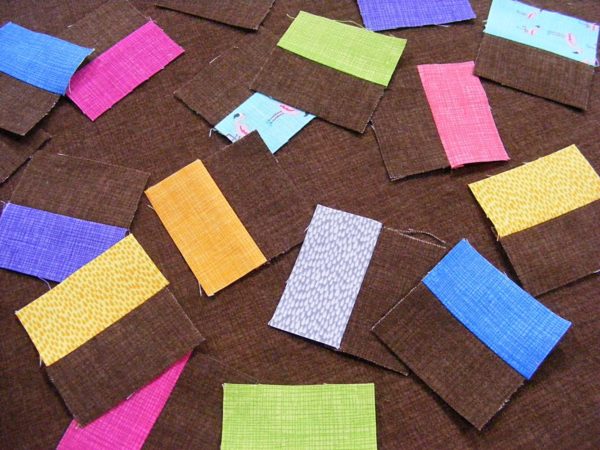
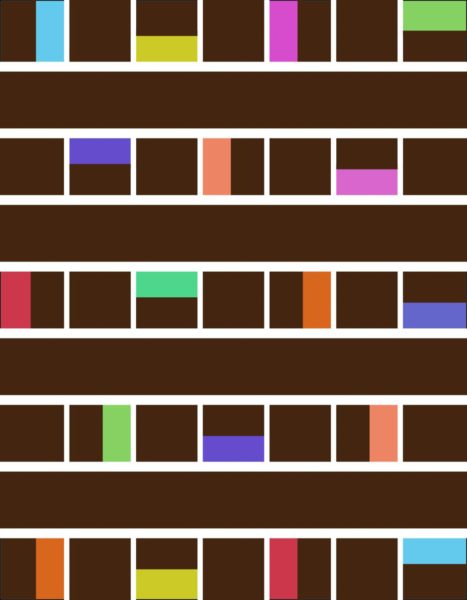
I used a bunch of orange scrappy strips all sewn together for a super textured background, but you can use just one solid square.

Cut your background fabric and a piece of 100% cotton batting 11 inches square.

Layer the block with a piece of 100% cotton batting. Quilt any pattern you like!

Find all the Quilt As You Go tutorials here.

If you’ll do the quilting later, simply skip this step.

Step 7

Peel off the paper backing and arrange the pieces on a background block. Tuck the ears and the neck behind the head.

Spooky - free cat applique pattern from Shiny Happy World

Remember -­ all the dotted lines indicate where pieces tuck behind other pieces.

Fuse the pieces in place.

Step 8

Outline all the pieces with black thread and a simple straight stitch – or choose your favorite decorative stitch.

Spooky - free cat applique pattern from Shiny Happy World

This video has some tips for outlining those tight curves.

Done!

One free cat applique pattern, all finished!

If you’re making a one-block project, go ahead and finish it up!

If you’re making a bunch of cats to join into a quilt -­ have fun!

Please share a photo of what you make! You can share it in the Shiny Happy People group or tag it with #shinyhappyworld on Instagram.

Happy stitching!

Perpendicular Mattress Stitch (knitting)

Do you remember when I was knitting this sweater?


Well… I’ve finished! And today, I want to chat about a seaming technique that really helped me out!

striped baby sweater by FreshStitches grey & orange

Perpendicular Mattress Stitch

I loved knitting this sweater… the pieces are knit flat, which makes for very speedy knitting. At the end, you need to seam the pieces together.

Have a look at the sleeves. You’ll notice that you need to seam together stitches that are going vertically to stitches that are going horizontally. Tricky, right?

Perpendicular Mattress Stitch

Fortunately, I discovered that MochiMochiLand has a fabulous tutorial for just this technique! She uses it for toys, but it works great on sweaters, too. You’ll want to click over to this blog post and scroll down to ‘Vertical-to-Horizontal Mattress Stitch’.

Genius!

Do you prefer seaming or double points?

When knitting a baby sweater, there’s no getting around those tiny little sleeves! Your choices are to either knit the sleeves flat and seam them at the end, or knit tiny little rounds… usually on double point needles.

Which method to you prefer?

I’m generally a knit-in-the-round girl, but those sleeves are very tiny! (Right now, I’m knitting Flax on two circulars, and there aren’t a lot of stitches!)

I think for baby sweaters, I’m a seaming girl!

A Red Rocket – felt Christmas ornament pattern

Red Rocket - a felt ornament pattern in the 2014 Christmas Club collection

I love this retro red rocket Christmas ornament! We have a collection of tin rockets and robots and this felt version fits right in with that vintage toy feel.

This is the seventh ornament in the Christmas Club collection. Here are the first six. . .

half of the felt ornaments in the 2014 Christmas Club collection

You can still join at any time! The Welcome PDF that you get with your order has a link to access all the patterns that have gone out so far. Get all the details and sign up here.

The weekly club is closed now, but you can still get all the patterns.

Get the entire 2014 Christmas Club pattern collection here.

Get just the red rocket pattern here.

Find all the felt ornament patterns here.

Merry Christmas!

Best,
Wendi
That's me!

Block 12 in the Controlled Chaos Scrappy Quilt-Along

Block 12 in the Controlled Chaos Scrappy Quilt-Along

Here’s block #12 in the Controlled Chaos Quilt!

What You’ll Need

  • 64  two-inch squares in color A (shown in red)
  • 36 two-inch squares in color B (shown in yellow)

Instructions

Use 1/4″ seam allowances for all sewing.

Press all the seams. I’m pressing mine open for this quilt. I think it will make things simpler in the end.

Arrange your squares according to the diagram below.

Block 12 in the Controlled Chaos Scrappy Quilt-Along

For this block I sewed things up in chunks in order to keep the edges of each color perfectly straight, even if my seams weren’t lined up perfectly.

We’re going to sew the whole thing into three fat columns, but we’re going to sew some parts of those columns into chunks first.

1. Sew up four yellow 3×3 squares.

2. Sew up two red 3×4 rectangles and one red 4×10 rectangle.

Arrange those chunks as you see below.

Block 12 in the Controlled Chaos Scrappy Quilt-Along

Now sew all those chunks into columns.

Block 12 in the Controlled Chaos Scrappy Quilt-Along

Finally – sew those three columns into one fabulous block. 🙂

Here’s what my twelve blocks look like so far. Just eight more to go!

Controlled Chaos scrappy quilt-in-progress

Click here for all the Controlled Chaos posts.

Happy piecing!

Best,
Wendi
That's me!

Free – Sprinkles Doll Quilt Pattern

Sprinkles! A free doll quilt pattern for the Dress Up Bunch at Shiny Happy World

Sprinkles is a doll quilt pattern I designed especially for the rag dolls in The Dress Up Bunch – but it’s also just the right size for American Girl dolls and lots of random teddy bears and stuffed animals.

Look at Bean – all ready for bed in his flannel jammies, cozily tucked in under his brand new quilt.

He’s ready for his bedtime story!

The quilt (and the name) are inspired by a river of hot fudge covered with brightly-colored sprinkles. That’s sure to bring him sweet dreams. 🙂

It’s super easy to make – comes together in just a few hours. You can make it during a naptime or two!

If you’ve never made a quilt before, this is a great one to start with. I designed it to be especially easy! The blocks are easy to cut, they go together without any fussy seam intersections, and the quilting is easy.

Here’s how to make it!

Materials

  • 1/2 yard chocolate brown fabric
  • 1 fat quarter backing fabric
  • small scraps for the sprinkles (less than 1/4 yard total)
  • small piece (approximately 16″ x 20″) of batting

Step 1

Cut all your pieces. Watch this video to see how to use rotary cutting tools to square your fabric and cut strips.

Chocolate brown fabric Cut 4 strips 2 1/2″ wide, the full width of the fabric. From those strips cut the following. . .

  • 4 rectangles, each 2 1/2″ x 14″
  • 17 squares, each 2 1/2″ x 2 1/2″
  • 18 rectangles, each 2 1/2″ x 1 1/2″

Cut 2 strips 2 1/4″ wide for the binding

Sprinkles fabrics Cut 18 rectangles, each 2 1/2″ x 1 1/2″

Backing fabric 1 fat quarter, uncut

Step 2

Join your smallest rectangles into squares. For each square join 1 brown rectangle with one sprinkle/colored rectangle. Sew them together with a 1/4″ seam allowance (I very strongly recommend using a 1/4″ foot on your sewing machine for accurate piecing!)

Partially-pieced blocks for the Sprinkles doll quilt

Press the seam allowance flat. It doesn’t matter which way you press it ­- this quilt has no nested seams. I usually press toward the darker fabric, but in this case, the brown flannel was thicker than the sprinkles fabric so I pressed it toward the thinner fabric.

Repeat with the remaining small rectangles until you have 18 squares.

Sprinkles blocks ready to assemble for the doll quilt pattern

Step 3

Join all the blocks together as shown in the diagram.

Sprinkles - doll quilt pattern assembly diagram

First sew the blocks into rows, alternating brown blocks with the pieced brown/sprinkles blocks you made in Step 2. Press all your seams flat.

Then sew those rows together with your long rectangles between them. Press your seams flat.

You’re done with your quilt top!

Step 4

Time to put the layers together! Watch this video to see how to layer and baste your quilt sandwich.

Step 5

Time to quilt!

Watch this video to see how to machine quilt.

A small doll quilt pattern like this is also a great opportunity to give Big Stitch Quilting a try.

I quilted this top in two steps. First I quilted around each sprinkle. Then I quilted across the surface of the entire quilt with diagonal lines that went corner to corner on all the squares – skipping over the sprinkles.

The squares are small enough that no marking is needed ­- just eyeball it. You can see the quilting in these photos of the front and back of the quilt.

Finished Sprinkles doll quilt - made with a free pattern from Shiny Happy World
doll quilt back showing the quilting lines

Step 6

Almost done! Now you just have to bind the edges -­ my favorite part. Watch this video to see how to bind your quilt.

Finished!

Dress your doll in their favorite jammies, read them a story, then tuck them in under their cozy new quilt. Then brag a little! Or a lot. :­-) You just made a quilt! Pat yourself on the back. Call everyone you know. Take photos and share them in the Shiny Happy People group. Share them other places too – but tag them #shinyhappyworld so I see them too. 🙂

cozy doll bedtime

So many patterns!

So much bedtime fun!

Happy stitching!

If you like this pattern, sign up for the Shiny Happy News! Members get a weekly newsletter with sewing tips and tricks, links to free patterns, special discounts, and more.

The Dress Up Bunch is a collection of cute and cuddly rag dolls. Get patterns for the dolls, plus all their fun outfits and accessories!

When should you teach a child to knit/crochet?

A little while ago, someone on Twitter asked me:

When should you teach a child to crochet?

My reply: whichever she’s most interested in, whenever she’s ready

Children begin to crawl at different ages. Kids start to speak at different ages. Is it any surprise that different children are ready to knit/crochet at different ages?

When is a child ready to knit/crochet?

There are a couple prerequisites to knitting or crocheting, so these are some good signs to look out for to see if your child is ready:

  • They hold and use a pencil (sloppy handwriting is okay!)
  • They can sit and work on an activity for at least 10-15 minutes
  • They can count to 10 (not a must, but helpful)
  • They show interest in the craft

Trying to teach a child before they are ready is not a good idea. It leads to frustration and can discourage the child from trying again later, so I highly recommend you look for these skills!

I began writing at four, and learned to chain when I was 5-6 years old. I just made chains for a really long time! That’s okay!

It’s most important that your child enjoys the activity, rather than hoping they accomplish a certain syllabus of skills. I liked crocheting (and according to my mom) was hopeless at knitting. Again, that’s okay. Encourage what the child is interested in.

What can you expect at what age?

One of the members of my Ravelry group taught her 6-year-old son to crochet. He made this frog all by himself!

frog crocheted by 6 year old

Isn’t that amazing? Before the age of 10, a child can typically learn to crochet with help from a parent who shows them the stitches and teaches them the steps of a pattern.

I’ve had children as young as 10 learn to crochet on their own in my Craftsy Course. By this age, kids are used to following instructions in class, and are able to take instruction from a teacher. So even if you can’t knit or crochet, your child might be able to learn!

child learning to crochet

Once a child is a teenager, they’re just about adults as far as learning knitting/crochet is concerned. ‘Kids’ of this age are usually fine taking an adult class at an LYS/shop (but double check with the store’s policy, first).

The younger the better!

As long as a child has the prerequisite skills (listed above), the younger the better! My husband, Tim, learned to knit when he was about 6 or 7, and it’s a skill he still has today!

With that background, I taught him to crochet as an adult in no time!

I think that exposing children to skills and experiences is a great thing to do… and they may never use it later on. (Tim has knit, like, one thing in his life) That’s okay! They may also latch on to it and the skill becomes a lifelong love, like it did for me!

You won’t know unless you give it a try! I recommend reading my post on tips for teaching a child to crochet!

A Cute Kitty – felt Christmas ornament pattern

Cute Kitty - a felt ornament pattern in the 2014 Christmas Club ciollection

I love this cute kitty felt Christmas ornament! This is one you can whip up in no time – which makes it super easy to make more than one. How about one in smoky grey? Or a black cat for Halloween? Play! (Or fill one with catnip and let your cat play. But don’t hang that one on the tree!)

This is the sixth ornament in the Christmas Club collection. We’re halfway there! Here’s the collection so far. . .

half of the felt ornaments in the 2014 Christmas Club collection

You can still join at any time! The Welcome PDF that you get with your order has a link to access all the patterns that have gone out so far. Get all the details and sign up here.

The club is closed now, but you can still get all the patterns. 🙂

Get the entire 2014 Christmas Club collection here.

Get just the kitty pattern here.

See all the felt Christmas ornament patterns here.

Merry Christmas!

Best,
Wendi
That's me!

Charity Quilt Tutorial

Red and purple improv log cabin blocks made with the free scrap quilt pattern from Shiny Happy World

For a while now I’ve been thinking about designing a free scrap quilt pattern that’s as fun, easy and versatile as the Warren the Charity Bear pattern.

Just like Warren, I wanted something that was fast. I know some of you make and give away a LOT of these quilt every year.

I wanted something that was easy. Easy enough for a beginner or a child to make.

I wanted something that was versatile. Something that you could play around with and make a lot of different looks – and not get bored making lots of them.

When Craft Hope announced that they were looking for some quilts for part of their newest project, I jumped right in.

I’m making my quilt entirely from scraps. I sort my scraps by color and I’m tackling one basket at a time, so the blocks so far are all purple and red. When I’m done it’ll include all the colors of the rainbow. 🙂

My quilt also uses Quilt As You Go – but a different technique from what you’ve seen me use for the applique quilts. For this quilt I’m actually quilting as I piece – a huge time-saver and lots of fun. This method also allows me to use batting scraps. Bonus!

Here’s how I build a block. . .

Batting squares cut and ready to use in a free scrap quilt pattern.

Cut some batting squares a little bit bigger than the size you want your finished blocks to be. My finished blocks will be 10 inches square, which means I’d normally cut them 10 1/2 inches – but I cut mine 11 inches square to give myself a bit of wiggle room. That wiggle room lets you be a bit imperfect in your cutting – see how the fold in the batting made a little jagged pointy bit on the left side? That’s ok – it’ll get trimmed off. 🙂

Important! You must use 100% cotton batting. You’re going to press this a lot and anything with polyester in it will melt to your iron. I always use Warm & Natural – you can read my review of it here.

Blue and yellow beetle fabric on a batting square

Pick a piece of fabric to be your center feature and cut it (roughly) into the shape you want. All of mine are four sides – but nowhere near perfect squares or rectangles. I used scissors (not rotary cutting tools) and just eyeballed everything. Slap that piece down in the middle-ish of a batting square.

detail image showing how to piece an improv log cabin block

Now pick another scrap of fabric. Trim it to match the width of the starter scrap, lay it face down over the starter scrap with the raw edges mostly lined up, and sew across the edge using 1/4 inch-ish seam allowance. You’re sewing through both pieces of fabric and the batting.

detail image showing how to piece an improv log cabin block

Flip that piece up and press it flat.

Now we’ll add another strip. I like to work clockwise, but it really doesn’t matter.

detail image showing how to piece an improv log cabin block

Lay a strip face down over both your earlier pieces and trim it (roughly) to fit. Sew it in place just like the first one. (You can click on the photo if you need to see it bigger.)

detail image showing how to piece an improv log cabin block

Flip that piece open and press it flat.

first rings of red strips sewn around a yellow rectangle, demonstrating a free scrap quilt pattern

Keep working your way around that center, building up the size of your block. I added the zigzag piece next, then the skinny stripes.

Keep adding strips until the batting is completely covered.

detail image showing how to piece an improv log cabin block

Those first four red strips were pretty uniform, so it’s time for a skinnier strip. I like to keep things mixed up for more interesting blocks.

detail image showing how to piece an improv log cabin block

I also like to make sure some of my strips go slanty – so they’re thicker at one end and thinner at the other. To do that, I don’t line up the raw edges exactly – I let the new strip slope up or down a bit, like in the photo above.

detail image showing how to piece an improv log cabin block

See how that looks when it’s pressed open? It’s not the most efficient use of fabric, but I’m only wasting a tiny bit and I think it makes the block much more interesting.

detail image showing how to piece an improv log cabin block

Sometimes I use a new fabric with every strip and sometimes I’ll use the same fabric a few times in a row to build interesting shapes. Two consecutive strips of the same fabric makes an L. Three makes a U. And four makes a frame.

detail image showing how to piece an improv log cabin block

Sometimes I only have strips that are too short to reach all the way from edge to edge of the block – especially as the center section gets bigger.

When that happens, I just sew two strips together and use the new, longer strip in my piecing. Sometimes I use two strips of the same fabric, and sometimes I use different fabrics (like in the strip on the right in the photo above). It totally depends on my mood at the moment.

Red improv log cabin block with raggedy edges, waiting to be trimmed. Free scrap quilt pattern.

Keep going until your batting square is completely covered.

Finished block in a free scrap quilt pattern, shown from the back so you can see the quilting lines

Here it is from the back. See how there’s fabric showing all around the edge of the batting? And look at the nice quilting already done – holding everything together. I’m going to back this quilt with cuddle fleece for special cuddly warmth. There are tips here for using cuddle fleece for the back.

Trimmed block (shown from the back) in a free scrap quilt pattern

Trim your block down to size from the back, so you can see that you’re getting batting in the entire block. I trimmed mine down to 10 1/2″ square.

And here’s the finished block!

Finished red improv log cabin block - a sample demo block in a free scrap quilt pattern

In the very first photo I showed the blocks arranged in a checkerboard-ish pattern, with red blocks alternating with purple. I’m not sure yet what the final arrangement for the quilt will be – it kind of depends on how many blocks I end up with for each color. Here’s an alternate possibility where the blocks blend from one color to another.

Red and purple sample block arrangement for a free scrap quilt pattern from Shiny Happy World

Whatever arrangement I choose, the final quilt will be bright and cheerful and cuddly and warm – just what I want to give a child. 🙂

Update! You can see the finished free scrap quilt here. Along with showing the finished quilt, I also answered a lot of questions people had about the process. Click over to get more details.

A couple of final notes. . .

I think improvisational scrap blocks like this look best when you sort your fabrics a bit first. You can see that within the red blocks there’s a brick red block, a red and white block, two bright pink blocks, one light pink block, and several bright red blocks. Within the purples I have one magenta-ish purple block, three lighter purple blocks, and lots of dark purple blocks. Sticking to one shade or tone per block keeps a little order.

This would be a really fun way to make an I Spy quilt – with pairs of center pieces to match up. I have two of the larger blue/green stars and two of the girl in the blue tree.

Here’s a post with some helpful info about where you can donate your finished beauties made with this free scrap quilt pattern.

Happy quilting!

Block 11 in the Controlled Chaos Scrappy Quilt-Along

Controlled Chaos Block #11

Here’s block #11 in the Controlled Chaos Quilt! This one is super simple and easy.

What You’ll Need

  • 40  two-inch squares in color A (shown in purple)
  • 60 two-inch squares in color B (shown in pale blue)

Instructions

Use 1/4″ seam allowances for all sewing.

Press all the seams. I’m pressing mine open for this quilt. I think it will make things simpler in the end.

Arrange your squares according to the diagram below.

Controlled Chaos Block #11 exploded

Super easy. Sew the blocks into columns, then sew the columns together into a beautiful stripy block.

Here’s what my eleven blocks look like so far.

11 blocks of Controlled Chaos

Click here for all the Controlled Chaos posts.

Happy piecing!

Best,
Wendi
That's me!

Block 10 in the Controlled Chaos Scrappy Quilt-Along


Block 10 in the Controlled Chaos Scrappy Quilt-Along

Here’s block #10 in the Controlled Chaos Quilt!

What You’ll Need

  • 52  two-inch squares in color A (shown in purple)
  • 48 two-inch squares in color B (shown in pink)

Instructions

Use 1/4″ seam allowances for all sewing.

Press all the seams. I’m pressing mine open for this quilt. I think it will make things simpler in the end.

Arrange your squares according to the diagram below.

Controlled Chaos block 10 exploded

For this block I sewed things up in chunks in order to keep the edges of each color perfectly straight, even if my seams weren’t lined up perfectly.

We’re going to sew the whole thing into three fat rows, but we’re going to sew some parts of those rows into chunks first.

1. Sew up the four purple 3×3 squares and 1 purple 4×4 square.

2. Sew up four pink 3×4 rectangles.

Arrange those chunks as you see below.

Block 10 in the Controlled Chaos Scrappy Quilt-Along

Now sew all those chunks into rows.

Block 10 in the Controlled Chaos Scrappy Quilt-Along

Finally – sew all those rows into one fabulous block. 🙂

Here’s what my ten blocks look like so far. It’s half of my quilt!

Block 10 in the Controlled Chaos Scrappy Quilt-Along

Click here for all the Controlled Chaos posts.

Happy piecing!

Best,
Wendi
That's me!