I designed the pattern for this little gizmo cozy (it’s free here) in February 2011. I’ve been using it to protect my MP3 player in my purse ever since.
That’s 3 1/2 years this little thing has been tumbling around in my purse and look at it! It still looks great!
The photo on the left is from the day I finished it in 2011. The photo on the right is from today.
The corners have gotten a little smooshy and rounded. The threads of the embroidery are a bit more embedded in the felt. The edges of the applique aren’t as crisp. The big lazy daisy flower in her hair is definitely looking a little flattened.
But there’s no pilling! If this were made of cheap acrylic felt I would have thrown it away long ago because it would have looked so grubby and terrible.
How do I know this? Because when Jo was little I made her a felt board. Not knowing any better, I used cheap acrylic felt from the craft store. Honestly, I didn’t know there was anything else!
Jo wasn’t any especially grubby or rough kid, but within DAYS those felt pieces started to look terrible. They pilled awfully. They seemed to pick up and grab onto every speck of dirt or dust. And in no time at all they had lost almost all their cling. The feltboard quietly disappeared and I didn’t work with felt again for a long time. Why put a lot of work into a material that’s going to look awful almost right away?
And then I discovered wool felt. Online – of course – because there’s not a single brick and mortar store in my area that carries it. People wrote about how durable it was compared to the acrylic stuff. How it doesn’t pill. They didn’t mention how nice it feels in your hands, and how pretty embroidery looks on it, but I discovered that on my own pretty quickly. 🙂 I fell in love with felt! I couldn’t buy it locally, so I started carrying it in my shop.
I’ve made a lot more felt projects since then – so many things that I had to create a whole section in my shop for felt patterns! But it all started with this little gizmo cozy. 🙂
One of the many things I love about felt ornaments is that they’re impossible to break. That makes them perfect to give to even the youngest kids! And I love, love, LOVE the way little felt toys look hanging on a tree. 🙂
The second ornament in the 2014 Christmas Club is a cute little dinosaur – very easy to make. He was so easy and fun to make that I’m tempted to make a whole bunch in a rainbow of colors. Wouldn’t that be fun?
Here are the first two ornaments in the Christmas Club collection.
You can still join at any time!
The club is closed now, but you can still get the patterns!
I had to take a bit of a break from the Controlled Chaos while I made my daughter Jo a T-shirt quilt to take to school with her, but I’m back! I’m easing back into things with some simple wide stripes.
Ready to make block #7?
What You’ll Need
60 two-inch squares in color A (shown in blue)
40 two-inch squares in color B (shown in pink)
Instructions
Use 1/4″ seam allowances for all sewing.
Arrange your squares according to the diagram below and sew them together into rows.
Press all the seams. I’m pressing mine open for this quilt. I think it will make things simpler in the end.
Sew the rows together to make the finished block.
Here’s the exploded view. . .
Here’s what my seven blocks look like so far. . .
I’ve decided to make mine a largish lap-sized quilt for me to use on the couch. It’ll be 4 blocks wide and 5 blocks tall for a finished size of 60″ x 75″ – a little smaller than a twin quilt. And I’m going to hand-quilt it!
Everyone knows not to use your good fabric scissors on paper, right?
RIGHT?
Today I thought I’d go beyond that very basic info with some extra detail on how I manage all my scissors – including my fabric scissors. This is going to answer a few questions that I get all the time.
Do you use expensive scissors?
Nope. Don’t get me wrong – I’m a big fan of high quality tools. I KNOW that quality scissors are better than cheap ones. But I also know that I am terrible at things like. . . bringing scissors in to get them professionally sharpened.
Good quality scissors that are painfully dull because I don’t know how to sharpen them myself and I can’t seem to coordinate my life well enough to get them professionally sharpened are worse than cheap scissors.
I can get a decent pair of Fiskars sewing shears at any big box fabric or craft store for under $20 – and then replace them every year. More on that replacement in a bit. . .
Which scissors do you use for cutting fabric and paper together – like with fusible adhesive or freezer paper?
Ah – that brings me to The Great Scissor Rotation.
I keep three pairs of big scissors in my fabric room. (This is only about the big scissors (shears, if you want to get technical) – I also have spring-loaded snips at the sewing machine and an assortment of tiny scissors for precision work.)
My newest pair of scissors is for fabric only.
When I bring in a new pair, the old fabric scissors become the scissors I use for fabric fused to paper.
(Update! I’ve discovered some specialty scissors that I REALLY love for cutting applique pieces, so now I use these for that purpose exclusively, and I leave this step out of my rotation)
The old fabric-fused-to-paper scissors become my paper scissors.
My old paper scissors move into the kitchen for snipping herbs, cutting waffles into dipping strips, cutting open packaging, etc.
And my old kitchen scissors move into the toolbox for real heavy duty work.
The scissors that were in the toolbox are usually totally destroyed by this time and they finally go in the trash.
I buy a new pair of scissors about once a year. While that may seem wasteful at $20 a pair when I could buy a quality pair that will last a lifetime for just under $100 – every pair of scissors I bring in gets used for about five years. Not bad at all! And I never need to coordinate bringing them in to be sharpened. 🙂
I mentioned above that this rotation only applies to basic shears. I do have some other specialty scissors that I love and am very particular about.
By the way – because I know someone is going to ask. I do sharpen my kitchen knives – but sharpening scissors is a different matter, one that I’ve been told repeatedly is best left to professionals. The angle of the sharpening is very different and you need to get both blades to work together. It’s more complicated and beyond my rudimentary knife-sharpening skills.
Here are handy links to all the posts about quilting tools and supplies.
Talk Like a Pirate Day is coming up soon – September 19th!
To celebrate, I’m taking my favorite pirate embroidery pattern and giving it away for free. Free!
Stitch up a fun Wanted: Dead or Alive poster. I include a Peg Leg Pete pattern with an image of a boy pirate and also a Hurricane Hattie pattern with an image of a girl pirate. There were lots of female pirates out there – this is a great book about some of them.
You can even personalize the poster with your own pirate’s name!
What You Get
Full-sized patterns for small (6 x 7 1/2 inch) and large (8 x 10 inch) images and alphabets – no enlarging needed
Reversed patterns for use with iron-on transfer tools
Complete color and stitch guide
Instructions for personalizing with a custom pirate name
Links to videos teaching all the stitches used
What You’ll Need
Fabric to be embroidered (I used unbleached muslin, soaked in hot tea for about half an hour to stain it)
Your favorite tools for transferring the pattern (you all know I swear by Sulky Sticky Fabri-solvy)
Embroidery needle, thread, and hoop
Difficulty
Easy! The whole pattern uses just 3 simple embroidery stitches – and there are links to videos teaching all three.
It’s easy – but all that fill stitching does take a lot of time. Expect to spend several evenings on this one.
If you like this free pattern, sign up for the Shiny Happy News! Members get a weekly newsletter full of sewing tips and tricks, free patterns, special discounts, and other things to make you smile. 🙂
Want to learn how to make a quilt with an easy online workshop – totally free?
Sign up for Let’s Make a Quilt here. You’ll learn how to get started, the tools and supplies you’ll need, and how to make a quilt from start to finish using Quilt As You Go and applique with fusible adhesive.
It’s the easiest, most fun way to make an applique quilt. You can do it!
Applique a pretty butterfly with this free pattern!
Nothing creepy. A ladybug, a bee and a butterfly. Maybe a grasshopper and a worm.
In the end I decided to just make it a wild riot of colorful flowers – bug free.
But I kept thinking about the bugs. The zinnias in my garden and the butterfly bushes in my yard are in full bloom right now and they are covered with swarms of beautiful butterflies.
I realized that I could release a free butterfly pattern, scaled to match the blocks in the Wild Flowers quilt. That way you can substitute one (or more) butterfly blocks for any of the square blocks in the quilt.
Fun!
Of course, you don’t have to make a quilt. You could use this solo block pattern in a pillow, a tote bag, a tablet cover, a wall hanging or more. You could applique it on a finished T-shirt or on a tea towel.
You could also go totally quilt crazy and make a bunch of butterfly blocks in different colors and join them into one joyous, colorful quilt!
Have fun with it!
Want to see a mock up of the butterfly applique pattern mixed in with the flowers from the Wild Flowers pattern?
See it? I tweaked the color a bit in photo editing to make it stand out more, but you’d let it blend in real life. 🙂
This is easy peasy applique. All of the instructions use my favorite applique with fusible adhesive technique (with links to video tutorials, of course) but you could also use needle turn or freezer paper applique.
Materials Needed
For each block you’ll need an 11 inch square of fabric for the background, scraps of fabric for the butterfly and one sheet of fusible adhesive. (I usethis printable product – no tracing!)
If you’re doing Quilt As You Go you’ll also need an 11 inch square of cotton batting.
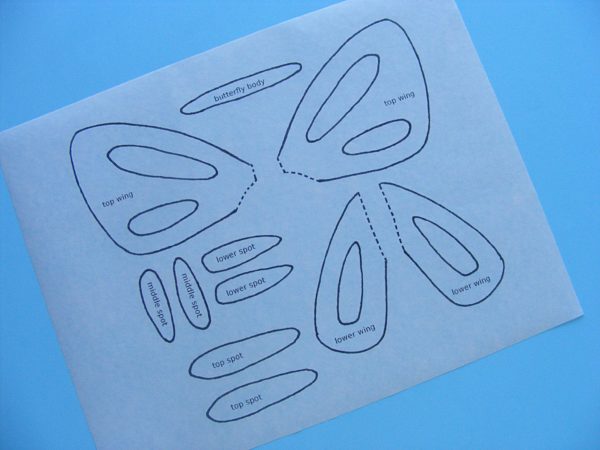
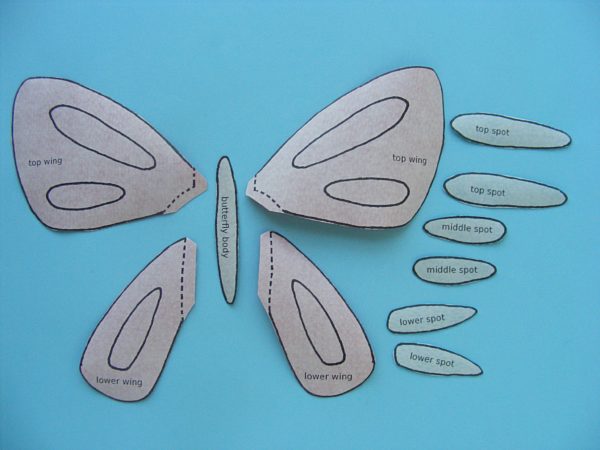
The image has already been reversed, so just trace or print.
Step 2
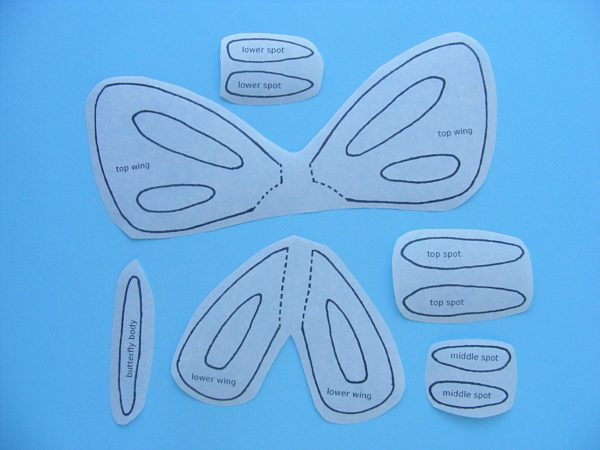
Rough cut around each shape.
Leave a little bit extra all the way around - a little extra extra (at least 1/4 inch) where there’s a dotted line - the inside edges of the wings where they’ll tuck under the body.
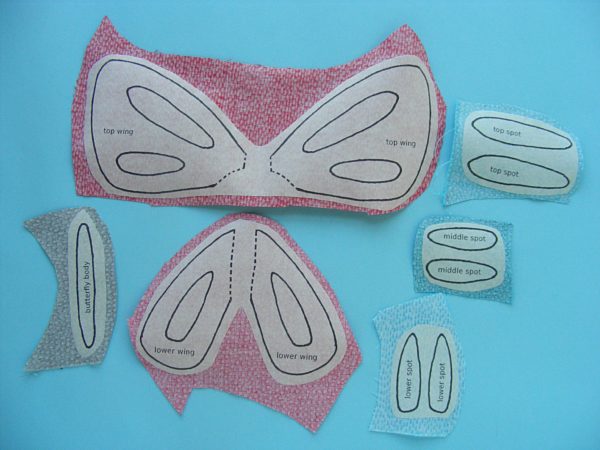
Step 3
Fuse each pattern piece to the wrong side of the fabric.
Step 4
Cut around each piece.
Cut directly on the solid lines. Leave a little seam allowance on the dotted lines – that’s where the inside edges of the wings will tuck under the main body piece.
Step 5
If you’re doing Quilt As You Go then you can quilt your block before adding the applique. So easy!
Cut your background block and your batting 11 inches square. Layer them together and quilt any pattern you like!
If you’ll do the quilting later, simply skip this step. (That’s what I did for my sample block – so you won’t see a quilted background in the following photos.)
Step 6
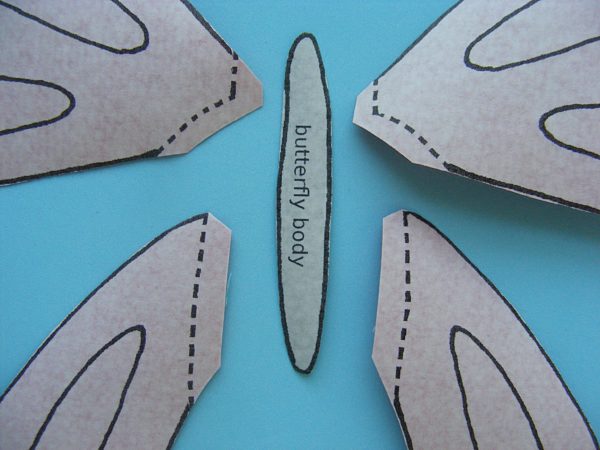
Peel off the paper backing and arrange the butterfly pieces on your background block. Tuck the edges of the wings behind the body, and the top wings behind the bottom wings.
Remember - all the dotted lines indicate where pieces tuck behind other pieces.
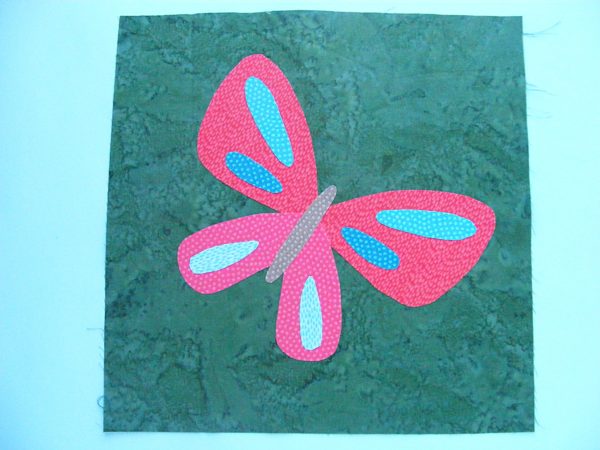
Fuse the pieces in place, following the package instructions for whatever brand of fusible adhesive you’re using.
Step 7
Stitch around all the pieces. I just did simple straight line stitching in black thread.
I love the cartoony effect.
This post has more information about outlining stitching your applique.
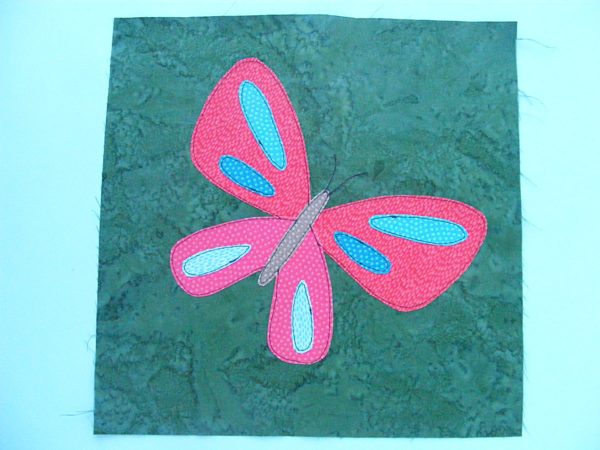
Done!
One free butterfly applique pattern becomes as lovely fabric butterfly block!
If you’re making one-block project, go ahead and finish it up!
If you’re making a bunch of butterfly blocks to join into a quilt - have fun!
It makes me so happy that many crocheters use my designs as a way of making an income for themselves… by selling the finished items! (Yup, it’s allowed! Read here)
I’ve asked Michaela, the woman behind Crochet City KC on Etsy to share some of tips for selling crocheted items.
Hopefully, these tips will help you avoid some common problem spots and sell with success!
And a huge thanks to Michaela for taking the time to write this guest post!
1: Get Payment up front for Custom Orders
When I first started crocheting I was very lax in requiring payment for my creations. Since then, I have revised my policy to require payment up front on orders, as I had a few bad experiences of not receiving payment for my work.
Here’s an example: I took an order for a very large project that took me about 6 months and a large amount of yarn. And although I had quoted the person a price at the beginning of the project, because this person was a coworker, I didn’t feel comfortable asking for money up front. When the project was finished, the customer claimed I had quoted a lower price, and I felt like I needed to take it because there was nothing in writing and the work was already done.
Looking back, I realize how silly I was for not standing up for myself and its definitely one of the experiences I look back on most and think to myself… wow I’ve come a long way! Trust me, you want to receive the money up front for your hard work!
2: Always Communicate!
I can’t express enough how important communicating with your customers is, if you think something isn’t turning out quite right, you aren’t sure about exactly what a customer wants or if you are behind on an order communicating from the beginning is so much easier then dodging them and then having an upset customer in the end.
For example, one time, I received an order for a blue octopus. But what blue? Royal blue? Light blue? Green blue? or who knows what kind! Instead of guessing, I took my phone to the store and sent photos of the various blue yarns available. I sent picture after picture until we found the right one, and I’m so glad I did. The little boy who received the octopus sleeps with it every night and it matches his bed room perfectly, which would have never happened if I hadn’t taken the time to clarify the customer’s desires.
3: Be Honest about Your Abilities/Time
Sometimes, a request may be out of your crochet comfort zone or just may take too much time for you to complete. Earlier this year a customer came to me asking if i could re-create a very complicated monster from a TV show and after looking at all the detail and weighing the time it would take, I decided to turn down the customer.
It may sound bad to turn down an order, but it’s actually much better than getting in over your head and being unable to deliver. It’s in everyone’s best interest to just be honest about what is in your comfort zone.
4: Keep Accurate Records
In my experience, customers often change their minds or “forget” certain aspects of your original discussion. If there’s no record of the original discussion, this can lead to disappointment!
I do a lot of orders through Etsy and Facebook (which automatically leave a written record), but there are often times I take orders in person. If I take an order in person I write out the details of what they what and have the person look over each detail and sign off on it – that way they are acknowledging it and I have proof later in case they decide they want something different.
Last year I had a customer ask why the item they ordered had blue eyes when they asked for green. I was able to send them a copy of their original message to me where it stated exactly what they asked for. Needless to say they were happy about their blue eyes after that!
5: Put Yourself out There!
I am a very shy person when it comes to meeting people and socializing, so this advice is a little weird coming from me. One of the biggest favors you can do for yourself if you are trying to sell crocheted item is to put yourself out there. No one will know about you unless you tell people!
Maybe your version of telling is maybe just carrying around your crocheting in public and having a business card on hand for when that person who asks “What are you making?” You can easily tell them and then point them in the direction of where they can see more of your work!
Just try one little act of putting the word out about what you do and chances are it will go a long way. I’m not the most active facebooker/etsy seller/tweeter in the world but I still manage to keep pretty busy with orders by just putting it a tiny bit of effort every so often!
It’s finished! Jo’s T-shirt quilt is finished – and just in time.
Whew!
I finished the last bit of the binding at midnight the night before she had to leave for school. It’s a good thing Jo wanted to spend her final night at home watching a Doctor Who marathon (perfect for binding handwork) otherwise I was sure I’d be finishing it in the car on the way. 🙂
Yes – that’s Cuddle Fleece on the back. She’s just crazy about that stuff! She actually asked me to make her a pillowcase out of it the morning before leaving for school. I had to tell her I’d mail it to her. 🙂
The finished quilt fits a twin-size bed with an overhang all around. It’s 72 inches wide and 87 inches long – made up of thirty 15-inch squares.
I know you can’t see all the individual blocks with it wrapped around her, so here it is all flat.
The image is actually a digital mock-up of the finished blocks. I used it to help me decide on the final layout without crawling around on the floor.
The blank gray squares you see are where Jo didn’t have quite enough T-shirts for the size quilt she wanted. I filled those spots in with favorite fabrics she picked from my stash.
I love how it’s a collection of all the things she’s loved/been obsessed with over the last 8 or 9 years. I see a lot of cats in there. . .
. . . some geeky goodness. . .
. . . a reminder of a terrific Dragon*Con panel with the creators of Fraggle Rock. . .
. . . Minecraft and other video games. . .
. . .our trip to Japan. . .
. . . and (of course) Doctor Who.
Quilting was simple. She didn’t want batting – just the Cuddle Fleece backing – so I didn’t have to worry about quilting closely enough to hold the batting in place. I just stitched in the ditch between each block. Here are some videos to help you with the final steps of the project.
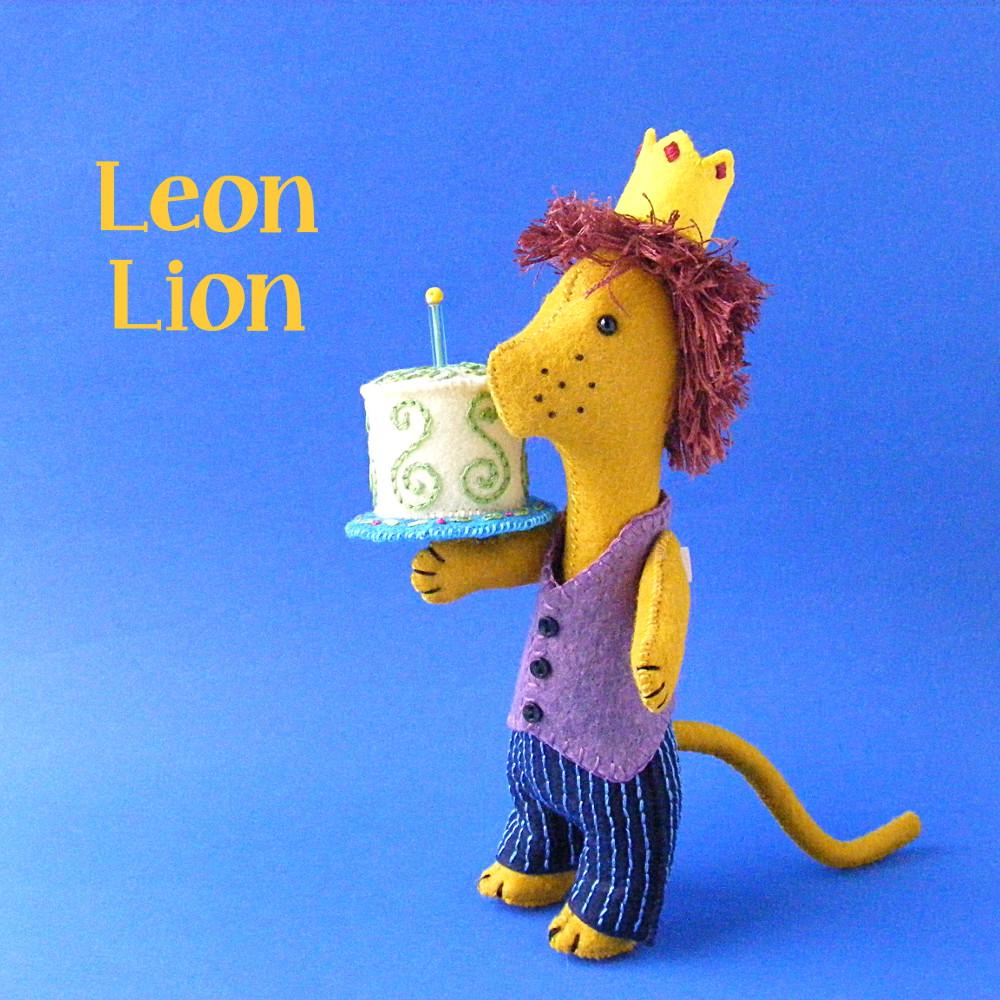
You may be feeling a little nervous about that mane. Don’t be nervous! It’s a relatively easy stitch called Turkey work and the pattern has a link to this video showing how to do it.
I had a question asking me to get more specific about the spacing of the stitches in the Turkey Work for his mane.
I didn’t get terribly specific because a little variation here won’t be a problem. It’s not like eyes which really need to be placed just so. If you start his hair a little farther back, he’ll just have a bit of a receding hairline. If you go lower on his forehead than I did, he’ll have a shorter forehead. It’s all good. 🙂
Here’s a bit more info. . .
I started stitching with a row of stitches right down the back of his head, starting a bit back from his forehead and stopping a bit short of the nape of his neck.
This shows an approximation of starting and stopping places. Again – you don’t need to stress too much about this.
Then you just basically circle around that first row of stitching, giving him a wider and wider Mohawk until it’s not a Mohawk at all anymore and starts to look more like a mane.
I stitched up one side, across the front, down the other side, across the bottom, etc. until I used almost the whole skein of thread. At some point I decided that it was far enough down the nape of his neck and I stopped adding loops when I went across the bottom and just skipped over to the other side by slipping my needle through his head. Every time you finish a circuit, take a look at him and decide if you like the way his hair is growing. You can add an extra row or two across his forehead if you want, or make it go lower on his neck the same way. It’s totally up to you!
I do recommend going around in circles. It’ll be the easiest way to keep your stitching even on both sides so his mane is balanced – which is more important than the particular placement on the head.
I also had a question about coverage.
You can see in the loopy photo that there are bits of head showing through the mane before cutting and fluffing.
That fluffing really fills things out! I took this photo after fluffing, but spreading apart the mane so you can see his scalp underneath.
You can see that there’s actually a LOT of scalp visible if you work your way down there – rather like a doll’s head. So don’t worry about getting perfect coverage there. The fluffing will really fill things out.
One other note. I made mine an adolescent lion with a shortish mane that doesn’t grow very far into his face. If you wanted to make a more mature lion you can buy an additional skein of the thread and keep making more circles until he looks the way you want. If you decide to do that, I’d make the loops a little longer too. My loops were about 3/4″ tall and not perfectly even. I left them a little shaggy after trimming – I just cut the loops in half and left them mostly untrimmed because I wanted a pretty shaggy look.
Did you notice how many times I said things like “a little variation is good” and “don’t worry too much about the placement here” and other things like that? That’s because it’s really not that fussy. I understand you being nervous – it’s a brand new stitch for most of you and it’s very different. But fluffing those loops out covers a lot of little “mistakes” – so relax and have fun! And imagine all the other things you can do with that new stitch! Fancy fringes, bushy eyebrows, dignified beards – the possibilities are endless!
Jo’s cleaning out her closet today and she may pull out a couple more that are getting too small. If that doesn’t net us three more I’ll be hitting my fabric stash and just cutting 3 big blocks of fabric she loves for the last few squares.
We had one of her favorite T-shirts that didn’t make it into the quilt. It was just too tall and she didn’t want to lose any of the image – not even a smidgen. So she asked if I could make her a pillow out of it.
Done!
It’s a nice squishy pillow and she loves it!
I used this method to make the pillow – only instead of adding framing all the way around I just added strips to the sides. It’s the same idea though! And I always put a zipper in the back so I can remove the cover and wash it.
Jo LOVES these pillows and uses them instead of bed pillows. In case you’re wondering, it’s Fairfield brand Home Elegance Ultimate Luxury PIllow – it feels exactly like a pricey down pillow but it’s less expensive and machine washable. Win!


 It’s finished! Jo’s T-shirt quilt is finished – and just in time.