How I Store and Organize My Fabric

How I store my fabric - including scraps

This week I’m on vacation. While I’m gone I’m showing off my new super-tidy sewing room, and sharing my solutions to some common craft supply storage challenges. On Tuesday I shared how I store and organize all my favorite sewing tools. Yesterday I showed you my embroidery thread. Today I’m going to show how I store all my fabric – including scraps.

I store most of my fabric under my main work table in plastic milk crates.

How I store my fabric

I divide it by color. . .

  • red
  • orange and yellow
  • green
  • blue
  • purple
  • browns and tans
  • black, white and grey

I also have one crate that holds works in progress. By that I mean things I’m really and truly making progress on – not unfinished objects that are just piling up somewhere that I’ll never get back to. 🙂

So that’s for regular woven cottons. I keep other fabrics under the other side of the table.

How I store my fabric

The bins on the right side hold polar fleece, cuddle fleece, satiny fabric that makes good ear linings, and tulle that makes good tutus. That’s a roll of batting and my cuddle fleece color swatches rolled up between the bins.

The right side holds my colored backdrop paper for photo shoots (top shelf), painted paper for making cards for Jo (middle shelf), and some more paper, a basket of felt scraps, and my stuffing tub on the bottom shelf.

Now – about scraps. . .

How I store my fabric

I used to have twice this space devoted to scraps. Now it’s just these three bins, sorted by color. I have one for warm colors, one for cool colors, and one for neutrals.

I went on a bit of a scrap quilt binge last year and realized the six bins I was using had enough scraps in them to make three quilts – and have more than half left over. I do NOT need enough scraps for six quilts, so I pared down what was left, got rid of the ugly stuff and the too-small pieces, and this is what I have left. When the bins fill up (like they are now) I need to make another scrap quilt.

So that’s how I store all my fabric – including my scraps. 🙂

Tomorrow – pins and needles.

Best,
Wendi
That's me!


How I Store and Organize My Embroidery Thread

embridery thread storage cover

I get a lot of questions about how to store embroidery thread in an organized way.

I recently decluttered my craft room so now I have multiple posts about storing and organizing craft supplies!

See my new super-tidy studio here.

See how I store my sewing tools here.

Today it’s all about storing embroidery thread.

I struggled with organizing my embroidery floss for a long time. A couple of years ago a reader suggested storing each color in a ziplock bag and IT TOTALLY WORKED. I love it, and I posted about it here.

I still use the same basic system to organize my thread, but I’ve made a couple of changes in the last year. Most of the thread I use is matched to one of my wool felt colors, so I bagged those up with the wool color AND the DMC thread # written on the label, like this. . .

How I organize my embroidery thread

Then I put all of those baggies on one binder ring, so all my felt colors are together in one place.

How I organize my embroidery thread

The rest of my thread is bundled by color and kept in a shoebox – just like I described in the other post.

So that’s my embroidery thread! Tomorrow – fabric!

Here are links to all my posts about embroidery tools and supplies.

For Beginners

Specialty Fabrics

Threads

Stabilizers and Pattern Transfer Tools

Return to the Learn to Embroider main Table of Contents.

Move on to the posts about working with patterns.

A Peek Inside My (Tidy!) Studio

A peek inside my clean sewing room at Shiny Happy World

Look! It’s a clean sewing room!

Over the years I’ve thought a lot about showing the space I work in here on the blog. But – frankly – it’s always been a bit of a mess. More than a bit, actually. If you follow along on Facebook you know I spent the last week doing a MASSIVE declutter. My husband has been doing the same thing in his office and between us we’ve gotten rid of five carloads of stuff.  (Now it’s time to tackle the rest of the house.)

I put a lot of thought into my decluttering this time and I was far more successful than I’ve ever been before. I wrote a post about how to declutter a craft room here – and you can see some scary before photos. 🙂 But for now, I’m (finally!) going to share photos of my clean sewing room, followed the rest of the week with more specific posts about how I tackle some of the most common craft-supply storage issues.

First up is a bird’s-eye view of my space.

A peek inside my Shiny Happy World studio

I took this photo from the top of the stairs to my husband’s office, which overlooks my studio. He writes children’s books and also works from home. It’s nice having our spaces adjacent so we can holler back and forth at each other throughout the day.

I love my space! It has lots of windows and terrific natural light. Please ignore the fact that none of those windows have trim yet. It will happen someday, but the fact that it took me five years to remove all the factory stickers from  the windows might be an indicator of something. . .

I’m going to start my tour at the ironing board (the purple bit at the right of the photo) and take you counterclockwise around the room. But first – look up!

A peek inside my Shiny Happy World studio

Technically I guess you’d be looking straight ahead from your stop at the top of the stairs. The corner over my ironing board has this support beam that I painted a pretty blue and then wrote “make” in purple. That’s what I do here! I love the glass baubles hanging from the support. And just to the left of the windows hangs my very first quilt. (More info about that here.)

A peek inside my Shiny Happy World studio

If you walk down the stairs you’ll run into my supremely awesome ironing board. It’s an Ikea hack and I posted all the details and instructions here.

The baskets and drawers are a later addition. (More Ikea stuff). All my wool felt is stored in the drawers. The blue cubbies are for general supplies (starch, water bottle for filling my iron, embroidery hoops, etc.). The natural baskets hold a lot of the tools and supplies I sell in the shop.

Keep moving to the left and you come to my desk, with some things I love hanging over it. I especially love these toys by Amanda Visell.

A peek inside my Shiny Happy World studio

And here’s my desk itself. It’s a hollow-core closet door from Home Depot sitting on two glass-fronted end tables from Target. It’s the best desk ever!

A peek inside my Shiny Happy World studio

The scanner and two printers used to be stored under my old desk so that I had to sit on the floor every time I wanted to use them. My back is very glad I don’t have to do that anymore. 🙂

See the tiny bit of orange hutch in the top left corner? That’s next.

A peek inside my Shiny Happy World studio

The jars in this hutch hold buttons, trim, elastic, eyeballs and more fun stuff – but it’s also a place where I put random things I love, like this. . .

A peek inside my Shiny Happy World studio

Behind the doors at the bottom of the hutch are random office supplies and all my shipping supplies.

If we keep moving left we’ll zoom past a tall bookcase full of kids nonfiction books. . .

A peek inside my Shiny Happy World studio

. . . and come to these low bookshelves where I store all my kits.

Turn the corner and this is where I store Cuddle Fleece.

A peek inside my Shiny Happy World studio

The quilt over the top keeps the bolts safe from sunlight and dog hair. 🙂

Turn the corner again and you’ll pass my washer and dryer, the door to Jo’s room, and a (probably overflowing) laundry hamper before you come to this.

A peek inside my Shiny Happy World studio

The right bookcase is all my picture books – great reference for when I need to know what a crocodile might look like standing upright on his back legs. 🙂

The left bookcase is all my craft/sewing/drawing/design reference books and sketchbooks, plus a few favorite things like the Party Animals.

A peek inside my Shiny Happy World studio

There’s a new guy ready to join the party soon!

Continue left and there’s this long row of low bookcases along the half-wall overlooking my dining room.

A peek inside my clean sewing room - Shiny Happy World studio

This is where I keep thread, beads, markers, paints, glue, my tool basket, files of patterns in progress, and other stuff. It’s just a step away from my main work table so it’s really handy. If I want to keep a clean sewing room – I need to make it easy to put things away properly. Otherwise I’ll let those supplies pile up.

Now we’re back to the stairs. Under the stairs is some pretty art. . .

A peek inside my Shiny Happy World studio

. . . and this piece of furniture.

A peek inside my Shiny Happy World studio

The striped bins hold my scraps and behind the doors you’ll find paper, extra printer ink, and random, bulky weird-shaped things like my tripods.

On the wall above the stairs (as you head back up to my husband’s office) is a collection of some of my favorite children’s book art.

A peek inside my Shiny Happy World studio

It’s impossible to shoot a photo without getting sun glare – I’ve tried every time of day and every time of year. But there’s some great stuff up there!

We skipped a couple of tables in the middle of the room.

A peek inside my clean sewing room - Shiny Happy World studio

This is my main work table with a big cutting mat up top, and fabric storage underneath. (And Augie Dog peeking in the side of the photo.) It’s between my desk and the low storage shelves.

Just past it you can see my sewing table – the magenta one.

A peek inside my clean sewing room - Shiny Happy World studio

That table top is a collage of picture book pages with a layer of clear epoxy over it. I love it! You can see how I did it here. There’s a futon backed up to the sewing table, because my studio is also the guest room. 🙂

And that’s it! My clean sewing room! More details coming every day this week about fabric storage, tool storage, embroidery floss storage, and pins & needles.

I hope you enjoyed the tour! Happy Monday!

How I Care for My Fabric Scissors

The Great Scissor Rotation - how to get the most use out of every pair of scissors

Everyone knows not to use your good fabric scissors on paper, right?

RIGHT?

Today I thought I’d go beyond that very basic info with some extra detail on how I manage all my scissors – including my fabric scissors. This is going to answer a few questions that I get all the time.

Do you use expensive scissors?

Nope. Don’t get me wrong – I’m a big fan of high quality tools. I KNOW that quality scissors are better than cheap ones. But I also know that I am terrible at things like. . . bringing scissors in to get them professionally sharpened.

Good quality scissors that are painfully dull because I don’t know how to sharpen them myself and I can’t seem to coordinate my life well enough to get them professionally sharpened are worse than cheap scissors.

I can get a decent pair of Fiskars sewing shears at any big box fabric or craft store for under $20 – and then replace them every year. More on that replacement in a bit. . .

Which scissors do you use for cutting fabric and paper together – like with fusible adhesive or freezer paper?

Ah – that brings me to The Great Scissor Rotation.

I keep three pairs of big scissors in my fabric room. (This is only about the big scissors (shears, if you want to get technical) – I also have spring-loaded snips at the sewing machine and an assortment of tiny scissors for precision work.)

My newest pair of scissors is for fabric only.

When I bring in a new pair, the old fabric scissors become the scissors I use for fabric fused to paper.

(Update! I’ve discovered some specialty scissors that I REALLY love for cutting applique pieces, so now I use these for that purpose exclusively, and I leave this step out of my rotation)

The old fabric-fused-to-paper scissors become my paper scissors.

My old paper scissors move into the kitchen for snipping herbs, cutting waffles into dipping strips, cutting open packaging, etc.

And my old kitchen scissors move into the toolbox for real heavy duty work.

The scissors that were in the toolbox are usually totally destroyed by this time and they finally go in the trash.

I buy a new pair of scissors about once a year. While that may seem wasteful at $20 a pair when I could buy a quality pair that will last a lifetime for just under $100 – every pair of scissors I bring in gets used for about five years. Not bad at all! And I never need to coordinate bringing them in to be sharpened. 🙂

I mentioned above that this rotation only applies to basic shears. I do have some other specialty scissors that I love and am very particular about.

By the way – because I know someone is going to ask. I do sharpen my kitchen knives – but sharpening scissors is a different matter, one that I’ve been told repeatedly is best left to professionals. The angle of the sharpening is very different and you need to get both blades to work together. It’s more complicated and beyond my rudimentary knife-sharpening skills.

Here are handy links to all the posts about quilting tools and supplies.

Sewing Machine

Iron

Rotary Cutting Tools

Scissors

Other General Sewing Room Supplies

One More Hugely Popular Post that Seems to Fit Here Better than Anywhere Else

Return to the Let’s Make a Quilt main Table of Contents.

Move on to the posts about choosing your quilt pattern.

Happy stitching!

An honest talk about charity, donating and the Philippines

I was going to show you how I made my monster skirt today… but I’ve postponed it a little because there’s a topic weighing heavily on me that I want to talk about.

By most reports, the typhoon that struck the Philippines is the worst tropical storm to make landfall. The death toll is over 3,000 and some estimates predict it will reach 10,000.

What I’m about to say may be controversial, but please hear me out.

Donating toys to the Philippines

Please do not send stuffed animals to the Philippines

The victims of the Philippines typhoon do not have food, drinking water or medicine. They don’t have enough personnel to move debris to search for survivors, or enough well-bodied people to bury their dead. It is a catastrophic situation that most of us find hard to imagine.

As crafters, we want to help. Our first instinct is to make/sew something to send to people in need.

This is a great instinct, but we need to use our judgement. We need devote our crafting energy towards causes where we can make the greatest impact.

And right now isn’t the time. Let me tell you a little about what we learned from Newtown…

Lessons from Newtown

Do you remember when we collected stuffed animals to send to the children of the Newtown tragedy? Crafters banded together and sent an astonishing number of stuffed animals. I was so proud!

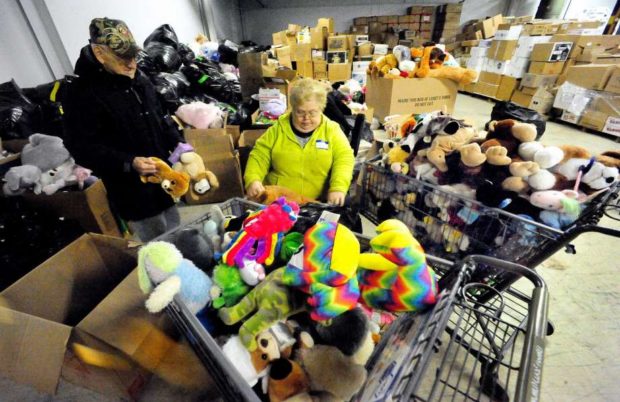
I was devastated to find out that what we thought was a great idea turned into a burden. The town was overwhelmed with stuffed animals, requiring countless volunteers and warehouses.

It breaks my heart to say that many of those animals never made it to children. There were just too many.

Do what is most needed

I love stuffed animals (trust me!), but we need to make sure we are doing what is best for the disaster area. The people in the Philippines need water and relief workers, and right now, the best way to get that help to them is to donate money to a relief organization.

Sending a stuffed animal to the Philippines won’t calm the grumble of a child’s hungry tummy and it takes up valuable shipping and distribution resources that are needed for essentials. The shipping cost, alone, would provide food for a family for days.

Use the tragedy to inspire your charity crafting

I know that in horrible times such as this, your fingers get itching to make something… that’s wonderful! You can still help! Maybe you make animals and sell them, donating the profits to the relief effort.

Or maybe you feel inspired to make animals… but save them and donate them to your local fire department, to calm a local child after a scary incident.

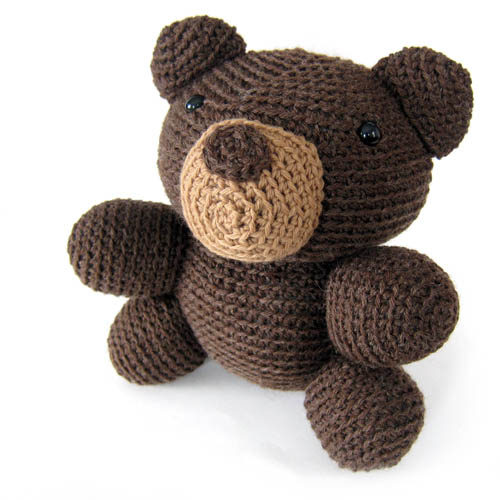
amigurumi crochet bear

Crafters are an amazingly caring group of people. Please continue the tradition of caring by doing what’s best for the disaster-struck region. Send money. Save your stuffed animals for where they’re needed.

Getting My Quilting Mojo Back

Getting My Quilting Mojo Back

I used to be a quilter – with a capital Q. I entered my quilts into shows and sold them in galleries. I liked making the quilts, but I hated everything else about the process. I hated writing Very Serious Artist Statements. I hated entering quilt shows. I hated worrying about how much time I was spending on a quilt, knowing that that was pushing up the price. I didn’t like thinking about my designs in that way.

So I stopped. And I started Shiny Happy World and I didn’t make a single quilt for a few years.

Buttonholes Quilt PatternI started making cute toys instead of expensive quilts. And then I started designing patterns for those cute toys so other people could make them too. And that was awesome!

But then I made a quilt. I made the Buttonholes quilt and it was really fun to design a quilt pattern especially for beginners – with no places where the seams needed to match up and no stress whatsoever.

And then I made the Scary Squares quilt and had the Most Fun Ever. And then there were a few more quilts – including the Puppies quilt which I love, love love. Scary Squares quilt pattern from Shiny Happy World

And all of a sudden I realize I have my quilting mojo back. And you know why? Because I’m making quilts that I LOVE. These quilts will never appear in any gallery. They’ll never win a prize in a show. But they make people smile and they keep people warm and they’re really fun to make. I’m not stressing about points or matching seams – I’m playing with color and shape and cuddly monsters and cute puppies. And I love it!

Why did this come as a revelation?

12_puppy_applique_patternsI reviewed Quilting Happiness here, and in responding to some people’s comments about the book and the review, it really made me think about my own quilting journey. I feel like I fell into this trap of always pushing my skills – always making more and more complicated quilts – until I didn’t enjoy what I was doing. I was designing for the galleries and the judges and my own weird internal measuring stick.

It’s like I had to give myself permission to make quilts that were “below” my skill level. Where does that come from? I have the technical skills to make a mariner’s compass quilt. Or a Baltimore Album quilt. That doesn’t mean I HAVE to make one! Making one (for me) will be stressful and sweaty and I’ll probably say a lot of bad words. I can do it – but it won’t be fun. And I want my quilting to be fun, dang it!

I’m writing this because I know a lot of you have struggled with the same thing. I read it in a lot of private emails after I posted my Quilting Happiness review. You don’t need my permission – but I’m giving it here just in case hearing it from another source helps.

You do not need to challenge yourself with every project you make. If you want to learn a new skill – awesome! But don’t feel like you have to. It’s ok to just make things for the joy of it. You can make beautiful, stunning, gorgeous quilts for the rest of your life without ever worrying about chopping off points or matching seams.

There. I’m off my soapbox now. 🙂

Starry Night quilt in progress - 10 starsAnd now that I have my mojo back, I’m planning a LOT of new quilt patterns for next year. Most of them will be of the easy peasy Buttonholes variety – with no fussy points and no seams to match. A few of them will be skill stretchers, like the Starry Night quilt. (Update – I’ve pulled the Starry Night pattern temporarily while I reformat it to be released as a regular pattern. Sign up for the newsletter to make sure you know when it’s in the shop.) I hope all of them will be fun – and that all of you will make things you love, whether those things are simple rag dolls or complicated quilts. Think about what makes you happy when you sew and follow that path!

Have a wonderful day!

Happy sewing! Or quilting! or stitching! Or whatever you love to do!

Best,
Wendi
Wendi_Gratz_Shiny_Happy_World

Designing a Rag Doll – a Peek at the Design Process

Designing a Rag Doll - a Peek at My ProcessToday’s post is part of the Let’s Talk Process Blog Hop! Eight different designers are each choosing a recent project and talking about the process of designing that project. Our approaches are all likely to be really different – and all inspiring! I love peeking behind the scenes at the process that goes into a finished design – and I always come away with some ideas I apply to my own work.

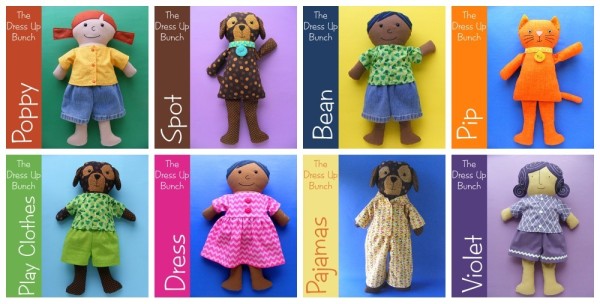
I’ll be writing about the new Dress Up Bunch rag dolls. Years ago – back when Shiny Happy World was about selling finished dolls and softies instead of patterns – I had the idea to design a dressable rag doll. I already had a rag doll that sold well, but I wanted one that was designed to be easier to dress, with a large wardrobe of possible clothing patterns. It wouldn’t hurt if she was easier (and faster) to make, too. 🙂

That idea sat on the back burner for a long time while I transitioned to selling patterns and  teaching, but a few months ago I finally got serious and designed what would become The Dress Up Bunch.
dress up bunch collage

The Dress Up Bunch – so far

I had a LOT of time to think about what I wanted from this pattern collection.

  1. Very easy to make.
  2. Arms and legs that would go in any direction for easy dressing.
  3. Cute, playable and fun.

Any time you design something, even something simple (especially something simple) there are countless small decisions to make along the way.

In many cases there are several good options – but one is the best choice for that particular project. I like to start with a list like this that I can use as a reminder to keep myself on track.

The Old Rag Doll Pattern

Abigail Darcy full

Usually I start with a blank page – but this time I had a successful rag doll pattern that I could use as a jumping off point.

This is Abigail Darcy. I think she’s adorable and the pattern had been a strong seller for me. I love her gangly coltishness, her subtle asymmetry, her cartoony face, her striped tights, her changeable skirt.

But she’s not Very Easy to Make.

She’s more of an advanced beginner pattern and I wanted something that would also work for people who are still getting acquainted with their sewing machines.

The way her arms are attached also greatly limits their movement – making her harder to dress and play with.

Very Easy to Make

The number one problem I see with handmade softies is that people don’t put enough stuffing in them. On some designs it doesn’t really matter, but with dolls it can matter quite a lot because less stuffing makes the necks go floppy very quickly. I gave the Dress Up Bunch dolls wider heads, wider bodies – and especially wider necks – so they would be forgiving of being too lightly stuffed.

If you don’t add enough stuffing, this doll still looks good and functions well.

The wider body also solved another problem.

There is a point in the original rag doll pattern where she looks like this.

17 an unholy mess

Her body is so skinny that it won’t hold all the arms and legs and they have to hang out the stuffing hole while sewing up the outside.

It looks worse than it is, but it’s definitely not fun and I want every step of my new pattern to be easy and fun.

The same stage in the Dress Up Bunch rag doll pattern looks like this.

16 pin back

See how neatly (and easily) all the parts fit inside the body?

In addition to making the head, neck and body wider, I also made the arms and legs shorter so they’d fit more easily inside the doll. The arms, in particular, are quite short. In real life a human’s head is much narrower than the shoulders, the neck is much narrower than the head, and hands hang down past the hips.

I decided against anatomical accuracy in favor of a body type that was easier to make.

One more detail you can see in this photo is the center back seam. Most rag doll patterns don’t have that, but I added it for two reasons. One – a stuffing opening in a nice straight seam like this makes the final handsewing a snap. I find it significantly easier than sewing up a seam in the side of the body – especially if that body is well-stuffed. Two – it provides a great seam where makers can easily and securely attach a waggy tail to the animal bodies.

Usually more seams means more complicated, but this is a case where adding a seam actually made the construction easier – in two ways!

Finally – I made the Dress Up Bunch doll pattern symmetrical. I love the casual charm of a little bit of asymmetry, but skin colored fabrics and felt have no easily identifiable front or back. It was very easy for pattern pieces to get flipped over during construction so they didn’t all match up at the end.

For this pattern – where Very Easy to Make was my #1 guideline – I was happy to sacrifice quirky asymmetry for ease of construction.

Super Flexible Arms and Legs

Pip - a kitty cat doll softie pattern for The Dress Up Bunch

On the old rag doll pattern you can see that her arms are attached at an angle. That’s pretty typical of rag dolls – but it definitely limits the flexibility of those arms. It’s hard to raise them over the doll’s head and the seams have a tendency to tear under the arms. It also makes them hard to dress.

Now look at Pip over there on the left. I left the tops of his arms completely unstuffed and attached them at a right angle to the side of the body. Bingo! Arms that can go in any direction – making for fun play and easy dressing. They don’t look as neat and tidy as the typical angled arm attachment of a rag doll, but they function much better.

Neat and tidy was not on my list. Easy dressing and playing was.

I originally tried sewing elbow and knee joints into the arms and legs (like on the legs of the old rag doll) but my daughter said they looked ugly – like sausages. I tried them unjointed, but very lightly stuffed and with some plastic pellets added to give them good flop. She pronounced that version “very huggable and soft, good for playing, and not ugly.” Success. 🙂

Playability

Spot in jammies back

This was a big one for me. I’ve watched kids play with my dolls for years and I’ve seen how they interact with them. They want to carry them around by the arm (another reason the arms need to be flexible). They want to cuddle them. They want to sit them up and have them stay sitting. They want their arms and legs to bend. And if they have tails – they want to wag them. 🙂

A lot of dressable animal dolls have no tails – or they have applique tails that are covered by the clothing. I wanted actual waggable tails.

It added an extra few steps to the construction of the critter dolls – and their pants – but it adds a ton to the playability. It’s always a balancing act.

In this case I was happy to add a tiny bit of difficulty to the construction in order to have a doll that would be a lot more fun to play with.

The Process is Never Done

Old Violet - a Dress Up Bunch doll from Shiny Happy World

The first human doll in The Dress Up Bunch was Violet. Here she is.

I love her purple curls, but when I got ready to make the second doll in the collection I realized that the face still needed some work.

The new, wider body shape was chunky and cute, but she still had the smaller/finer features of the original rag dolls. They didn’t go together.

I played around so much with the face for the second doll!

(I have a whole post here about how I test faces on my prototypes).

I drew and erased and drew and erased and drew and erased until the face was a yucky grey mess. Then I flipped it over and did the same thing with the back of the head.

Spot - Dress Up Bunch Dog Softie Pattern

I had a nose and mouth I liked – but the eyes were killing me. No matter what I did they were too small. I tried pinning on some felt eyes, but I wasn’t happy with any of them. I had used plastic safety eyes for Spot – and I loved them – but I had it stuck in my head that they would look bug-eyed and goofy on a human doll.

Finally – in desperation – I grabbed a seam ripper, poked a hole where the prototype’s eye should go, and stuck in a safety eye to test it out.

The whole face suddenly came to life.

Poppy face

It didn’t look bug-eyed or goofy! The larger size looked friendly and young. And the shiny half-domes had a sparkle to them that I hadn’t gotten with felt eyes. I loved them!

So this is the new face of The Dress Up Bunch.

Try everything – even things you’re pretty sure will fail.

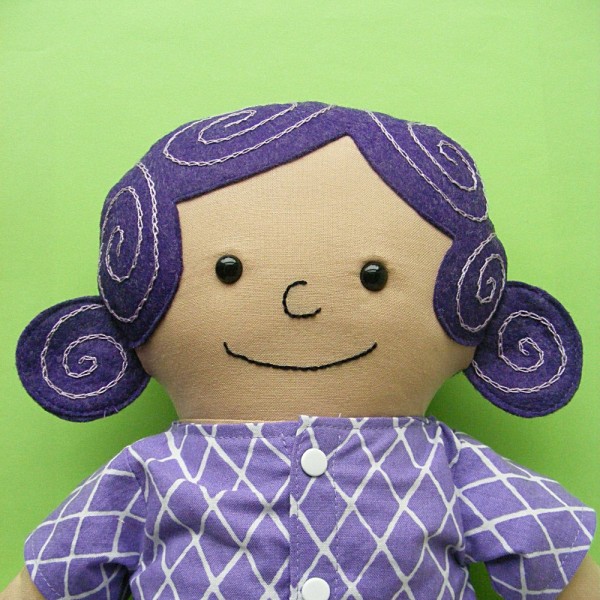
I redesigned Violet so she would have the younger, cuter face that the newer dolls have.
New_Violet_Rag_Doll_Face

One More Bit of Advice

I do all my prototyping with white muslin.

  • It’s cheap and easy to find.
  • It’s the least forgiving fabric I could possibly sew with – pieces that could be stretched to fit with fleece will not match up with muslin. I’ll know there’s a problem that needs fixing.
  • You can draw and write on it – like I do when I’m designing faces.
  • Every mistake will show. My daughter might not have noticed sausage-looking arms on a patterned fabric, but she sure hated them on the white prototype.

If your project looks good in white muslin it will look good in any fabric. 🙂

Let's Talk Process blog hop
I hope you enjoyed this look at the design decisions that went into a single project. Ready to see the approaches of some other designers? Take a look at the other posts in today’s hop and gather up enough tips and inspiration to keep you designing for weeks.

Happy stitching!

Best,
Wendi
Applique Wendi (with fabulous hat)

How to Make Yogurt

I never thought so many people would be interested in my yogurt-making! I make my own yogurt (once a week, if you’re curious), and every time I mention it, I get requests for a tutorial. So… here it is!

It’s not hard to do! And for folks like me (who like plain yogurt, or even flavored yogurt without lots of sugar), making your own can be easier than finding the one you like in the store. Making your own yogurt is also cheaper than buying it, although not by as large of a margin as other homemade items (like bread, for example).

The Equipment

To make yogurt, all you need to do is add a culture (ie. friendly bacteria) to warm milk and keep it at 120 degrees (f) for 6-8 hours.

There are various pieces of equipment available to help you achieve the required temperature. You can use:

  • a crock pot
  • your oven (if the temperature setting goes low enough)
  • a yogurt maker

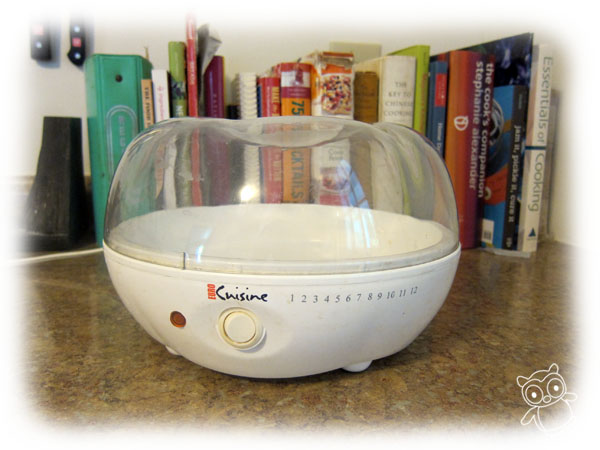
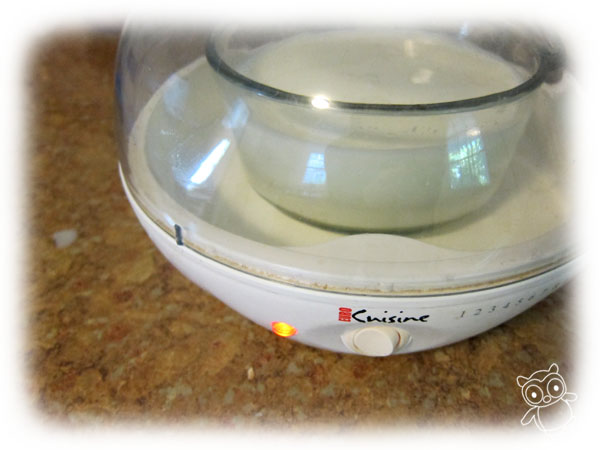
I use a Euro Cuisine Yogurt Maker, and I love it. It keeps the temperature just right (as well as the humidity) and it doesn’t use much energy to run.

Euro Cuisine Yogurt maker

It’s important to note that a ‘yogurt maker’ doesn’t ‘make’ the yogurt (in the way that you dump ingredients into a bread machine and get a finished loaf of bread), it just keeps the mixture you’ll make at the right temperature for it to turn into yogurt.

Some people balk at having a yogurt-making appliance, but I don’t have a crock pot and my attempts at using the oven have been unsuccessful. So, it works for me. You’ll have to find what works for you!

The culture

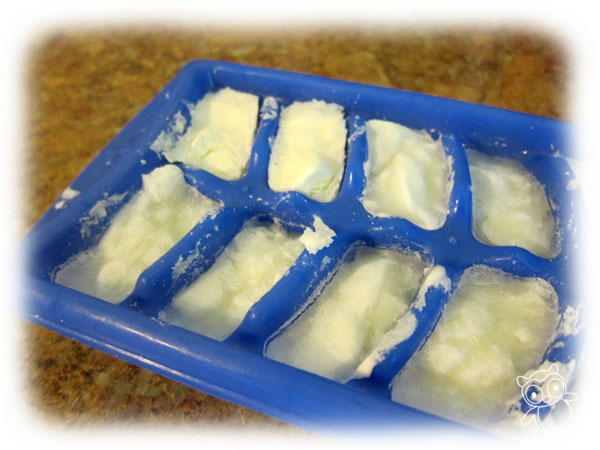
You also need some happy bacteria to start your yogurt. The easiest thing to do is buy a small plain yogurt from the store, and divide it up into ice-cube trays and freeze:

freezing yogurt for making

You can also find culture in powder form, but I haven’t personally tried that approach.

How to make yogurt

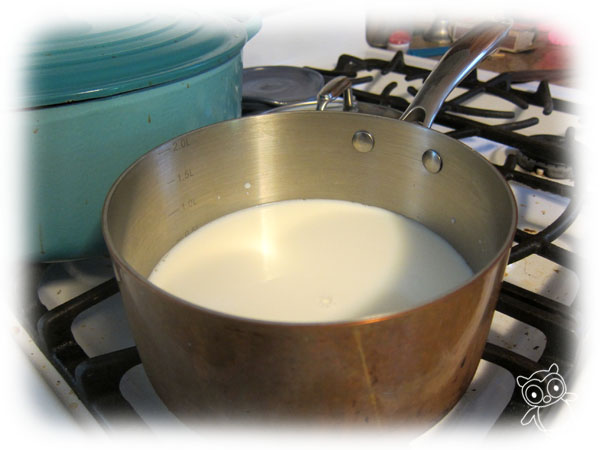
Step 1: Heat your milk to almost boiling

Heat the volume of milk that you want to become finished yogurt (which probably depends on the size of your vessel).

warming milk to make yogurt

If the milk boils a little, it’s okay. But, try to turn the heat off before it becomes a rolling boil.

Step 2: Let the milk cool

Now, let the milk cool to 120 degrees. Some folks use a thermometer, but I just stick my finger in and see if it feels like a nice bath temperature. If you skip this step, the too-hot milk will kill your bacteria.

Step 3: Add your culture

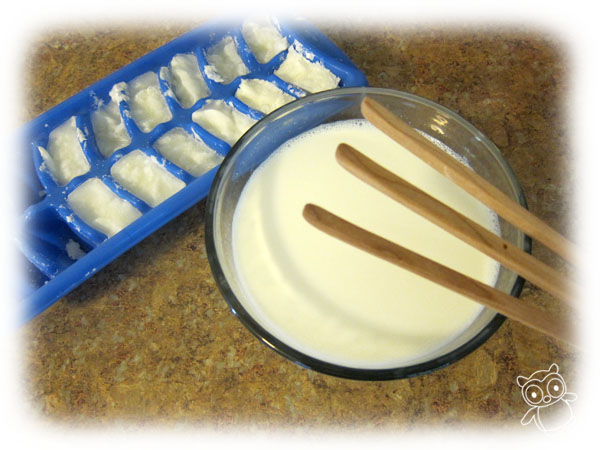
Whether you’re using the ‘ice cube’ method, fresh yogurt or powder, add the culture in and stir with a whisk. Use about 1 tablespoon (or two ice cubes) if using yogurt as a starter.

how to make yogurt

Pour the mixture into your vessel. I, personally, found the little jars that came with my yogurt maker too difficult to clean, so I use a glass storage bowl that fits inside my yogurt maker.

Step 4: Keep warm for 6-8 hours

Using a yogurt maker, this is easy. Turn it on and wait!

yogurt machine in use

Step 5: Refrigerate and enjoy!

When your yogurt is done, it should look like yogurt. You know, solid-ish stuff with some liquid on top:

finished yogurt

Draining the liquid is how you make Greek yogurt, but I like mine just this way. Refrigerate, and then enjoy!

Best,
Stacey

Better Photography: creating a seamless white background


I’m really excited to be taking part in the Better Photography Blog Hop! I’ve joined some crafty geniuses: Diane from CraftyPod, Haley from The Zen of Making, Michele from Michele Made Me and Megan from Rad Megan’s… and we’re each sharing our great photo tips!

Scroll down to the end of this post to get links to each post this week!

Today, I’m going to show you how to get a seamless white background, with just a white posterboard and photo-editing software.

Why a white background?

When you’re running a handmade business, there are two important considerations for taking quality product photos:

  • Each photo needs to clearly show your product
  • Your photos should be consistent across your webpage/shop

I find a white background to be the easiest way to meet these criteria. It’s possible to find a lovely, non-distracting fabric as the background, but taking consistent photos with a patterned background requires much more photographic skill than using a white background.

And you know what? I’m not a photographer. I design crochet patterns… so I need something easy! And this is it… so follow along!

A note about software

I’m not going to try to pull the wool over your eyes… I have fancy photo-editing software. (I use Adobe Photoshop CS3) With the number of photos I need to process, it made sense for me to splurge and purchase it.

However, it may not be worth it to you… that’s a personal decision. Fortunately, many of the tricks I’m going to show you use tools that are available on freebie photo editors (PicMonkey is a great one).

So, don’t fret if you don’t have expensive photo-editing software. Follow the key steps on whatever software you’re using, and you’ll still get great white backgrounds!

The setup

Ready for the materials list? Here’s what you’ll need:

  • a white piece of posterboard
  • your camera
  • the thing you want to photograph
  • some natural light

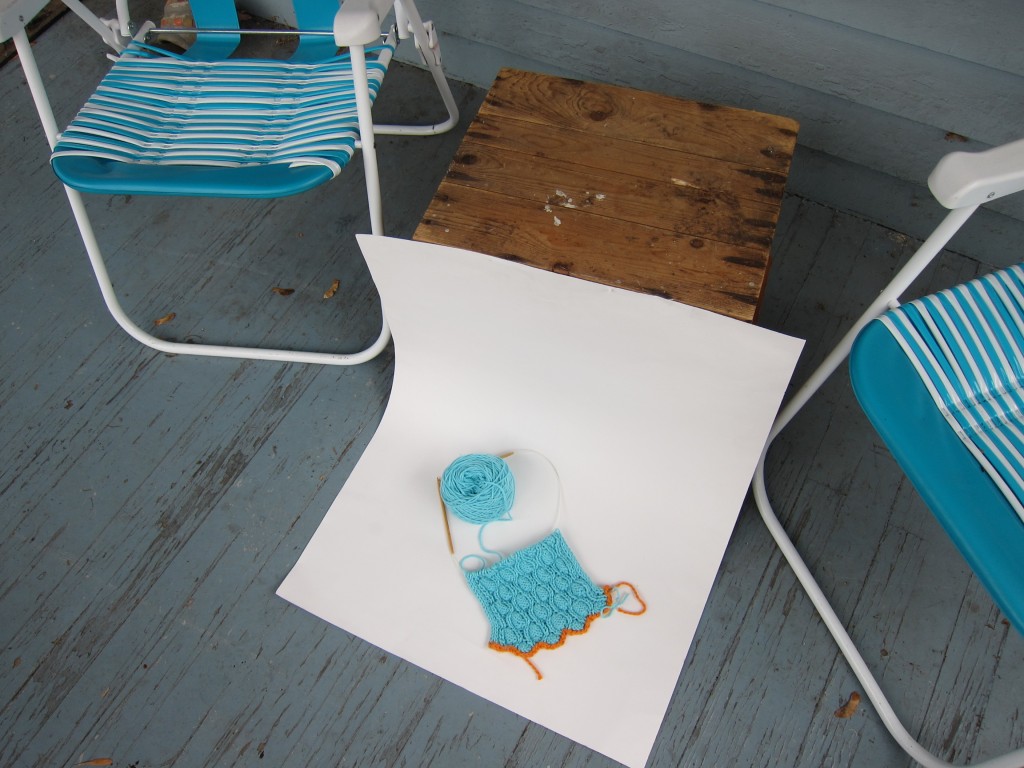
Seriously. That’s all. Here’s the photo of the setup I used for the photo I’ll be editing today:

You can read some more details about setting up the posterboard and snapping the photos in this blog post. I live in a often-cloudy climate where I’m able to get great indirect lighting on my porch. But, if you don’t, you’ll want to read Megan’s post on creating a light box.

Keep in mind: the better your photo is, the less editing you’ll need to do. And there’s no editing that can fix a blurry or way-poorly-lit photo, so snap the best one you can!

Step 1: Change the Exposure

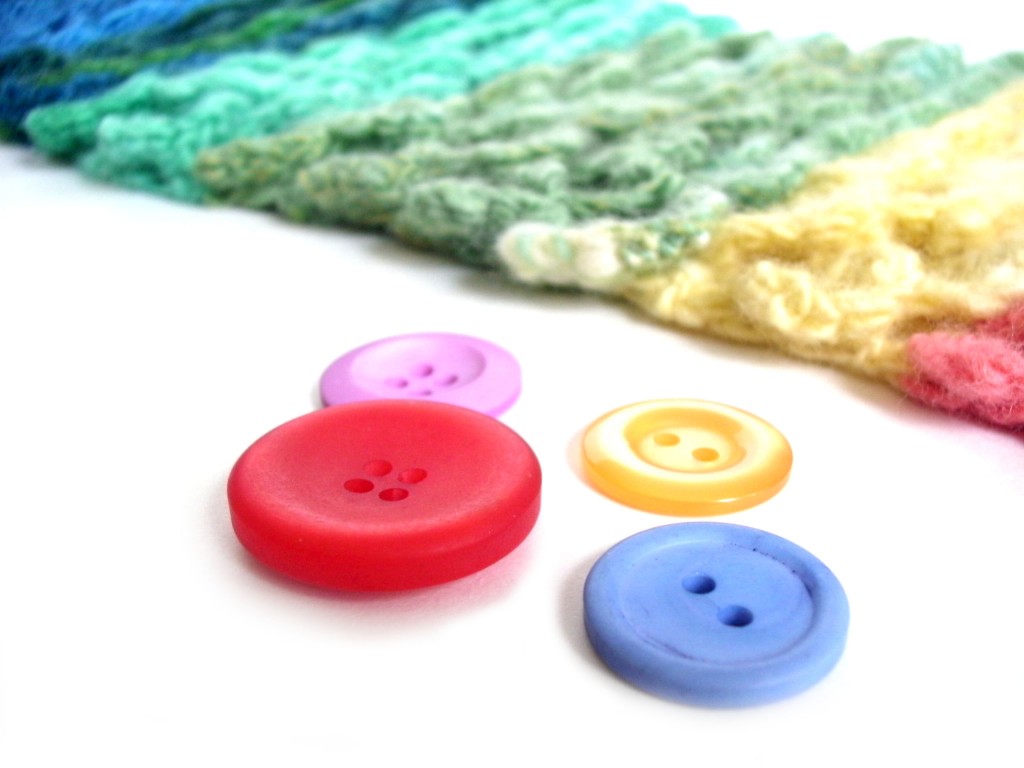
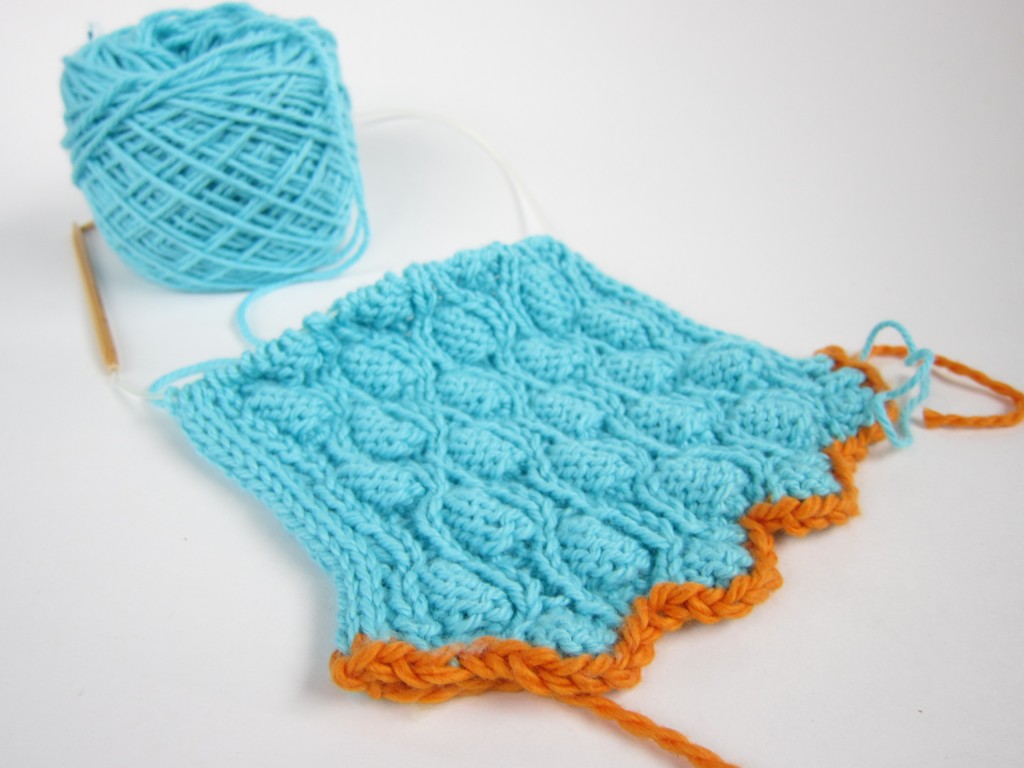
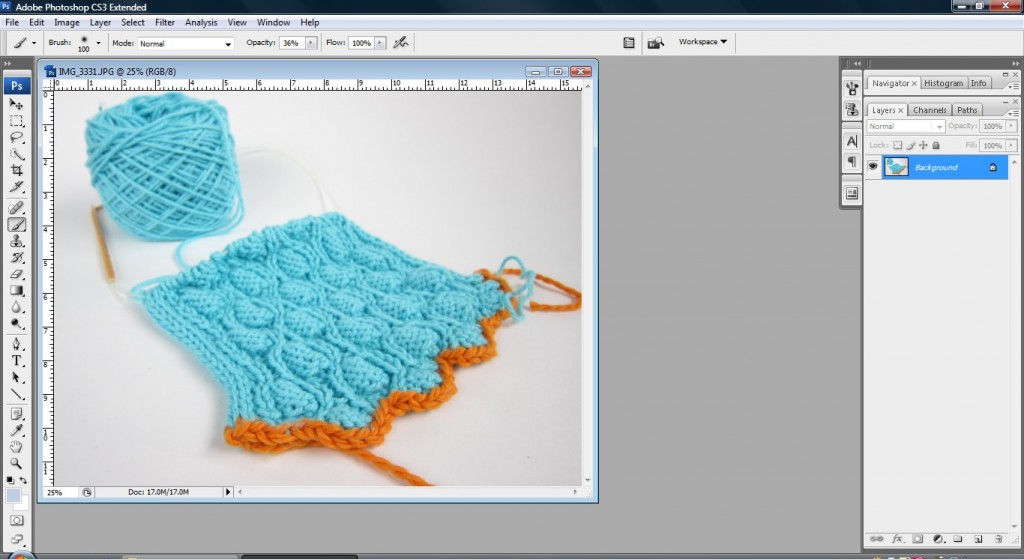
So, you’ve snapped your photo… here’s what mine looked like:

See how the background looks grey? Not good.

Open your picture up in your photo editing software:

Click on any of the photos in this post to enlarge
Your goal is to use the tools in the software to get the background as close to white as possible… without making the item you photographed look funny.

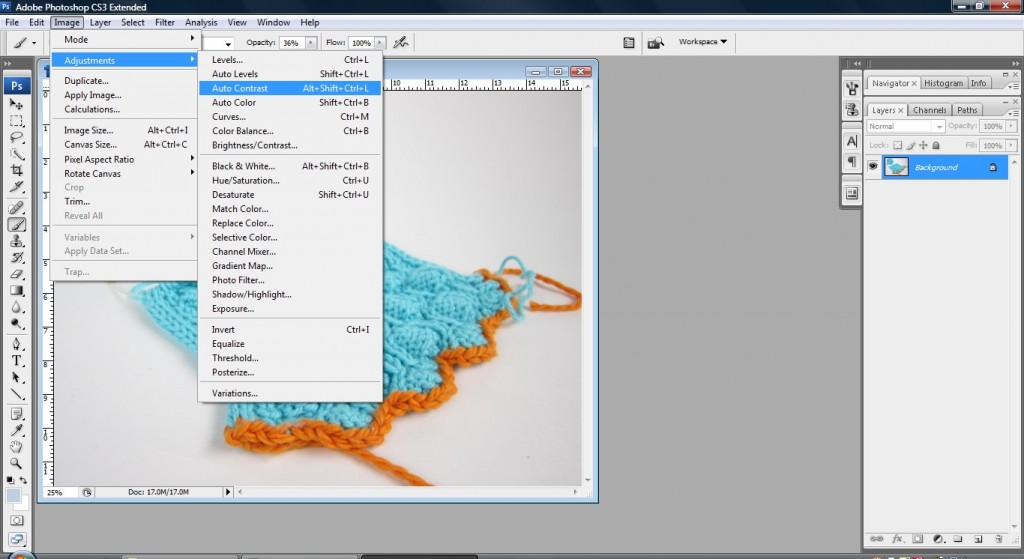
The first thing I like to do is run ‘Auto Contrast’. This isn’t required, but it tends to make the background whiter and the product a little sharper. On Photoshop, it’s under Image>Adjustments>Auto Contrast.

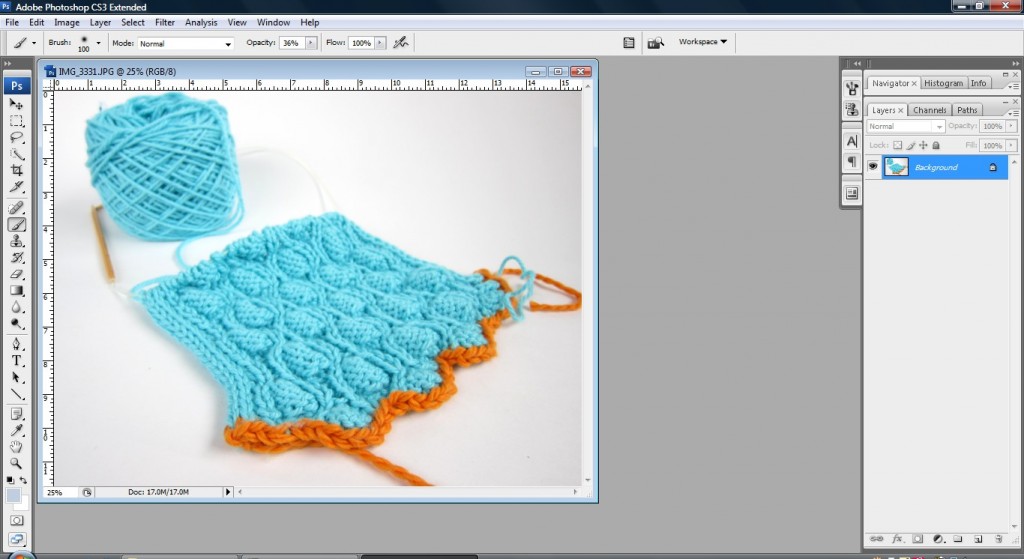
Here’s what my photo looks like after Auto Contrast:

See? The background’s a little whiter. You may also try ‘Auto Levels’, but depending on the color of your item, this tool can significantly alter the color, so it may not be best.

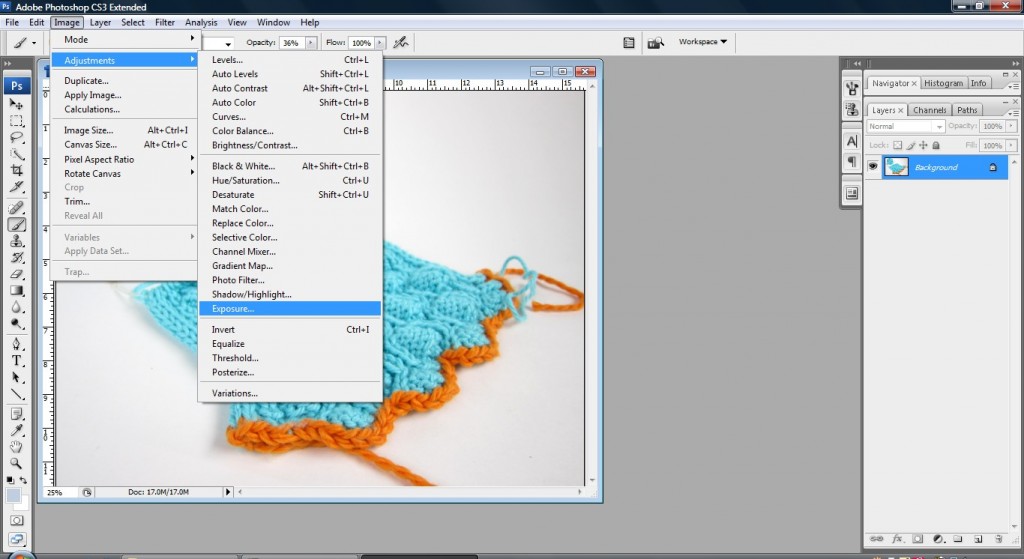
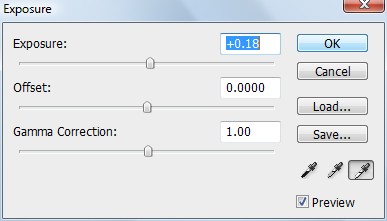
Okay, now we want to make even more of the background white. To do this, we’re going to increase the Exposure, which is under Image>Adjustments>Exposure.

When you click, a little dialog box will come up:

Fiddle with the exposure, increasing it until you get as much background to look white as possible… without making the item look washed-out. Here’s how mine turned out:

This step is an art… there’s no ‘right number’ that’s going to work. Just keep playing with it!

Step 2: Clean up the edges

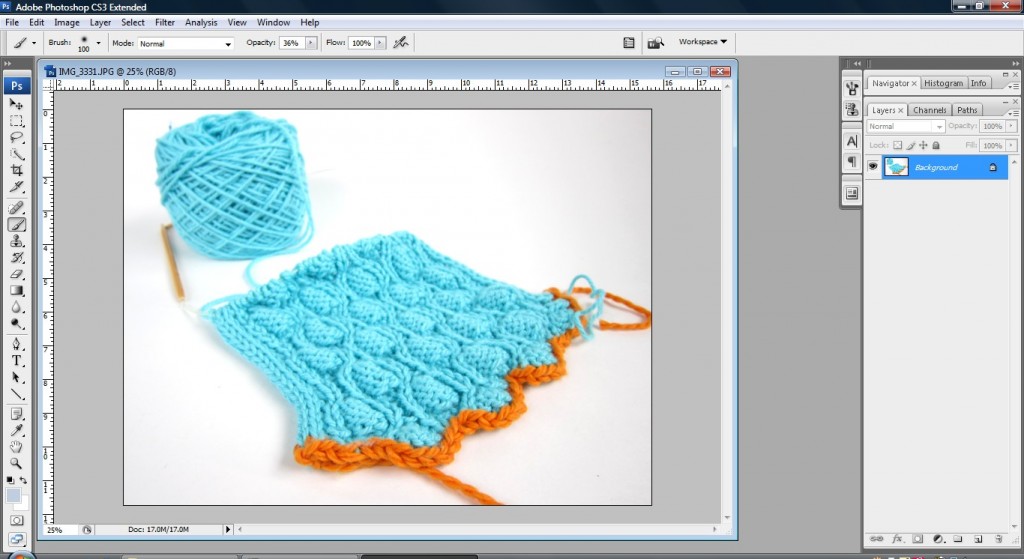
My photo looks pretty good… but we’re not quite at the point where the background is perfectly white. To do this, we’re going to need to do some touch-up with a brush.

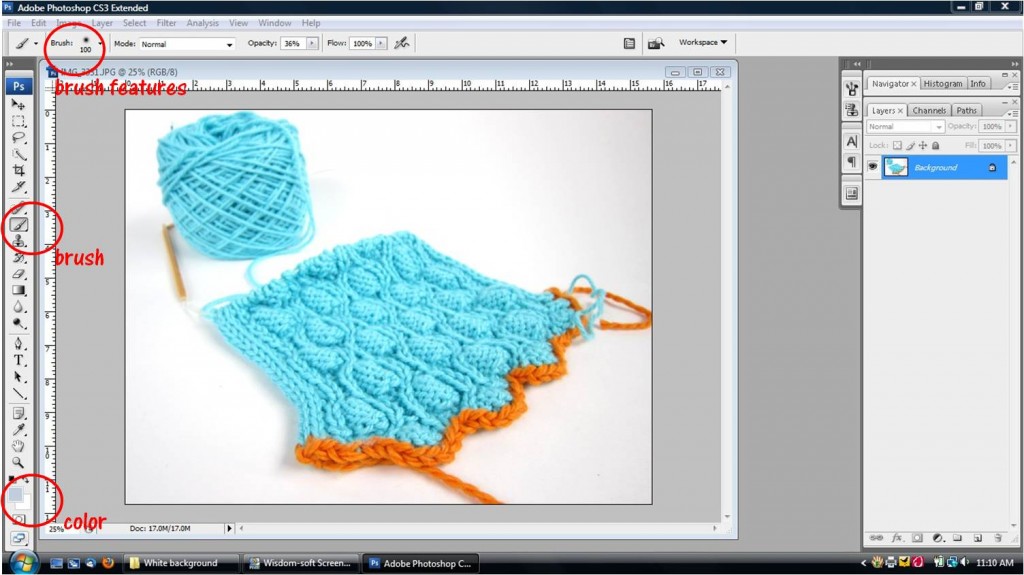
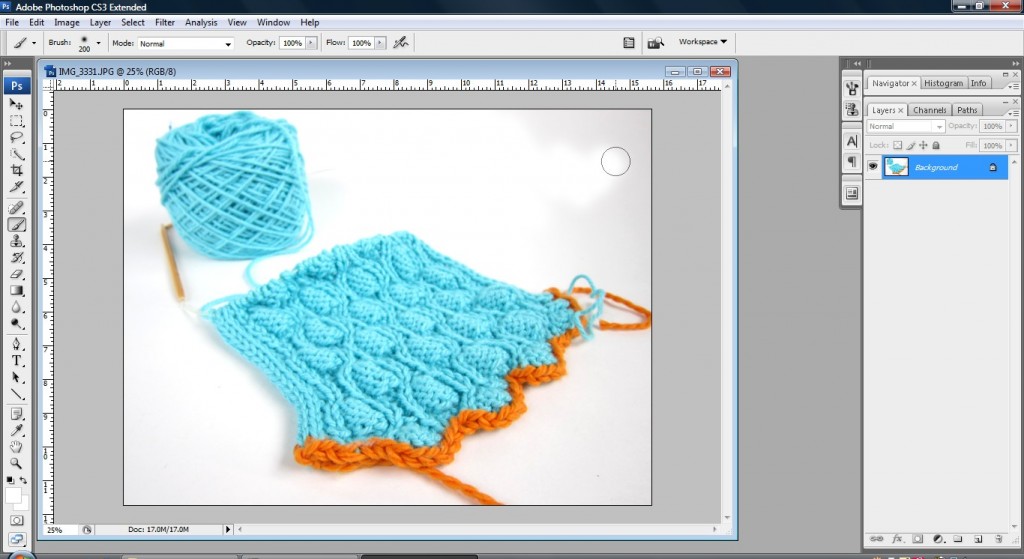
Now, you’ll select the brush (it looks like a paintbrush in the toolbar), set the color to white and pick the features of your brush:

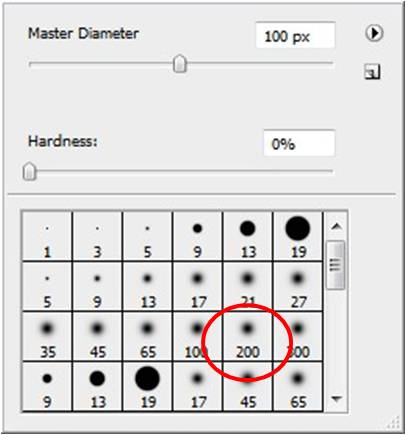
For the ‘brush feature’, I like to pick a brush with a fuzzy edge:

This makes it easier color around the edges of your item and make it look natural.

So… go ahead and paint everything in the background to look white!

Some tips:

  • Pay particular attention to the corners: these tend to be the darkest parts of the photo
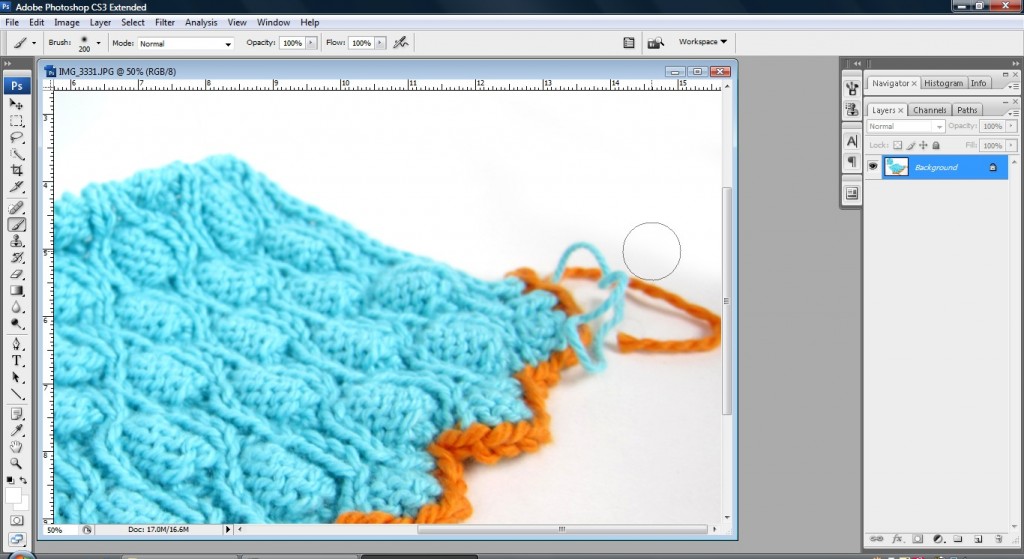
  • Be cautious when it comes to shadow: you may want to leave the existing shadow in place. It can be difficult to remove and still have the item look natural.
  • If you’re having to do a lot of painting, this might be a clue that the exposure needs to be higher (see step 1).

If you’re painting close to the item, you might want to zoom in and use a smaller brush:

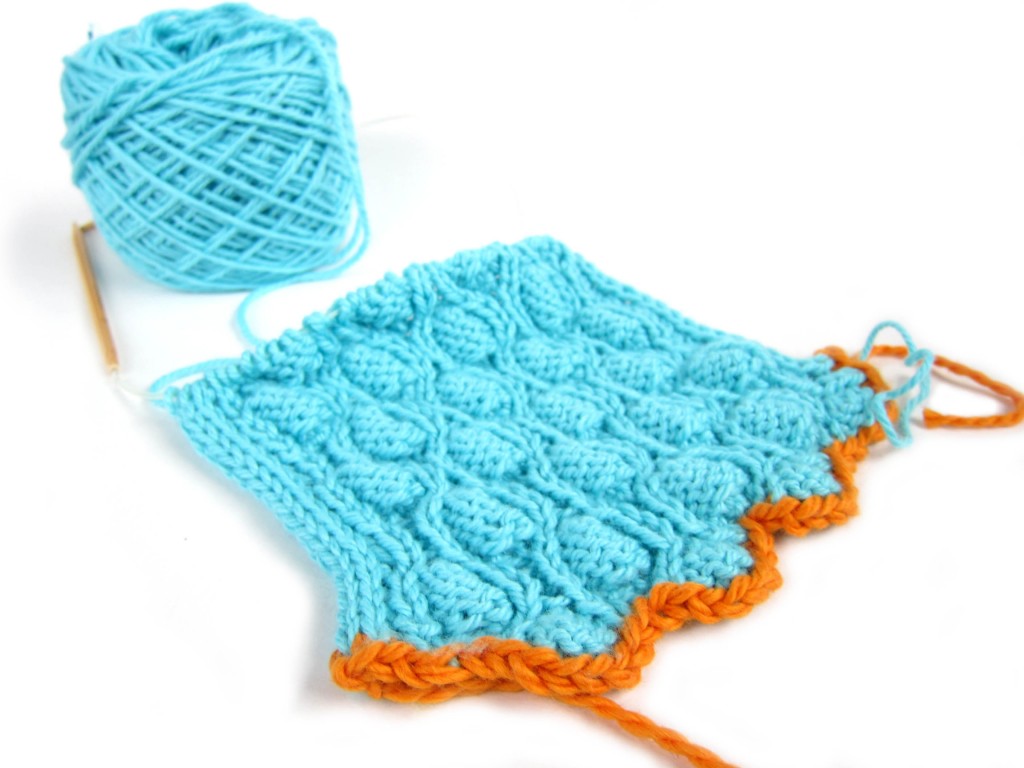
Ta da!

Here’s how mine looks when I’m done!

Yay!

As I said before, the better your photos are to start with, the less editing you’ll need to do. So, it’s worth taking the time to find a location with good lighting and become familiar with the exposure settings on your camera. If you take a fabulous photo, you’ll probably only need to paint the corners white to have a totally white background.

Give it a try!

I hope you give this tutorial a try! I’m sure that with a little practice, you’ll be able to take great photos with seamless white backgrounds.

And be sure to visit the other posts in the blog hop this week… such great photo tips!

Where does silk come from?

From a silkworm, of course! Well, we call them silkworms, but they’re actually caterpillars…

About Silk

Let’s step back a little bit. Have you met my friend, silk?

Silk is an astonishing fiber that has many dazzling features. Silk:

  • Is super-smooth and shiny. This is because it’s a protein that is extruded by the silk worm (just like a spider makes a web), meaning the outside is perfectly smooth and reflective.
  • Keeps you warm when it’s cold, and cool when it’s warm! This is because silk is both absorbent (taking up sweat when it’s hot) and has low conductivity (which keeps warm air close when it’s cool).
  • Soaks up dye fabulously. It’s the same absorbent quality already mentioned that makes silk like a sponge… meaning you can end up with incredibly rich shades of color.
  • Is very strong. The protein structure of silk gives the fiber one of the highest tensile strengths (i.e. it takes a lot of pulling lengthwise to make it break!) of any natural fiber. It’s even used in surgical sutures!

Amazing, right?

About Mr. Silkworm and his cocoon

As I said earlier, the silkworm is actually a caterpillar. And what do we all know about caterpillars? They build cocoons and then emerge as butterflies (or moths)!

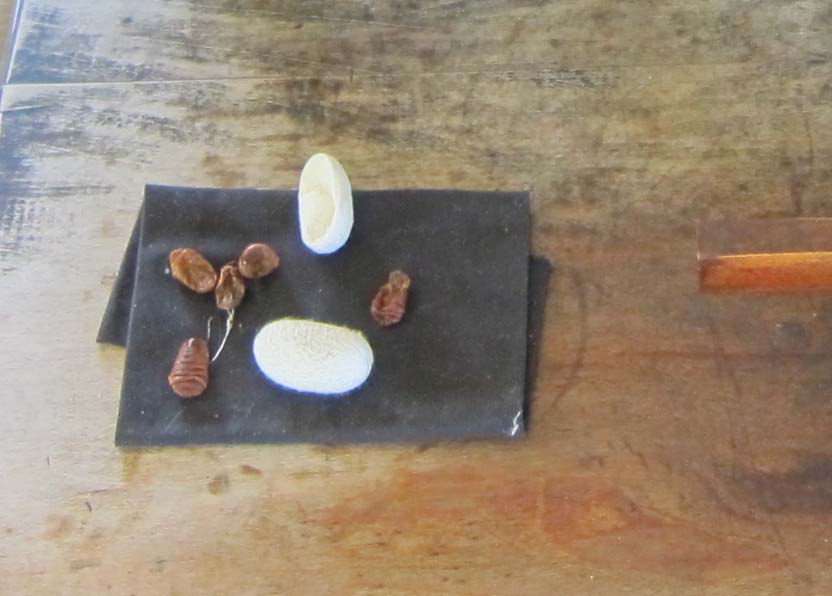
Silkworms make their cocoons by extruding (I don’t know why we call it ‘spinning’… they don’t have a spindle in there!) a long thread that has all of the coveted properties I told you about in the last section. Ever seen a silkworm cocoon? They’re white ovals about 1″ long, like you see here:

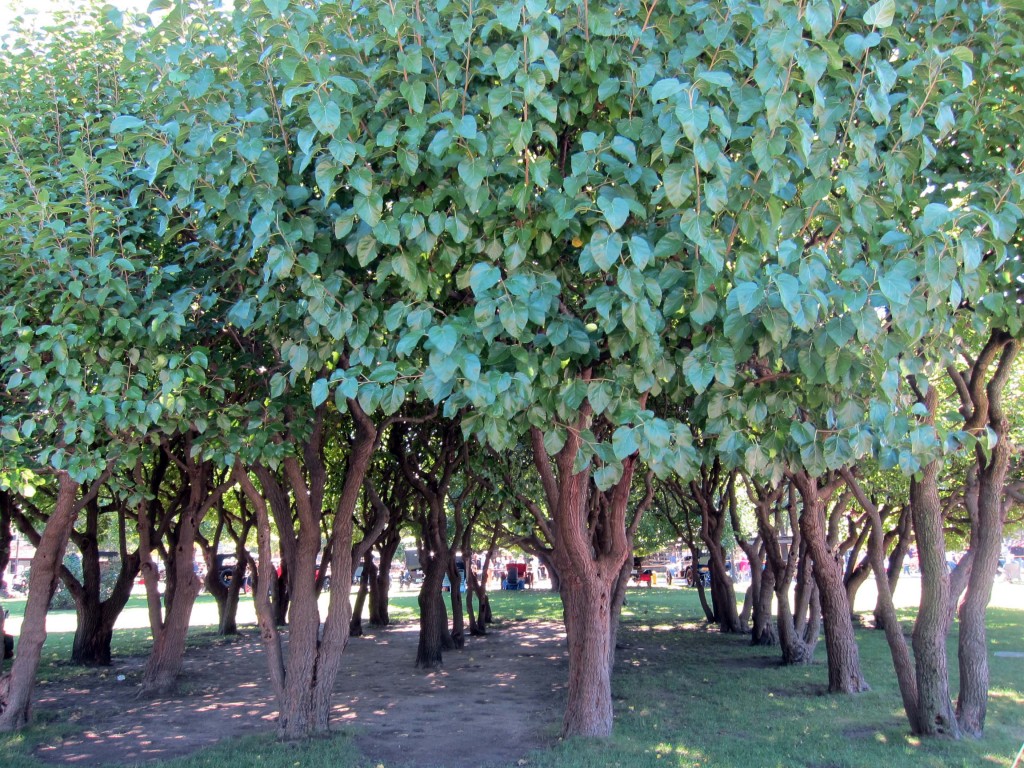
Silkworms only eat leaves from the white mulberry tree.

For a while (i.e. centuries!), the food source was one of the ways that the ancients monopolized the production of silk. Even if a rogue invader smuggled away some silkworms, they wouldn’t have known the secret to keeping them alive: mulberry trees!

The cocoon is made up of one continuous strand of thread. In the wild, the caterpillar would emerge from the cocoon as a moth, making a hole in the cocoon. This hole means that the thread is now in oodles of pieces, and is not ideal for further processing into silk fiber. (It’s possible to use, though. If you’ve heard of ‘peace silk’, it’s referring to silk taken from cocoons where the caterpillar has been allowed to emerge.)

In traditional silk-making, the caterpillar is killed so that the silk can be unraveled in one continuous thread. Back in the day, this meant dropping the cocoon into boiling water. I’m told that nowadays, the cocoons are irradiated, meaning an instant death for the little caterpillar.

How do we get the silk?

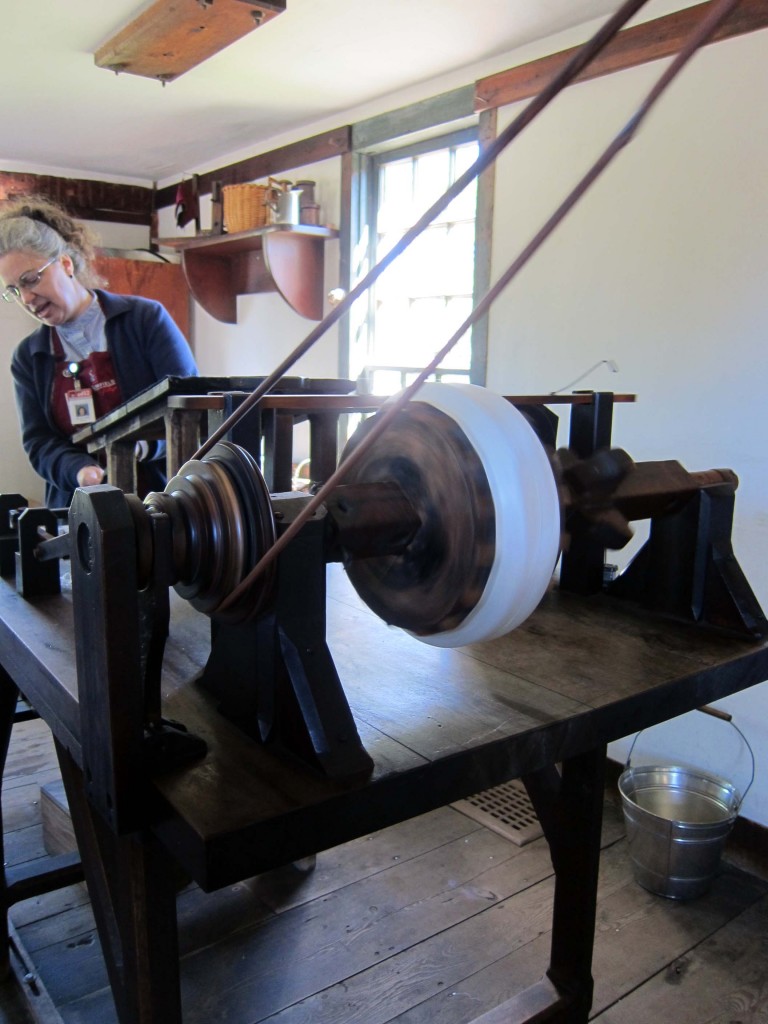
I’ve had the joy of visiting both a silk exhibit at the Imperial Palace in Tokyo (Sericulture, the raising of silkworms and making silk, was a traditional past time for the Empress) and a reconstructed 1812 silk mill in Greenfield Village (where the photos from today’s blog post- including the mulberry trees!- were taken). And despite being thousands of miles (and hundreds of years!) apart, the basic process for getting silk remains the same.

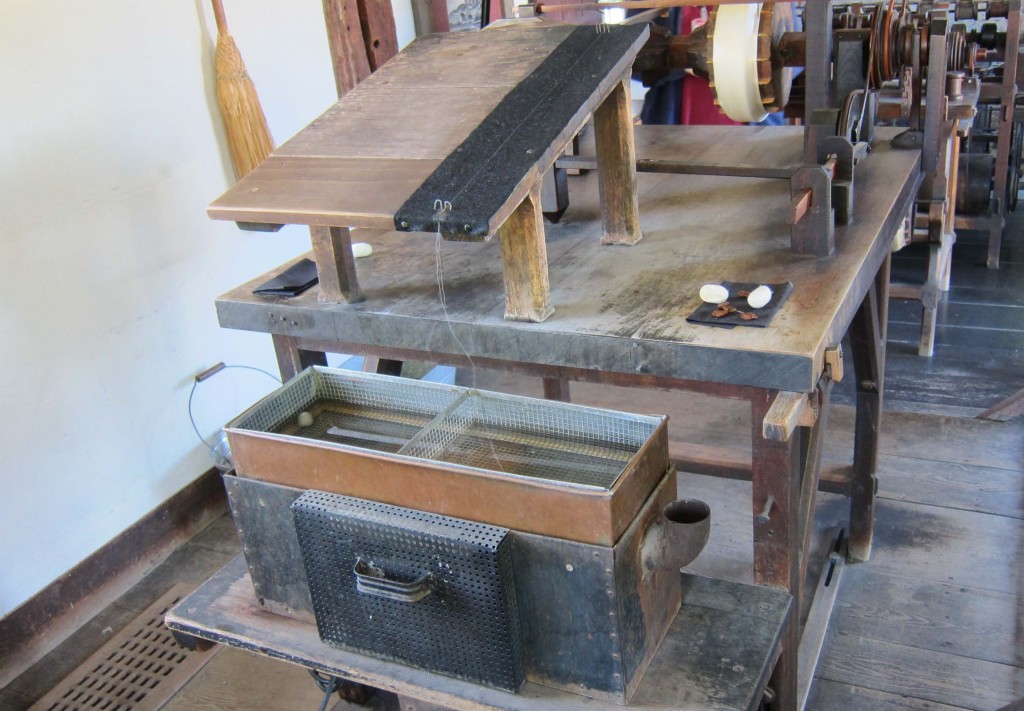
First, the cocoons are boiled in water (and some chemicals) to loosen the gum that holds the cocoon together. Then, the thread is carefully picked off (I have no idea how you find the end on that one!) and spun together with other threads to make a thicker thread of workable size.

Do you see the thin threads coming up out of the hot water?

In this case, the mill was making thread spun from about 4-5 silk threads. It’s a time-consuming process… no wonder silk has always been so precious!

How many worms do you need?

Each cocoon has about 1,000 yards of silk thread, but these are very thin and need to be spun together with others to become workable for weaving. It takes about 300 cocoons to produce enough silk for a tie, 1500 for a blouse and 5000 for a kimono!

Think about that when you see a silk blouse!

Resources

This is by no means a comprehensive guide to silk production! If you’d like to read more (particularly if you’re interested in the animal rights issues involved), have a google around. Here are a few of my faves: