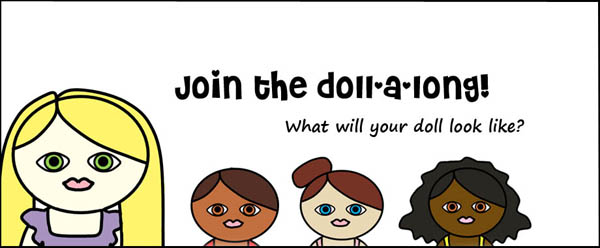
Are you crocheting along with us for the doll-a-long?
If so, hooray! What part are you up to? Today I’m going to show you some tips for aligning and crocheting together your doll’s legs!
Not crocheting along? It’s not too late to join in! Grab a copy of the pattern and start crocheting!
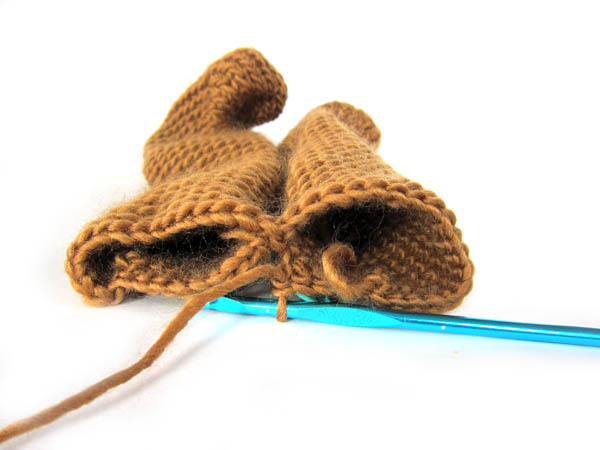
How to align the legs
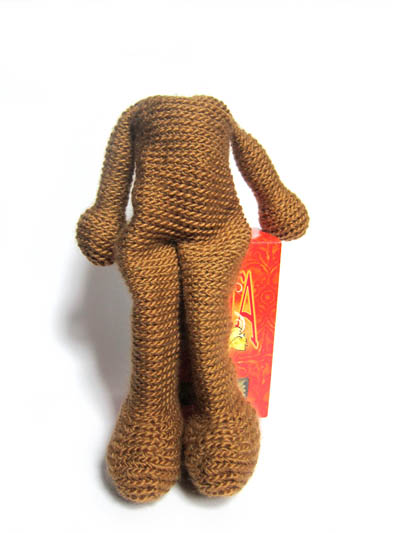
Once you’ve crocheted your legs, you’re going to crochet them together to continue her body. This method of construction is great… since it lets you skip doing any sewing! But it may be new to some of you, so don’t worry if it feels a little confusing.
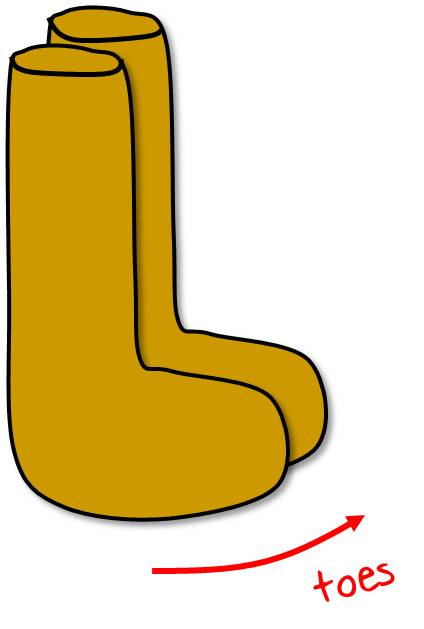
You want your doll’s toes to be straight and facing forward, right?
So, once you’ve crocheted your two legs, hold them together so that the toes face in the same direction:
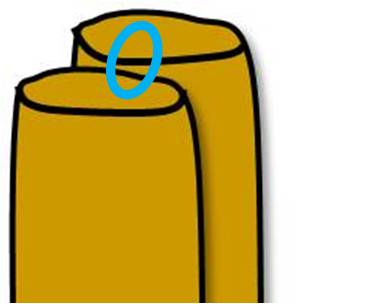
Now, here’s the trick! Use a locking stitch marker to pin the legs together in the position you want them:
How to crochet the legs together
For details on the crocheting, you’ll want to check out this video.
Keep going!
Hooray! In my opinion, you’ve just finished the trickiest part of the whole pattern! (Well, besides picking the clothing colors… that’s a real pickle!)
Today’s guide to yarn stores in DC is written by Jennifer Crowley, the designer/teacher/blogger at www.tinkingturtle.com.
Jennifer Crowley is a knit and crochet designer who teaches up and down the east coast. You can check out her designs on Ravelry. Recent and upcoming publications include Sockupied, Knitpicks and Classic Elite Yarns.
When not knitting or crochet, she can be often seen zipping around DC and the surrounding area on her bike.
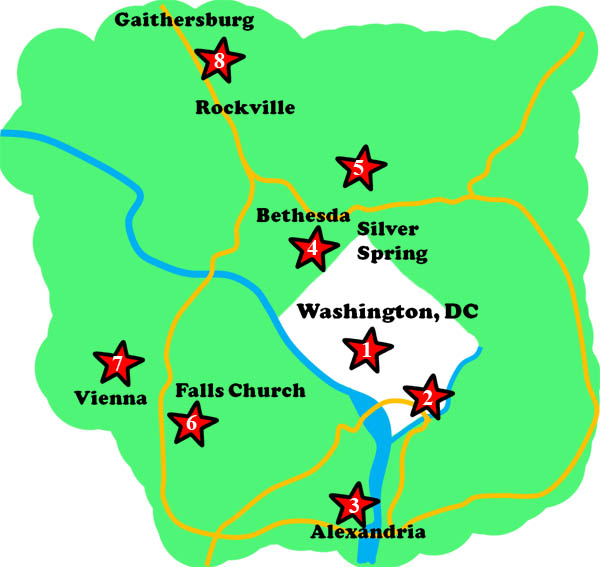
So you are planning a trip to Washington, DC, and you want to visit some yarn stores while you’re there? Well, you are in luck. In addition to being a city full of cultural attractions, there are a number of yarn stores in DC, accessible by a combination of riding the Metro, bus, or walking. If you are fortunate to have a car, the access to yarn stores improves even more. Recent changes have meant that old yarn stores have closed, and new ones are joining the group this year, so it’s a great time to go and check them out.
When I first moved to DC, I didn’t have a car, and was entirely dependent on my bike and public transportation. I have firsthand experience about what stores are the easiest to get to, and in this quick tour I’ll highlight the ones that are accessible by public transportation.
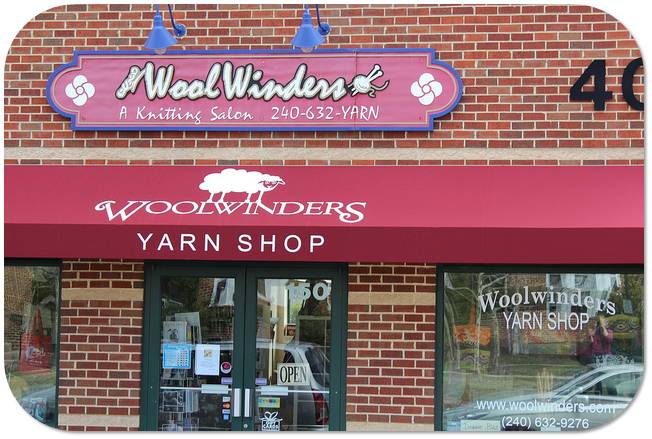
Disclaimer: I teach classes at Woolwinders, Fibre Space, and The Yarn Spot as a contract. I do not believe this influenced my review.
Looped Yarn Works
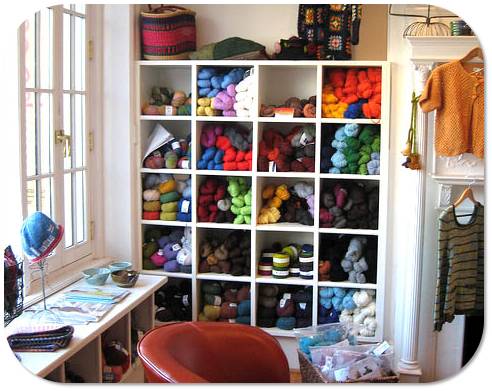
Looped Yarn Works (1) is located on the second story of a beautiful building near Dupont Circle Metro Station, about a 2 ½ block walk away. Looped offers a nice range of different priced yarns. One of the things I love about Looped is the amount of Natural light they have in the store. Susan and Janie, the owners, have put such careful work into making the space welcoming to customers, and are constantly featuring new activities, visiting authors and other events in the store.
How to get there: Looped is located on 1732 Connecticut Ave, NW #200 (remember, they’re on the second floor!) in Washington, DC. The best way to get there is by metro, as there isn’t that much parking in that area of town. Dupont Circle, located on the Red Line, is very close to the store.
The Knitting Loft
The Knitting Loft (2) is one of the newest yarn stores in DC, having opened in the Summer of 2013. As a new store, their selections of yarns are still expanding, but the staff couldn’t have been more welcoming when I stopped by over the summer. The great thing about this store, is they are wheelchair accessible and on the ground level. Located near the Eastern Market, the store is the perfect stop on a day of window shopping.
How to get there: The Knitting Loft’s address is 1227 Pennsylvania Ave Southeast, and is near both the Blue/Orange Line Metro. You can get to it from both the Eastern Market or Potomac Ave stops – both are about a 3 block walk away, though Potomac Ave is marginally closer. Parking, if you choose to drive, is a little bit easier to come by, but I think it’s still easier to metro in.
Fibre Space
Fibre Space (3) is the hip yarn store of Old Town Alexandria. They specialize in hand painted and hand dyed yarns, but have a good range of workhorse yarns too. Fibre Space offers a vibrant array of classes and great space to sit and knit. I always love checking out the window displays when I come to visit – they always have something creative put up! This last time I visited their window had a mannequin with a packed box of yarn – referring to the fact that in a few short weeks they’ll be moving around the corner to a new location that offers more space and versatility. It’ll be exciting to see how the store continues to expand!
How to get there: While technically in Virginia, Fibre Space is very accessible to DC and so it’s easy for tourists to visit. Fibre Space’s address is 102 North Fayette Street (for now) and is about 6 blocks from the King Street Metro. It’s a little bit of a walk, but under a mile, and it’s a pleasant walk at that, with lots of stores to widow shop. If you choose to drive, it’s easy to get off 495 and go straight up Route 1 (N Patrick St). You should consider parking along King, Prince, Duke or Queen Street, or any of the cross streets. Then walk to the store. Most parking is one or two hours – so be careful how much time you spend in any one place. If you are planning to make an afternoon out of looking around Old Town Alexandria, take the Metro and save yourself the worry.
The Yarn Spot
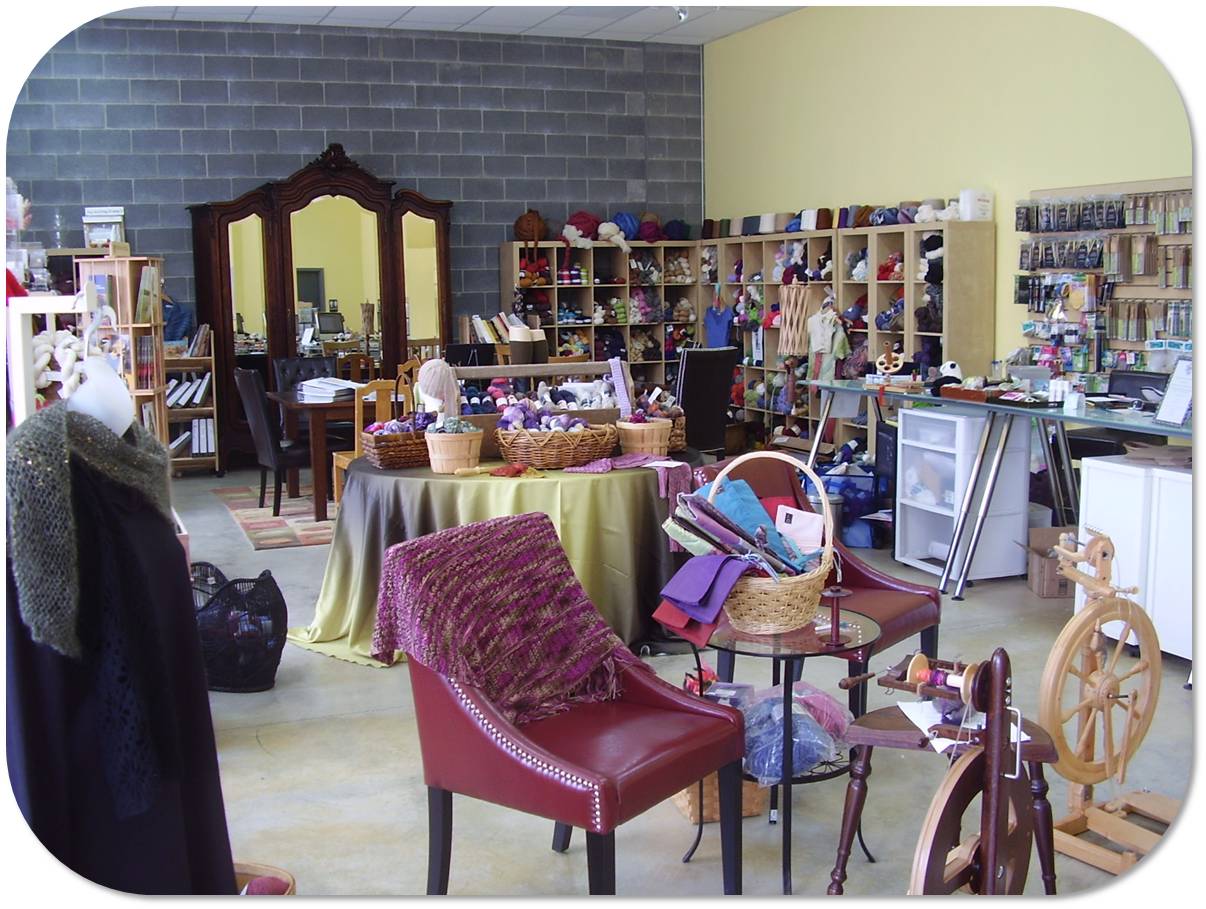
The Yarn Spot (5) is my personal “local yarn store” and until I moved this past year, I could easily walk to it in about five minutes. The Yarn Spot features two great places to sit and knit (a circle of couches and chairs and a table) and a friendly welcoming atmosphere. Yarn is arranged according to weight, with a middle section that rotates out different yarns that are being featured. They also have spinning supplies and fiber. With a knowledgeable staff – this is the perfect store to go to if you have a “knitting emergency” and need some help. They feature a wide range of yarns, from hand dyed yarns to workhouse yarns like Spud and Cloe Sweater and Encore.
How to get there: The Yarn Spot’s address is 11406a Georgia Ave, Wheaton, MD. Unfortunately, they are a bit hidden from the road, but if you look for “The Anchor Inn” sign, they are in the shopping center located behind the sign. The store has parking if you choose to drive, or it’s about a 1/2 mile walk from the Wheaton Metro to the store.
Woolwinders
Woolwinders (8) is one of my favorite yarn stores in DC for classes. They have very knowledgeable teachers and staff, and every time I go there I learn something new. They have a good selection of mid-range yarns, and highlight some really interesting higher range yarns. The last time I was there I appreciated their selection of Rowan Pattern books. I love how two of the walls of the store are windows, and how much natural light comes into the space. It really makes it easier to choose colors for my projects.
How to get there: Woolwinders is a brisk walk from Shady Grove Metro Station – just under a mile. Located at 404 King Farm Blvd in Rockville, MD, this is also a good store to drive to, with plenty of parking street-side or behind the store.
Knit & Stitch = Bliss
Knit & Stitch = Bliss (4) is one of my favorite stores to go to if I’m looking for patterns or books. They have a really good selection, and a nice area to sit down and flip through all the books and patterns as you are deciding what to work on. Yarn selection runs from midrange to some nice high priced yarns, and they have a great selection of needles and notions. Located near the heart of Bethesda, there’s great shopping and restaurants nearby if you wish to make a short trip of going to the store and picking up dinner or lunch.
How to get there: Knit & Stitch = Bliss is located at 4706 Bethesda Ave, Bethesda MD. If taking the metro, walk West down Rockville Pike until you turn right on Bethesda Ave. If driving, there’s plenty of street parking available, and a few different parking lots if you don’t relish parallel parking.
Aylin’s Wool Gatherer
Aylin’s Wool Gatherer and its compatriot, Uniquties, are both a bit harder to get to by public transportation, but still worth the visit.
Aylin’s Wool Gatherer (6) has the honor of being one of the longest running yarn stores in DC metro area, running upwards of 35 years. Specializing in offering a wide selection of mid-range yarns, including some nylon blends I haven’t noticed elsewhere, this store is a solid addition to the Metro DC Yarn stores. When shopping, prices are listed on sheets throughout the store.
How to get there: Aylin’s is a bit hidden from the street, being located on the third floor of a building (however, there’s an elevator!). Their address is 7245 Arlington Blvd, Falls Church, VA. However, when walking or driving to the store look for the Starbucks in Loehmann’s Plaza, and go around the corner. You’ll see a side entrance to the building; take the elevator to the third floor. The store is down the hall. If you have difficulty, call the store at 703-573-1900 – they are old hands at giving directions. As to transportation, this is one store where driving is definitely easier, though it is possible to take public transportation. If you ride the Metro to the Dunn Loring-Merrifield Station, you can then walk to the Temp Bay D (follow the signs). From there, you can catch the 1B bus towards Ballston Station. Get off at Arlington BV & Graham Rd, and walk towards Loehmann’s Plaza.
Uniquities
Uniquities (7) offers not only yarn to knitters and crocheters, but is one of my favorite stores to check out for their spinning supplies. One of the other things I love about the store is their separate class space, which makes taking classes very pleasant. I also love their yarn choices, with a stunning collection of sock and laceweight yarns, and a wide range of worsted and aran weights too. They carry some of my favorite yarn lines, like Mountain Colors, Blue Sky Alpacas and Manos Del Uruguay.
How to get there: Uniquties is also a store that is easier to drive to. They’re located at 421 Church Street Northeast, Vienna, VA. Driving, there’s a spacious parking lot to park at. If you are looking to take public transportation, take the Metro to the Dunn Loring-Merrifield Station, then walk to Bus Bay B. Take the 2T towards Tysons Corner and get off at R 123 Maple Ave & Beulah Rd. The store is a block away.
Want more stores?
While the eight yarn stores I’ve highlighted here are the easiest to get to via public transportation, there are a few others that deserve honorable mention.
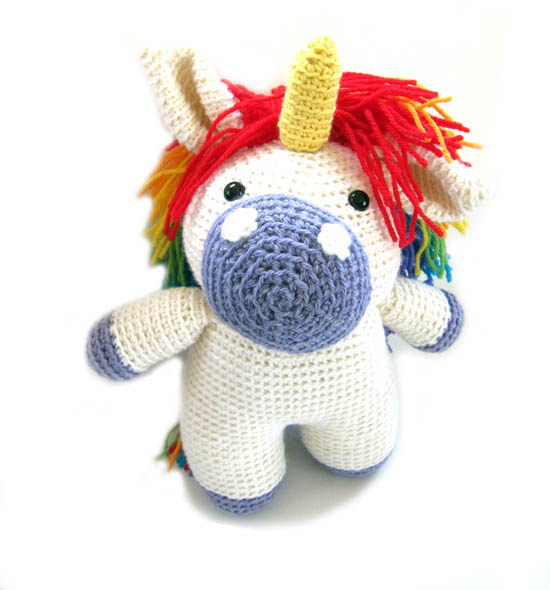
When I published Flavia the Unicorn, I thought I was being quite clever in suggesting you could use the same pattern to make both a unicorn and a horse!
And then you guys got your creative juices flowing…
But my ideas are nothing compared to what happened when you guys got your hands on the pattern!
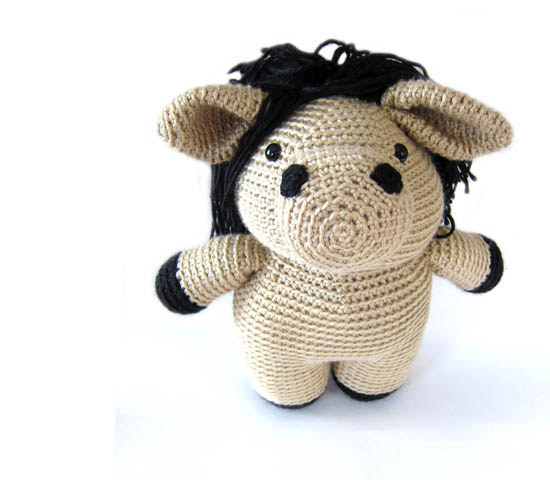
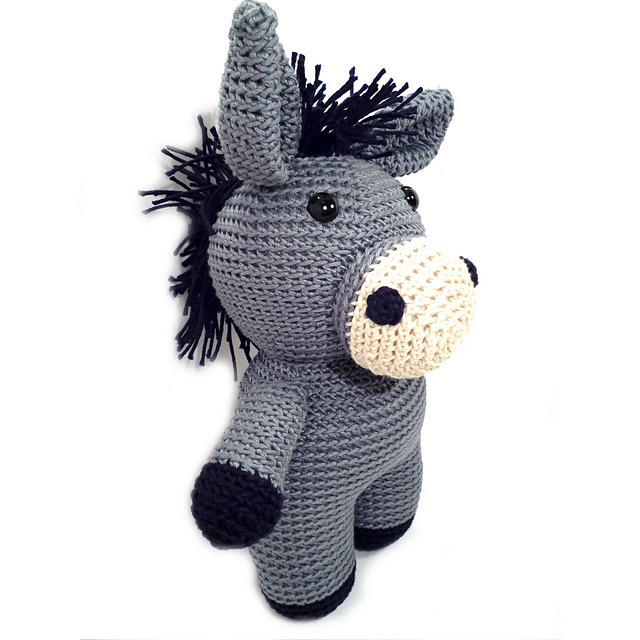
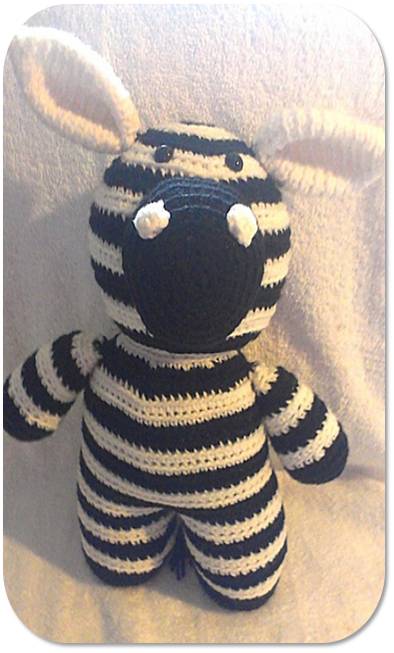
Horses and unicorns are child’s play! You started making donkeys and zebras!
Chloe made an adorable donkey:
And Nikki used the same pattern to crochet a zebra:
So creative!
I’ll bet that if you crochet this guy in pink, and leave off the hair, you’ll have pig!
What else can you think of doing with this pattern?
It can be hard to find a nice skin-tone yarn. So, I’ve compiled a few suggestions for you!
Keep in mind that it’s going to be hard to find a yarn that’s exactly like a skin tone… remember you’re crocheting a toy, not painting an exact likeness! Keep your mind open, and you’ll find a yarn that’s at least close!
Doll Day is tomorrow!
Don’t forget, tomorrow is the release day for my new, super-exciting doll patterns! I think you’ll love them!
And… now I know you’ll be able to pick the perfect color for your doll!
Want to learn how to make adorable crocheted stuffed animals with an easy online workshop – totally free?
Sign up for Let’s Make Amigurumi here. You’ll learn how to get started, the tools and supplies you’ll need, and how to make an easy amigurumi from start to finish using simple crochet stitches.
It’s a fun, inexpensive, and totally portable craft. You can do it!
I honest-to-goodness think the easiest way to learn to crochet is to make an animal. But of course, I design crochet animal patterns, so maybe you don’t want to take my word for it!
I reached out to my readers and asked for folks whose first crochet project was a stuffed animal! Responses came pouring in!
Why are animals easy?
There are a few reasons:
They’re small (compared to an afghan), so changes in tension as you learn to crochet aren’t a big deal
They’re mostly single crochet… easy!
They’re crocheted in the round, so they avoid those oh-so-tricky turning stitches
But, not everyone takes my advice! Melanie L. dove straight into Nelson the owl!
She says: “I had no idea how to crochet and just grabbed a hook from my mum – I didn’t even know there were different sized hooks! So, using your pattern, the kit materials, and your videos, I got started on Nelson (of course I chose a more difficult one – with a colour change!). I watched some of the videos about 10 times each, I swear! But eventually I got through it, and Nelson the First was born. He’s affectionately known as a ‘special needs’ Owl due to the resulting product, but he has pride of place on my shelf. “
When there’s a will, there’s a way!
Chloe confirms that the first project isn’t always the cutest: “In just a few words, last April, I wanted to do something crafty and I came across the Crocheted Softies on the Book Depository. It was love at first sight with those cuties on the front page! I knew I wanted to make them myself, it just happened to be crochet! My very very first project was the owl from that book. It was really chaotic at first. I didn’t know how to begin, I had to look up every stitch (and more than once), I wasn’t sure which were the back loops, I didn’t use stitch markers and kept losing count, I did a very clumsy work in attaching parts etc. It took me several days, but after that I was really hooked! I haven’t stopped crocheting since then!“
So, don’t get discouraged if your first one seems a bit crooked… it’s your first one! We’ve all been there, and your skills will improve as you practice. Both Melanie and Chloe started crocheting about a year ago, and they’re putting out fabulous pieces, now!
Don’t give up!
It’s unanimous. The first project is the hardest!
And not only that – the first two rounds are the hardest. Once you finish round two you’re cruising. So don’t give up!
What’s important is to not be too hard on yourself, and find what works for you.
Melanie M. says that “By far the most difficult part for me was learning how to hold the yarn in order to achieve the right tension. I watched a lot of videos of people crocheting and tried out each of their methods for wrapping the yarn around their fingers until I found one that was comfortable for me.”
Nikki agrees, “Don’t give up! Like any craft, learning something knew takes time. You’re not going to pick up the hook and yarn and know exactly what to do… start small and work your way up. I highly recommend Howie. (Click here for the free Howie the Penguin pattern.) It gives you all the necessary tools to begin crocheting. The best part about crocheting is there is always room to learn more; you will never be done learning.”
Are you ready to start?
Okay, I’ll warn you… it might be addicting!
Melanie L. says, “I am definitely a convert! Crocheting plays a few roles in my life now – it’s a form of relaxation, enjoyment, and productivity. I love being able to hand-make a unique gift for my nieces or my friends’ kids, or even my adult friends and family! I can’t pass a yarn store now without buying a few balls of wool and I’m always trawling the internet for pattern ideas. I’ve even started to design a few things of my own. It’s a great hobby!”
Are you going to join us in loving crochet? If you do, be sure to stop by the Shiny Happy People group and say ‘hi’! We love newbies!
Best, Stacey
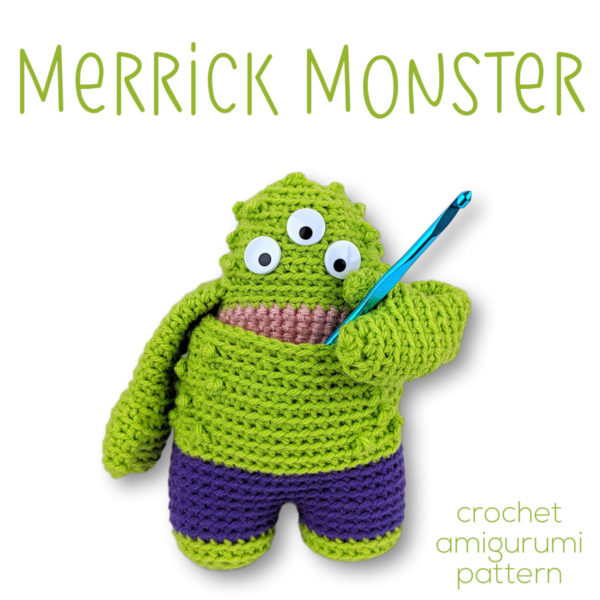
Try our newest crochet pattern! Get the Merrick Monster pattern here.
Especially after last week’s Wingspan debacle, there have been a lot of questions about originality and copyright. How can you tell if your new design is ‘different enough’ from someone else’s?
This is a really tricky question, and frankly, I’m not going to talk about the legal side at all, because I’m not qualified to do so. But, today I’m going to talk about some questions to ask yourself when you’re wondering if your new design is original and suited to publish.
I originally began knitting Mrs. Tumnus by Eskimimi, but the lace pattern on the edging was too thought-intensive for my current knitting brain, so I decided to simplify the pattern.
In the end, I used the short-row shaping from Mrs. Tumnus, but enlarged the entire shawl and added a garter stitch border (with its own short-row shaping).
Would I consider publishing this shawl as a new pattern? No. Because I clearly used the Mrs. Tumnus shawl as an inspiration and made modifications.
But now, let’s look at the interesting case. What if I had designed the shawl completely from scratch… would seeing Mrs. Tumnus prevent me from publishing my new pattern? Probably not.
Mrs. Tumnus isn’t the first shawl to use short rows, and if I had come up with the ‘Stacey Shawl’ completely on my own, I wouldn’t look at Mrs. Tumnus and say, ‘geesh, that’s mine in a different size with a different edging’. I would probably publish the pattern, and it would be a case of two designers having similar ideas.
Do you see the difference? If you just ‘tweak’ an existing design, that’s not as original as coming up with the concept yourself.
Is the design your own style?
Creating an original design is tricky because we’re all using the same components. I didn’t invent crocheting in the round, increasing or crocheting through the back loop. But I use these components to create my own style of patterns.
You want to make sure that a design you publish is in your own style, as well.
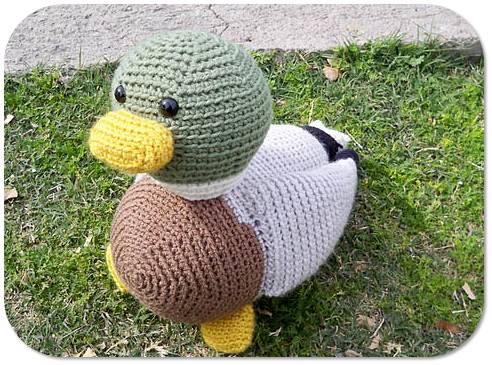
It’s crocheted through the back loop, in the round… but whoa! It doesn’t look like a FreshStitches pattern… this little duck has some fabulous shaping and color changes that represent Hollie’s own style. That’s fabulous!
What if you took my cow pattern and changed the ears so it looked like a pig? You see… that would look like another FreshStitches pattern, and isn’t really developing a different style.
A note about working from ‘inspiration photos’
It’s very tempting to look around online for cute photos… and with a little bit of skill, it’s possible to ‘reverse engineer’ a cute design: that is, crochet it without a pattern.
Is this your own design? Not really. If you’re crocheting an item that was designed by someone else (whether or not it’s an existing pattern), then you also aren’t creating your own design.
Follow your gut…
In the end, it’s up to you. While there are copyright laws in place, in practice, there isn’t much of a ‘copyright police’ going around that are going to investigate your pattern.
It’s up to you to only publish patterns that are original and uniquely your own.
This blog post isn’t an ‘answer’ to how to decide that for yourself, but I hope I’ve at least given you a starting point of some questions to ask yourself!
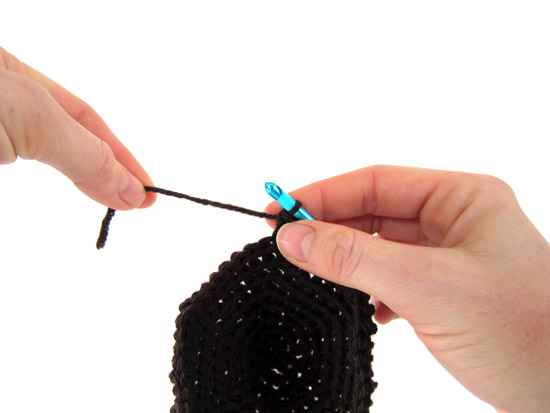
But maybe you don’t want to join your scraps in advance! What if you want to start crocheting right away, and join your yarns as you go? No problem! Today, I’ll show you how!
I’ll show you a technique for joining yarns as you crochet with no knots. First, I’ll show you in photos… then I have a video for you!
How to crochet yarns together
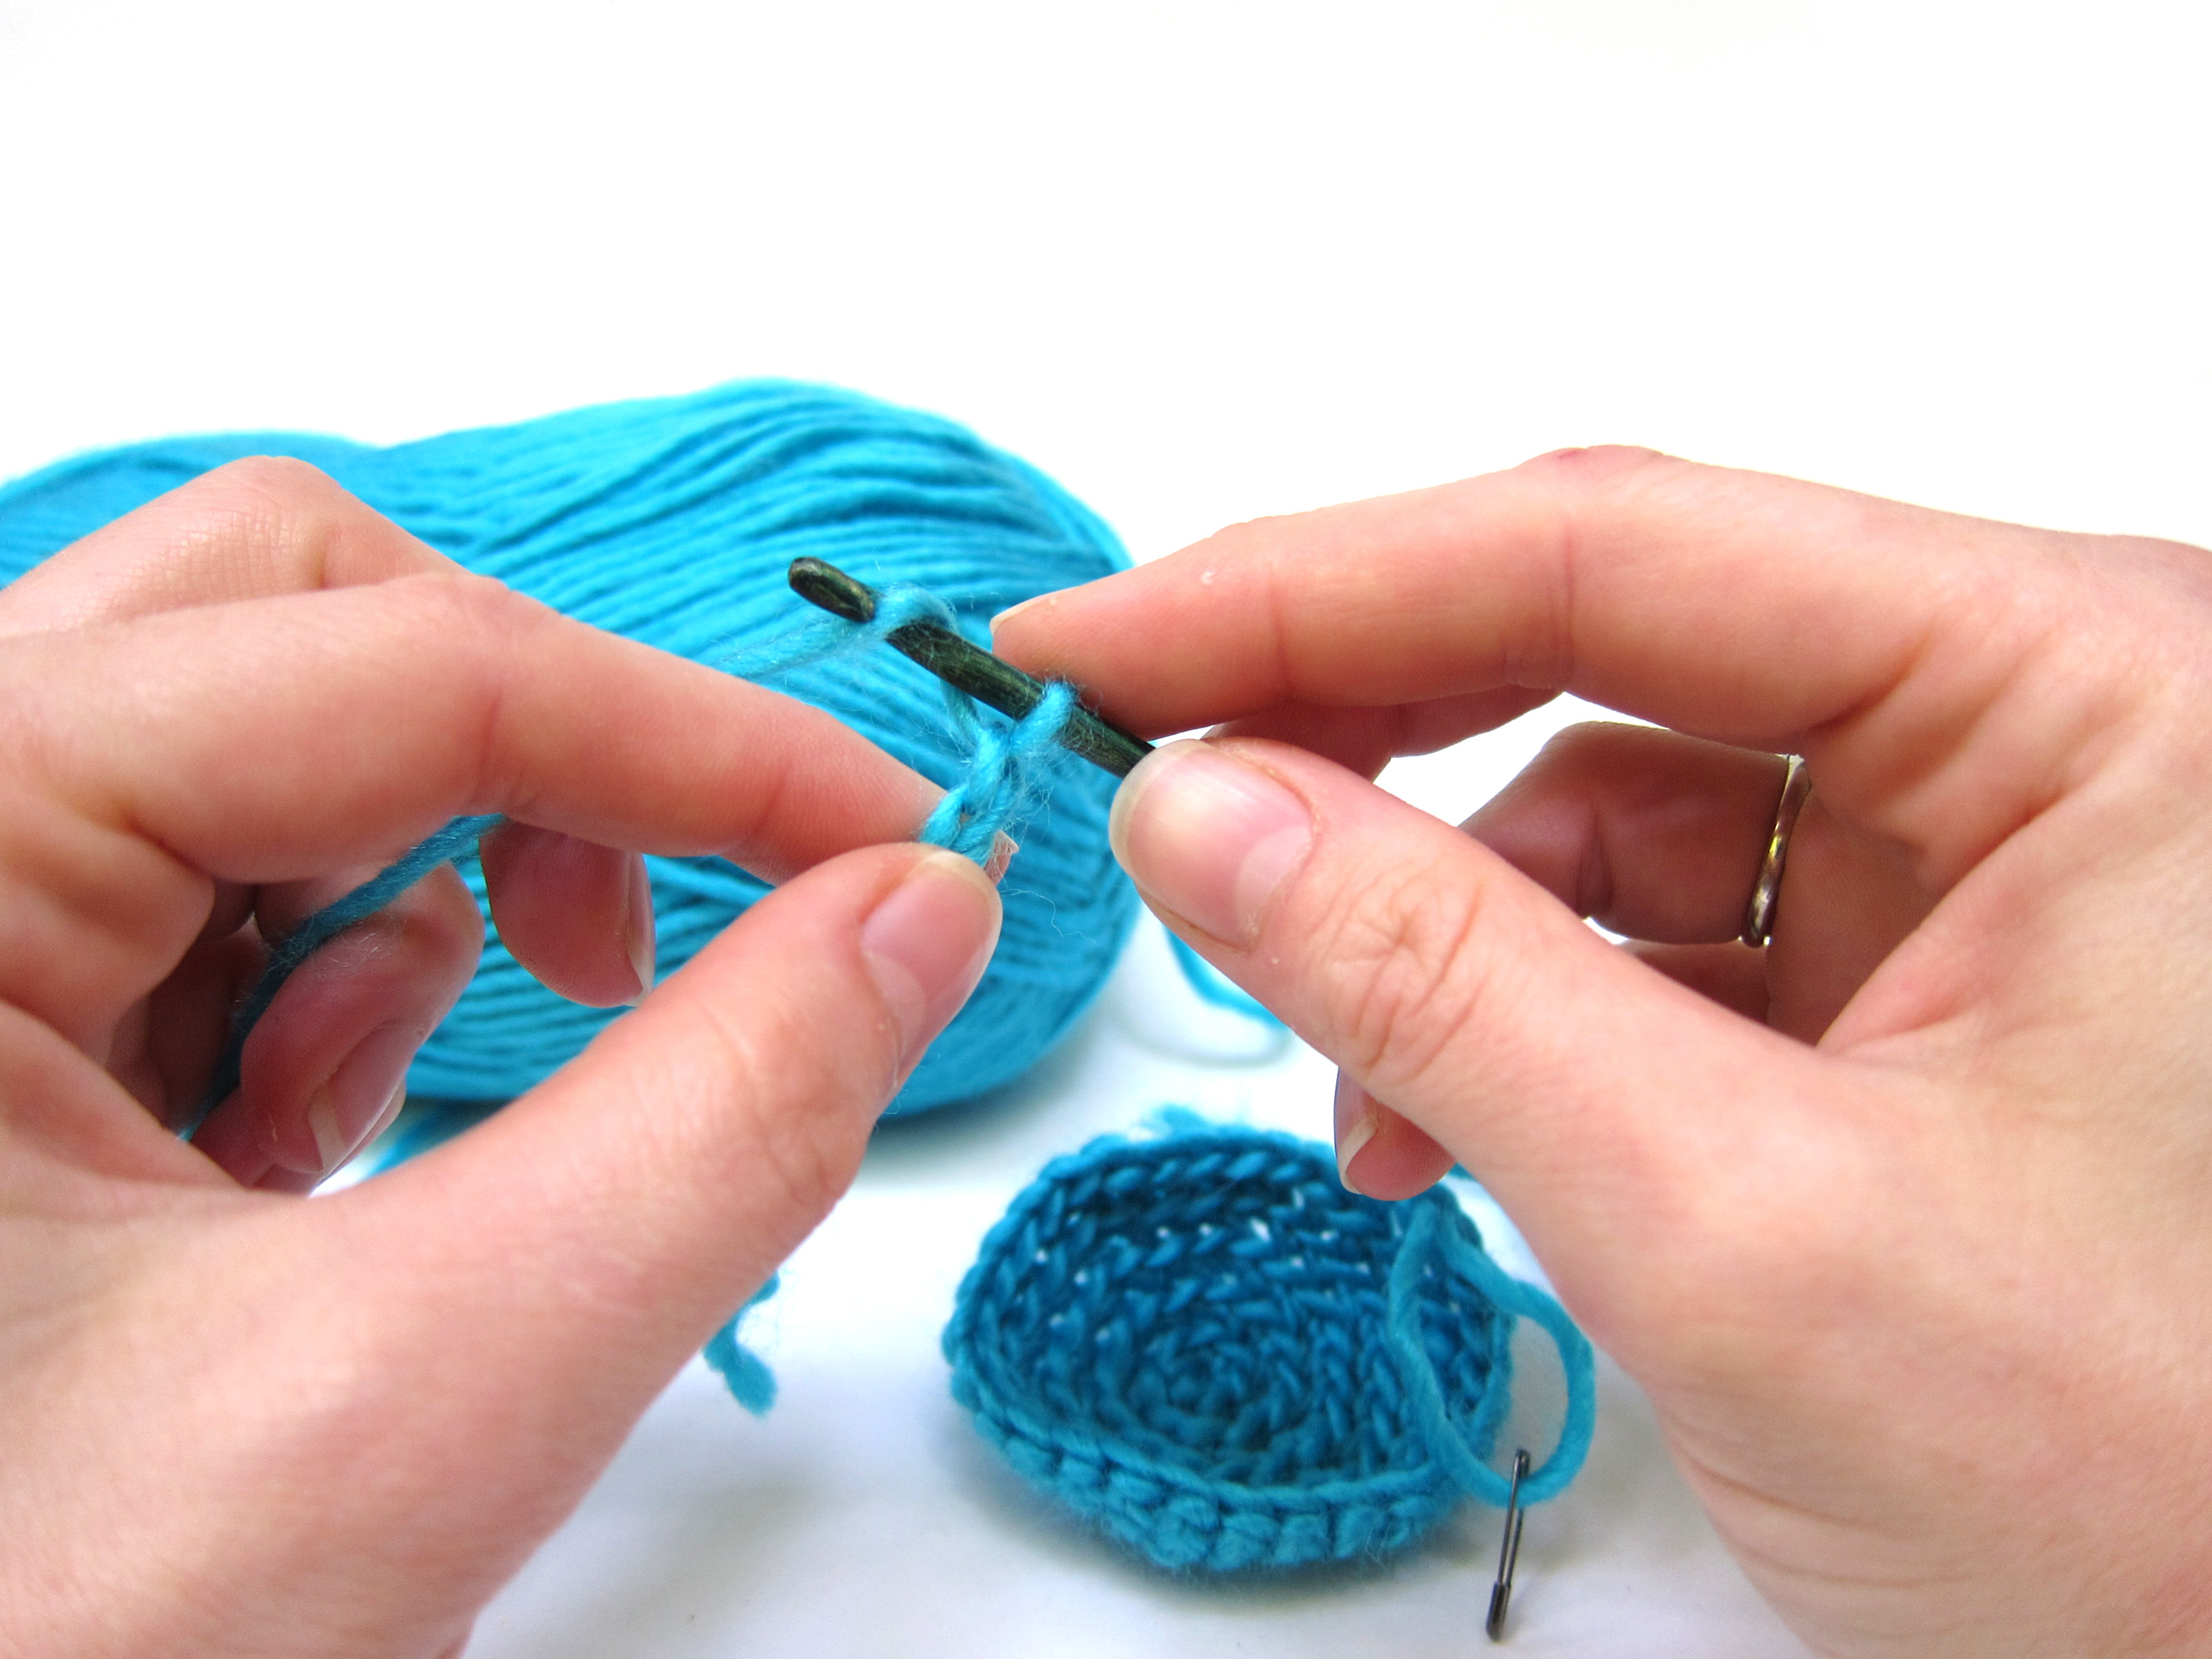
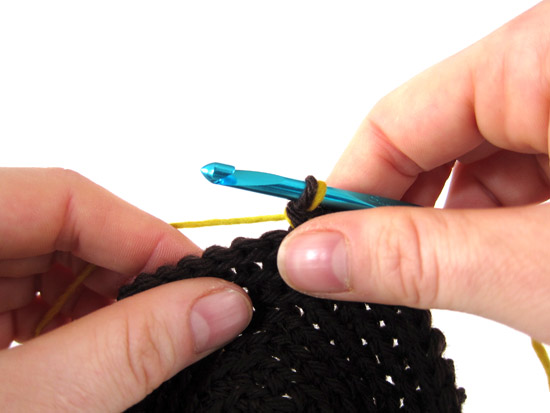
First, crochet until you have about 3″ remaining in your current yarn (shown here in brown):
Then, hold up your new yarn (shown in yellow) so that the new yarn extends beyond the tail of your current yarn:
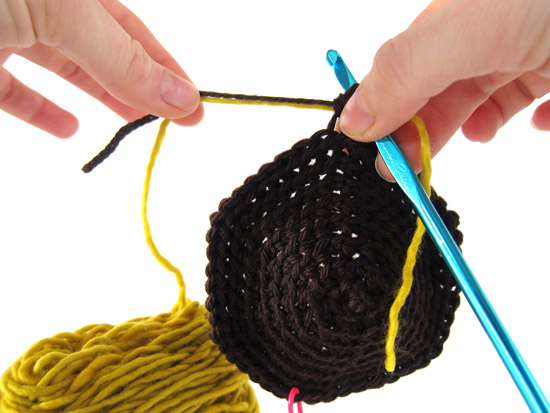
Holding the two yarns together, crochet a stitch:
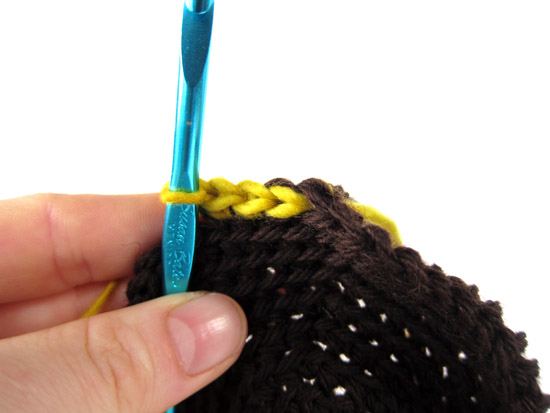
Now, drop the old (brown) tail of yarn…
… and continue to crochet with your new yarn!
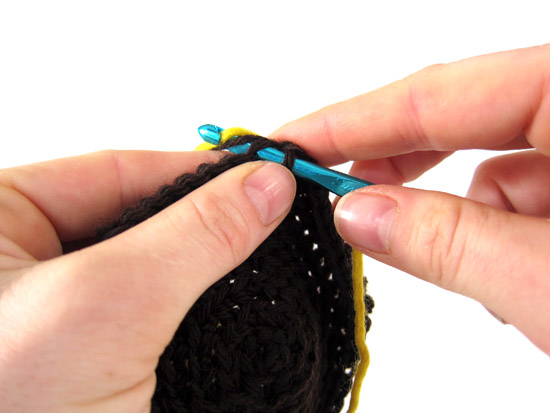
Ta da!
The yarns are secure… you don’t need to do anything else. Just let the tails hang on the inside of your piece!
And for the video…
Just in case you want to see it in action:
To view larger, click ‘play’, then the rectangle in the lower right-hand corner.
So handy!
In this post, I’ve used this technique to change colors of yarn, but it’s also a great way to change yarns… even if you’re just finishing one skein and starting another (of the same color).
I also use this technique while crocheting with two strands together. Just add one new yarn when one is about to end… easy!
And I do this when knitting, too!
One possible drawback to this technique is that you do get one stitch using both yarn colors. If your design calls for a “clean” color change – where you don’t have that blending of colors in one stitch – then take a look at this post on changing colors with single crochet. It’s also easy!
Here are handy links to all the posts about yarn. . .
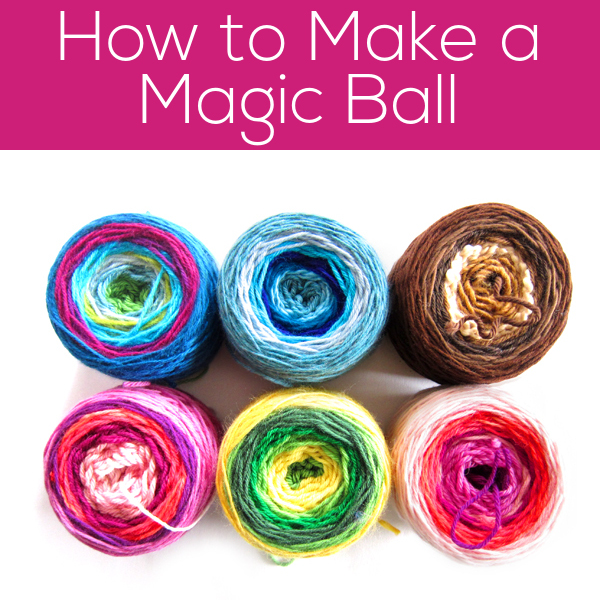
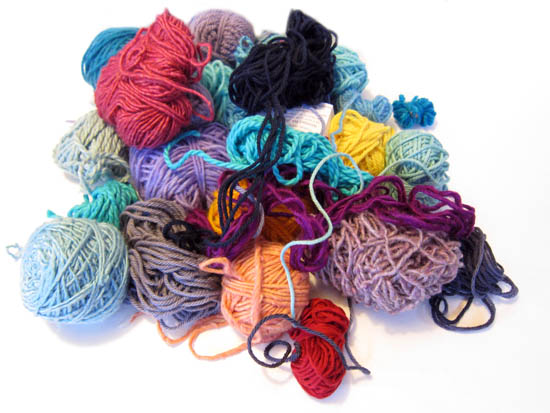
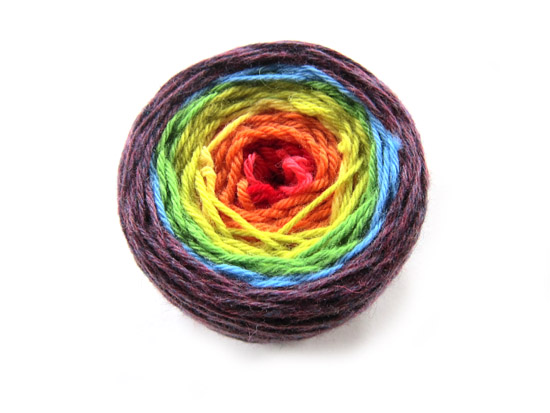
It’s a ball of yarn that changes colors and textures as you work. It’s something offered by a number of artisan yarn makers… but it’s also something you can make yourself with your leftover yarn!
Besides ending up with an awesomely fun end-product… you’ll finally get to use up all of those weird leftover pieces of yarn that are too small (you thought!) to do anything with! How great is that?
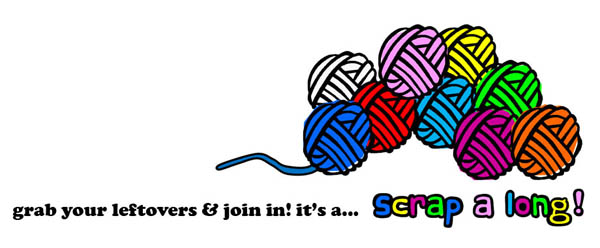
Perfect for the scrap-a-long!
Magic Balls are fun to make… but they’re even more fun if you have a project in mind!
You’ll need two things. One, gather all of the leftover yarn bits that are lurking in your stash. You know what I mean. They’re too small for their own projects, but too big to toss out. You keep thinking you’ll do something with them…
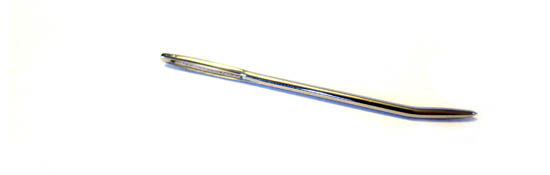
And a tapestry needle.
(mine is a bent-tip needle, but that’s by no means necessary for this. All you need is a needle that’s big enough to fit your yarn through the eye.)
Okay, now we’re ready to start!
We’re going to make our magic ball by joining all of these leftover yarns together using a technique called the ‘Russian Join’. The Russian join allows you to fasten yarns together without a knot, and it has the advantage of working with any type of yarn (unlike the ‘spit splice’, which relies on 100% wool yarn.)
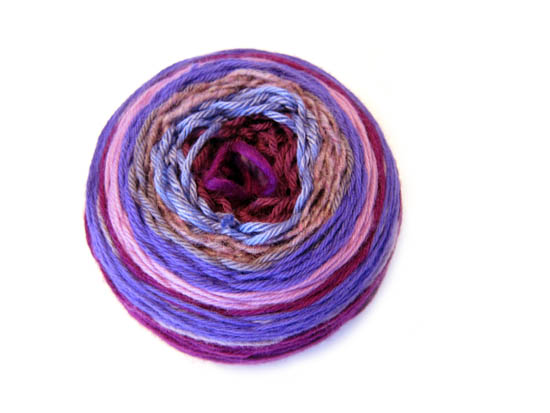
In terms of grouping your yarns together, you’ll want to group yarns in a way that is pleasing to you. Some folks prefer the random approach, but I like creating a color theme (check out How to organize your scraps for help!). For my magic ball, I’m attaching only various shades of purple. I also recommend using yarns of the same weight. My magic ball is composed entirely of worsted weight yarns.
How to do the Russian Join
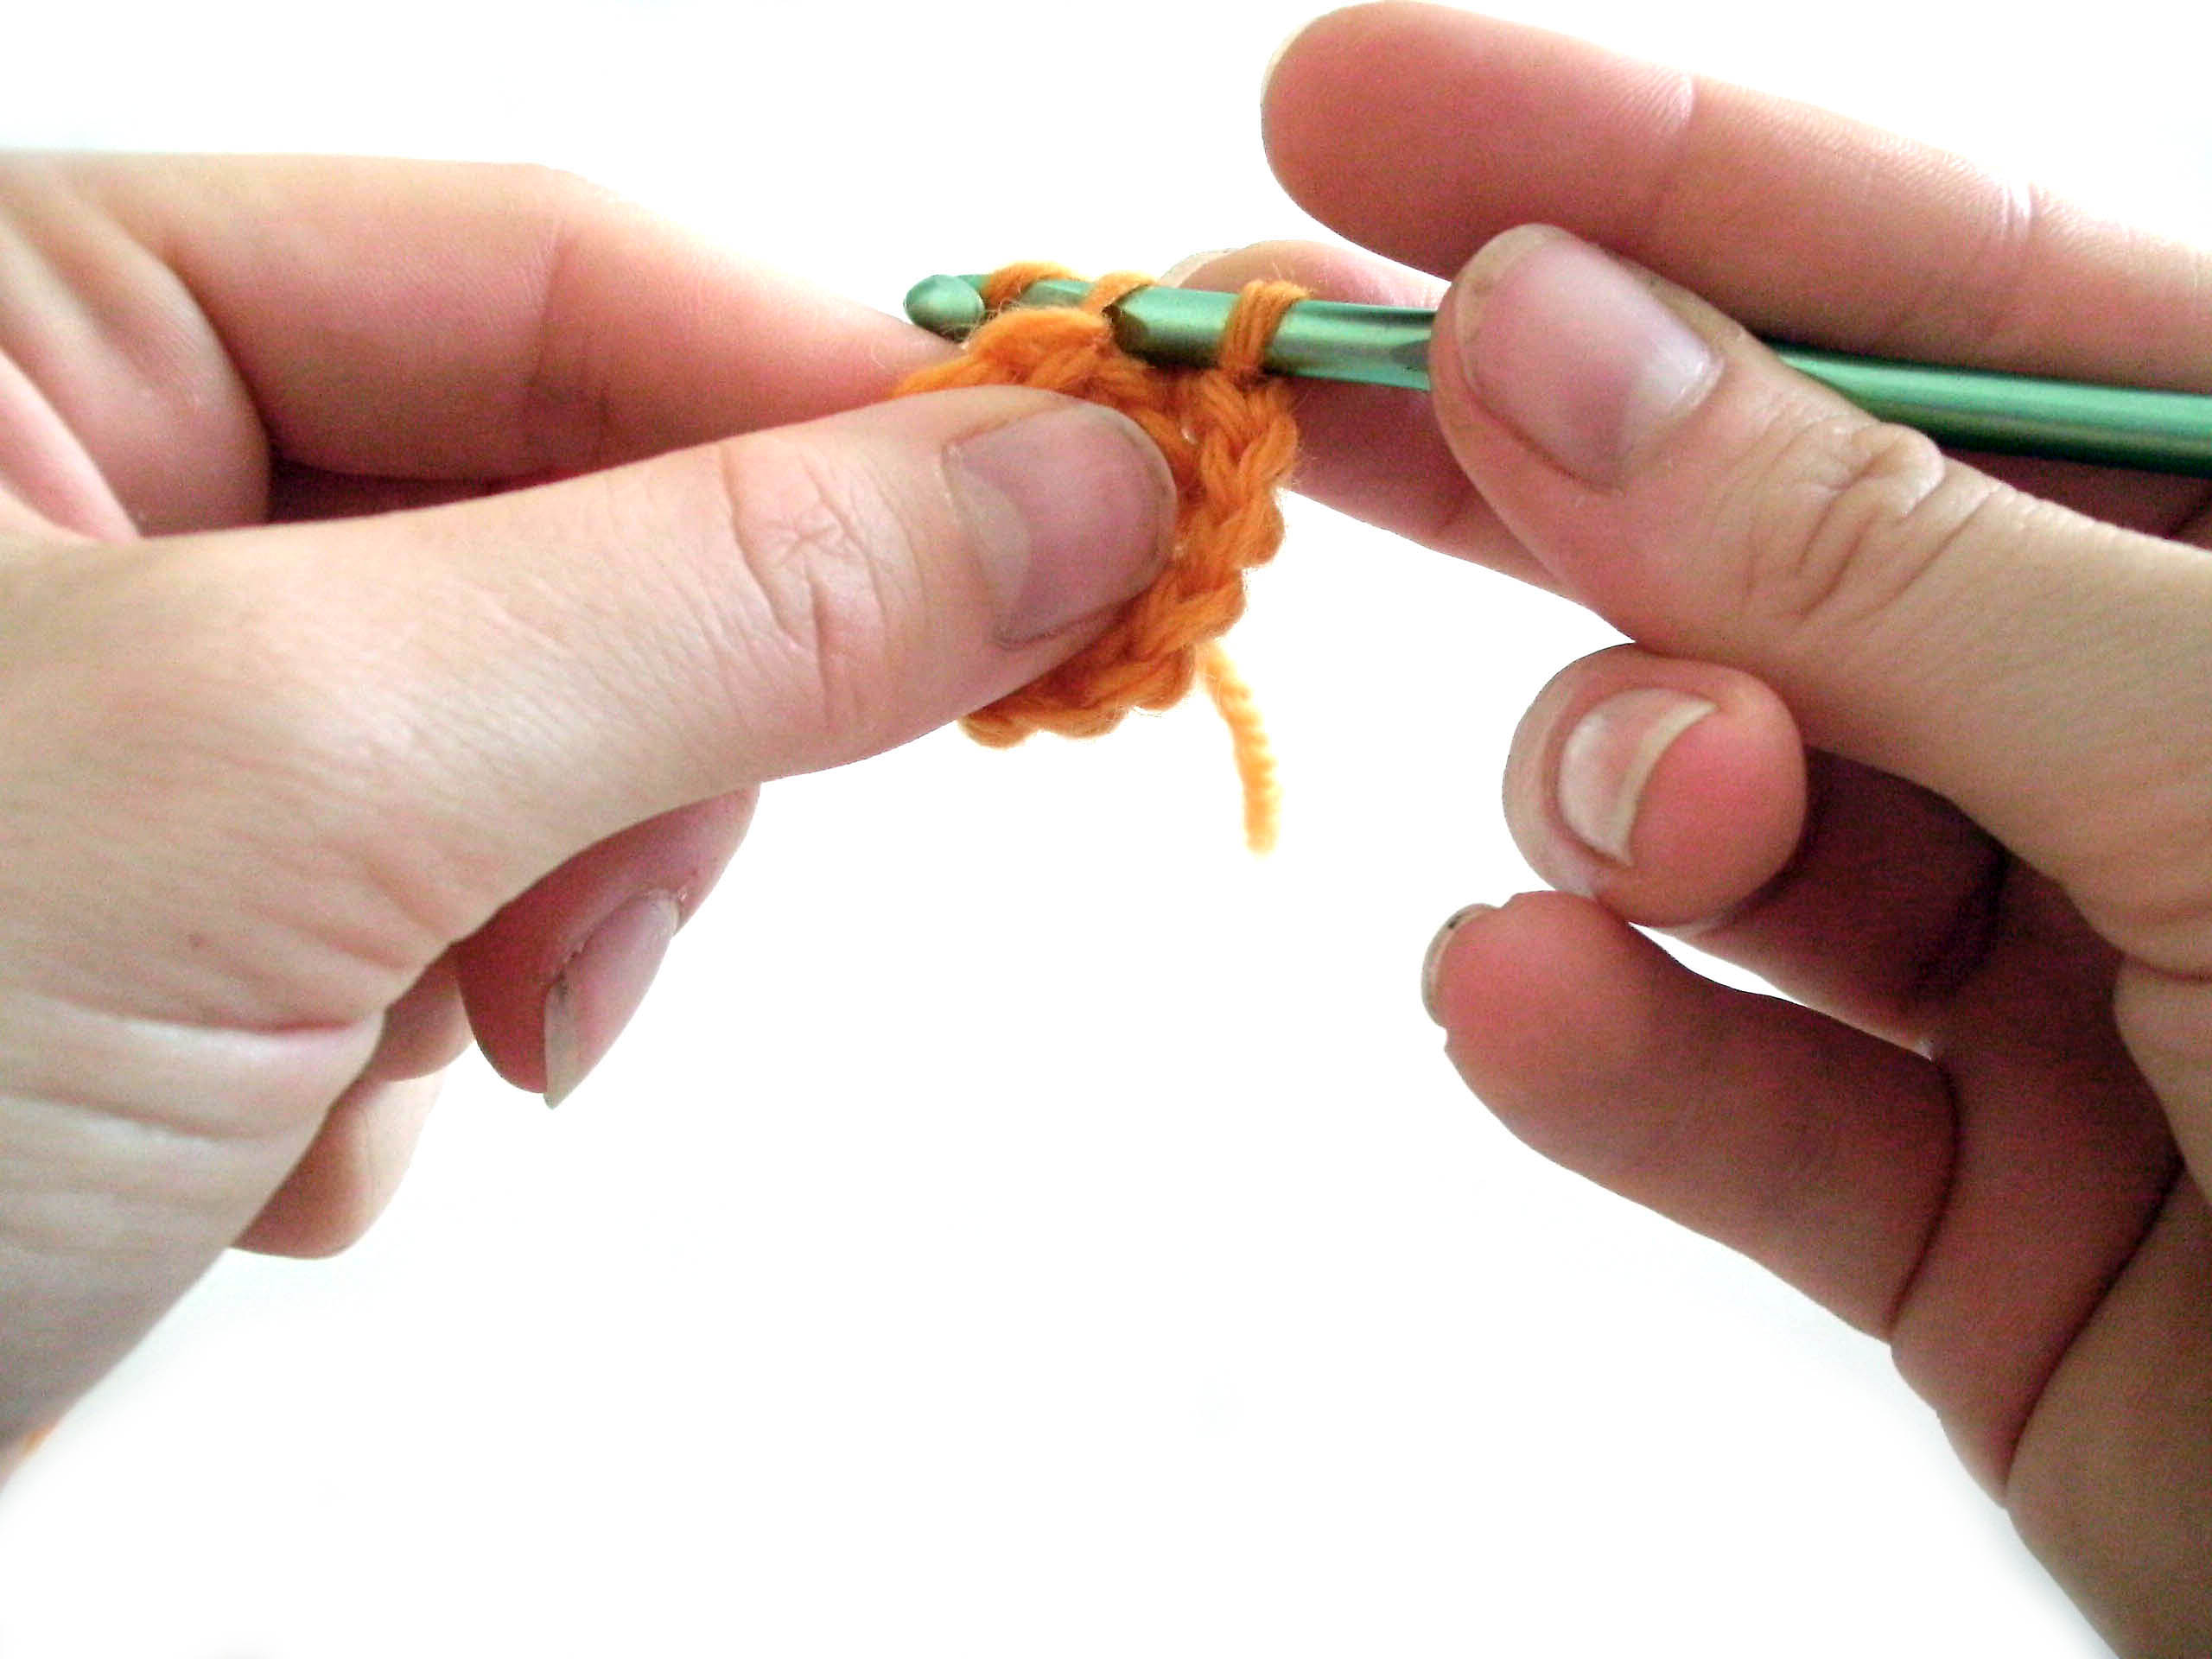
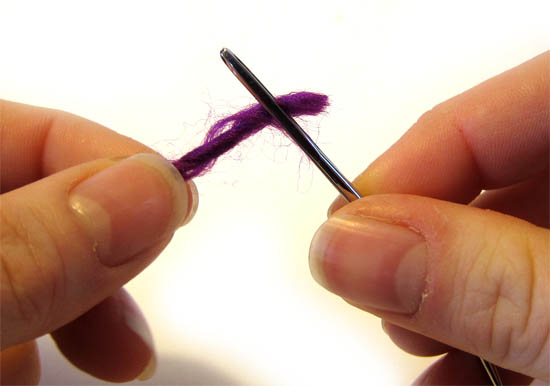
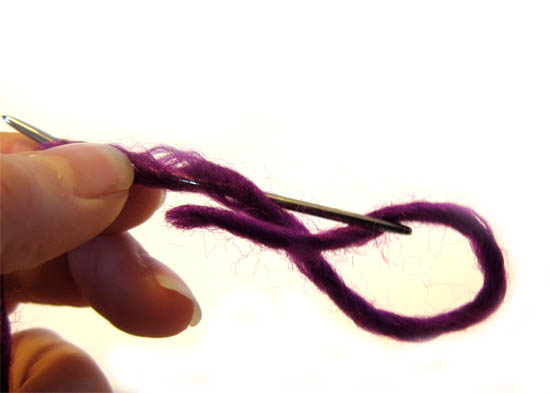
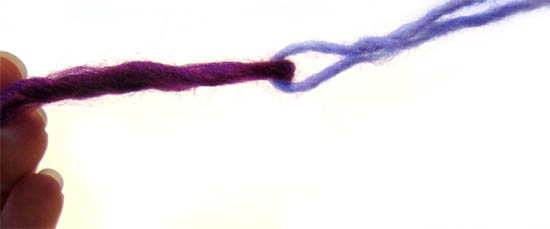
Step 1: Thread your tapestry needle with yarn A (to start, yarn A will be an arbitrary choice. As you continue, yarn A will be the yarn that is attached to your ball).
Step 2: About 2 inches from the end of the yarn, insert your tapestry needle through the yarn. Split the plies, and work the needle through the yarn for about an inch, then pull the needle through, bringing the yarn tail through this bit of yarn.
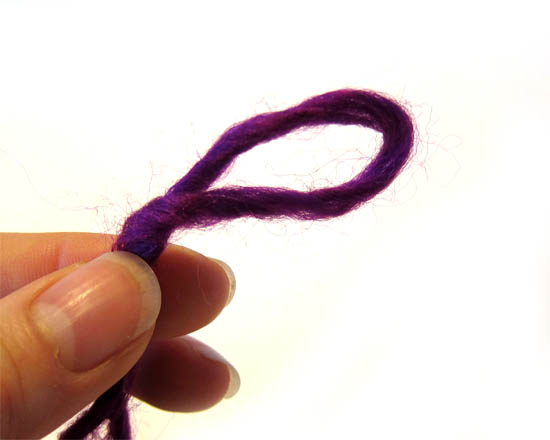
Notice that you have a loop!
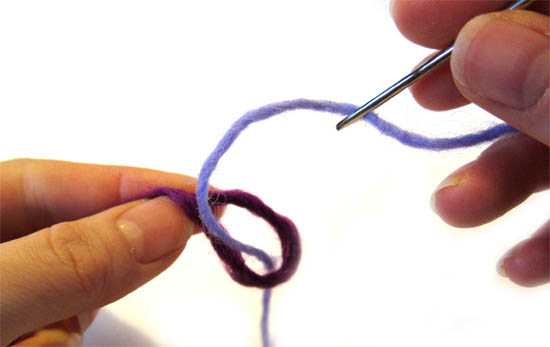
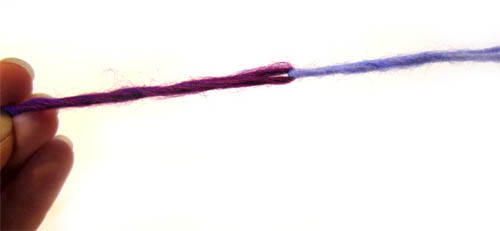
Step 3: Okay, now, thread yarn B (the other yarn) through the tapestry needle, and stick the tapestry needle through the loop in yarn A.
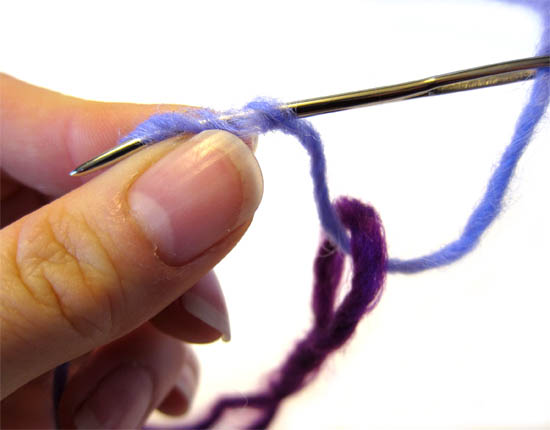
Step 4: About 2 inches from the end of yarn B’s tail, insert the tapestry needle through the yarn… just like you did before.
Now you’ve made a second loop, joined onto yarn A!
When you pull the ends, you’ll notice the two yarns are fully joined! Hooray!
To make a magic ball, keep attaching yarns, one after another. You’ll probably find it helpful to wind the ball up as you go, particularly if you’re using long leftover lengths of yarn.
Once you’ve run out of leftovers (or have a ball that’s big enough), you can use your magic ball for any project! When knitted or crocheted, it’ll create an awesome striping-effect! And, you don’t need to do anything special at the joins, just keep working!
Isn’t that fun?
And doesn’t it make you want to gather up (and use) your leftovers?
Here are handy links to all the posts about yarn. . .
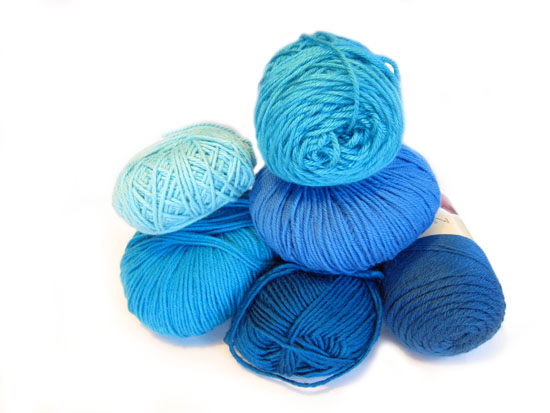
You’re joining in on the scrap-a-long, right? This crochet-a-long is all about gathering up those little bits of yarn that you can’t find a use for… and turning them into something fabulous!
Even if you’re not crocheting with us, this post will help you to corral those scraps and get them organized! It’s spring… why not do a little cleaning up of your scraps?
Step 1: Find them… all
That’s it… now’s the time. Haul out all of your yarn bins and your baskets and start gathering the bits of yarn that are ‘scrappy’.
What counts as scrappy? That’ll vary by person… but my philosophy is: if you look at it and can’t figure out what in the world to do with it, it’s scrappy.
Step 2: Consider odd skeins
I know it’s a scrap-a-long, but to you have a skein of yarn in a color that just doesn’t work for you? It’s totally okay to throw it into the scrap pile.
The objective of this organizing is to clean out your stash… no need to leave uglies behind with your favorite skeins! At a later stage, you can snip these rogue skeins into scrap-sizes.
Step 3: Sort by weight
In the scrap-a-long, we’ll be making an animal from the scraps we gather, and it’s best to use scraps of the same thickness.
It doesn’t matter which thickness it is, just so long as they can work together without leaving holes in your work. So, select the thickness you’d like to use for your project, and pull out all of the bits of yarn with that thickness.
It’s not a science… trust your gut. If two yarns look to be about the same thickness, then that’ll do!
And who knows… maybe you want to do the following steps with each group of yarns you have… you’ll make multiples! Fun!
Step 4: Sort by color
It’s like being in kindergarten again… put the blues in one pile, the pinks in another…
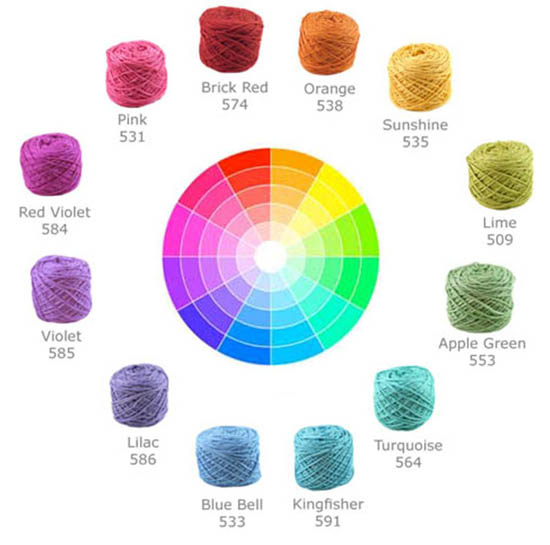
Sorting all of your yarn by color will give you an idea for the color palette you’re working with.
You can be as picky as you want to be with the sorting. My categories were: neutrals, green/yellows, red/pink/oranges, blues and purples. You can have broader or narrower categories… the point is just to see what you have!
Step 5: Put together your color sequence
Now that you see all of the colors you have, you’ll want to think about how you’ll organize them in your project. Allow the colors you already have guide you… remember, we’re not trying to get more yarn!
Check out my blog post on color theory and craft your plan.
If you’re feeling particularly ambitious, you might want to make color collections for a few different projects!
Step 6: Weigh your yarn
Now you’ve got some beautifully organized yarn… let’s see how much you have!