Gingerbread! A Free Felt Christmas Ornament Pattern

Gingerbread House - a free felt Christmas ornament pattern from Shiny Happy World

This project is part of the 2014 Crafty Christmas Tutorial Link-Up over at Bugs & Fishes. Go check out all the fun projects!

As much as I love to cook, and as much as I love the flavor of gingerbread, and as much as I love candy and fussy details – I’ve never made a gingerbread house. Until now.

Maybe the problem is that I know a real gingerbread house is not really edible, even thought it’s made of edible goodies.

No such illusions with this little house made of felt and embroidery thread! You get all the pretty decorations and fanciness and it will last for years. Plus you can make it on your couch in front of the fire instead of in the kitchen. 🙂

Here’s what you’ll need. . .

You can find links to sources for all my favorite tools and supplies here.

  • scraps of wool felt (I used Tahitian sunset for the gingerbread and lavender, grass skirt, blue bayou and fuchsia for the decorations)
  • matching embroidery thread (I used DMC floss in white, 3858, 3746, 550, 907, 699, 326, 601, 603, 3846)
  • 1 sheet of Sulky Sticky Fabri-solvy (optional, but recommended – will make two ornaments)
  • small amount of polyester fiberfill stuffing (a few cotton balls will do if you don’t have it)
  • scrap of string or yarn for the hanging loop

Throughout the pattern, the links go to video tutorials teaching that skill. If it’s a new stitch or technique for you, just click through to see how to do it!

Here’s how to make it. . .

1. Print the pattern. You can download it here. It’s formatted to give you the pieces for two houses – make one for yourself and one for a friend. Print the pattern at 100% size onto a sheet of Sulky Sticky Fabri-solvy (aka The Magical Embroidery Stuff).

Gingerbread House - a free felt Christmas ornament pattern from Shiny Happy World

2. Peel the backing off and stick the stabilizer/pattern transfer onto the felt. I used Tahitian sunset for the gingerbread, fuchsia for the pink lollipops on the sides of the door, grass skirt for the green stick candy sills, blue bayou for the door, and lavender for the purple candy.

Cut the pieces out on the lines.

Embroider the designs right through the stabilizer.

Gingerbread House - a free felt Christmas ornament pattern from Shiny Happy World

I used the following stitches and colors. . .

  • For the snow along the roof I used U-stitch and 4 strands of DMC #white.
  • For the snowflakes I used 2 strands of DMC #white.
  • For the center window I used backstitch in 2 strands of DMC #white, with French knots in the same color below it.
  • For the candycane stripes on the windows and door I used whipped backstitch. Backstitch the lines first with 4 strands of DMC #white, then whip with 2 strands of DMC #326.
  • For the lollipop sticks on the sides of the door I also used whipped backstitch. Backstitch the lines with 4 strands of DMC #699, then whip with 2 strands of DMC #907.
  • For the swirls on the purple candy I used chain stitch and 2 strands of DMC #550.

Gingerbread House - a free felt Christmas ornament pattern from Shiny Happy World

3. Soak off the Sulky Sticky Fabri-solvy. I soak mine in cold water for at least an hour, then rinse off the mushy stabilizer under cold running water. Don’t rub it to remove any stubborn bits – just hit them with a kitchen sprayer if needed.

Lay the pieces flat on a towel to dry. Do not wring, twist or even smoosh them. Just set them sopping wet on a towel and let them be. I promise they’ll dry. 🙂

(If you’ve never used Sulky Sticky Fabri-solvy before, I ramble on endlessly about how awesome it is and why I love it so much and how I use it here.)

Gingerbread House - a free felt Christmas ornament pattern from Shiny Happy World

4. Layer the small applique pieces onto the house. The stitching makes such a nice guide to help position everything!

I usually just hold them in place while I stitch them down, but this time I experimented with using a fabric glue stick. I used Prym brand and it stuck really well, but there was also a noticeable hardness to the glued bits. It wasn’t so hard that it was difficult to sew through – especially since I was mostly just sewing around the edges and I put a dab of glue in the middle of each piece – but I’d be careful not to use too much.

Gingerbread House - a free felt Christmas ornament pattern from Shiny Happy World

5. Use whipstitch and matching thread to applique each piece in place.

Here’s a video showing how to do whipstitch applique.

Add a tiny bit more detail stitching because there wasn’t enough already. Really – if you can’t go overboard on a gingerbread house then when can you? It’s supposed to be slightly insane. 🙂

I added little diagonal stripes on the green stick candy with 2 strands of DMC #699. I also added little starbursts in the centers of the pink lollipops using 2 strands of DMC #603.

Gingerbread House - a free felt Christmas ornament pattern from Shiny Happy World

6. Layer the ornament front and back together and whipstitch all around the edges.

Whipstitching the edges of the felt is a little different that whipstitch applique, so it has its own video. You can watch it here.

Leave the bit under the door open for stuffing.

Gingerbread House - a free felt Christmas ornament pattern from Shiny Happy World

7. Add a few pinches of stuffing through the hole, then switch to matching blue thread and sew up the opening.

Thread a 10″ piece of string through the peak of the roof and tie a knot to form a hanging loop.

Finished!

Like all Shiny Happy World designs – you’re welcome to sell items you make with my patterns, but please don’t sell or distribute the patterns themselves.

If you like this free pattern, sign up for the Shiny Happy News! Subscribers get a weekly newsletter with updates, special offers and links to happy things. :-) Sign up here.

This ornament is the same style and size (and difficulty level) as all my other holiday ornament patterns. Here are the first ten ornaments in this year’s Christmas Club collection.

Christmas Club 2014 - twelve felt ornament patterns

*happy sigh*

I do so love handsewing felt. 🙂

Happy stitching!

Best,
Wendi
That's me!


A Pretty Felt Bird Ornament Pattern

 A pretty felt bird ornament - easy pattern from Shiny Happy World

I seem to be slightly obsessed with pretty, patterned birds – but they’re so much fun to stitch!

This felt bird ornament is the tenth ornament in the Christmas Club collection. We’ve only got two more to go! Here they all are so far. . .

Christmas Club 2014 - twelve felt ornament patterns

You can still join at any time! The Welcome PDF that you get with your order has a link to access all the patterns that have gone out so far.

The Club is closed now, but you can still get all the patterns!

Get the entire 2014 pattern collection (at a discount!) here.

Get just the bird pattern here.

See all the felt Christmas ornament patterns here.

Merry Christmas!

Best,
Wendi
That's me!

A Matroyshka Doll – felt Christmas ornament pattern

Matroyshka Doll - felt Christmas ornament pattern

All the detail stitching and bits of applique in this matroyshka doll were So Much Fun! I love a rich little project like this one – lots of detail for fun stitching, but it’s small so I can finish it in a couple of nights. 🙂

This is the ninth ornament in the Christmas Club collection. Here they all are so far. . .

The first 9 Christmas Club ornaments.

You can still join at any time! The Welcome PDF that you get with your order has a link to access all the patterns that have gone out so far.

The club is closed now, but you can still get all the patterns!

Get the entire 2014 ornament collection here.

Get just the Matroyshka doll pattern here.

Find all the felt ornament patterns here.

Merry Christmas!

Best,
Wendi
That's me!

A Red Rocket – felt Christmas ornament pattern

Red Rocket - a felt ornament pattern in the 2014 Christmas Club collection

I love this retro red rocket Christmas ornament! We have a collection of tin rockets and robots and this felt version fits right in with that vintage toy feel.

This is the seventh ornament in the Christmas Club collection. Here are the first six. . .

half of the felt ornaments in the 2014 Christmas Club collection

You can still join at any time! The Welcome PDF that you get with your order has a link to access all the patterns that have gone out so far. Get all the details and sign up here.

The weekly club is closed now, but you can still get all the patterns.

Get the entire 2014 Christmas Club pattern collection here.

Get just the red rocket pattern here.

Find all the felt ornament patterns here.

Merry Christmas!

Best,
Wendi
That's me!

A Cute Kitty – felt Christmas ornament pattern

Cute Kitty - a felt ornament pattern in the 2014 Christmas Club ciollection

I love this cute kitty felt Christmas ornament! This is one you can whip up in no time – which makes it super easy to make more than one. How about one in smoky grey? Or a black cat for Halloween? Play! (Or fill one with catnip and let your cat play. But don’t hang that one on the tree!)

This is the sixth ornament in the Christmas Club collection. We’re halfway there! Here’s the collection so far. . .

half of the felt ornaments in the 2014 Christmas Club collection

You can still join at any time! The Welcome PDF that you get with your order has a link to access all the patterns that have gone out so far. Get all the details and sign up here.

The club is closed now, but you can still get all the patterns. 🙂

Get the entire 2014 Christmas Club collection here.

Get just the kitty pattern here.

See all the felt Christmas ornament patterns here.

Merry Christmas!

Best,
Wendi
That's me!

A Dapper Felt Gingerbread Man Ornament

Gingerbread man Ornament from the 2014 Christmas Club pattern collection

I love this cute felt gingerbread man ornament – with his dapper pinstriped pants and his fancy snowflake buttons. 🙂

The pattern includes suggested felt colors to make chocolate and sugar cookie versions. Wouldn’t it be cute to make a bunch with different colored outfits and string them together into a garland?

This is the fifth ornament in the Christmas Club collection. Here are all five so far. . .

5 ornaments in the 2014 Christmas Club pattern collection

The club is closed now, but you can still get all the patterns!

Get the full 2014 Christmas Club collection here.

Get just the Gingerbread Man pattern here.

Find all the felt ornament patterns here.

Merry Christmas!

Best,
Wendi
That's me!

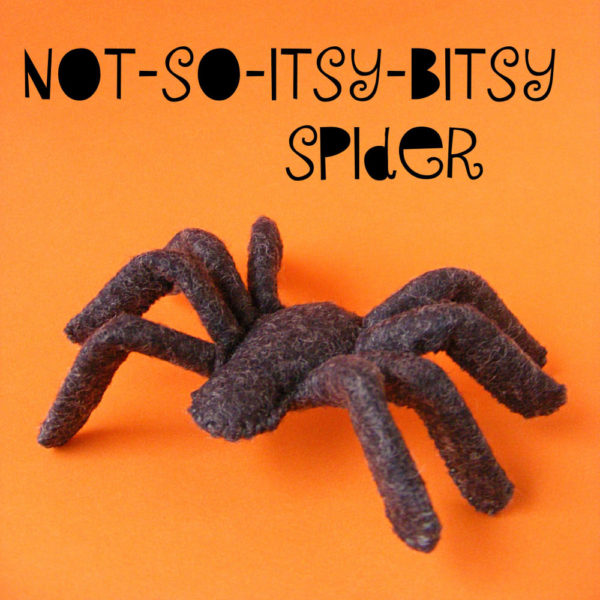
A Not-So-Itsy-Bitsy Spider – a new handsewing pattern!

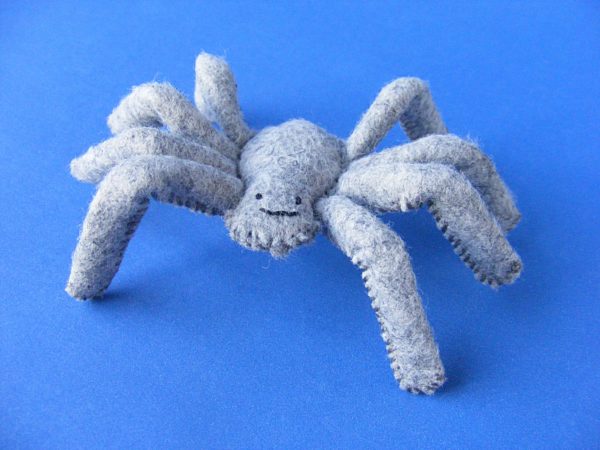
I originally designed this spider as a best friend for Nellie the Pig. She was made of light grey felt with a friendly smiling face – not scary at all. This is the perfect little spider to send up the water spout when you’re singing The Itsy Bitsy Spider with a group of preschoolers. 🙂 You can see that spider here.

I named her Aranea after one of Charlotte’s daughters who decided to stay behind with Wilbur.

However – I decided that a spider pattern just wouldn’t be right without a slightly spookier version. I wanted to show you another version that would be perfect for Halloween decorations – something you could scatter around a table. 🙂 This version skips the embroidered face and uses Licorice felt for a slightly-hairy-looking, almost-black spider.

This is definitely NOT the spider to use with your preschool class. It’s surprisingly realistic looking! Jo suggested adding a hair clip to the bottom of the body for a spooky barrette.

And now the pattern is available in the shop! It’s a PDF pattern, so it will be delivered instantly by email.

Get the felt spider pattern here.

There are also materials kits available in both colors. Choose the kit option from the drop down menu above the add to cart button.

This will only take an evening to stitch up and it’s all hand sewing so you can take it anywhere.

Happy sewing!

Best,
Wendi
That's me!

Why I Use Wool Felt

Why I Use Wool Felt

This is why I use wool felt.

I designed the pattern for this little gizmo cozy (it’s free here) in February 2011. I’ve been using it to protect my MP3 player in my purse ever since.

That’s 3 1/2 years this little thing has been tumbling around in my purse and look at it! It still looks great!

Why I use wool felt - a side by side comparison

The photo on the left is from the day I finished it in 2011. The photo on the right is from today.

The corners have gotten a little smooshy and rounded. The threads of the embroidery are a bit more embedded in the felt. The edges of the applique aren’t as crisp. The big lazy daisy flower in her hair is definitely looking a little flattened.

But there’s no pilling! If this were made of cheap acrylic felt I would have thrown it away long ago because it would have looked so grubby and terrible.

How do I know this? Because when Jo was little I made her a felt board. Not knowing any better, I used cheap acrylic felt from the craft store. Honestly, I didn’t know there was anything else!

Jo wasn’t any especially grubby or rough kid, but within DAYS those felt pieces started to look terrible. They pilled awfully. They seemed to pick up and grab onto every speck of dirt or dust. And in no time at all they had lost almost all their cling. The feltboard quietly disappeared and I didn’t work with felt again for a long time. Why put a lot of work into a material that’s going to look awful almost right away?

And then I discovered wool felt. Online – of course – because there’s not a single brick and mortar store in my area that carries it. People wrote about how durable it was compared to the acrylic stuff. How it doesn’t pill. They didn’t mention how nice it feels in your hands, and how pretty embroidery looks on it, but I discovered that on my own pretty quickly. 🙂 I fell in love with felt! I couldn’t buy it locally, so I started carrying it in my shop.

I’ve made a lot more felt projects since then – so many things that I had to create a whole section in my shop for felt patterns! But it all started with this little gizmo cozy. 🙂

If you’ve never used wool felt before, give it a try! There are a bunch of free felt patterns here. Enjoy!

Happy stitching!
Best,
Wendi
That's me!


A Cute Dinosaur for Your Christmas Tree

A dinosaur! Ornament #2 in the 2014 Christmas Club collection from Shiny Happy World

One of the many things I love about felt ornaments is that they’re impossible to break. That makes them perfect to give to even the youngest kids! And I love, love, LOVE the way little felt toys look hanging on a tree. 🙂

The second ornament in the 2014 Christmas Club is a cute little dinosaur – very easy to make. He was so easy and fun to make that I’m tempted to make a whole bunch in a rainbow of colors. Wouldn’t that be fun?

Here are the first two ornaments in the Christmas Club collection.

The first two ornaments in the 2014 Christmas Club collection at Shiny Happy World.

You can still join at any time!

The club is closed now, but you can still get the patterns!

Get all the 2014 Christmas Club patterns here.

Get the dinosaur ornament pattern here.

Get the Santa ornament pattern here.

Merry Christmas!

Best,
Wendi
That's me!

Leon Lion is Here!

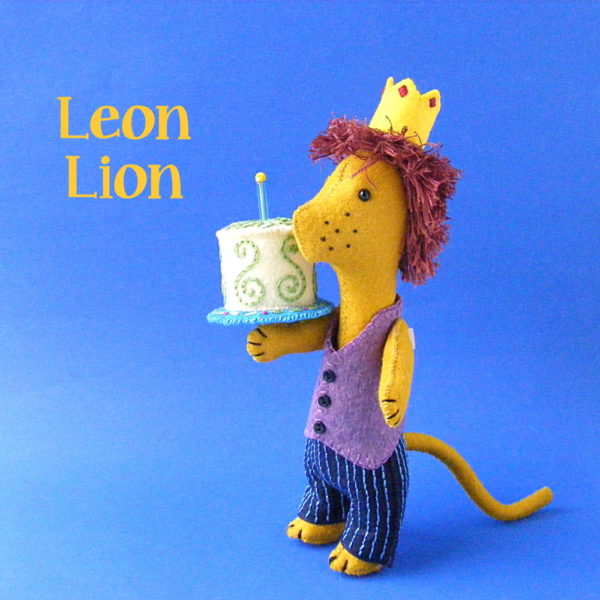
Leon Lion is here – the third animal in the Party Animals series.

Leon Lion loves to bake! He made an extra fancy cake for this party with lots of pretty swirls. 😄

You’ll notice he’s not wearing a party hat. That’s because he NEVER takes off his crown. He takes his duties as King of the Jungle very seriously.

Check out that shaggy mane! You’ll get to practice your new Turkey work skills on this guy.

Get the pattern here.

It’s really starting to look like a party!

Three Party Animals!

You may be feeling a little nervous about that mane. Don’t be nervous! It’s a relatively easy stitch called Turkey work and the pattern has a link to this video showing how to do it.

I had a question asking me to get more specific about the spacing of the stitches in the Turkey Work for his mane.

I didn’t get terribly specific because a little variation here won’t be a problem. It’s not like eyes which really need to be placed just so. If you start his hair a little farther back, he’ll just have a bit of a receding hairline. If you go lower on his forehead than I did, he’ll have a shorter forehead. It’s all good. 🙂

Here’s a bit more info. . .

I started stitching with a row of stitches right down the back of his head, starting a bit back from his forehead and stopping a bit short of the nape of his neck.

This shows an approximation of starting and stopping places. Again – you don’t need to stress too much about this.

marked head

Then you just basically circle around that first row of stitching, giving him a wider and wider Mohawk until it’s not a Mohawk at all anymore and starts to look more like a mane.

I stitched up one side, across the front, down the other side, across the bottom, etc. until I used almost the whole skein of thread. At some point I decided that it was far enough down the nape of his neck and I stopped adding loops when I went across the bottom and just skipped over to the other side by slipping my needle through his head. Every time you finish a circuit, take a look at him and decide if you like the way his hair is growing. You can add an extra row or two across his forehead if you want, or make it go lower on his neck the same way. It’s totally up to you!

I do recommend going around in circles. It’ll be the easiest way to keep your stitching even on both sides so his mane is balanced – which is more important than the particular placement on the head.

I also had a question about coverage.

You can see in the loopy photo that there are bits of head showing through the mane before cutting and fluffing.

13 loopy mane 1000 px

That fluffing really fills things out! I took this photo after fluffing, but spreading apart the mane so you can see his scalp underneath.

bald spots

You can see that there’s actually a LOT of scalp visible if you work your way down there – rather like a doll’s head. So don’t worry about getting perfect coverage there. The fluffing will really fill things out.

One other note. I made mine an adolescent lion with a shortish mane that doesn’t grow very far into his face. If you wanted to make a more mature lion you can buy an additional skein of the thread and keep making more circles until he looks the way you want. If you decide to do that, I’d make the loops a little longer too. My loops were about 3/4″ tall and not perfectly even. I left them a little shaggy after trimming – I just cut the loops in half and left them mostly untrimmed because I wanted a pretty shaggy look.

Did you notice how many times I said things like “a little variation is good” and “don’t worry too much about the placement here” and other things like that? That’s because it’s really not that fussy. I understand you being nervous – it’s a brand new stitch for most of you and it’s very different. But fluffing those loops out covers a lot of little “mistakes” – so relax and have fun! And imagine all the other things you can do with that new stitch! Fancy fringes, bushy eyebrows, dignified beards – the possibilities are endless!

Get the Leon pattern here.

Happy stitching!
Best,
Wendi
Applique Wendi (with fabulous hat)