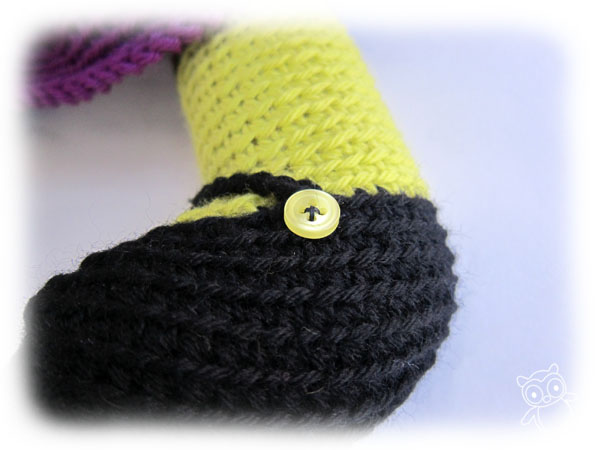
You can even find shaped buttons (like a little duck or fruits)! Use your imagination about which button would make your doll shine!
Start your thread
I begin by attaching my thread to the button. If you’re unfamiliar with sewing, watch the video in my blanket stitch tutorial to see how to get started. Instead of sewing on felt eyes (as shown in the tutorial), you’re sewing on a button!
Sew a nice pattern
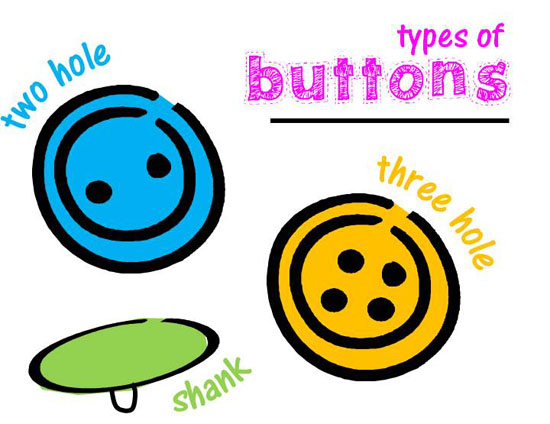
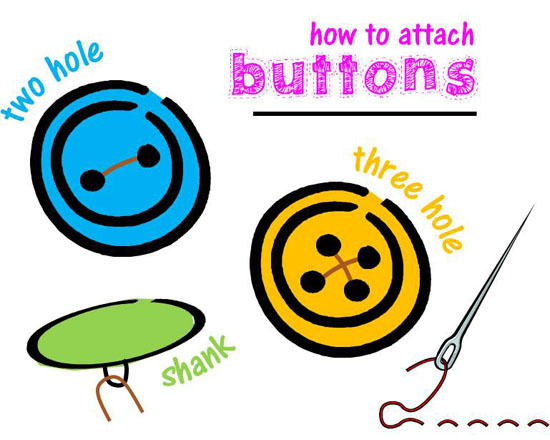
How you place your stitches depends on the type of button you have. Check out my suggested stitch patterns (shown in brown thread):
Once you’ve finished firmly attaching the button, tie a knot! Ta da!
Where will you add buttons?
They’d be cute on shoes, on dress straps or even as hem decorations! Go crazy!
Happy Father’s Day!
In the crafting world, moms get a lot of credit. They’re usually the ones to pass down the actual skill of sewing, crocheting or knitting.
I think, especially on Father’s Day, it’s important to reflect on the skills that fathers pass on to their children. Even though the men in my life didn’t teach me any craft skills, they instilled in me a do-it-yourself (and entrepreneurial) spirit, and passed on the value of quality workmanship.
Read my tribute (written last year) to the great guys I have!
I never thought so many people would be interested in my yogurt-making! I make my own yogurt (once a week, if you’re curious), and every time I mention it, I get requests for a tutorial. So… here it is!
It’s not hard to do! And for folks like me (who like plain yogurt, or even flavored yogurt without lots of sugar), making your own can be easier than finding the one you like in the store. Making your own yogurt is also cheaper than buying it, although not by as large of a margin as other homemade items (like bread, for example).
The Equipment
To make yogurt, all you need to do is add a culture (ie. friendly bacteria) to warm milk and keep it at 120 degrees (f) for 6-8 hours.
There are various pieces of equipment available to help you achieve the required temperature. You can use:
a crock pot
your oven (if the temperature setting goes low enough)
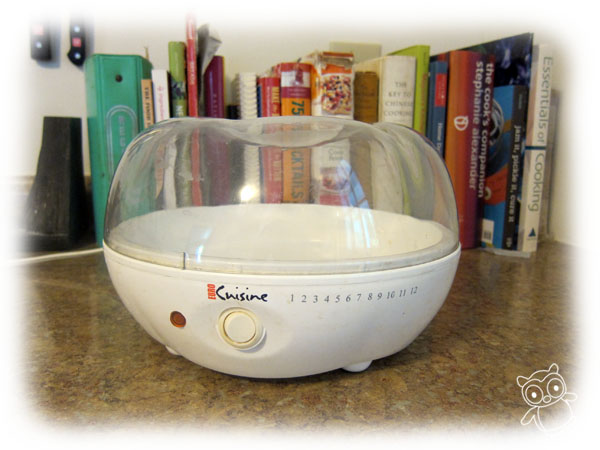
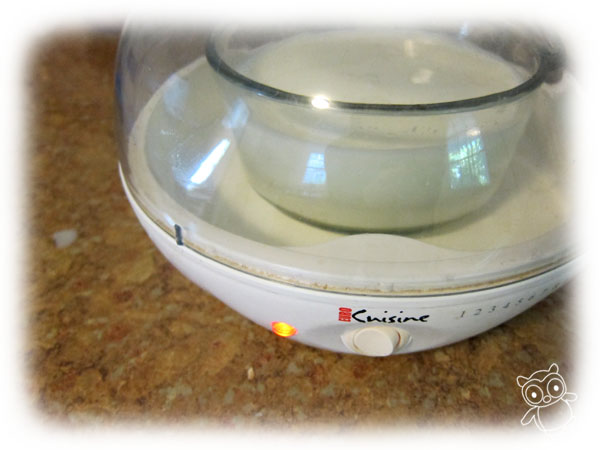
a yogurt maker
I use a Euro Cuisine Yogurt Maker, and I love it. It keeps the temperature just right (as well as the humidity) and it doesn’t use much energy to run.
It’s important to note that a ‘yogurt maker’ doesn’t ‘make’ the yogurt (in the way that you dump ingredients into a bread machine and get a finished loaf of bread), it just keeps the mixture you’ll make at the right temperature for it to turn into yogurt.
Some people balk at having a yogurt-making appliance, but I don’t have a crock pot and my attempts at using the oven have been unsuccessful. So, it works for me. You’ll have to find what works for you!
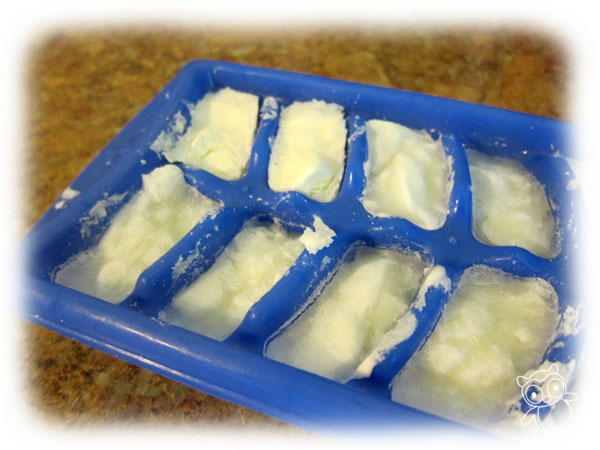
The culture
You also need some happy bacteria to start your yogurt. The easiest thing to do is buy a small plain yogurt from the store, and divide it up into ice-cube trays and freeze:
You can also find culture in powder form, but I haven’t personally tried that approach.
How to make yogurt
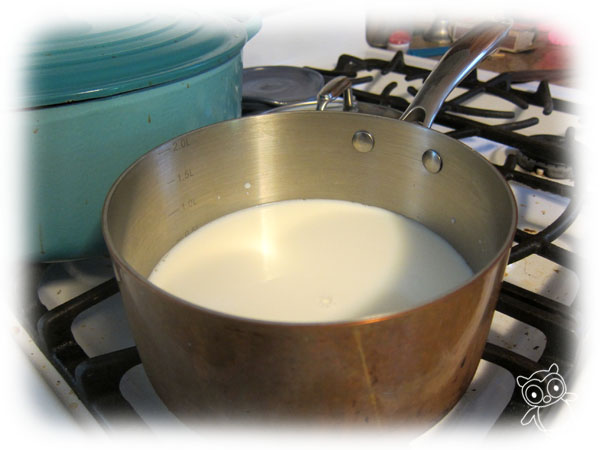
Step 1: Heat your milk to almost boiling
Heat the volume of milk that you want to become finished yogurt (which probably depends on the size of your vessel).
If the milk boils a little, it’s okay. But, try to turn the heat off before it becomes a rolling boil.
Step 2: Let the milk cool
Now, let the milk cool to 120 degrees. Some folks use a thermometer, but I just stick my finger in and see if it feels like a nice bath temperature. If you skip this step, the too-hot milk will kill your bacteria.
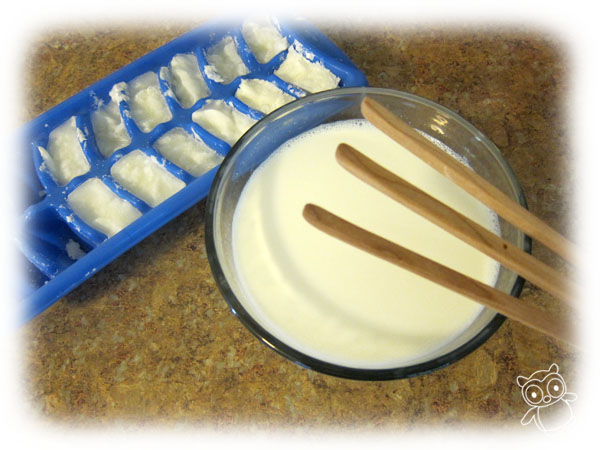
Step 3: Add your culture
Whether you’re using the ‘ice cube’ method, fresh yogurt or powder, add the culture in and stir with a whisk. Use about 1 tablespoon (or two ice cubes) if using yogurt as a starter.
Pour the mixture into your vessel. I, personally, found the little jars that came with my yogurt maker too difficult to clean, so I use a glass storage bowl that fits inside my yogurt maker.
Step 4: Keep warm for 6-8 hours
Using a yogurt maker, this is easy. Turn it on and wait!
Step 5: Refrigerate and enjoy!
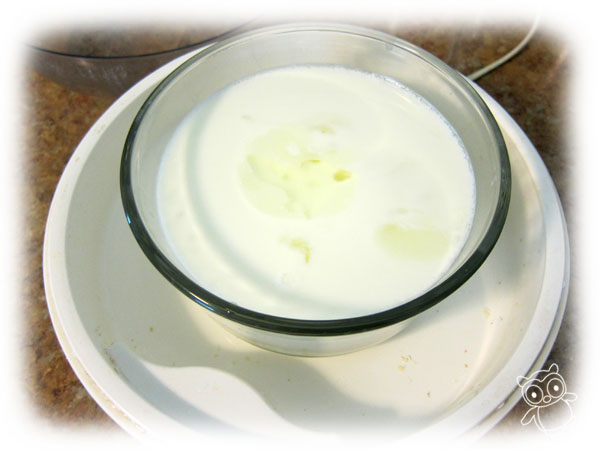
When your yogurt is done, it should look like yogurt. You know, solid-ish stuff with some liquid on top:
Draining the liquid is how you make Greek yogurt, but I like mine just this way. Refrigerate, and then enjoy!
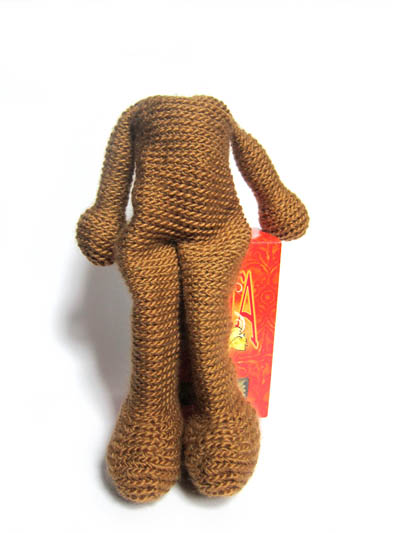
I’ve been seeing some fabulous works-in-progress and finished dolls in the Ravelry Doll-a-long thread… have I seen yours?
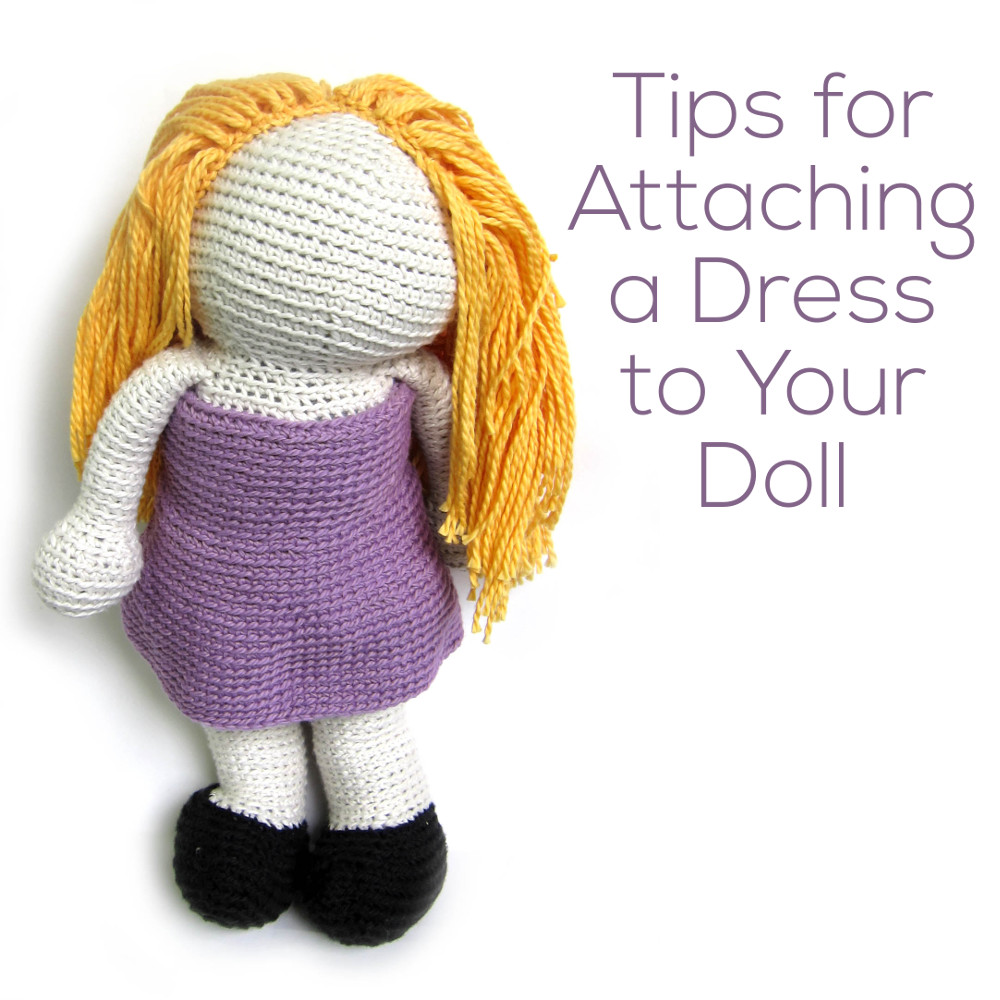
Today, I’m going to share some tips for crocheting on the dress/skirt/tutu for your doll!
Tip 1: Start without a head
The dress can be added after your doll has been stuffed and assembled, and many people prefer doing this because they can ‘envision’ what clothing will look best.
However, it’s actually easiest to crochet clothing on before the doll has been stuffed.
In doing it this way, you can crochet on the dress (and easily maneuver the body) without the bulk of stuffing or the head getting in the way.
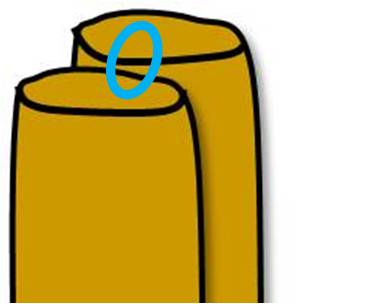
Tip 2: Join the new yarn with a sc, in the back
Okay, so this ‘tip’ is written in the pattern, but I thought it was worth repeating!
It may look like the doll’s body doesn’t have a front/back… but take a look at the feet! The toes point forward to the front!
Attach your new yarn with a sc, at the center back of the body. This way, any jog in the rounds will be hidden at the back.
Tip 3: Hold your doll upside down
When attaching the dress, you want the right side of the dress fabric to face outwards.
This means holding the doll ‘upside down’ (head towards you, feet away) when you attach your new yarn.
Notice how the right side of the dress is now facing outwards? That’s important! It will continue to do so as you crochet:
Tip 4: Weave in that end!
When you finish the dress/skirt, you’ll have an end that needs to be woven in. Whip out your tapestry needle, and zig-zag it through the wrong side of the fabric!
How’s your dress coming?
Well… if you’re doing one of the girls, that is! I know a number of you are crocheting Ethan, so you don’t need a skirt… but the same tips apply to attaching the sleeves!
Here’s how my Avery looks:
She’s almost done! Now to make choices about her eye color…
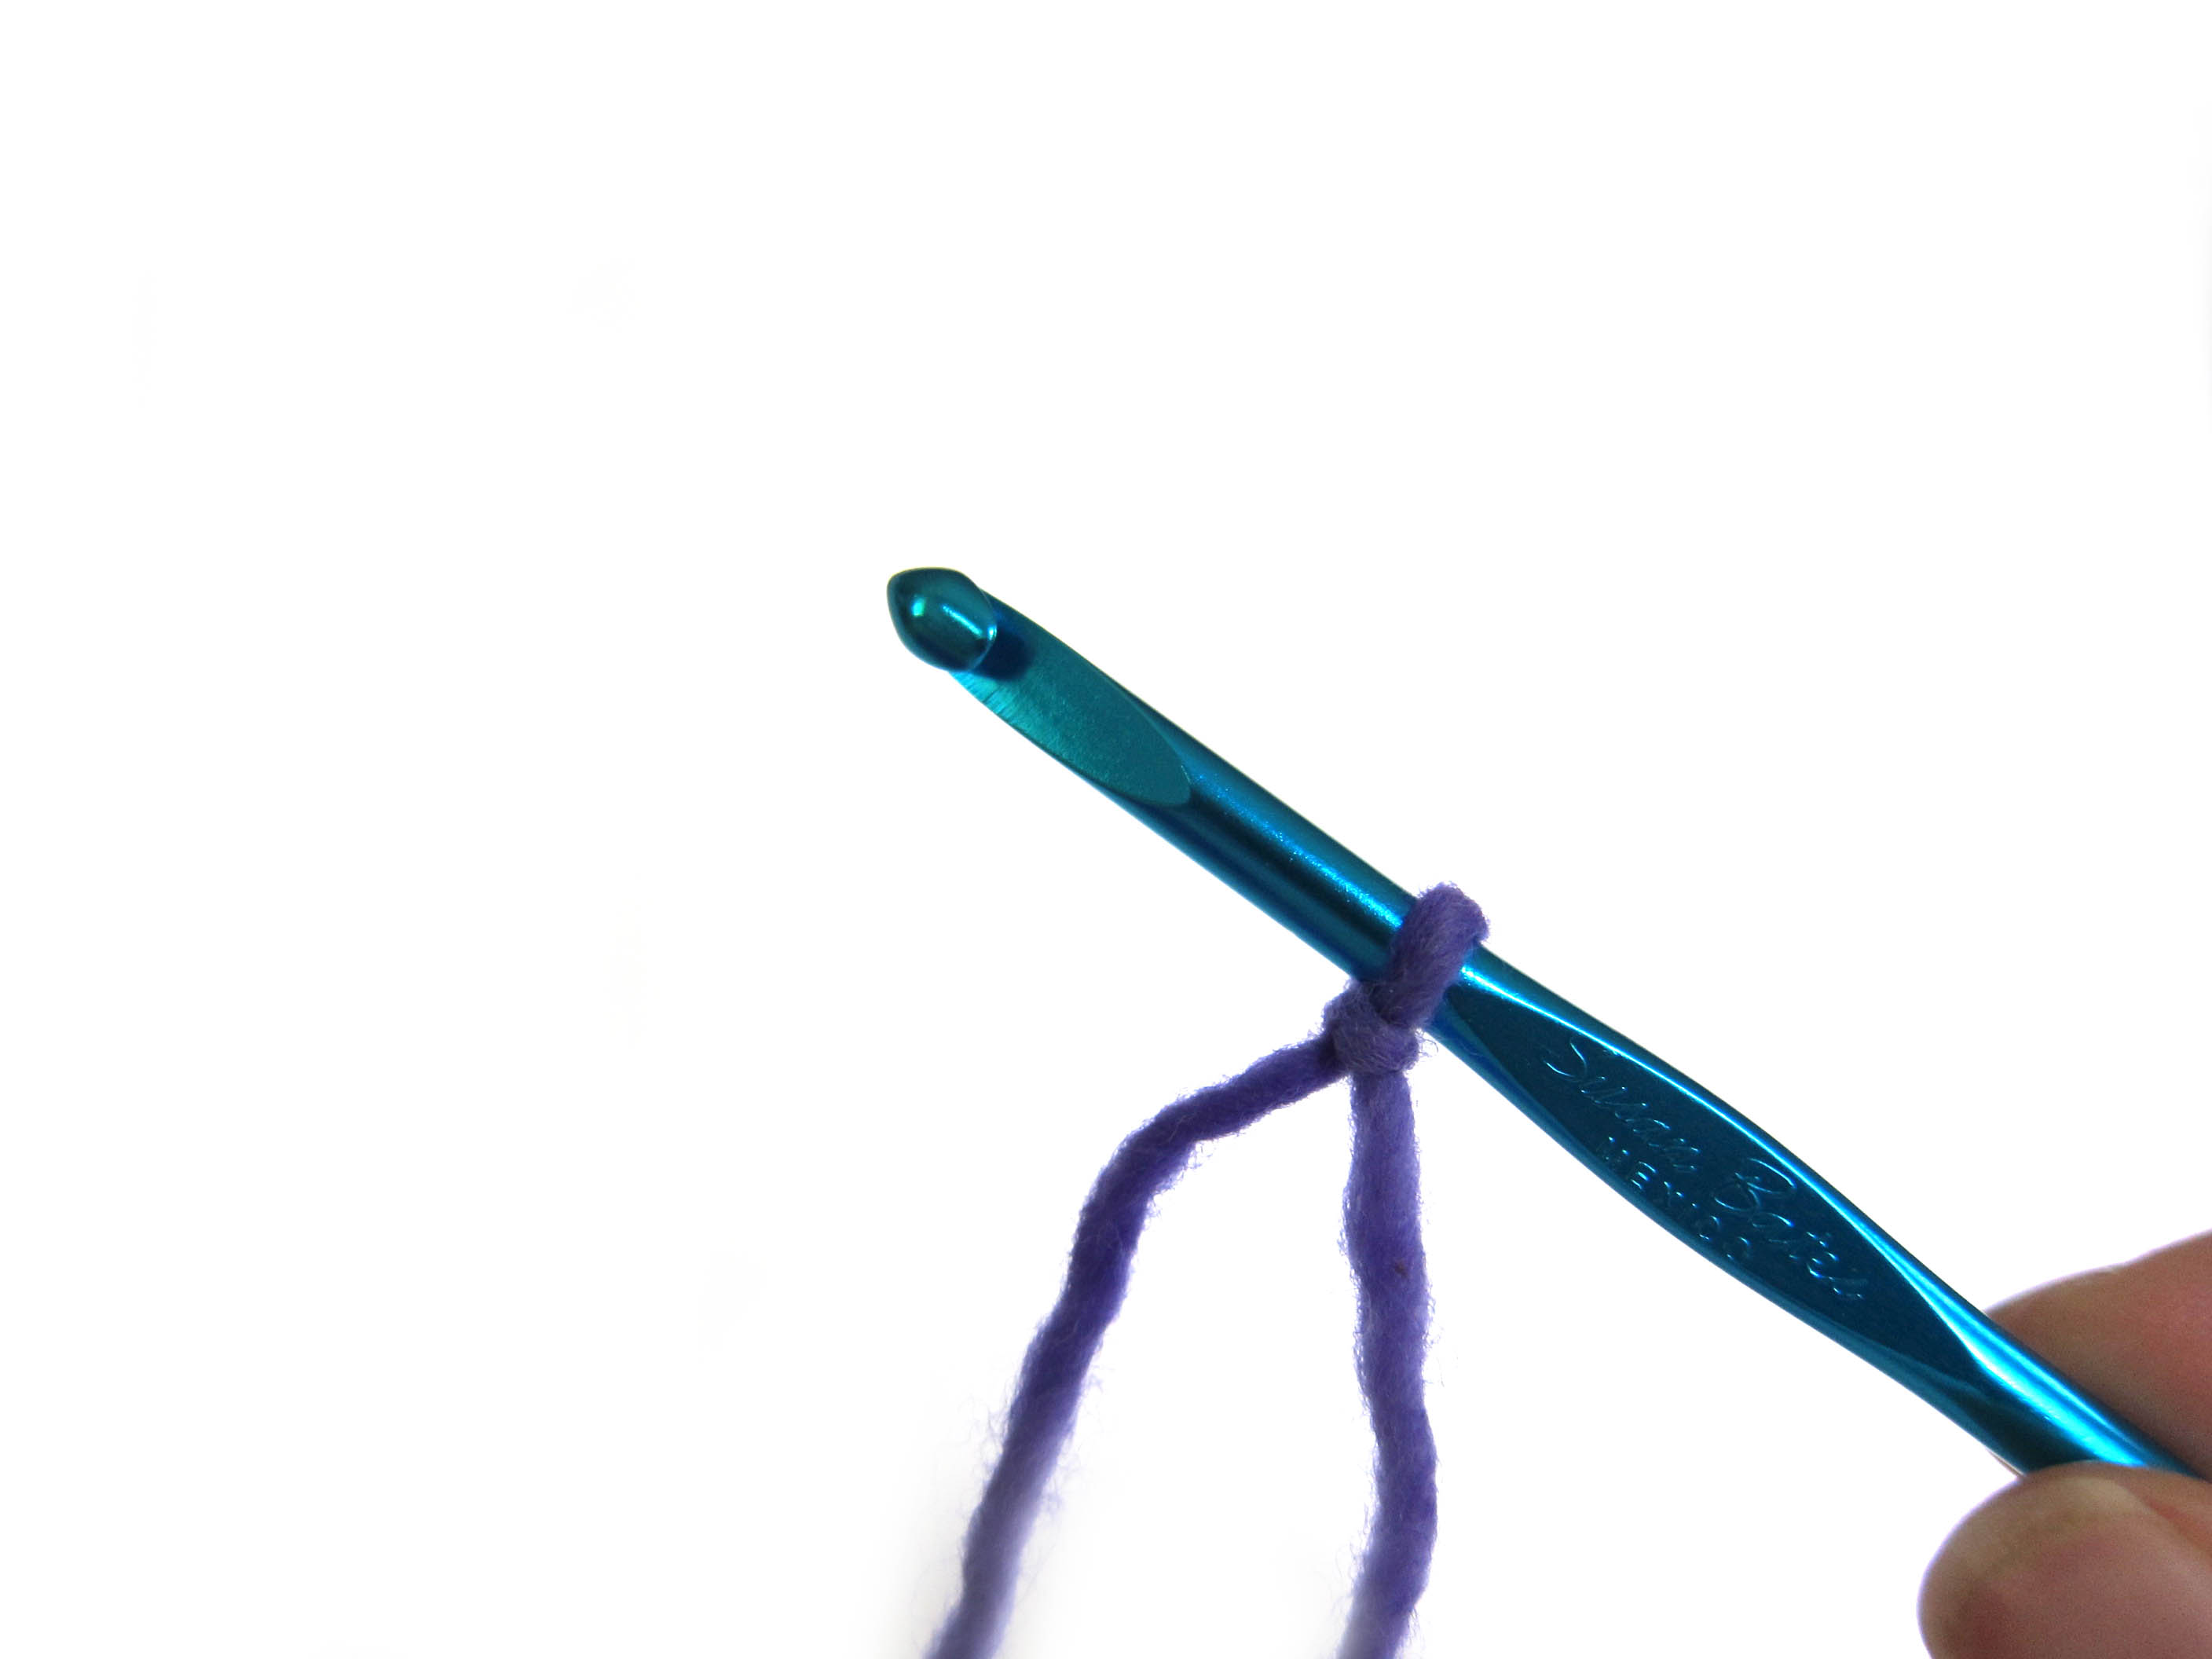
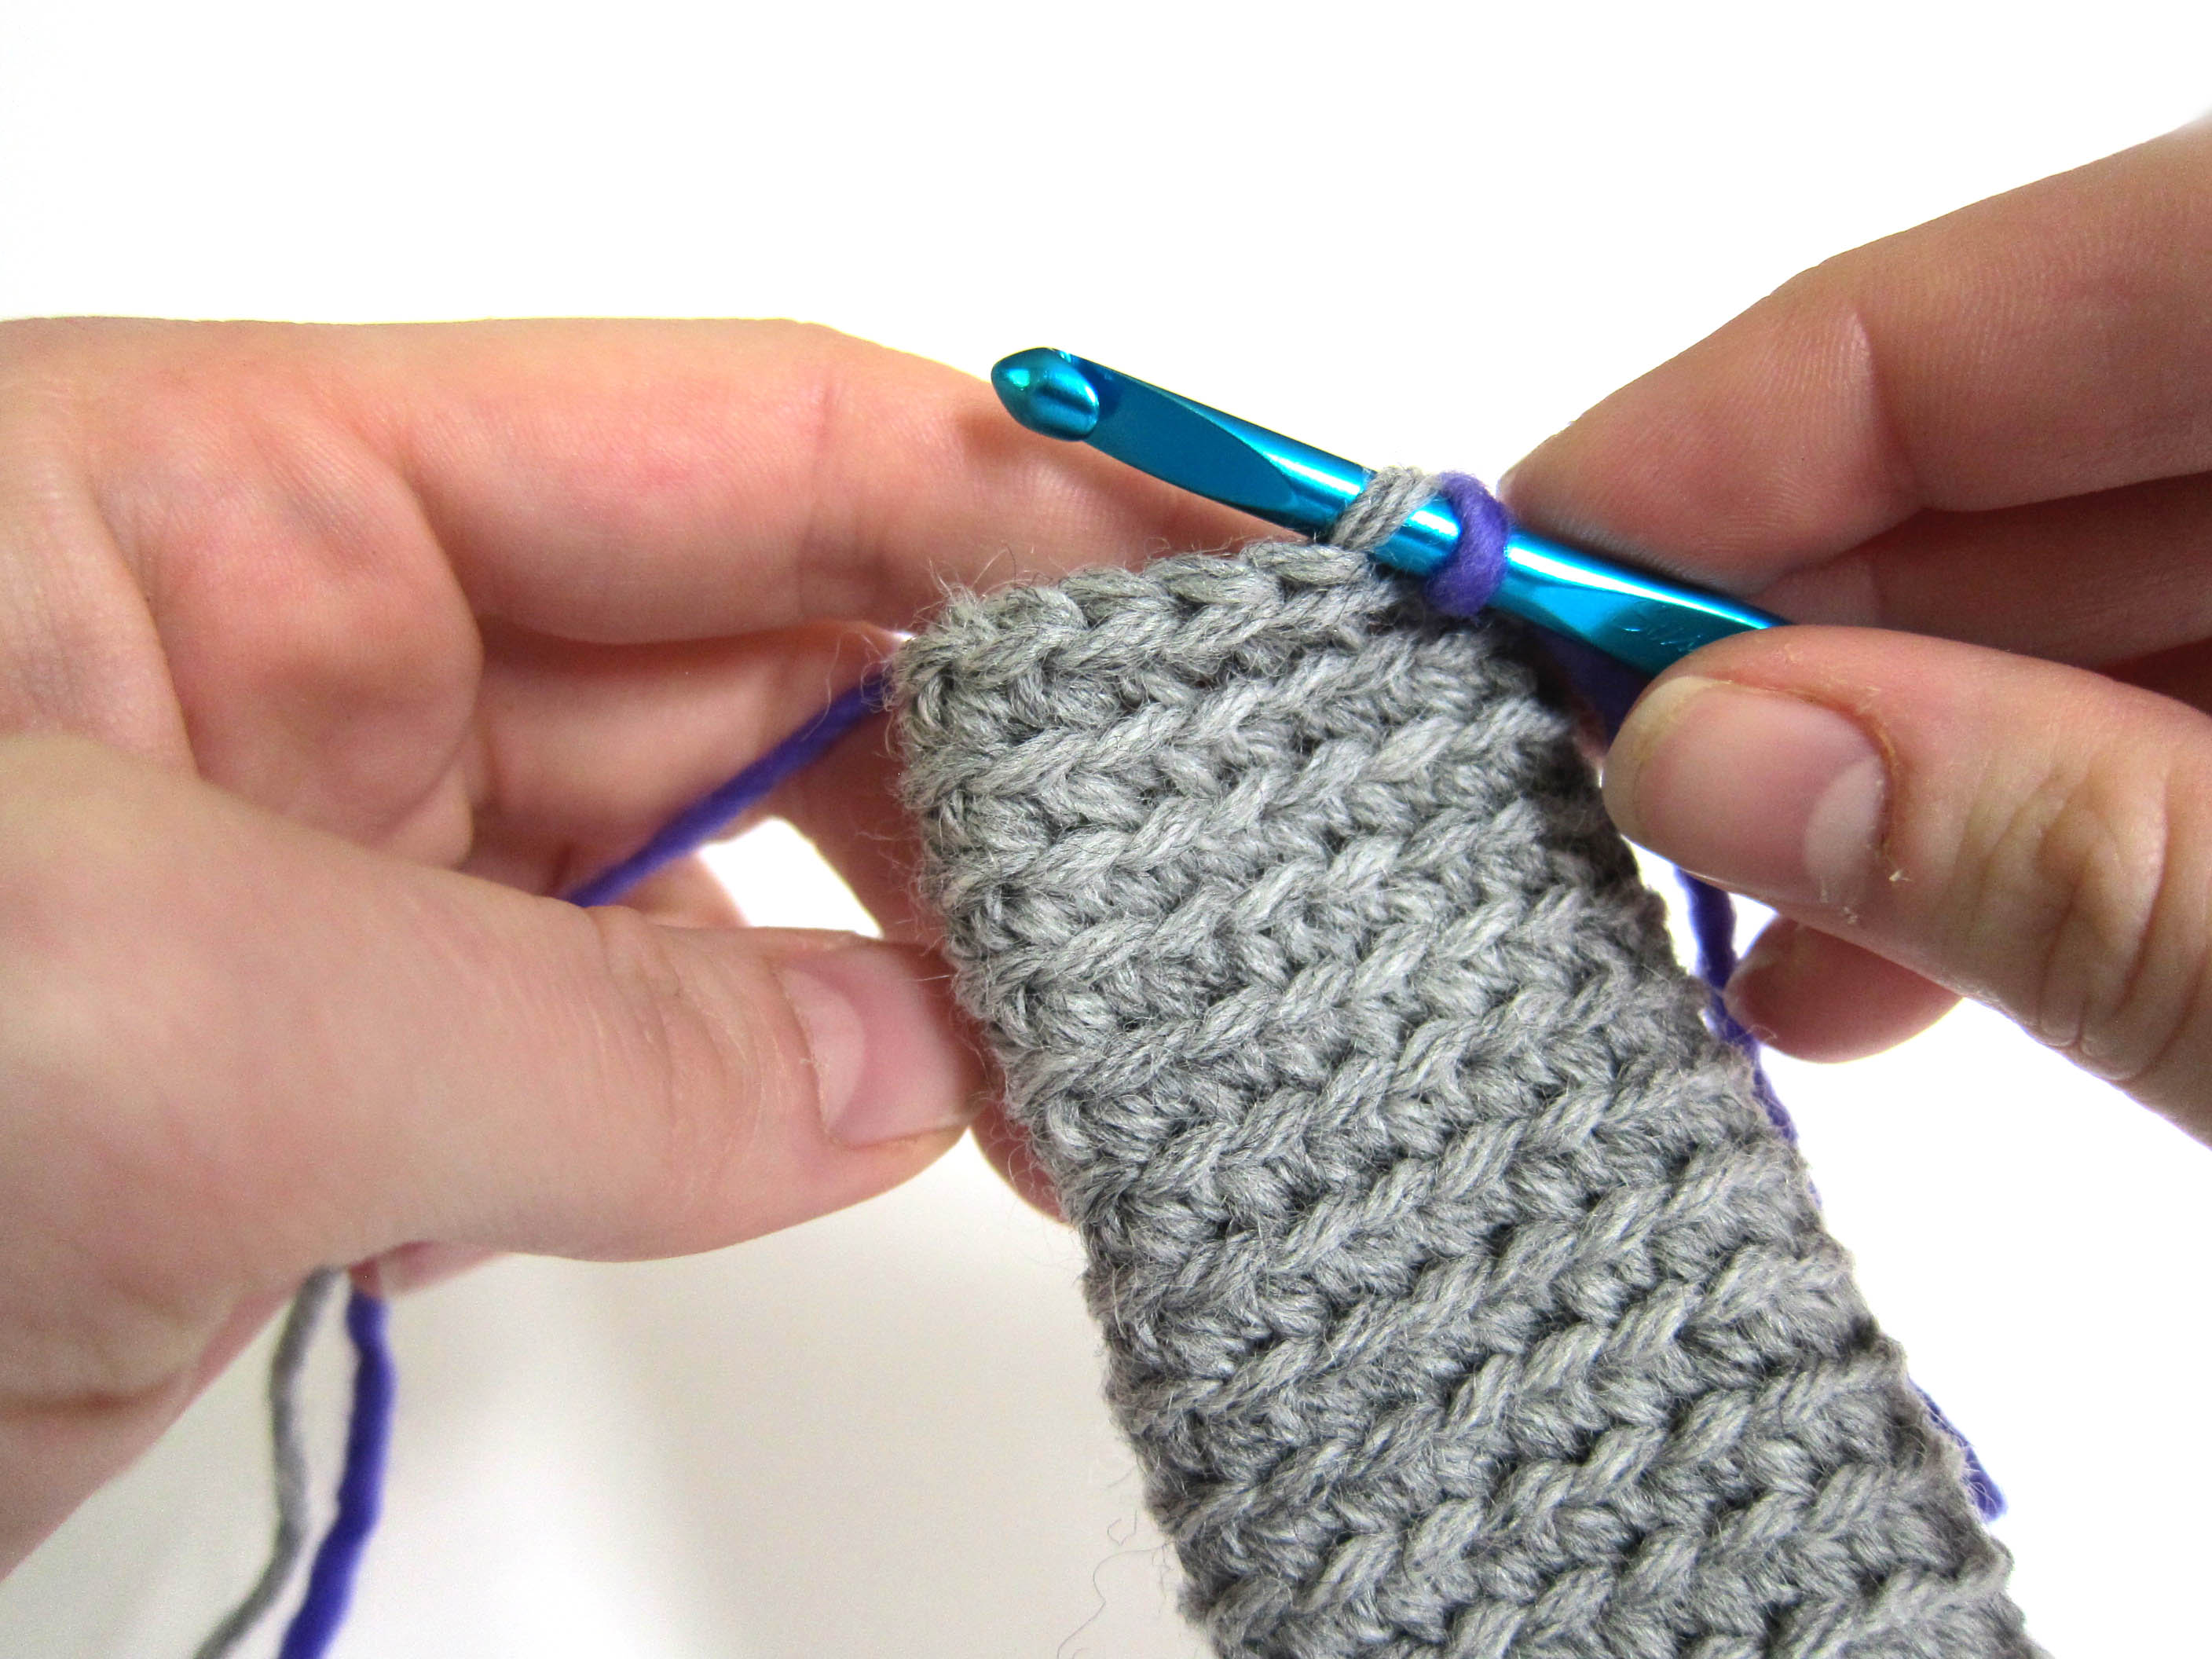
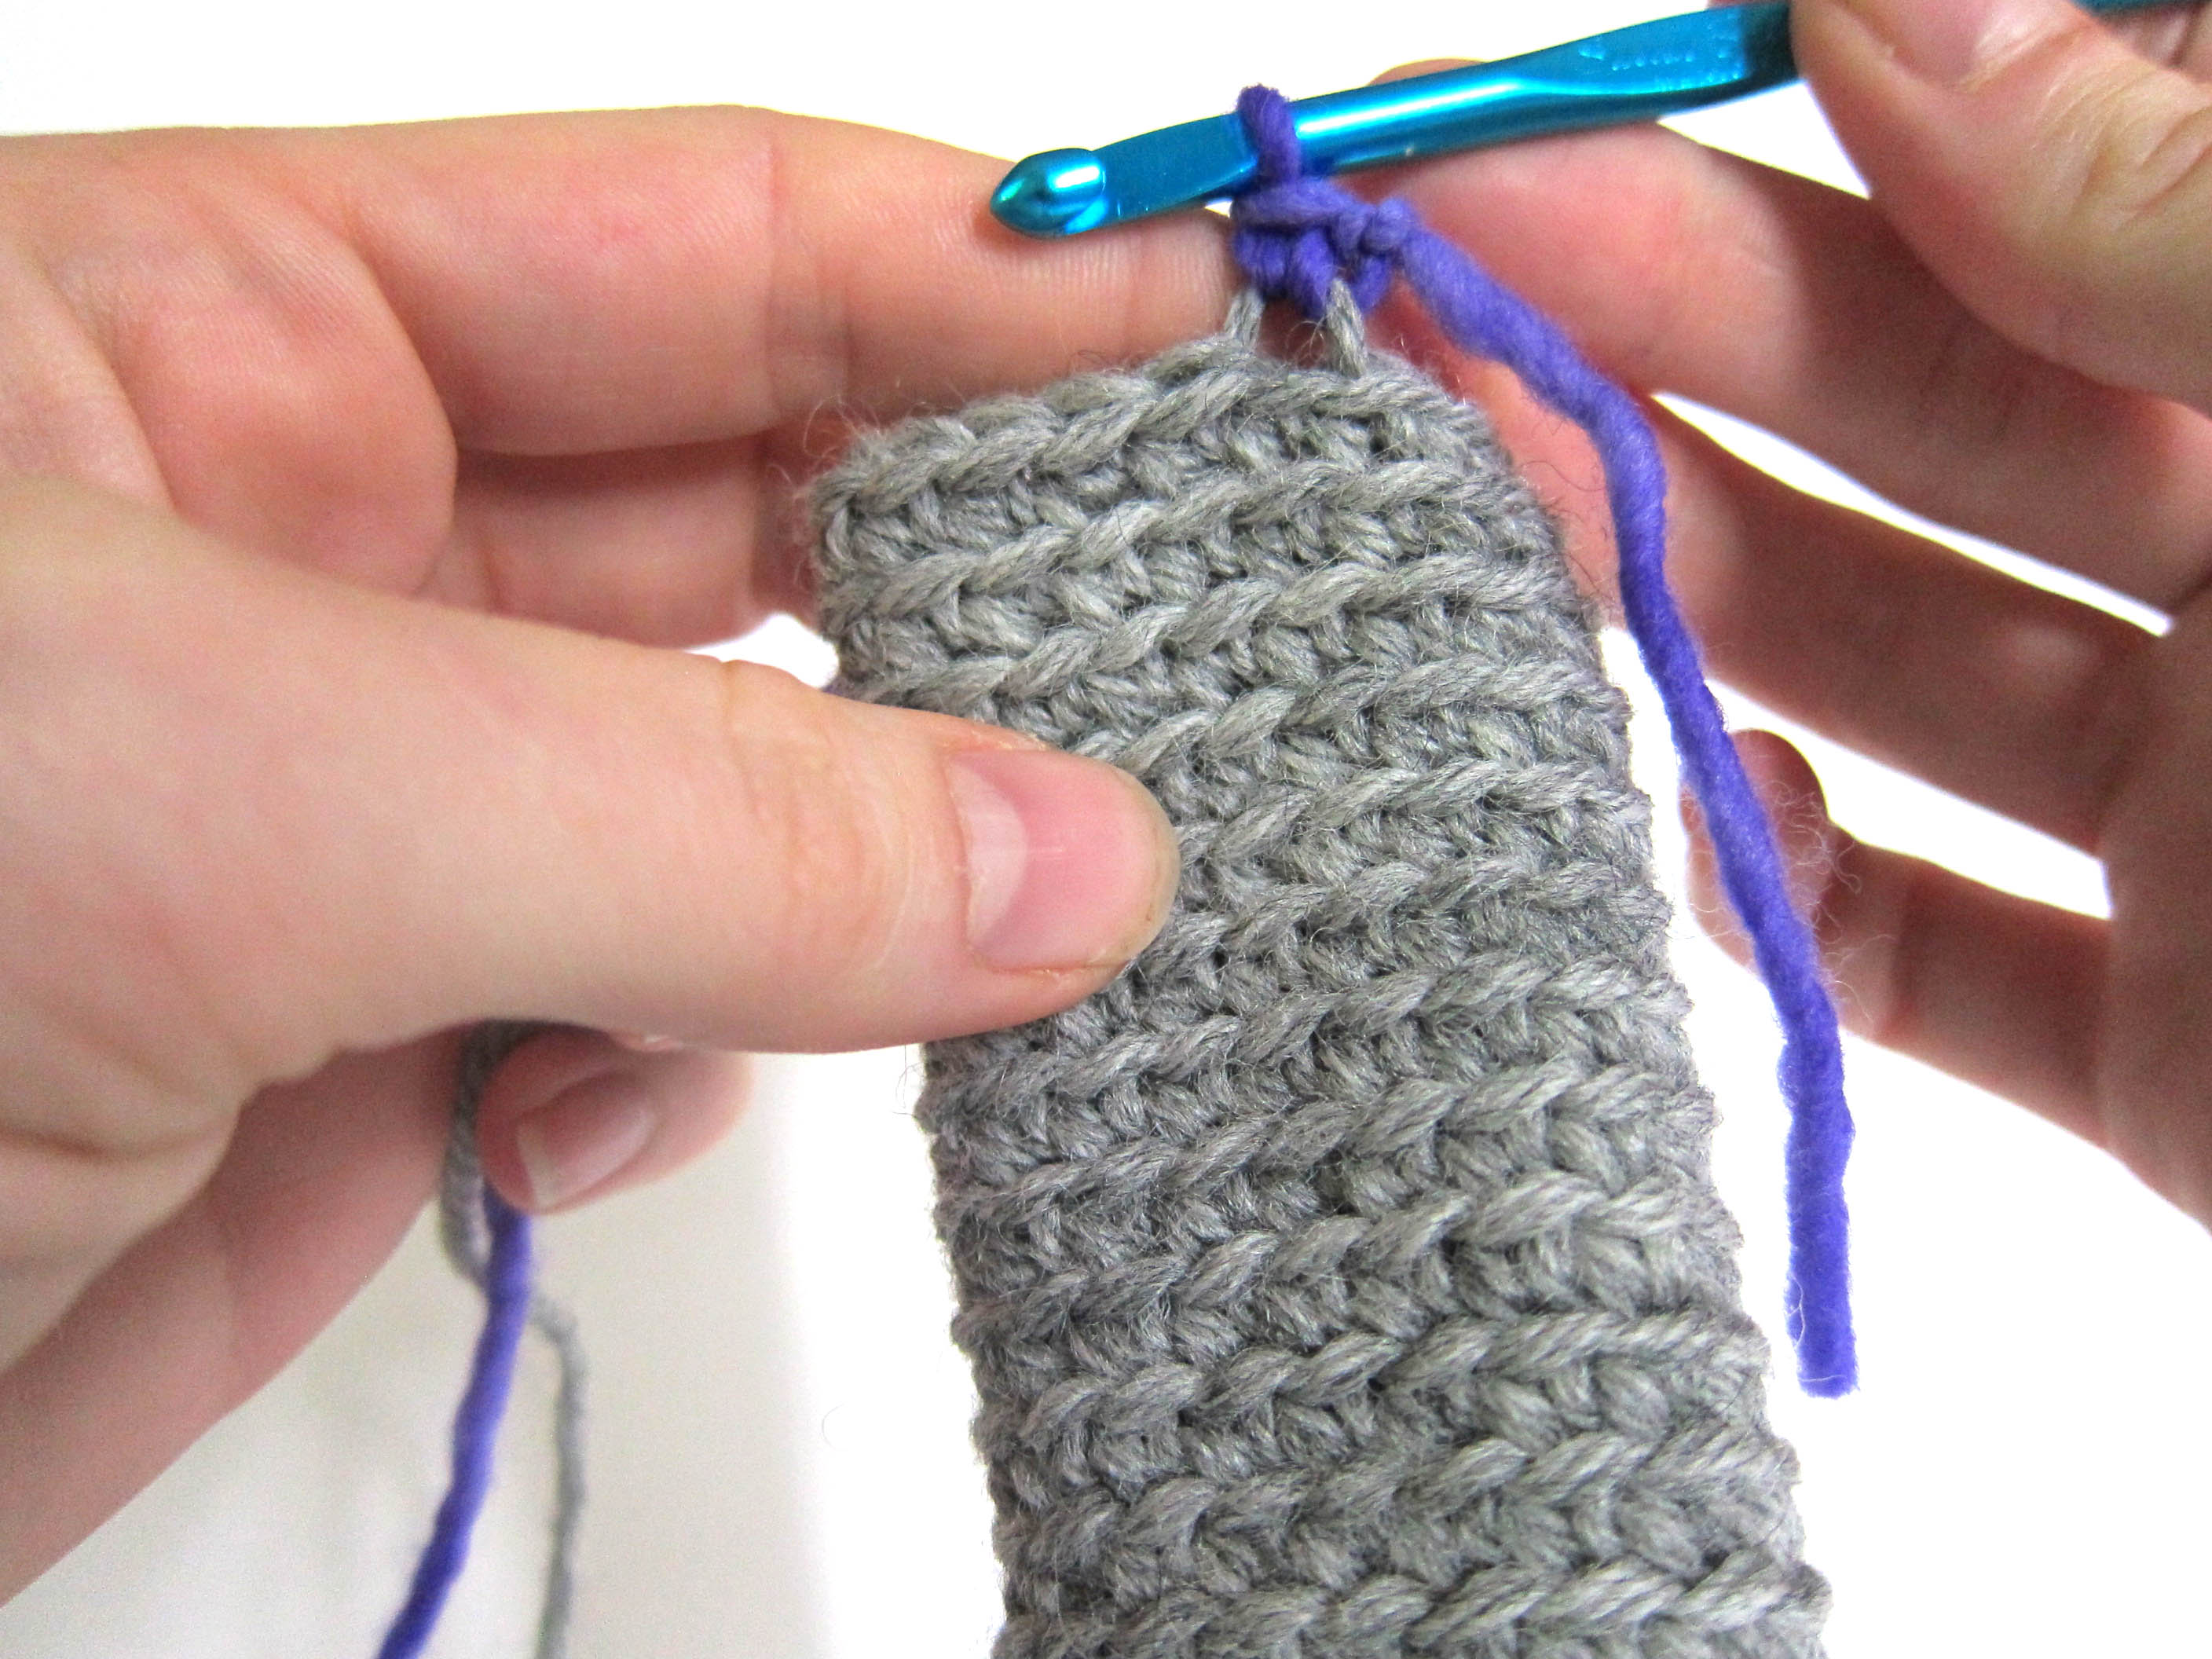
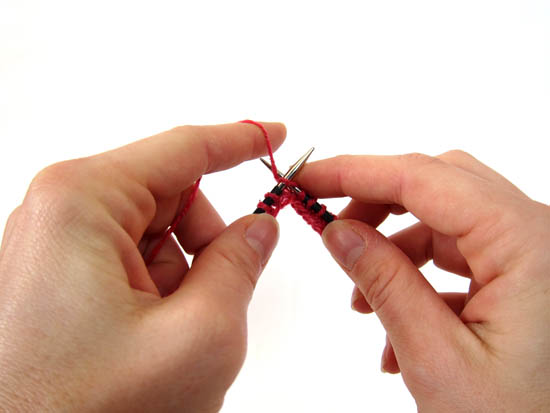
Occasionally, in a pattern, you’ll read the instruction ‘attach with a sc’. What does this mean? I’ll tell you!
Attach with a single crochet
This technique is used to attach a new yarn to an existing crocheted work. It’s used in the doll patterns to attach a piece of clothing like a dress or a sleeve. You might also use it to attach a foot to a slug, prickles to a hedgehog, a mane to a lion, and more.
Here’s how to do it. Begin with a slipknot on your hook:
Now, just pretend this loop is any ol’ loop! Insert your hook into the indicated stitch on your crocheted fabric:
And then crochet as instructed!
Hooray!
Here are handy links to all the posts about attaching parts. . .
Any other odds & ends the pattern calls for (in my case, craft eyes, thread, stuffing and felt)
A standard sewing toolkit (scissors, sewing needle, etc)
Fusible interfacing & an iron (optional)
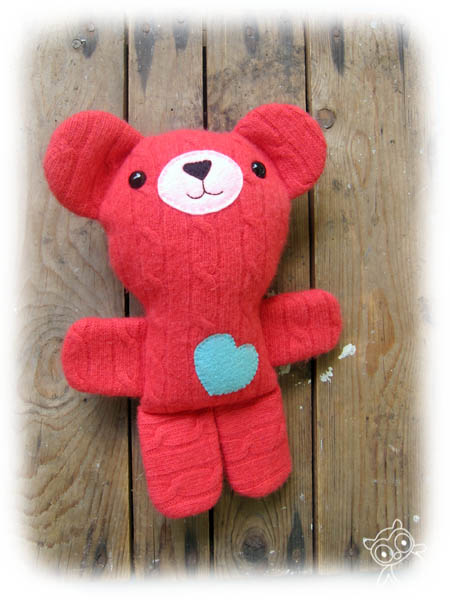
I’ll confess: I don’t like using a sewing machine. It’s loud and takes effort to set up. So, I sewed my Pete entirely by hand and loved it! You can’t use not having a machine as an excuse to skip sewing a cutie!
Felt your sweater
You’ll notice that I said that you’ll need a ‘mostly wool sweater’. This is because you’ll want to felt your sweater before cutting it up (or else it will unravel). A cotton or acrylic sweater just won’t felt.
Read this blog post for details on how to felt, but it’s not hard: you basically throw your sweater in the washing machine!
Once you’ve felted the sweater, cut the seams so that you have flat pieces of fabric to work with.
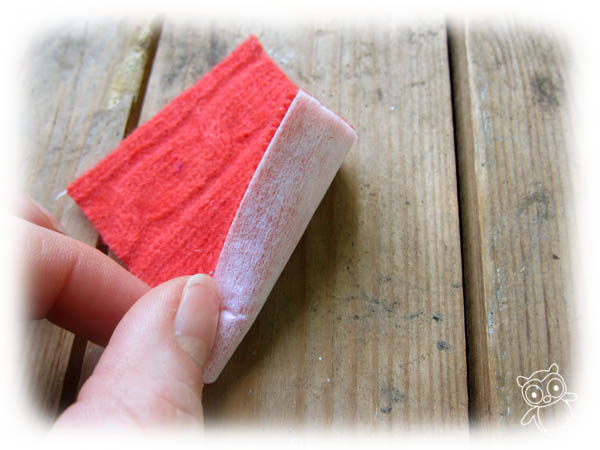
Decide if interfacing is right for you
If you felt your sweater, and it comes out feeling like felt you would buy in the store (pretty stiff and non-stretchy), then you don’t need interfacing.
The sweater I used was a wool blend, so it didn’t felt to be completely stiff. This meant that it was very stretchy (it’s a knit, after all!) and I wasn’t confident the ends wouldn’t fray. So, I used fusible interfacing.
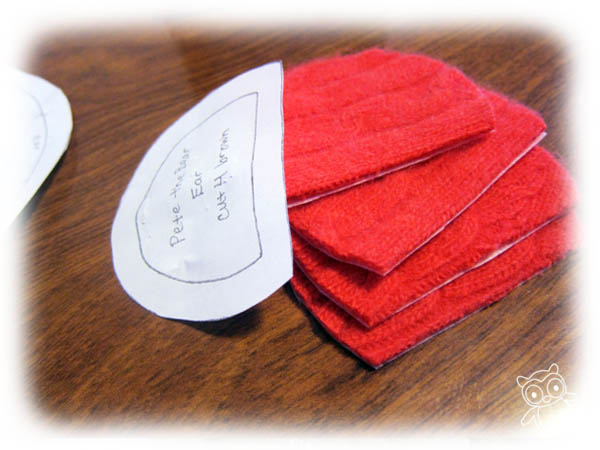
To use the interfacing, follow the instructions on the interfacing to fuse it to your sweater fabric. I fused the interfacing before cutting my pattern pieces, because doing so makes cutting easier.
Cut and sew!
Regardless of whether or not you used interfacing, cut your pattern pieces, and you’re ready to sew as instructed!
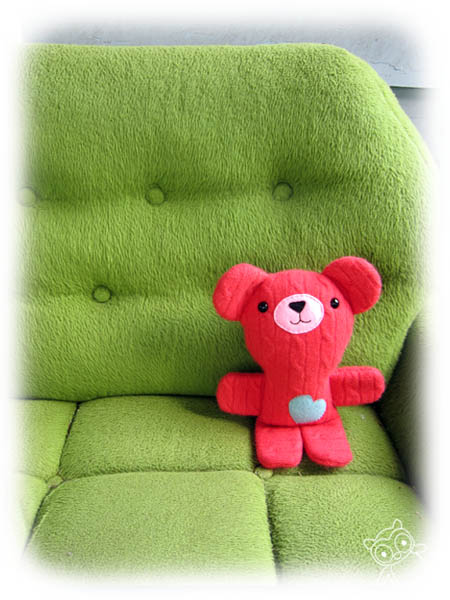
Isn’t this guy adorable?
This technique will work with any stuffed animal pattern that calls for fleece or felt as the fabric… which is most patterns! Go ahead and give it a try!
Lots of love to our June sponsors!
All the goodies that go into this blog take a bit of work, so I want to send a huge hug to this month’s sponsors for helping to make it all happen!
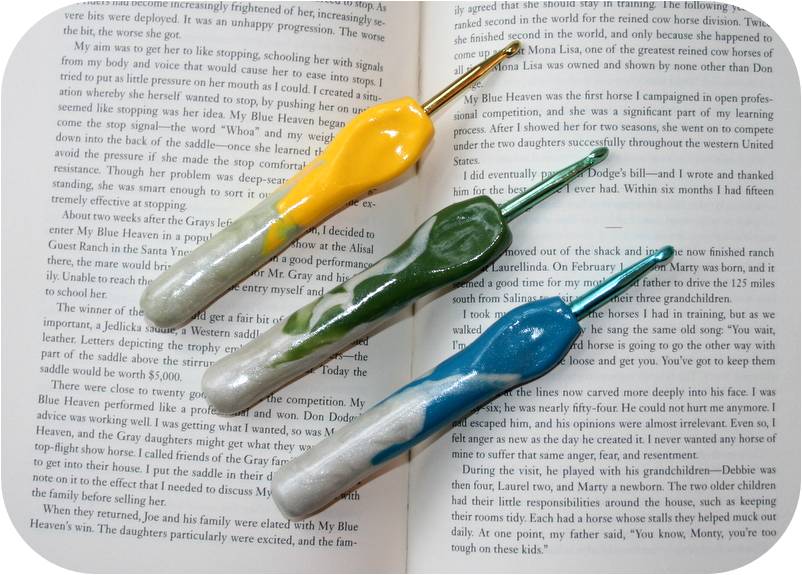
Purple Bird Crochet
Katie, of Purple Bird Crochet, is the maker behind beautiful ergonomic crochet hooks:
Aren’t they lovely? The hooks provide a comfortable place for your thumb to rest, and each hook is stamped with the hook size, so you won’t get mixed up!
These hooks are built on a Boye hook base. Katie’s hooks come in a variety of colors (and she’s open to requests), so you can get the color combo that’s right for you! Check out Purple Bird Crochet’s shop to view her full selection!
Katie is also giving the winner of the doll-a-long a set of three of her hooks… so you’ll want to enter!
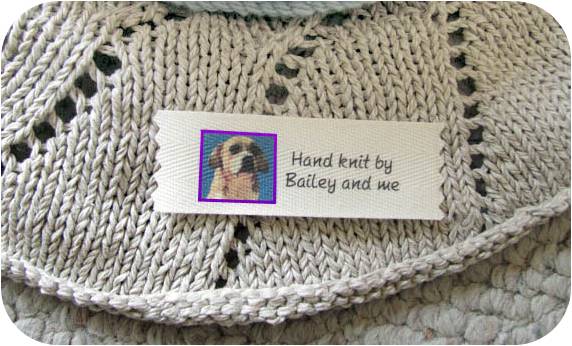
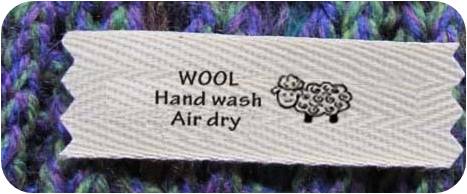
Mountain Street Arts
You’ve heard about these labels before, but now Pam’s added even more choices to her shop! And these aren’t the skinny satin labels you had sewn into your socks as a kid… these are high-quality labels that your work deserves!
In addition to covering a number of crafts (crochet, knitting, quilting…), Mountain Street Arts labels now have the option of adding a photo!
Isn’t that fabulous? If you don’t want to put your face on the labels, there are also a number of graphics & designs (each designed & drawn by Pam!) available. She also stocks care labels, so your work will always be properly cared for:
Visit Mountain Street Arts to view the full collection. These labels are perfect for your crocheting/knitting business or for gifts that you make!
Yeah, that’s right. You can’t stick me in one little crafty box. I knit, crochet, sew and needle felt. I’ve dabbled in wheel-throwing (pottery), metal-working, quilting, spinning, locker hooking, embroidery, beading and tatting. And depending on your definition of ‘craft’, you should add baking, cheese making and gardening to the list.
I’m irresistibly drawn to making things. But do you know what? If you’re not careful, being involved in oodles of crafts can be a messy business. What do you do with all of those tools? How do you find the time to do them all?
Here are my 6 tips for managing your multi-craftual-ness… follow these, and you’ll be crafting with ease!
1. Accept that your work won’t be perfect
If you’re multi-craftual, then you’re only spending a small percentage of your crafting time on any particular skill. So, if you show up to a quilting group, don’t worry that your skills aren’t as advanced as some other people in the group! They’ve probably put more time into practicing!
Instead, be proud of yourself that you’re trying out something new. Chances are, because you have so much crafting experience under your belt, you’re doing great for the level of quilting experience you have. Enjoy the learning process!
2. Be careful about stashing
If you’re a knitter, then it’s fine to buy and stash beautiful skeins of yarn. But what happens if start stashing yarn and fabric and beads and…
A mess.
When you’re multi-craftual, it’s extra important to reign in your stashing. Focus on making purchases when you have a project specifically planned.
3. Allow your skills to transfer, even if it makes you ‘different’
I began my needlework life as a crocheter. This means that I tension my yarn with my left hand. So, when I began knitting, it was natural for me to knit ‘continental’ (holding the yarn in my left hand).
As a beginner, a number of people told me that I should learn to throw (also called knitting ‘American’ or ‘English’), because it was easier, and learn ‘continental’ later. I ignored that advice, and I’m happy I did!
You see, I was already comfortable holding my yarn a certain way… why not roll with that? When you’re multi-craftual, you need to let your experience from other crafts transfer, even if it means you’re learning ‘a little funny’. Follow your gut!
4. Divide your crafting time
Some crafts are better to do at certain times. Maybe crocheting a washcloth is easy to do in front of the TV, but your intricate beading is best done under the good lighting in your bedroom. And your sewing is easiest on weekends when you can commandeer the dining room table for your machine.
Think about when your crafts are most suitable to do. And if you work on crafts when they’re easiest, you’ll find that less frustration comes your way.
5. Know when a craft needs to leave your house
I told you I dabbled in metal working. Did I buy a soldering iron and drill press? No.
I took a class at my local arts center, where renting the equipment was part of my class fee.
Not all of the crafts you do need to be in your house. Look for opportunities (including renting sewing machine hours at a sewing shop) to do them outside of your living space. Not only will this provide a social opportunity, it saves space and a serious investment of money when you’re still just dabbling.
6. Find various groups
If you’re multi-craftual, it may be hard to find others who share all of your passions. But having others (either in real life or online) who support your crafts and inspire you is important to stay motivated and keep learning.
You may need to join a knitting circle and find a sewing forum online to meet your needs. Look for groups that meet infrequently, since joining multiple weekly groups would be a serious time-commitment!
What are your crafts?
Are you multi-craftual too? What crafts are you into? Any tips for managing them? Do share!
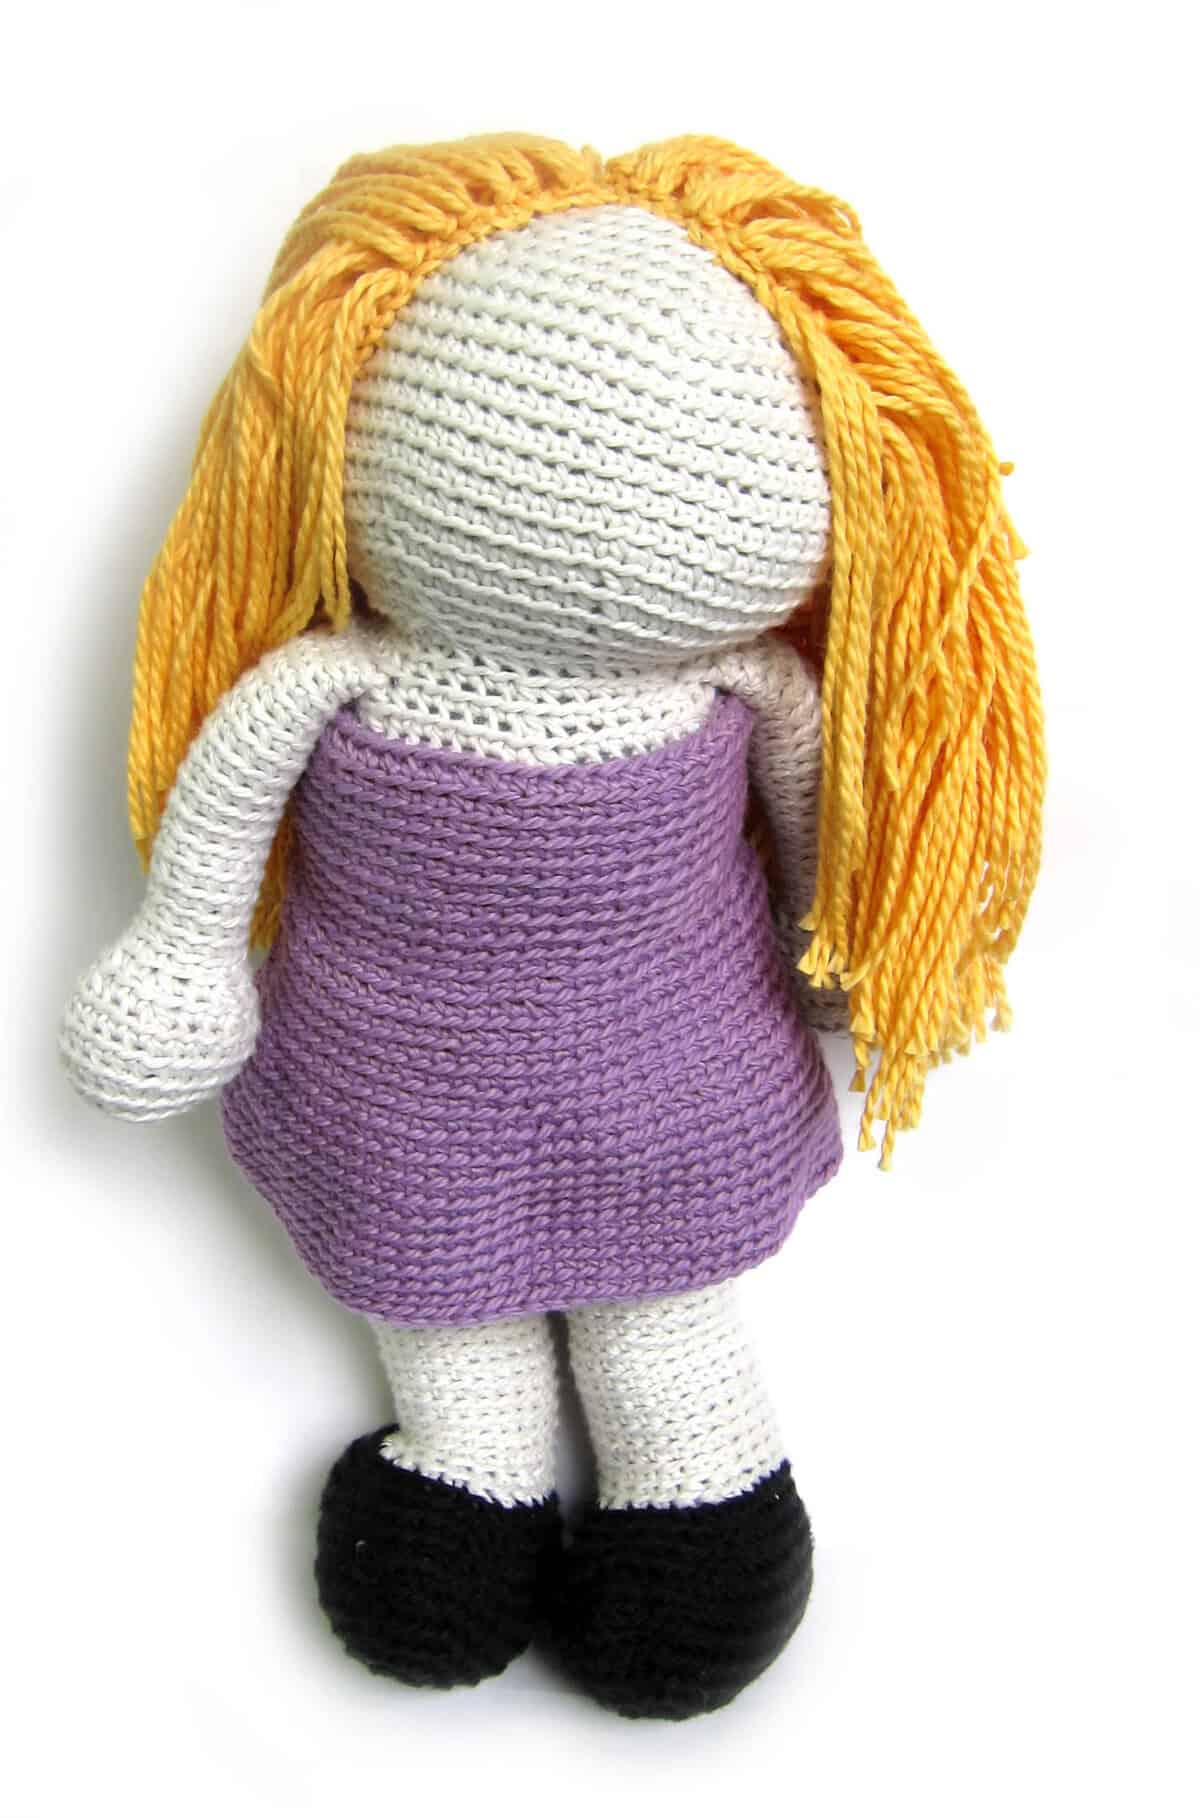
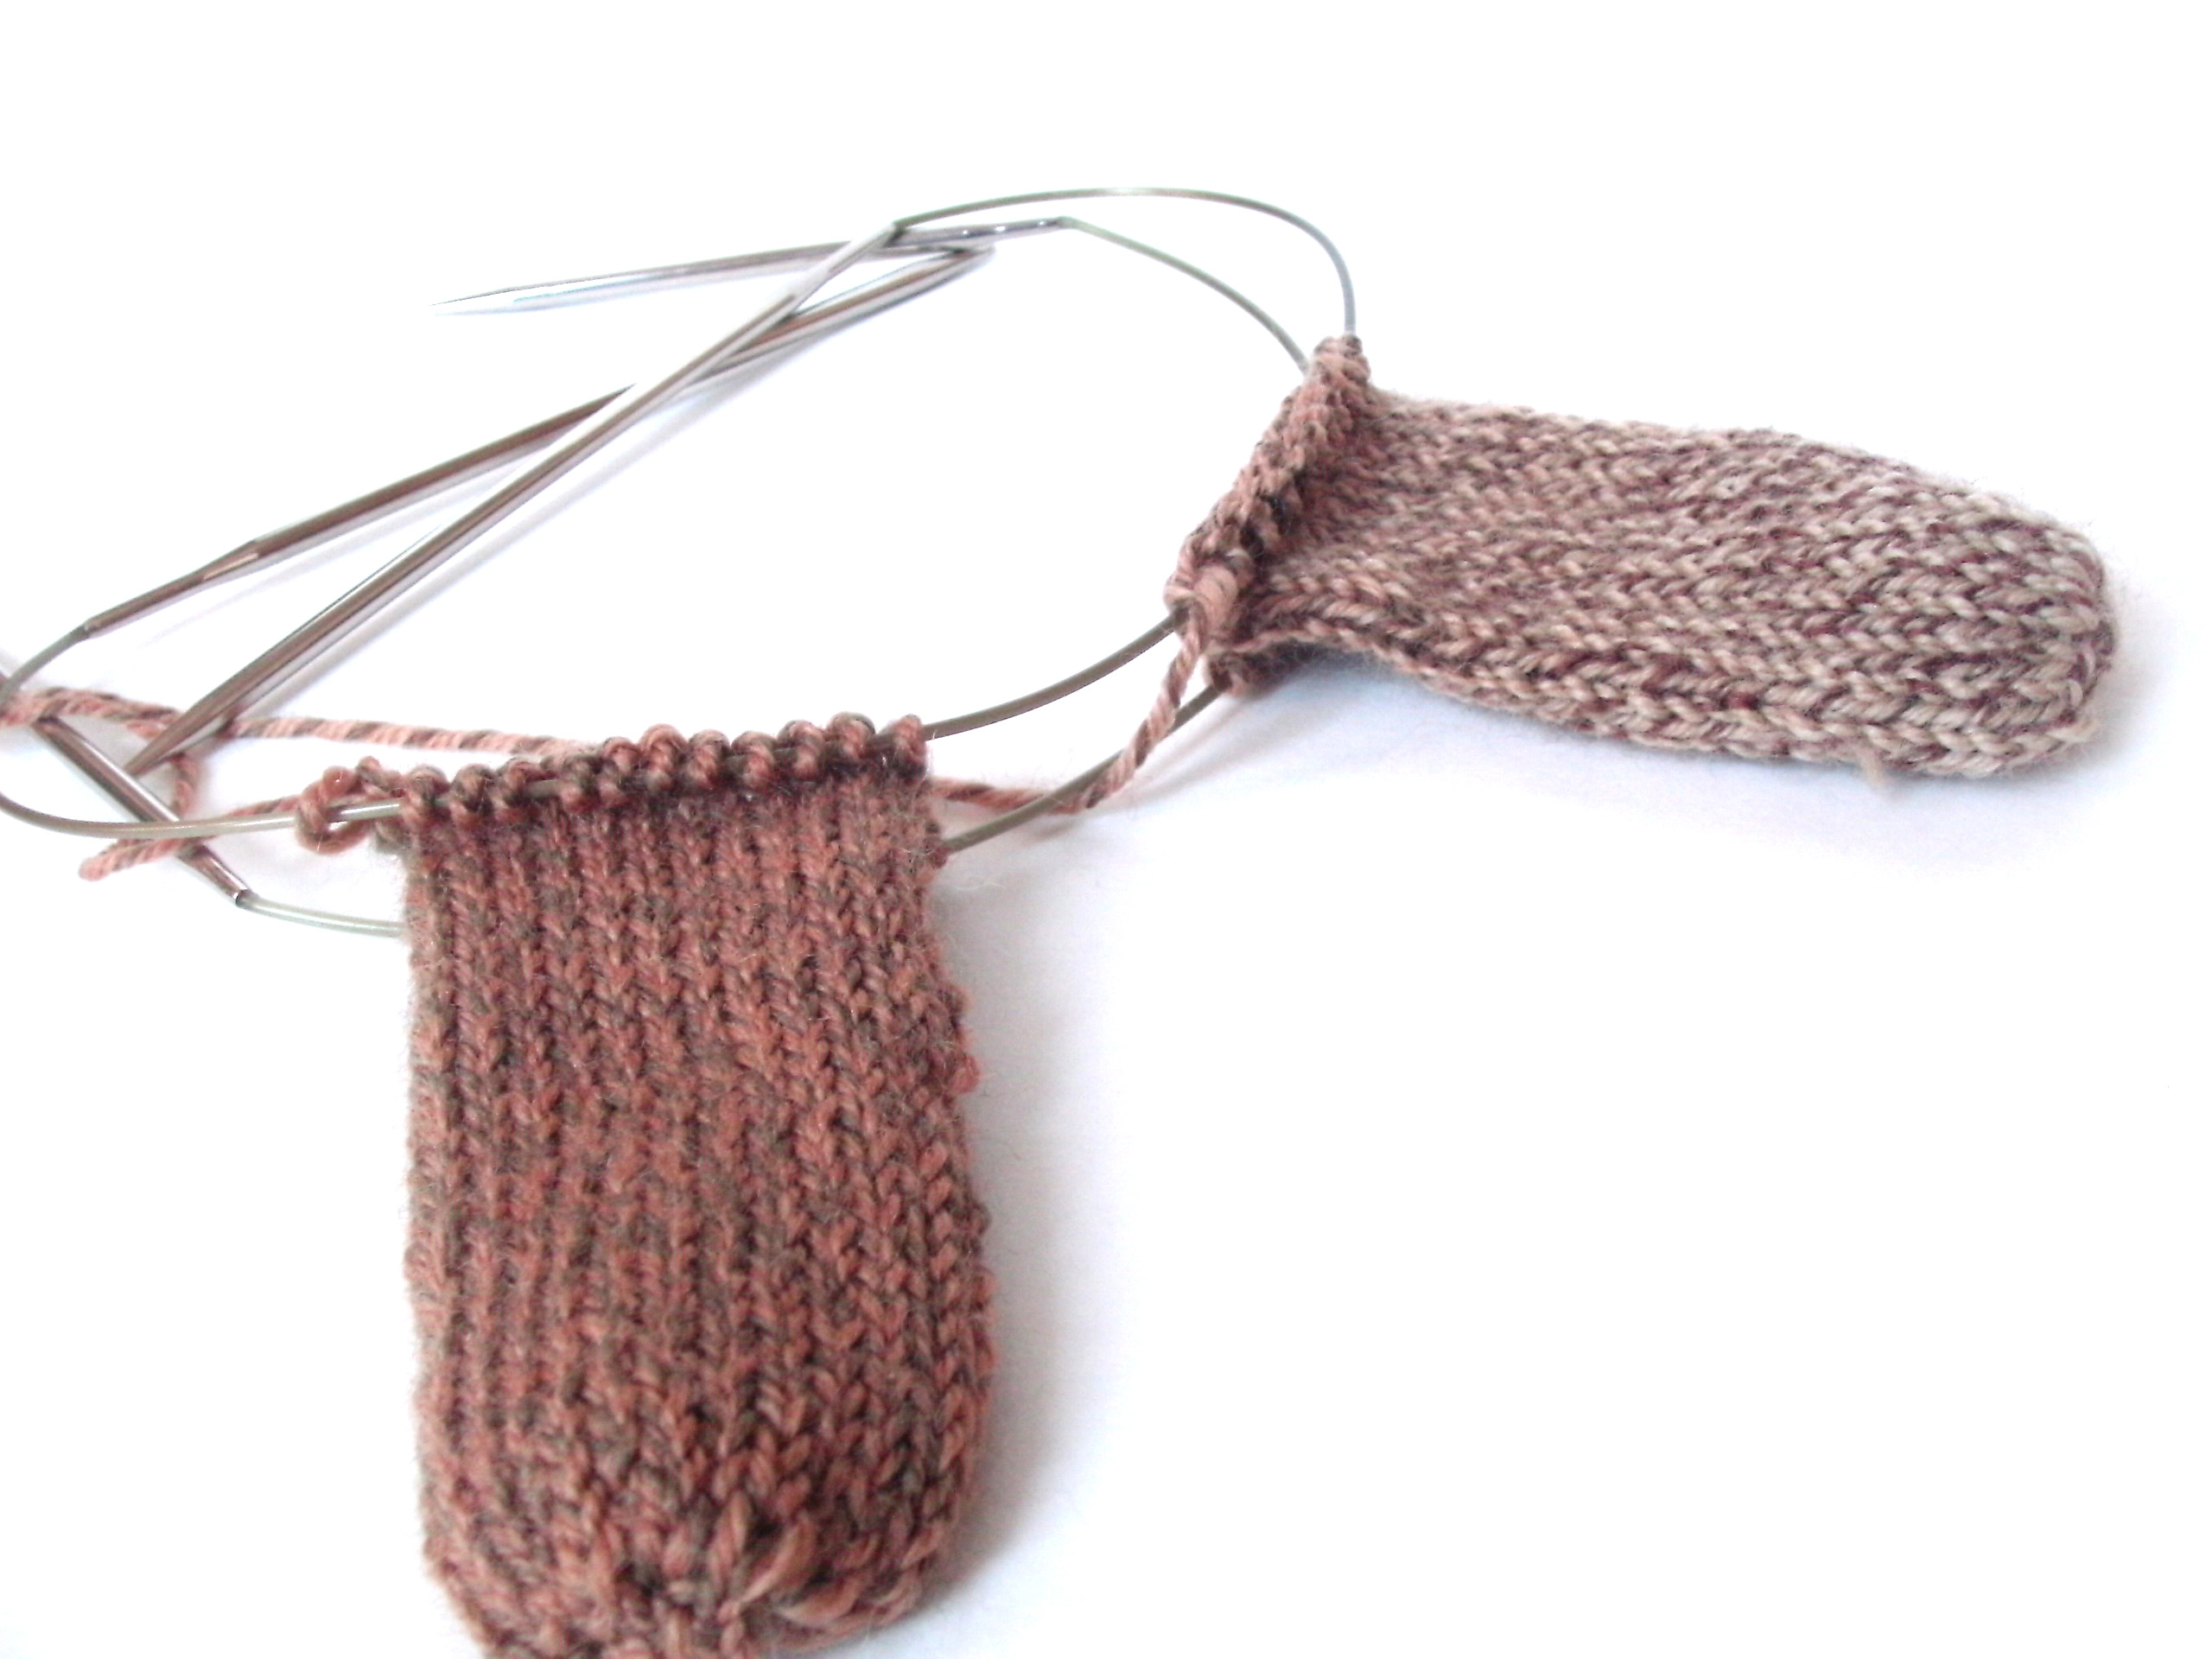
Are you crocheting along with us for the doll-a-long?
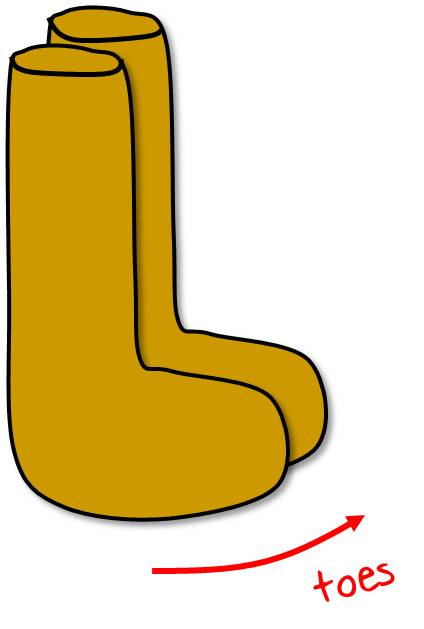
If so, hooray! What part are you up to? Today I’m going to show you some tips for aligning and crocheting together your doll’s legs!
Not crocheting along? It’s not too late to join in! Grab a copy of the pattern and start crocheting!
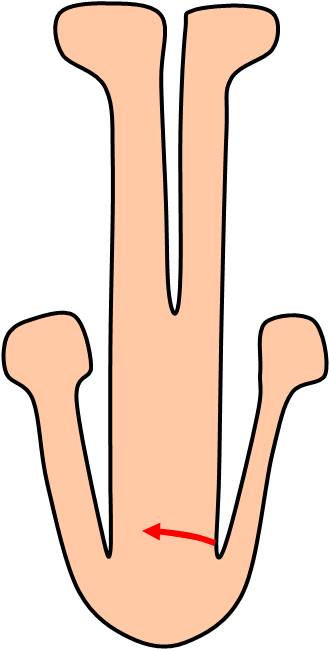
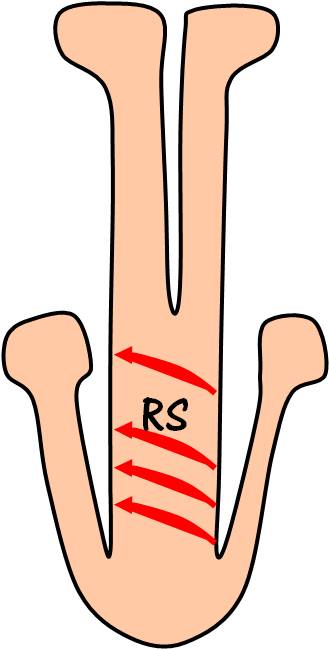
How to align the legs
Once you’ve crocheted your legs, you’re going to crochet them together to continue her body. This method of construction is great… since it lets you skip doing any sewing! But it may be new to some of you, so don’t worry if it feels a little confusing.
You want your doll’s toes to be straight and facing forward, right?
So, once you’ve crocheted your two legs, hold them together so that the toes face in the same direction:
Now, here’s the trick! Use a locking stitch marker to pin the legs together in the position you want them:
How to crochet the legs together
For details on the crocheting, you’ll want to check out this video.
Keep going!
Hooray! In my opinion, you’ve just finished the trickiest part of the whole pattern! (Well, besides picking the clothing colors… that’s a real pickle!)
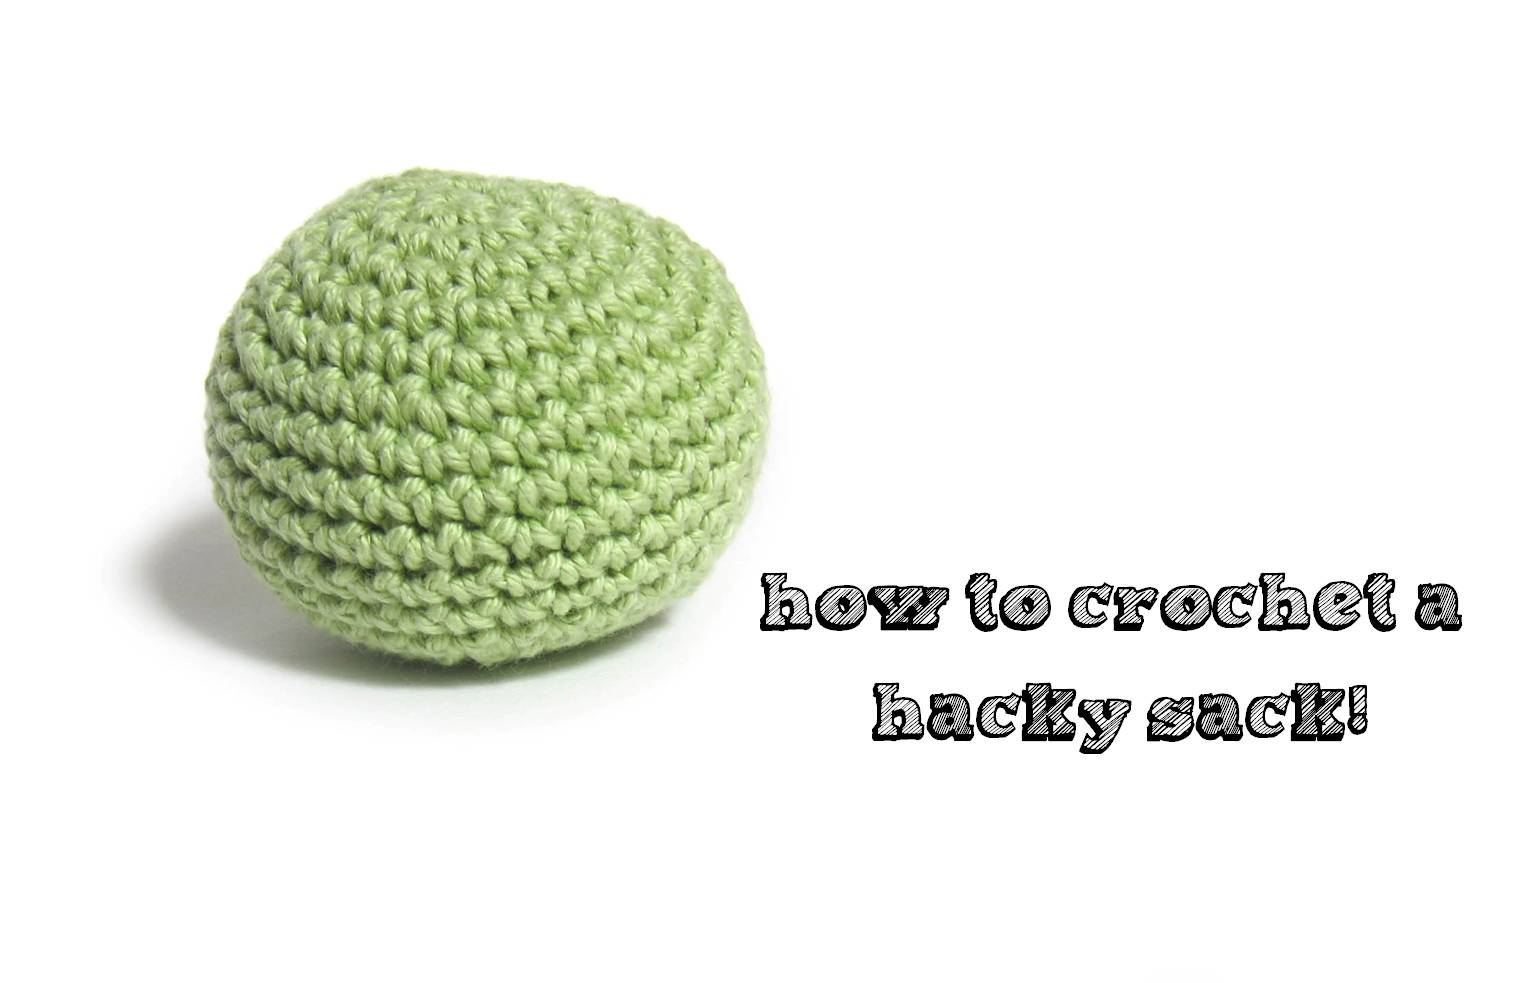
Now that summer’s rolling around, I bet you’re looking for excuses to get you (and your kids) outside! How about making a hacky sack? (Don’t know what playing hacky sack looks like? It’s worth having a look on YouTube!)
If you can single crochet, you can make a hacky sack! I’ll show you how!
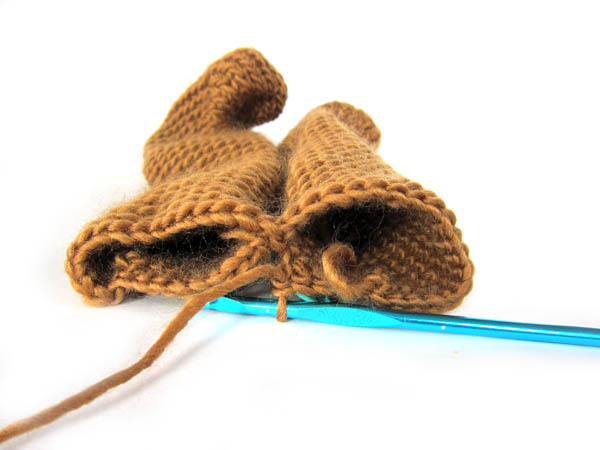
Round 1: Sc 6 times in 2nd ch from hook. (6) Round 2: Sc twice in each st. (12) Round 3: *Sc twice in next st, sc in next st. Repeat from * 5 times. (18) Round 4: *Sc twice in next st, sc in next 2 sts. Repeat from * 5 times. (24) Round 5: *Sc twice in next st, sc in next 3 sts. Repeat from * 5 times. (30) Round 6: *Sc twice in next st, sc in next 4 sts. Repeat from * 5 times. (36) Rounds 7-12 Sc in each st. (36, 6 rounds) Round 13: *Sc2tog, sc in next 4 sts. Repeat from * 5 times. (30)
Remove hook…
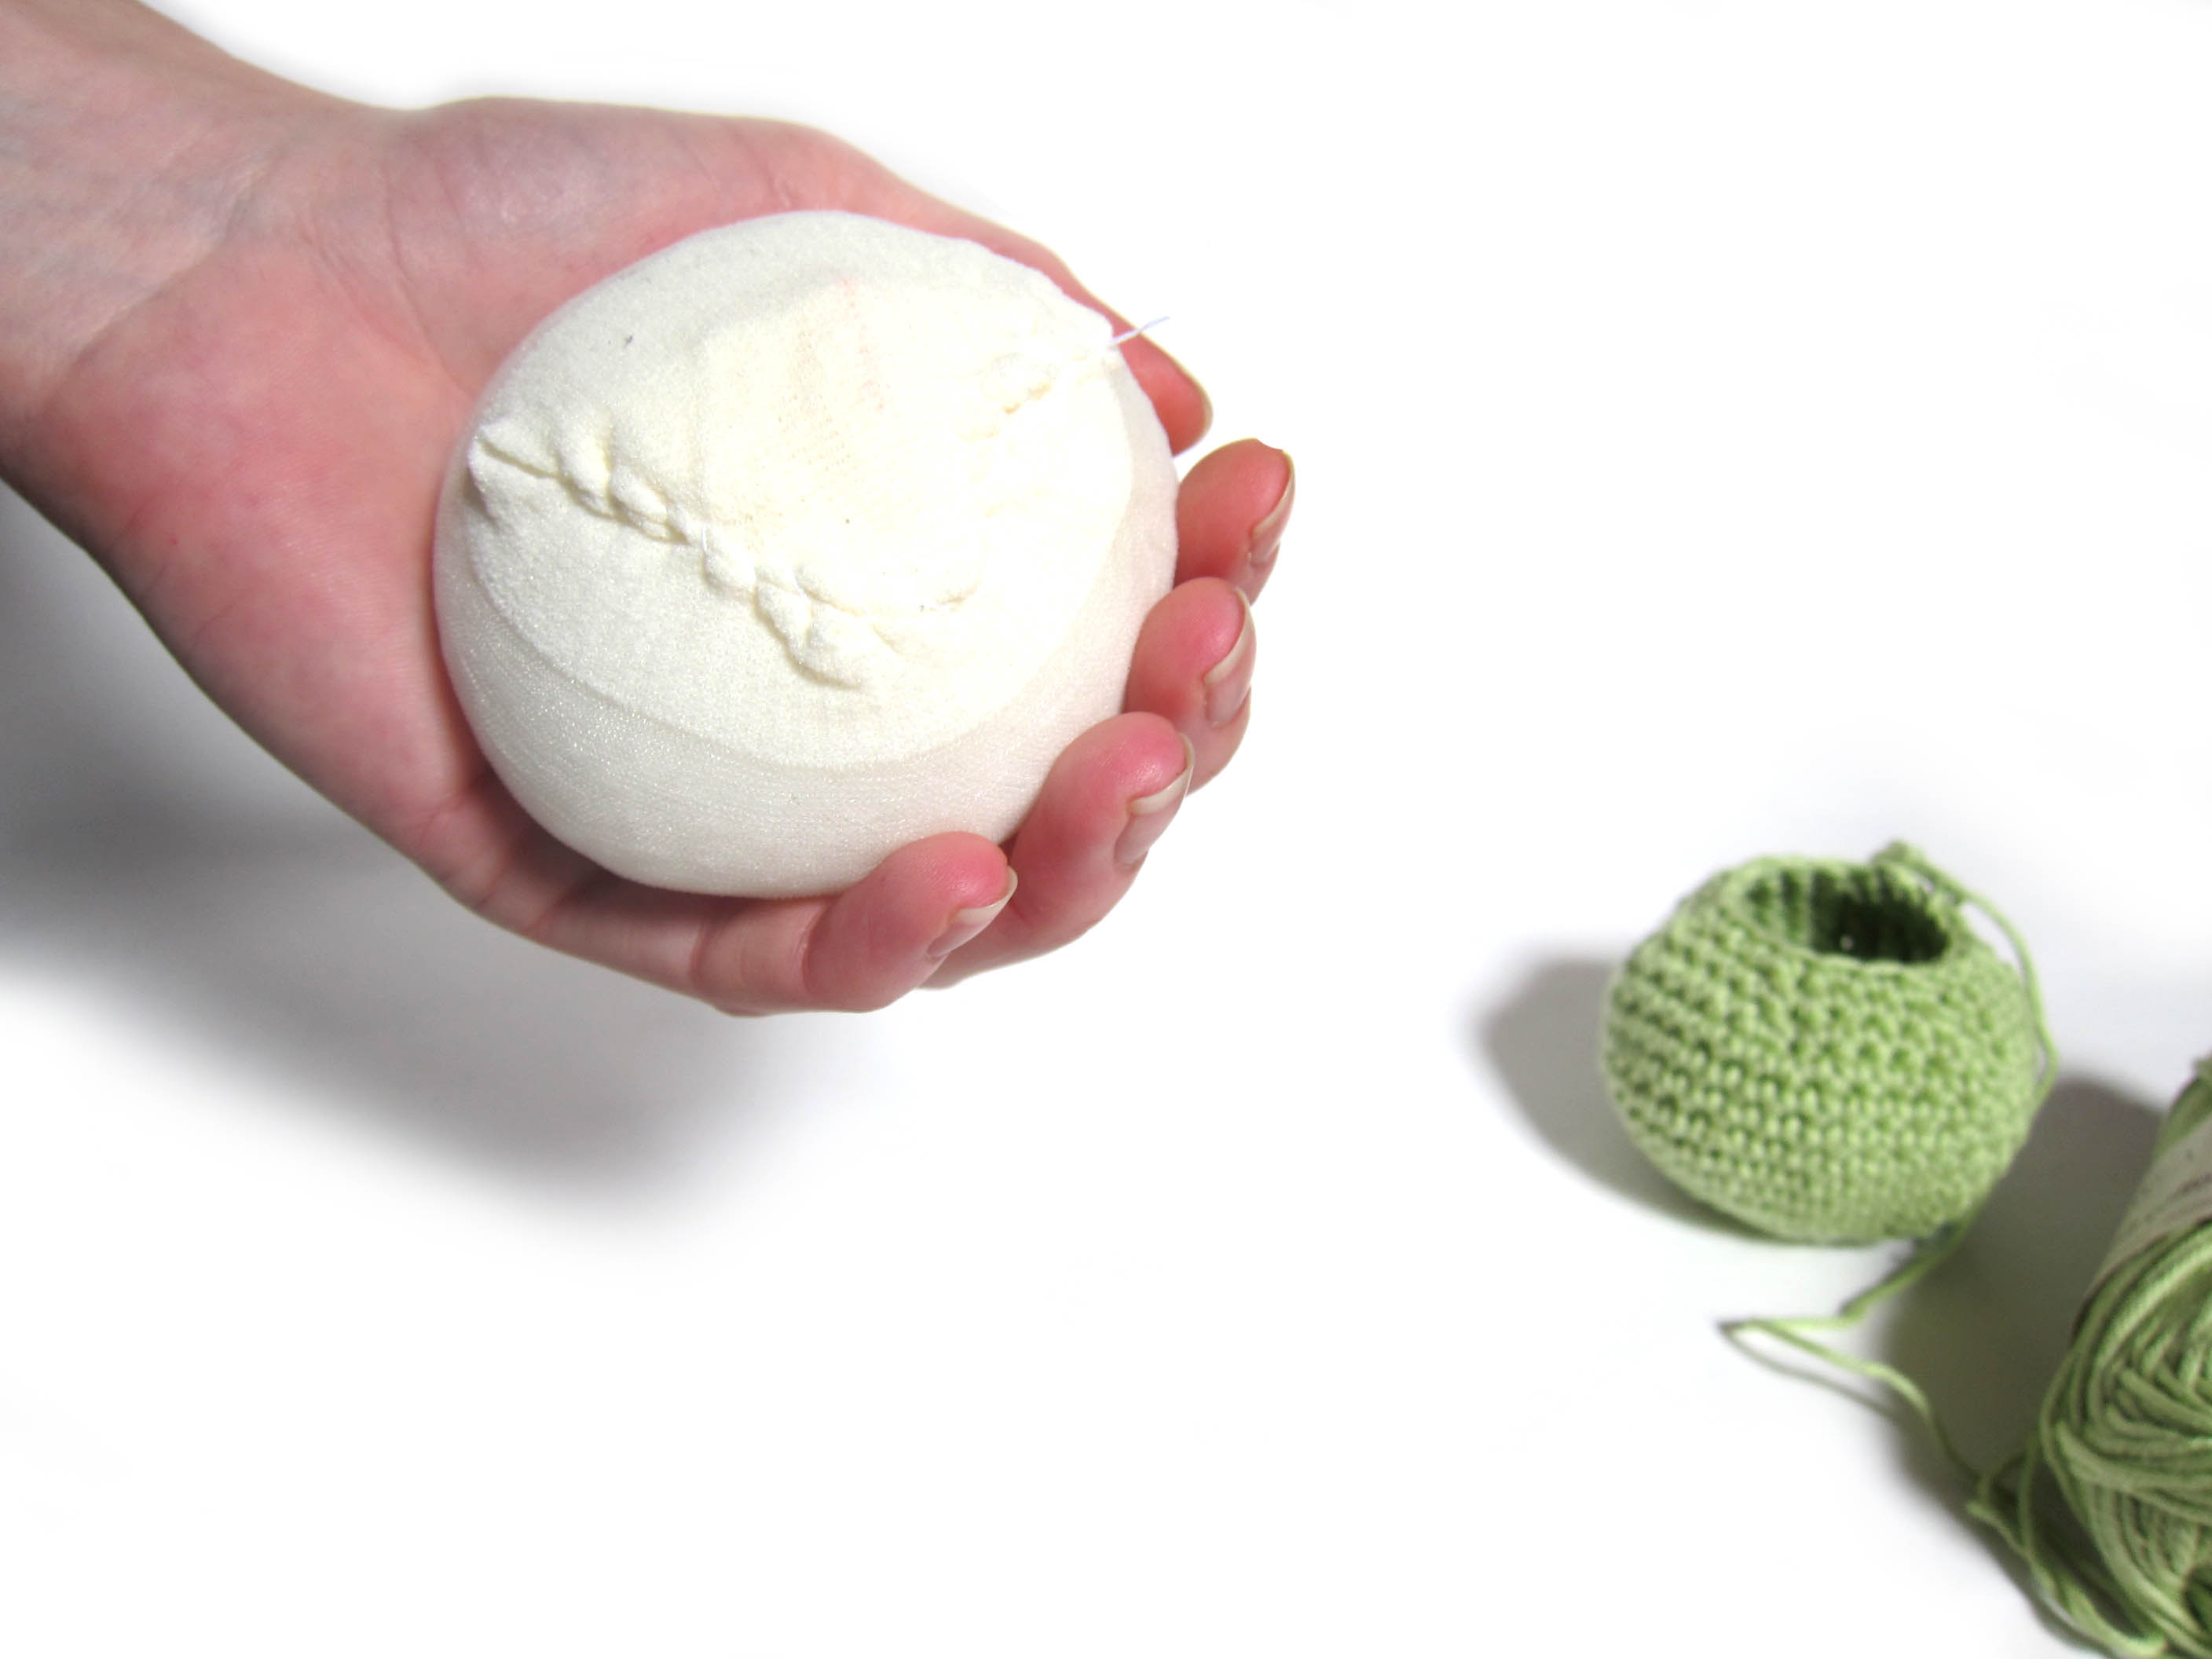
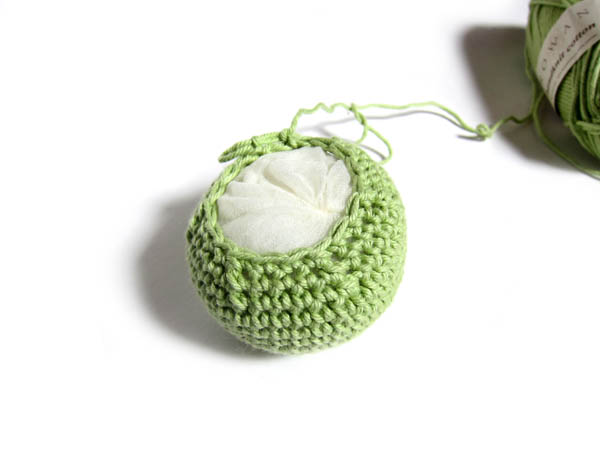
Place a handful of poly-beads in the nylon sock and sew it up. Your goal is to create a ball that will fill your hacky sack about 90% full:
Place your stuffed stocking inside your crochet.
Continue crocheting…
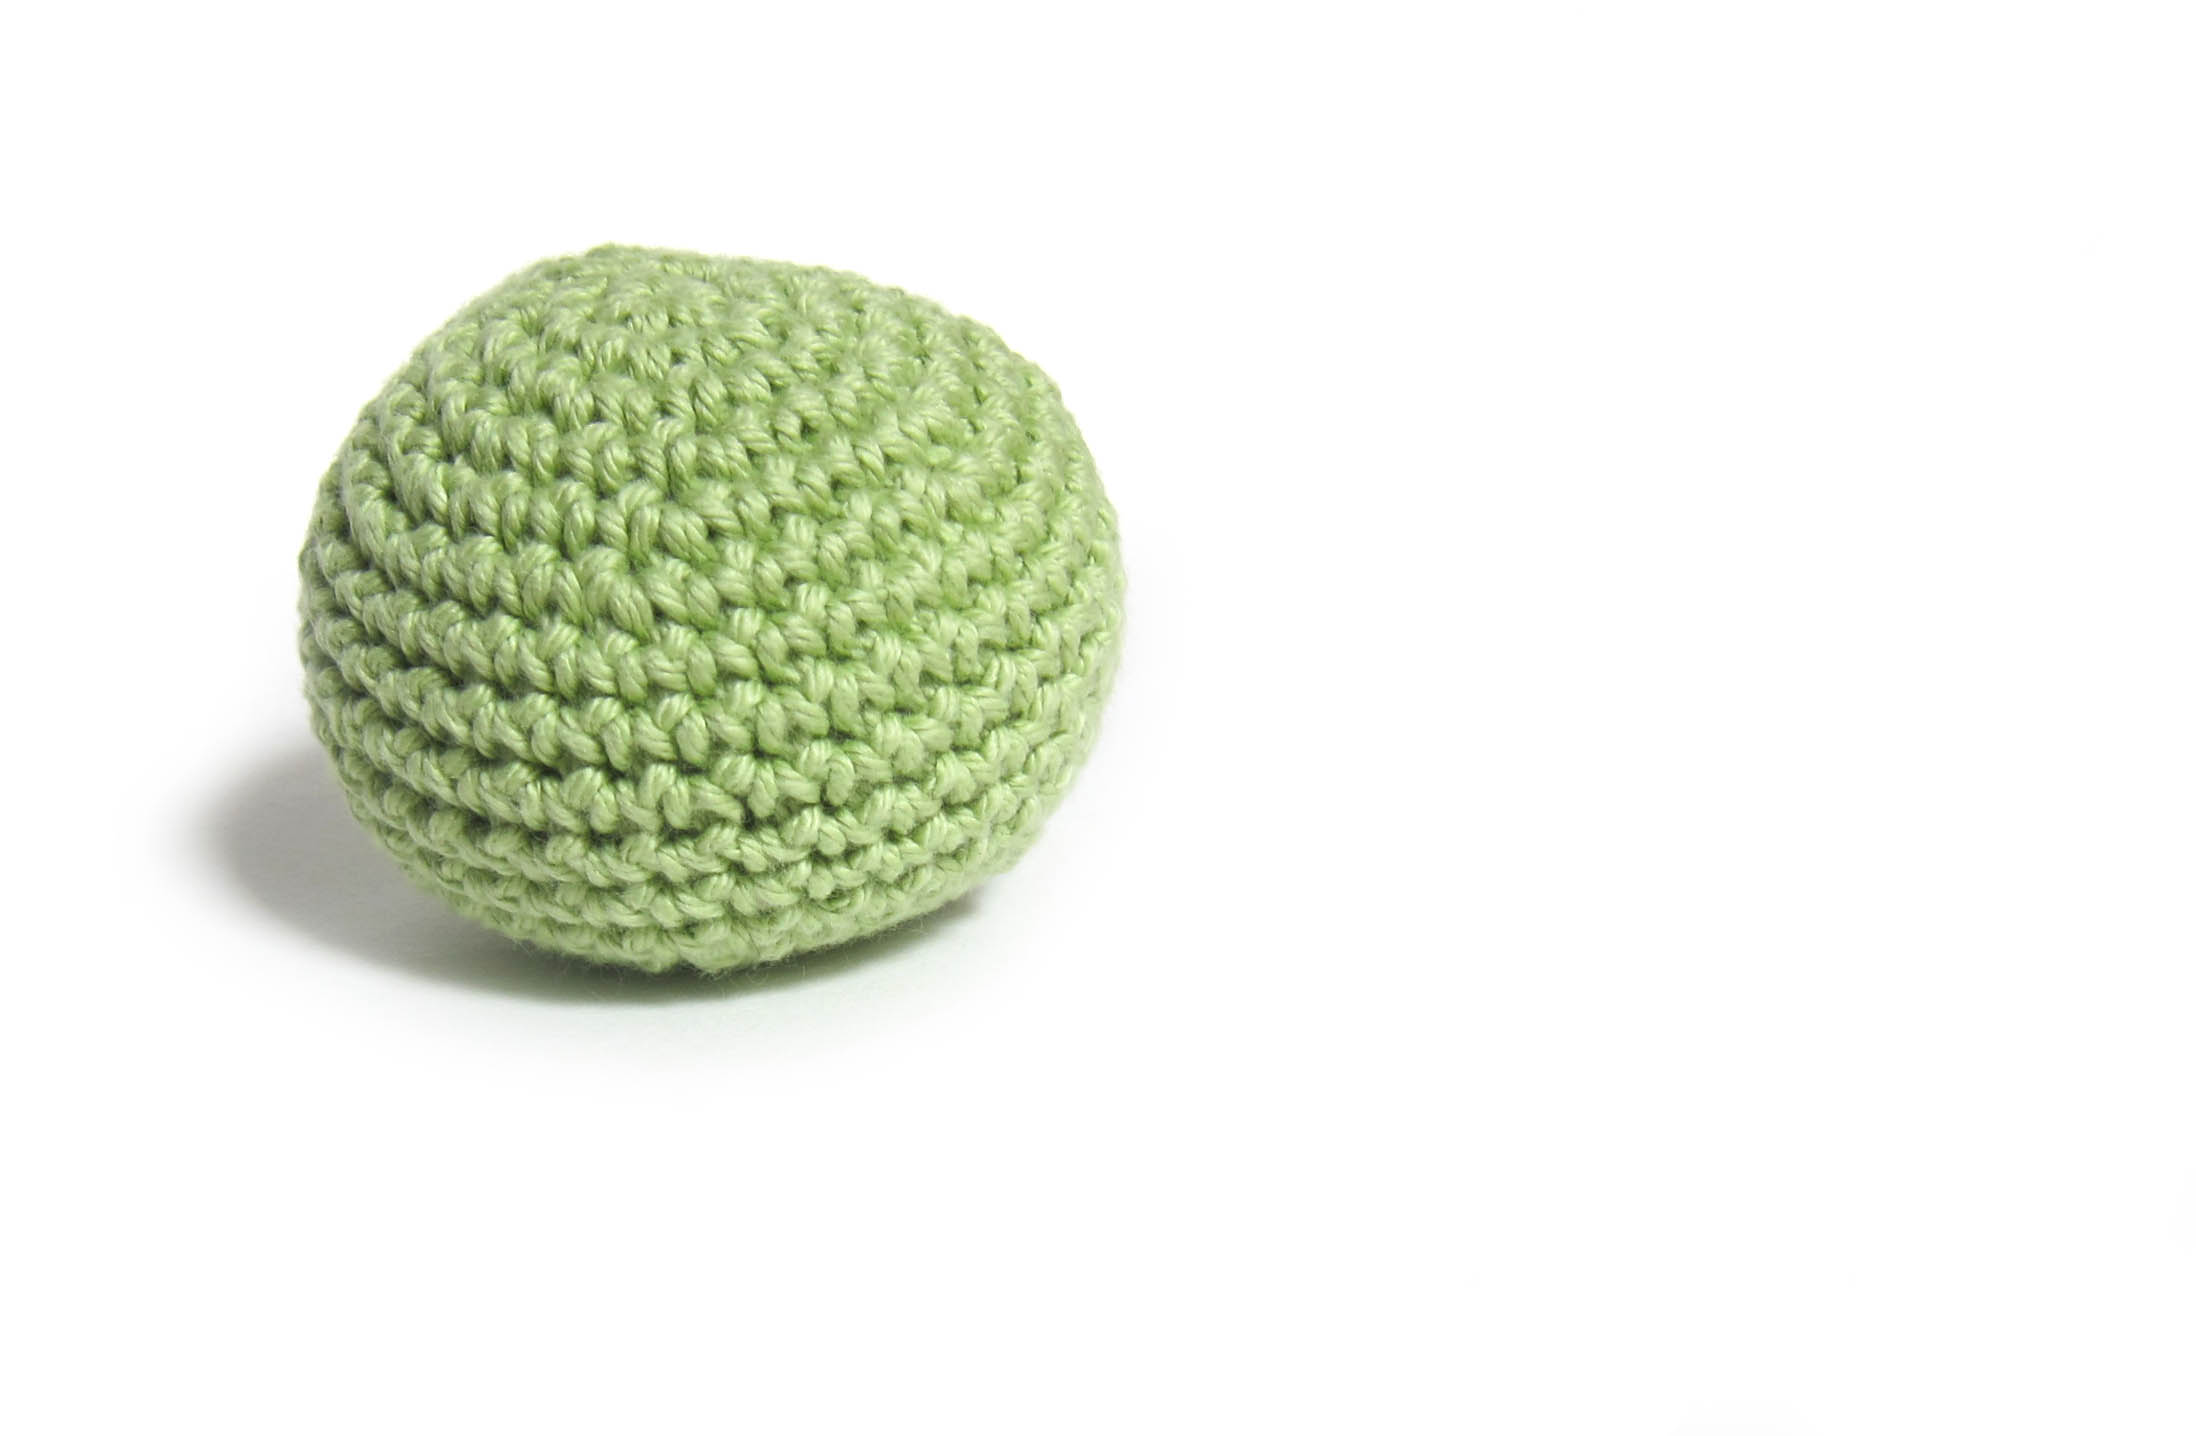
Round 14: *Sc2tog, sc in next 3 sts. Repeat from * 5 times. (24) Round 15: *Sc2tog, sc in next 2 sts. Repeat from * 5 times. (18) Round 16: *Sc2tog, sc in next st. Repeat from * 5 times. (12) Round 17: *Sc2tog. Repeat from * 5 times. (6) Round 18: Use the drawstring method to fasten off, and weave in the end!
Variations
Want to use a thicker yarn, like Lily’s Sugar & Cream? Simply skip rounds 6 & 13 (working fewer increase rounds), and use a size H (5.0mm) hook.
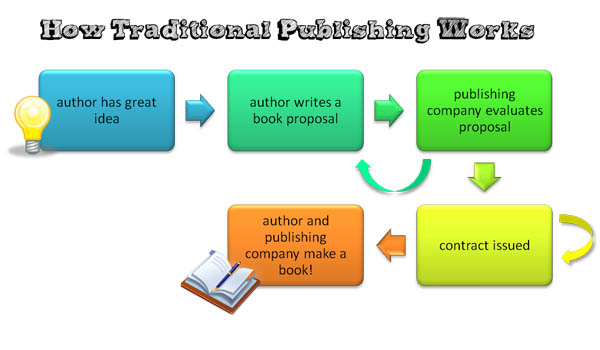
It was a fabulous bunch of ladies and a lot of super-helpful information about publishing a craft book came to the surface. But what about those of you who couldn’t make it to Boston to see us? It’s not fair that you should miss out, is it?
So today, I’ll tell you some tips for getting started publishing your own craft book.
1. Consider how a book fits your life
When speaking on the panel, we all agreed on one thing loud and clear: writing a book isn’t for everyone. You probably won’t become rich and you’ll spend at least a year of your life (maybe not solid, but at least a year from idea to finished book) working on it.
You need to be passionate about your topic. I, personally, view writing a book as a leg of my existing business. Before beginning this adventure, make sure you’re ready!
2. Everything you need is online
Craft publishing is easier today than it has ever been before. Many craft publishers post their proposal package/submission criteria on their webpage! You don’t need the email address of an editor or inside information… following the proposal package instructions carefully is enough to get your book idea read!
3. Shop around
Not all craft publishers are the same. Some publishers may specialize in ‘niche’ crafts (zombie-themed basketweaving, perhaps?), while others may have strengths in particular crafts (such as quilting). Before sending in your proposal, spend some time researching different publishers.
This isn’t hard: walk around your bookstore and look at the available books. Which publishers catch your eye? Which suit your style (modern, quirky, etc.)? Publishers are likely looking for books that fit within their existing market.
4. Sell yourself and your ideas
When you send in a proposal for a book idea, you need to sell yourself. This is your one chance to get your ideas in front of an editor’s eye.
A good proposal:
follows all of the proposal guidelines, and includes all requested information
is well-thought-out, including a table of contents and photos/samples of project ideas
contains information about your professional experience: evidence that you can really write a book!
discusses market information: what makes your book different from others on the shelves? Are people interested in the craft you have to offer?
looks clean and professional (including a nicely-designed, but not over-the-top package, if that fits your brand)
5. Expect revisions
Between all of us sitting on the panel, we’d written 6 books. At least half of those book proposals elicited a, “gee, it seems like you’ve got great ideas, but I’m not sure this exact one will work…”
Don’t be discouraged! That’s good news! It means the publisher likes you and wants to work with you on an idea that will make a best-selling book.
It’s not unusual for your plan to undergo serious revisions due to suggestions by the publisher. Keep in mind, the publisher’s business is publishing: they give good advice!
6. Don’t get discouraged
You didn’t get an encouraging ‘let’s talk!’ phone call from the publisher? Don’t despair. Maybe your idea just wasn’t up the publisher’s alley. Maybe you didn’t provide enough evidence that pastel-colored polymer clay tiaras are the next big thing.
Keep trying. Think about your concept a little and try another publisher.
7. Prepare to negotiate
You’re getting a contract? Congrats!
But they want you to finish the book in 4 months? Or pay for your own photography? There’s no ‘right answer’ for what makes a good contract, but it needs to be something that you can live with.
Many authors negotiate their contracts, so don’t be afraid to ask questions and get something that can work for you.
And then the work begins…
Once you land the book deal, the real work begins! Tips for how to actually write the book are a topic for another day!
Today’s guide to yarn stores in DC is written by Jennifer Crowley, the designer/teacher/blogger at www.tinkingturtle.com.
Jennifer Crowley is a knit and crochet designer who teaches up and down the east coast. You can check out her designs on Ravelry. Recent and upcoming publications include Sockupied, Knitpicks and Classic Elite Yarns.
When not knitting or crochet, she can be often seen zipping around DC and the surrounding area on her bike.
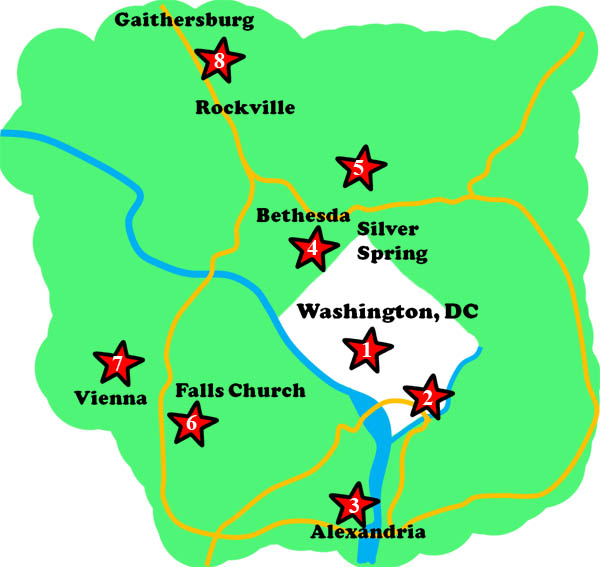
So you are planning a trip to Washington, DC, and you want to visit some yarn stores while you’re there? Well, you are in luck. In addition to being a city full of cultural attractions, there are a number of yarn stores in DC, accessible by a combination of riding the Metro, bus, or walking. If you are fortunate to have a car, the access to yarn stores improves even more. Recent changes have meant that old yarn stores have closed, and new ones are joining the group this year, so it’s a great time to go and check them out.
When I first moved to DC, I didn’t have a car, and was entirely dependent on my bike and public transportation. I have firsthand experience about what stores are the easiest to get to, and in this quick tour I’ll highlight the ones that are accessible by public transportation.
Disclaimer: I teach classes at Woolwinders, Fibre Space, and The Yarn Spot as a contract. I do not believe this influenced my review.
Looped Yarn Works
Looped Yarn Works (1) is located on the second story of a beautiful building near Dupont Circle Metro Station, about a 2 ½ block walk away. Looped offers a nice range of different priced yarns. One of the things I love about Looped is the amount of Natural light they have in the store. Susan and Janie, the owners, have put such careful work into making the space welcoming to customers, and are constantly featuring new activities, visiting authors and other events in the store.
How to get there: Looped is located on 1732 Connecticut Ave, NW #200 (remember, they’re on the second floor!) in Washington, DC. The best way to get there is by metro, as there isn’t that much parking in that area of town. Dupont Circle, located on the Red Line, is very close to the store.
The Knitting Loft
The Knitting Loft (2) is one of the newest yarn stores in DC, having opened in the Summer of 2013. As a new store, their selections of yarns are still expanding, but the staff couldn’t have been more welcoming when I stopped by over the summer. The great thing about this store, is they are wheelchair accessible and on the ground level. Located near the Eastern Market, the store is the perfect stop on a day of window shopping.
How to get there: The Knitting Loft’s address is 1227 Pennsylvania Ave Southeast, and is near both the Blue/Orange Line Metro. You can get to it from both the Eastern Market or Potomac Ave stops – both are about a 3 block walk away, though Potomac Ave is marginally closer. Parking, if you choose to drive, is a little bit easier to come by, but I think it’s still easier to metro in.
Fibre Space
Fibre Space (3) is the hip yarn store of Old Town Alexandria. They specialize in hand painted and hand dyed yarns, but have a good range of workhorse yarns too. Fibre Space offers a vibrant array of classes and great space to sit and knit. I always love checking out the window displays when I come to visit – they always have something creative put up! This last time I visited their window had a mannequin with a packed box of yarn – referring to the fact that in a few short weeks they’ll be moving around the corner to a new location that offers more space and versatility. It’ll be exciting to see how the store continues to expand!
How to get there: While technically in Virginia, Fibre Space is very accessible to DC and so it’s easy for tourists to visit. Fibre Space’s address is 102 North Fayette Street (for now) and is about 6 blocks from the King Street Metro. It’s a little bit of a walk, but under a mile, and it’s a pleasant walk at that, with lots of stores to widow shop. If you choose to drive, it’s easy to get off 495 and go straight up Route 1 (N Patrick St). You should consider parking along King, Prince, Duke or Queen Street, or any of the cross streets. Then walk to the store. Most parking is one or two hours – so be careful how much time you spend in any one place. If you are planning to make an afternoon out of looking around Old Town Alexandria, take the Metro and save yourself the worry.
The Yarn Spot
The Yarn Spot (5) is my personal “local yarn store” and until I moved this past year, I could easily walk to it in about five minutes. The Yarn Spot features two great places to sit and knit (a circle of couches and chairs and a table) and a friendly welcoming atmosphere. Yarn is arranged according to weight, with a middle section that rotates out different yarns that are being featured. They also have spinning supplies and fiber. With a knowledgeable staff – this is the perfect store to go to if you have a “knitting emergency” and need some help. They feature a wide range of yarns, from hand dyed yarns to workhouse yarns like Spud and Cloe Sweater and Encore.
How to get there: The Yarn Spot’s address is 11406a Georgia Ave, Wheaton, MD. Unfortunately, they are a bit hidden from the road, but if you look for “The Anchor Inn” sign, they are in the shopping center located behind the sign. The store has parking if you choose to drive, or it’s about a 1/2 mile walk from the Wheaton Metro to the store.
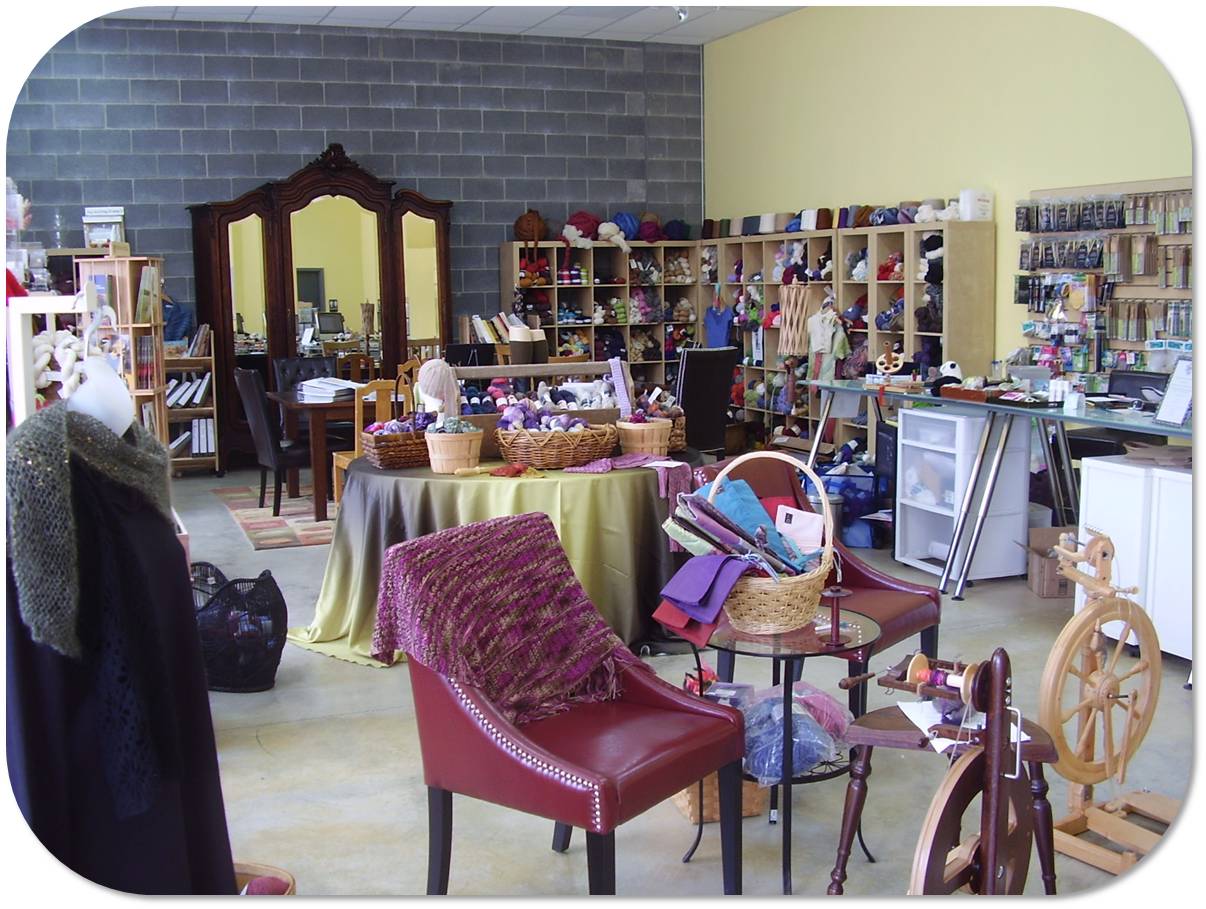
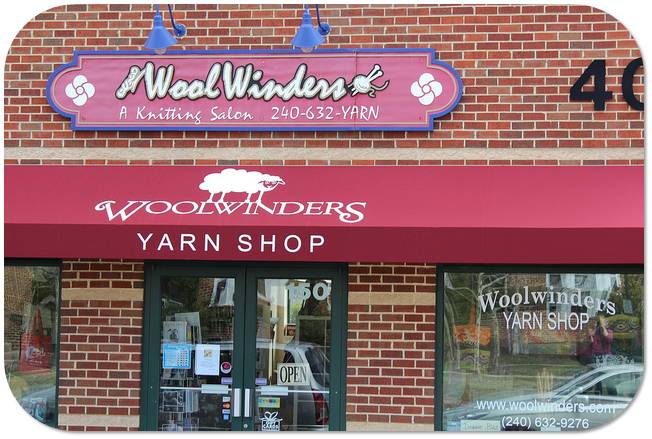
Woolwinders
Woolwinders (8) is one of my favorite yarn stores in DC for classes. They have very knowledgeable teachers and staff, and every time I go there I learn something new. They have a good selection of mid-range yarns, and highlight some really interesting higher range yarns. The last time I was there I appreciated their selection of Rowan Pattern books. I love how two of the walls of the store are windows, and how much natural light comes into the space. It really makes it easier to choose colors for my projects.
How to get there: Woolwinders is a brisk walk from Shady Grove Metro Station – just under a mile. Located at 404 King Farm Blvd in Rockville, MD, this is also a good store to drive to, with plenty of parking street-side or behind the store.
Knit & Stitch = Bliss
Knit & Stitch = Bliss (4) is one of my favorite stores to go to if I’m looking for patterns or books. They have a really good selection, and a nice area to sit down and flip through all the books and patterns as you are deciding what to work on. Yarn selection runs from midrange to some nice high priced yarns, and they have a great selection of needles and notions. Located near the heart of Bethesda, there’s great shopping and restaurants nearby if you wish to make a short trip of going to the store and picking up dinner or lunch.
How to get there: Knit & Stitch = Bliss is located at 4706 Bethesda Ave, Bethesda MD. If taking the metro, walk West down Rockville Pike until you turn right on Bethesda Ave. If driving, there’s plenty of street parking available, and a few different parking lots if you don’t relish parallel parking.
Aylin’s Wool Gatherer
Aylin’s Wool Gatherer and its compatriot, Uniquties, are both a bit harder to get to by public transportation, but still worth the visit.
Aylin’s Wool Gatherer (6) has the honor of being one of the longest running yarn stores in DC metro area, running upwards of 35 years. Specializing in offering a wide selection of mid-range yarns, including some nylon blends I haven’t noticed elsewhere, this store is a solid addition to the Metro DC Yarn stores. When shopping, prices are listed on sheets throughout the store.
How to get there: Aylin’s is a bit hidden from the street, being located on the third floor of a building (however, there’s an elevator!). Their address is 7245 Arlington Blvd, Falls Church, VA. However, when walking or driving to the store look for the Starbucks in Loehmann’s Plaza, and go around the corner. You’ll see a side entrance to the building; take the elevator to the third floor. The store is down the hall. If you have difficulty, call the store at 703-573-1900 – they are old hands at giving directions. As to transportation, this is one store where driving is definitely easier, though it is possible to take public transportation. If you ride the Metro to the Dunn Loring-Merrifield Station, you can then walk to the Temp Bay D (follow the signs). From there, you can catch the 1B bus towards Ballston Station. Get off at Arlington BV & Graham Rd, and walk towards Loehmann’s Plaza.
Uniquities
Uniquities (7) offers not only yarn to knitters and crocheters, but is one of my favorite stores to check out for their spinning supplies. One of the other things I love about the store is their separate class space, which makes taking classes very pleasant. I also love their yarn choices, with a stunning collection of sock and laceweight yarns, and a wide range of worsted and aran weights too. They carry some of my favorite yarn lines, like Mountain Colors, Blue Sky Alpacas and Manos Del Uruguay.
How to get there: Uniquties is also a store that is easier to drive to. They’re located at 421 Church Street Northeast, Vienna, VA. Driving, there’s a spacious parking lot to park at. If you are looking to take public transportation, take the Metro to the Dunn Loring-Merrifield Station, then walk to Bus Bay B. Take the 2T towards Tysons Corner and get off at R 123 Maple Ave & Beulah Rd. The store is a block away.
Want more stores?
While the eight yarn stores I’ve highlighted here are the easiest to get to via public transportation, there are a few others that deserve honorable mention.