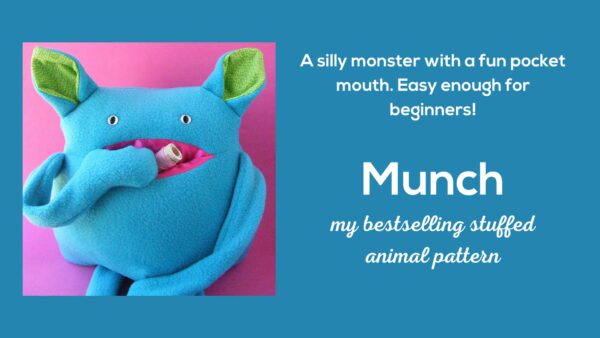
Why do I need to know how to sew boxed corners? I don’t even know what a boxed corner is!
Well – it’s a simple way of adding depth to a fabric shape. It’s what makes this mini tote bag (there’s a free pattern here) fat instead of flat.
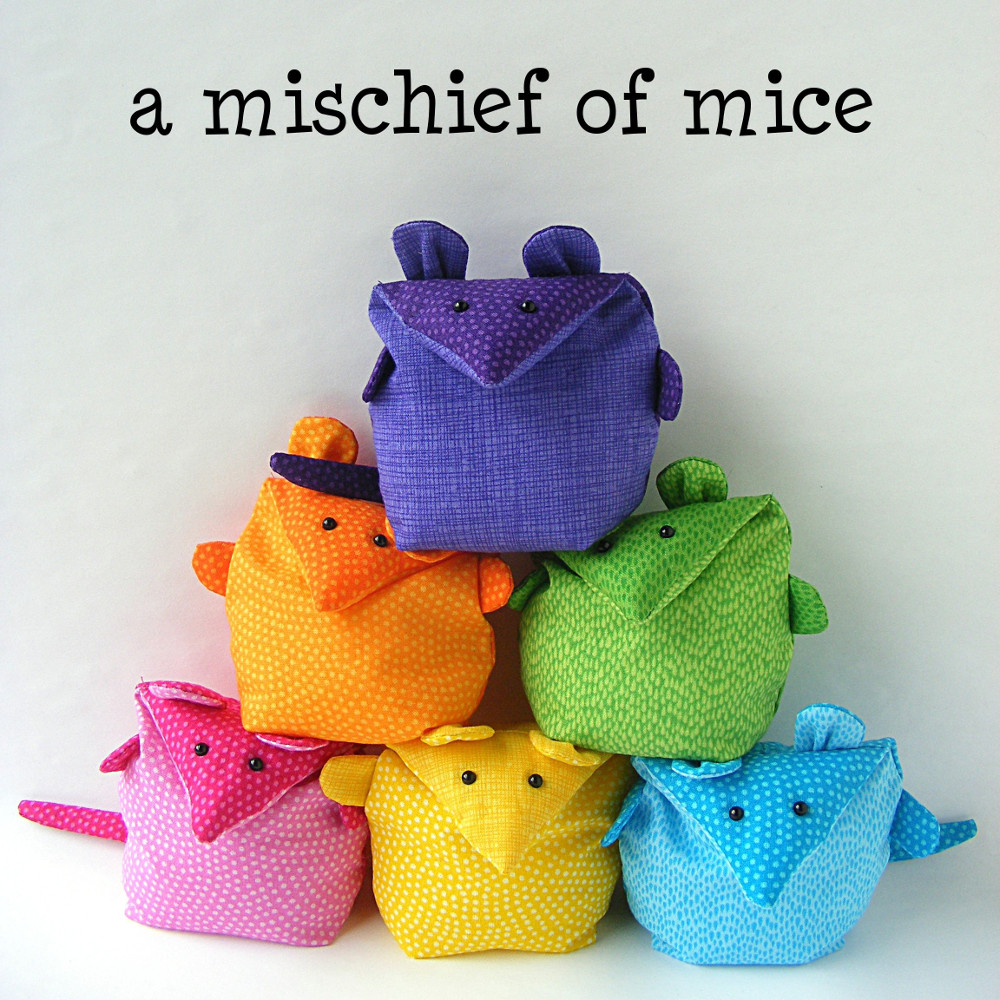
And it’s what gives these little mice nice fat bottoms.
Look – this guy will show you his.
I describe how to sew boxed corners in the Mischief of Mice pattern, but someone asked for a video to help clarify the process.
Ask and you shall receive!
See how easy it is?
The trickiest part is getting the seam aligned, but if you open the seams (like you see in that photo above) it’s really easy to see where they line up.
You’ll run into instructions to sew boxed corners in a lot of pillow and cushion patterns, but I don’t often sew pillows and cushions. I prefer to sew covers for ready-made pillow inserts. But I use the technique a lot for bags and softies!
Here are a few more patterns that use this technique. . .
These goody bags are great little gift bags or party favor bags.
I designed a cute little mouse pattern, and I thought I’d share a bit of the design process with you.
The Head
I knew that I wanted to have his head be part of the body structure, just folded over. The original inspiration was this owl.
I designed it especially for quick and easy sewing (I need to make them with twenty kids at a Harry Potter Camp I was teaching – you can see all the details here).
When I was playing with that design I noticed that sometimes the bit folded over for the top of his head looked kind of mouse-like. If I stuffed it before folding it over it just might work – and I filed that thought away for later.
Well – now was later!
The Bottom
I also knew I wanted his body to be fat – so that his feet would disappear when he sat up on his back legs. (He actually has no feet – but the shape of his body makes them look like they’re just hidden.)
Usually if I want a fat bottom I design a flat pattern piece for the base and set it in, but that can be fussy sewing on a softie this small – and I avoid fussy sewing whenever possible. 🙂
I decided to use a technique that I use on all my tote bags. You’ll see it too in pillow corners – to give the pillow more fatness. It’s a way of boxing in the corners to add depth. I’ve used it before on these monsters and it was really easy to sew, so I decided to try it here. The final result looks like this.
He’s not dead – he’s just lying on his back so we can see his bottom. 🙂
See how the “corners” of the body are boxed in? This is very easy to sew.
The Ugly Part of the Design Process
So – that was two design decisions made. Time to start some prototypes.
I sew these out of a yucky white sheet with whatever thread I happen to have in my sewing machine. They’re not pretty, but they let me work out the details of the pattern pieces.
Sometimes the very first prototype is just right, but usually I have to try at least a few variations before things get good. I lost track of the number of prototypes I tried for this “simple” mouse – but these were the three still sitting on my table when I was done. Sometimes I take out the stuffing and resew a couple of seams – like to take in the sides a bit – instead of starting a whole new prototype.
The proportions on the first one were pretty good. I would have done a second round to make his body a little wider – but overall he was just too big.
The second one was better size-wise. But when I stuffed him properly he was just too tall, and when I took out some of the stuffing to make him shorter, he just looked hunchbacked.
The third one was just about right.
Time to add some details – ears, paws and a tail. I usually leave them off in the first round so I can just focus on the basic body shape.
The Details
When I start to add all the other bits and pieces, I usually cut them out of paper first and pin them to the softie. That’s a quick and easy way to check proportion and placement. Then I use those as pattern pieces and make up another prototype all from fabric.
It usually takes a bit of tweaking to get things just right – the size of the ears, the length of the paws, the thickness of the tail. In this case my original tail was too skinny to turn right side out. I had to redesign it so my favorite turning tubes would fit inside. 🙂
I’m picky about eyes – I’ve written about my obsession with eye placement here and here. The main thing to remember is that the shape of the face can change a lot after stuffing – so I always just draw the eyes on a stuffed prototype. Usually I’ll also poke holes and try out a few different eye sizes. I pick the final prototype apart and trace that eye placement onto the final pattern pieces.
Cuteness!
The final step, of course, is to make him out of cute fabric. 🙂
I knew that I wanted him to be made of quilting cotton, because I wanted to use colorful, patterned fabric.
I couldn’t choose a color, and I couldn’t stop at one. I made a whole mischief of mice in a rainbow of colors – and I love them!
Finished!
So now you’ve seen the ugliness behind the scenes in the design process. 🙂
I’ve been getting a lot of requests lately for a pattern for a topsy turvy doll.
Weird. I have no idea what has prompted the sudden influx.
I’ve had a topsy turvy doll on my Big List o’ Things to Make for a long time now, but the number of requests recently made me move it to the top of the list.
As soon as I mentioned it to Jo, she was full of IDEAS. She immediately started lobbying for a day and night doll. Not an awake and sleeping doll, but a doll with one girl all sunshine and bright, and another girl all deep indigo and starlight. She specifically asked for the night doll to have “dark blue hair – the darkest blue felt you have – sprinkled with tiny little embroidered stars in pale yellow.”
OK then. I can do that!
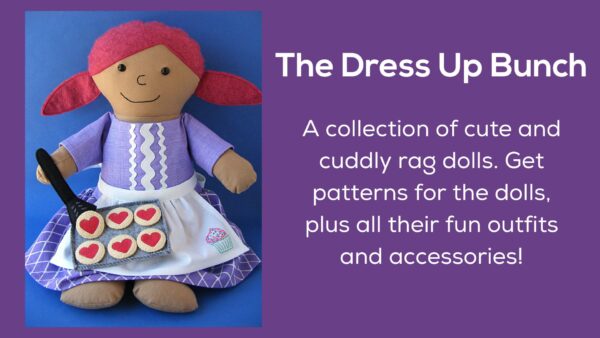
Instead of creating a pattern especially for one topsy turvy doll, I thought it would be more fun to show you how to turn any of the Dress Up Bunch dolls into topsy turvy dolls. You can apply the same basic technique to work with any rag doll pattern.
Fun!
So here we go. . .
To make a topsy turvy doll you’ll need to make two identical doll tops and no legs. The body will need to be chopped off at the waist so you can sew two bodies together.
Prep the Pattern
Measure down 4 1/2 inches from the top of the body front and body back pattern pieces of any Dress Up Bunch doll pattern. Draw a line parallel to the top of the pattern piece and cut off the bottom of the pattern. (if you’re using another pattern you’ll need to figure out where the “waist” of the body piece is and add 1/2 inch seam allowance before you make your cut.)
Cut Your Fabric
Cut out all the pattern pieces for two dolls except the legs. I usually use skin-colored fabric for the body, but I don’t like having to put a shirt on a topsy turvy doll so I cut the body pieces from fabric to match the dress. Only one doll half needs to have a stuffing opening, so cut a total of 3 doll front pieces and 2 doll back pieces.
Cut two pieces of fabric for the reversible skirt – each 10 1/2″ tall and 30″ wide. (You’ll need to calculate your own measurements if you’re using a different rag doll pattern.)
Leave One Stuffing Opening
Sew the two body back pieces together leaving almost the entire seam open for turning and stuffing. Don’t skimp on the size of the opening! You’ll be pulling a lot of fabric through here! I only sewed about an inch at the top and an inch at the bottom.
Press the seam open, then sew it to the back head piece. I stuck my turning stick through the stuffing opening so you can see it.
Sew Two Doll Tops
Follow the regular pattern instructions to make two doll tops, leaving the bottom open.
Man – these dolls look so creepy from the inside!
The second doll (the one without the stuffing opening) will use body front pieces on the front and back.
Make the Skirt
Fold one skirt rectangle in half so the short ends are lined up, right sides together, and sew those short ends together with a 1/4″ seam allowance. Press the seam open. That makes one (ungathered) skirt.
Repeat for the second skirt.
Turn one skirt tube right side out and put it inside the other tube, lining up the seams you just sewed. Now the right sides are together. 🙂 Sew the two skirt tubes together around the bottom of the skirt using 1/4″ seam allowance.
Flip the skirt so it’s right side out and press that bottom fold nice and flat.
Oooh! It’s looking nice! Both sides of the skirt are the “right” side. For now make sure it’s turned so that the fabric on the outside is the one matching the doll with the stuffing opening.
Gather the Skirt
I’ve got a video tutorial here showing how to gather. For this project I used the “old-fashioned” method of sewing two rows of basting stitches around the top (raw edge) of the skirt – sewing through both layers as if they were one – then drawing up the bobbin threads to gather up the fabric.
Fold the top of the skirt in half and half again and use pins to mark the four equal sections.
Fold the center front of the doll with the stuffing opening and mark the center front point. (The sides and center back are already “marked” with seams.)
Gather up the fabric of the skirt and stuff the skirt inside the doll with the stuffing opening, matching the center back seam of the skirt with the center back seam of the doll. Match the remaining pins to the remaining seams on the doll. Adjust the gathers so that the top of the skirt fits the bottom of the doll, adding additional pins as needed.
I’ll be honest. This part isn’t much fun. It’s not hard, but it takes some patience and fiddling.
Sew the top of the skirt to the bottom of the doll using 1/4″ seam allowance.
Add the Second Doll
You’re almost done! Turn the second doll right side out and stuff it inside the first doll and skirt. Make sure the back of the head is on the side where the stuffing hole is, and line up the side seams.
Sew around that same opening, this time 1/4″ from the first seam you sewed joining the skirt to the first doll. That means your seam allowance this time is 1/2 inch. This way you double-sew the skirt (extra-strong!) and also make sure all your basting stitches from gathering are well-hidden.
Turn Everything Right Side Out
You can do it – just be patient and go slowly. First pull the second doll outside of the first one, then pull the skirt through the stuffing hole and keep going until everything is right side out.
Finished!
Stuff the doll, sew up the opening as instructed in the pattern, and you’re done!
Normally the Dress Up Bunch dolls are very easy patterns. Turning them into topsy turvy dolls bumps them up a notch in difficulty. It’s not hard – it’s more about patience than actual skill – but I do NOT recommend this as a first project. Make a regular doll first, then start practicing radical, Frankensteinian surgery. Ok? 🙂
I discovered it at Quilt Market last year and fell in love – and then couldn’t find it in any shops. It was even hard to find online! So I ordered a few bolts to carry in my shop and I’ve been using it for softies and quilt backs ever since.
Update – I’m not able to carry Cuddle Fleece in the shop anymore, but I found a good substitute! More details here.
It’s mostly very easy to work with – similar to polar fleece – but I do get some questions about it. Here are the answers to the most frequently asked questions. . .
It’s so shifty! How do you keep the layers from moving around?
The layers come in two times in the process – when you’re cutting and when you’re sewing. I prefer to cut mine one layer at a time instead of folding and cutting through two layers. That way I get the most accurate cut possible. Do be sure to flip the pattern pieces for the second cuts so you’re still getting one reversed!
When you’re sewing two layers together you have to deal with layers. There’s no way around it. That’s when I use Wonder Clips. You can use pins instead, but Wonder Clips handle the fat fabric really well and without distorting the layers at all. You can clip them really close together (every inch or so) and just sew slowly, unclipping each one as you get to it.
It’s so fat! Do I have to do anything special to sew through it?
Cuddle Fleece shares one of the same challenges as polar fleece.
It’s fat.
The thickness of the fabric can make the layers shift while you’re sewing – especially when you’re sewing through two layers plus the additional layers of an arm or leg in there. There’s a video showing how I deal with the fatness here. It’s specifically about polar fleece, but all those tips also apply to Cuddle Fleece.
Do I need a special needle?
I sew mine with a basic universal needle and have no problems. If you find your machine is skipping stitches I recommend switching to a stretch needle.
If you have a walking foot – use it!
If you don’t have a walking foot – pin like crazy.
Which is the right side of the fabric?
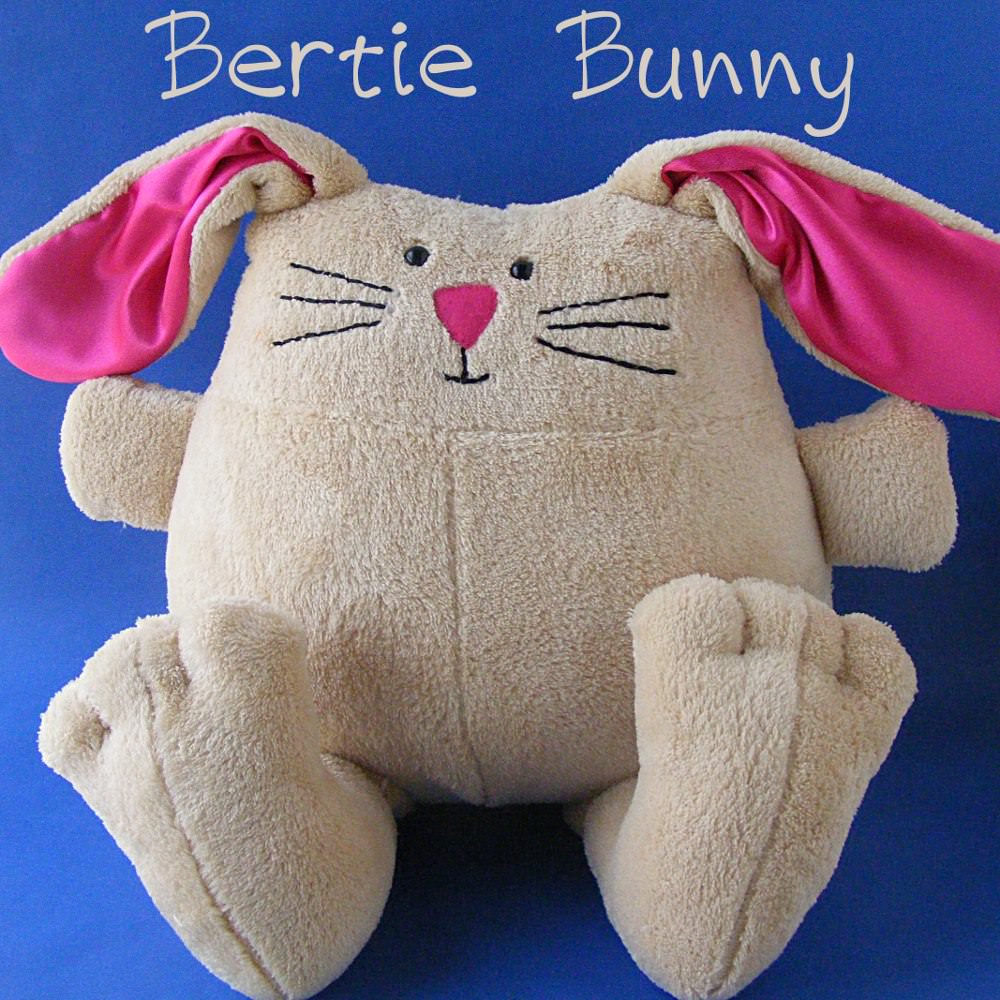
They’re both good – but they are different. You just have to choose what works best for you for a particular project. One side has a shorter, smoother pile. That’s the one I often choose as the “right” side. It’s what you see on the bunny up there.
The other side is a little shaggier looking. The pile is a bit longer, and a teeny bit more irregular. Use this as the right side when you want a rougher look.
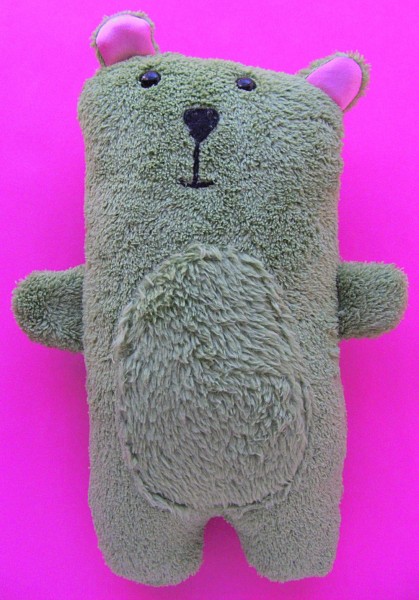
You can also combine the two textures in one softie like I did with that green Bailey Bear. I used the shaggier side on his belly patch.
How do you mark on it?
Cuddle Fleece, like polar fleece, can also be difficult to mark on. With polar fleece the problem is that it’s basically made out of plastic, so markers tend to bead up on it, take a long time to dry, and smear easily when wet.
The problem with marking on Cuddle Fleece is that it has a bit of a nap to it.
Seriously – is there anything this stuff isn’t good for?
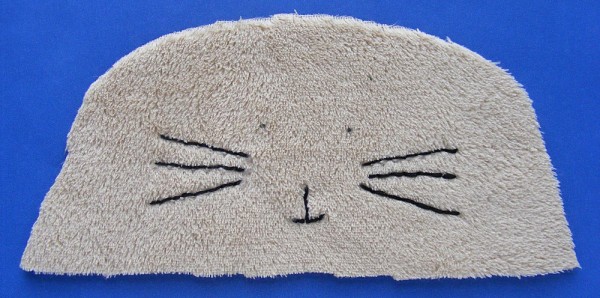
For the bunny you see at the top of the post I marked the eyes as mentioned above. I could have eyeballed the nose and mouth, but I wanted to make sure I got those whiskers balanced. That meant sticking to my pattern piece exactly as drawn. 🙂
I traced the entire face on a scrap of Sulky Sticky Fabri-Solvy and then stuck it down to the fabric, using those eye markings to guide my placement.
Yes – it sticks just fine to the Cuddle Fleece. It’s amazing stuff!
I embroidered right through the stabilizer, then soaked it away in cold water and tossed it in the dryer for a quick dry and fluff.
Perfect! And since I used a fabric marker to mark those eyes, the dots are still there after rinsing The Magical Embroidery Stuff away.
The fluff! Is there any way to keep the fluff under control?
That’s the most common question people have. Cuddle Fleece is fluffy and soft – and when you cut it that fluffiness can go everywhere!
When I cut pieces to make a softie, I walk them straight to the dryer and toss them inside. I tumble it all with no heat for about 10 minutes. When I pull them out – all the fluff is gone. The edges won’t fray after cutting, so once you get that initial cutting fluff off, you can continue work on the rest of the project with no more shedding.
Awesome!
If you have any other questions about this lovely fabric, just let me know in the comments. I’ll either update this post or (if there are enough additional questions) I’ll do a follow-up post.
Here’s one of those follow-up posts. 🙂 A video answering lots of reader questions about using cuddle fleece for quilt backs. Watch it here.
The face is really important, and I usually spend a lot of time on it, trying a lot of variations until it feels just right.
I always try things out on an already-stuffed softie. That does two things.
I don’t have to visually erase the seam allowance. Even when I draw the sewing line on my pattern pieces, I think it’s hard not to see that extra bit all around the edge and place features accordingly. When the softie is already stuffed, that seam allowance is gone.
I can account for the curve of the finished softie. Let’s say I place the eyes, nose and mouth up high on the softie (that can often make it look extra-plump). That might look super cute on the pattern, but once I stuff it, the face is actually on the curve facing up instead of facing out. That’s no good.
I’ve found I get the best results when I draw my face on the finished prototype, then pick it apart and trace it onto the pattern piece.
So what’s the best way for you to transfer that face to your own softie piece?
It’s all about the eyes.
You can play around a bit with the placement of the nose and the mouth, but I really recommend putting the eyes right where the pattern tells you to.
And the easiest way to do that is by punching holes in your pattern piece. I know this is crazy obvious to many of you – but it took me a long time before the light-bulb went on. 🙂
This is the pattern I made when I taught a recent softie-making class to a bunch of kids. They made Warren the Charity Bear.
I used a hole punch to punch holes right at the pattern markings for the eyes. That way the kids could just pop in a couple of dots with a marker while they were tracing around the pattern. Easy peasy!
For my own use I don’t bother with cardboard and I don’t trace the pattern pieces – I use pattern weights and just cut around the piece. But I still punch holes where the eyes go so I can mark them very easily and very precisely.
If the eyes are too far from the edge of the pattern piece to reach them with a hole punch, I just punch a messier hole with my awl. You could also cut them with an X-Acto knife. Whatever works best for you – just make a hole in the pattern piece so you can easily mark dots exactly where the eyes go.
This works with any kind of fabric and you’ll always get the eyes just right. 🙂
I designed the free Warren pattern especially for people who want to make bears for donations. I had a few goals in mind as I worked on his design. . .
He had to be easy to make. Easy enough for kids to make.
He needed to be a good, huggable size.
I wanted him to have mix & match parts – so you could make a hundred of them and never get bored.
He needed to be pretty foolproof – it doesn’t matter if his features are precisely positioned. It’s ok if he’s stuffed a little loose or a little tight. It’s all good. 🙂
He needed to work well with easy-to-find polar fleece – but also work well with fancier fabrics like minky and cuddle fleece.
Jo and I tested this pattern a LOT – and then I used the pattern to teach softie-making to a bunch of kids – and then Jo and I made a bunch more. And now he’s ready to share. I can’t wait to see the bears that YOU make with him!
One note – I designed this pattern especially for charitable giving – but of course I’m giving it to you with no strings attached. Make bears for yourself and your kids and grandkids. Use the pattern when you teach. Sell finished bears. The pattern is yours! Make whatever you want with it! If you want to make bears to donate, I suggest the following places. . .
homeless shelters
battered women’s shelters
fire departments
police departments
children’s hospitals (check first to see if they have special requirements about the materials they’re made with)
Please suggest other places in the comments!
Here’s how to make him!
Prepare the Pattern
Download the pattern here. Print it out at 100%. Layer the two pieces together, overlapping so the edges of the pattern and the little hearts line up. Tape the pieces together into one large pattern piece and cut it out. I like to punch holes where the eyes are to make marking their placement easy.
Cut Out the Body
Lay the pattern on the fabric so the stretch of the fabric goes across the bear’s belly. You want him to stretch wide – not tall. 🙂
Cut two body pieces.
Mark the placement of the eyes on the front piece.
Applique Any Parts
Cut any muzzles or belly pieces you want to use out of felt and applique them in place. Just stitch them close to the edge with a basic straight stitch. Nothing fancy. If you have trouble on the tight curves of some of the smaller pieces, watch this video for help.
There are two different muzzle patterns so you can give your bear a wide muzzle, a tall muzzle or no muzzle. You can see the three nose sizes in these photos too. 🙂
You can also give him a belly patch, a heart patch, or no patch.
Embroider the Mouth
Thread a needle with a full six strands of black embroidery thread and knot the end. You’ll embroider the mouth in three stitches, always coming up at point A and going down at point B. If the A’s on the second and third stitches are above the B, your bear will be smiling. If the A’s are below the B he’ll be frowning. Don’t worry about making the sides exactly even. Crooked smiles are sweet. 🙂
Layer your bear front and bear back pieces right sides together and pin or clip the layers in place.
Sew around the edge using 1/4″ seam allowance, leaving a stuffing opening on the side of one leg.
If you’re using a fabric that has no stretch, you’ll need to clip into all the concave curves. Watch this video for the why and how. Polar fleece, minky and cuddle fleece don’t need this step – they have a natural stretch that will allow the curves to turn smoothly without clipping.
Finish Your Bear
Turn your bear right side out and stuff it.
Make sure you get some stuffing in his ears and arms before you fill up the big body – once you block access to those bits it’s hard to get back in there. Watch this video for some stuffing tips.
If you like this free pattern, sign up for the Shiny Happy News! Subscribers get a weekly newsletter full of sewing tips and tricks, free patterns, special discounts, and other things to make you smile. 🙂
Using a button joint allow your softies to sit, stand, wave, and be posed in other fun positions. Here are a few examples.
Here’s Rhonda Rhino, carrying a pretty balloon to a birthday party.
You can just barely see one of the buttons on her shoulder.
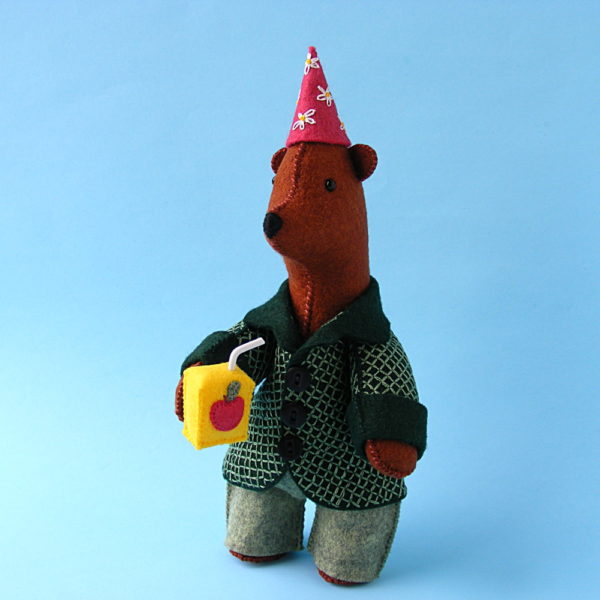
Benedict Bear‘s buttons are almost completely covered by his fancy coat – but they’re there.
They’re what allow him to raise that adorable felt juice box to take a sip.
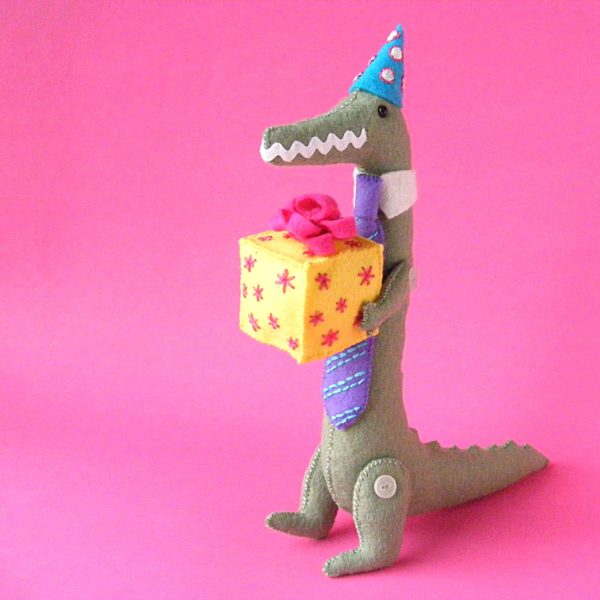
You can see the button joints much more clearly here on Carlisle Crocodile.
All those button joints are not hard to do! Watch this video and see how. . .
See how easy the button joint is? It actually makes the construction of the rest of the animal super easy – most of the parts are just two pieces sewn and stuffed! the feet usually have a flat part added at the base that makes them easy to stand – but that’s easy too. There’s a video here showing how to give softie feet flat bottoms.
That’s how I made the cute kissable toes on that softie?
Do you think that’s probably really hard to do?
Not at all! Take a look at the video and see how easy it is. 🙂
See?
You will need one specialized tool for needle sculpting – a long doll needle. You can find the ones I use here. That’s it! Now you just need some thread – and a softie that’s ready for sculpting.
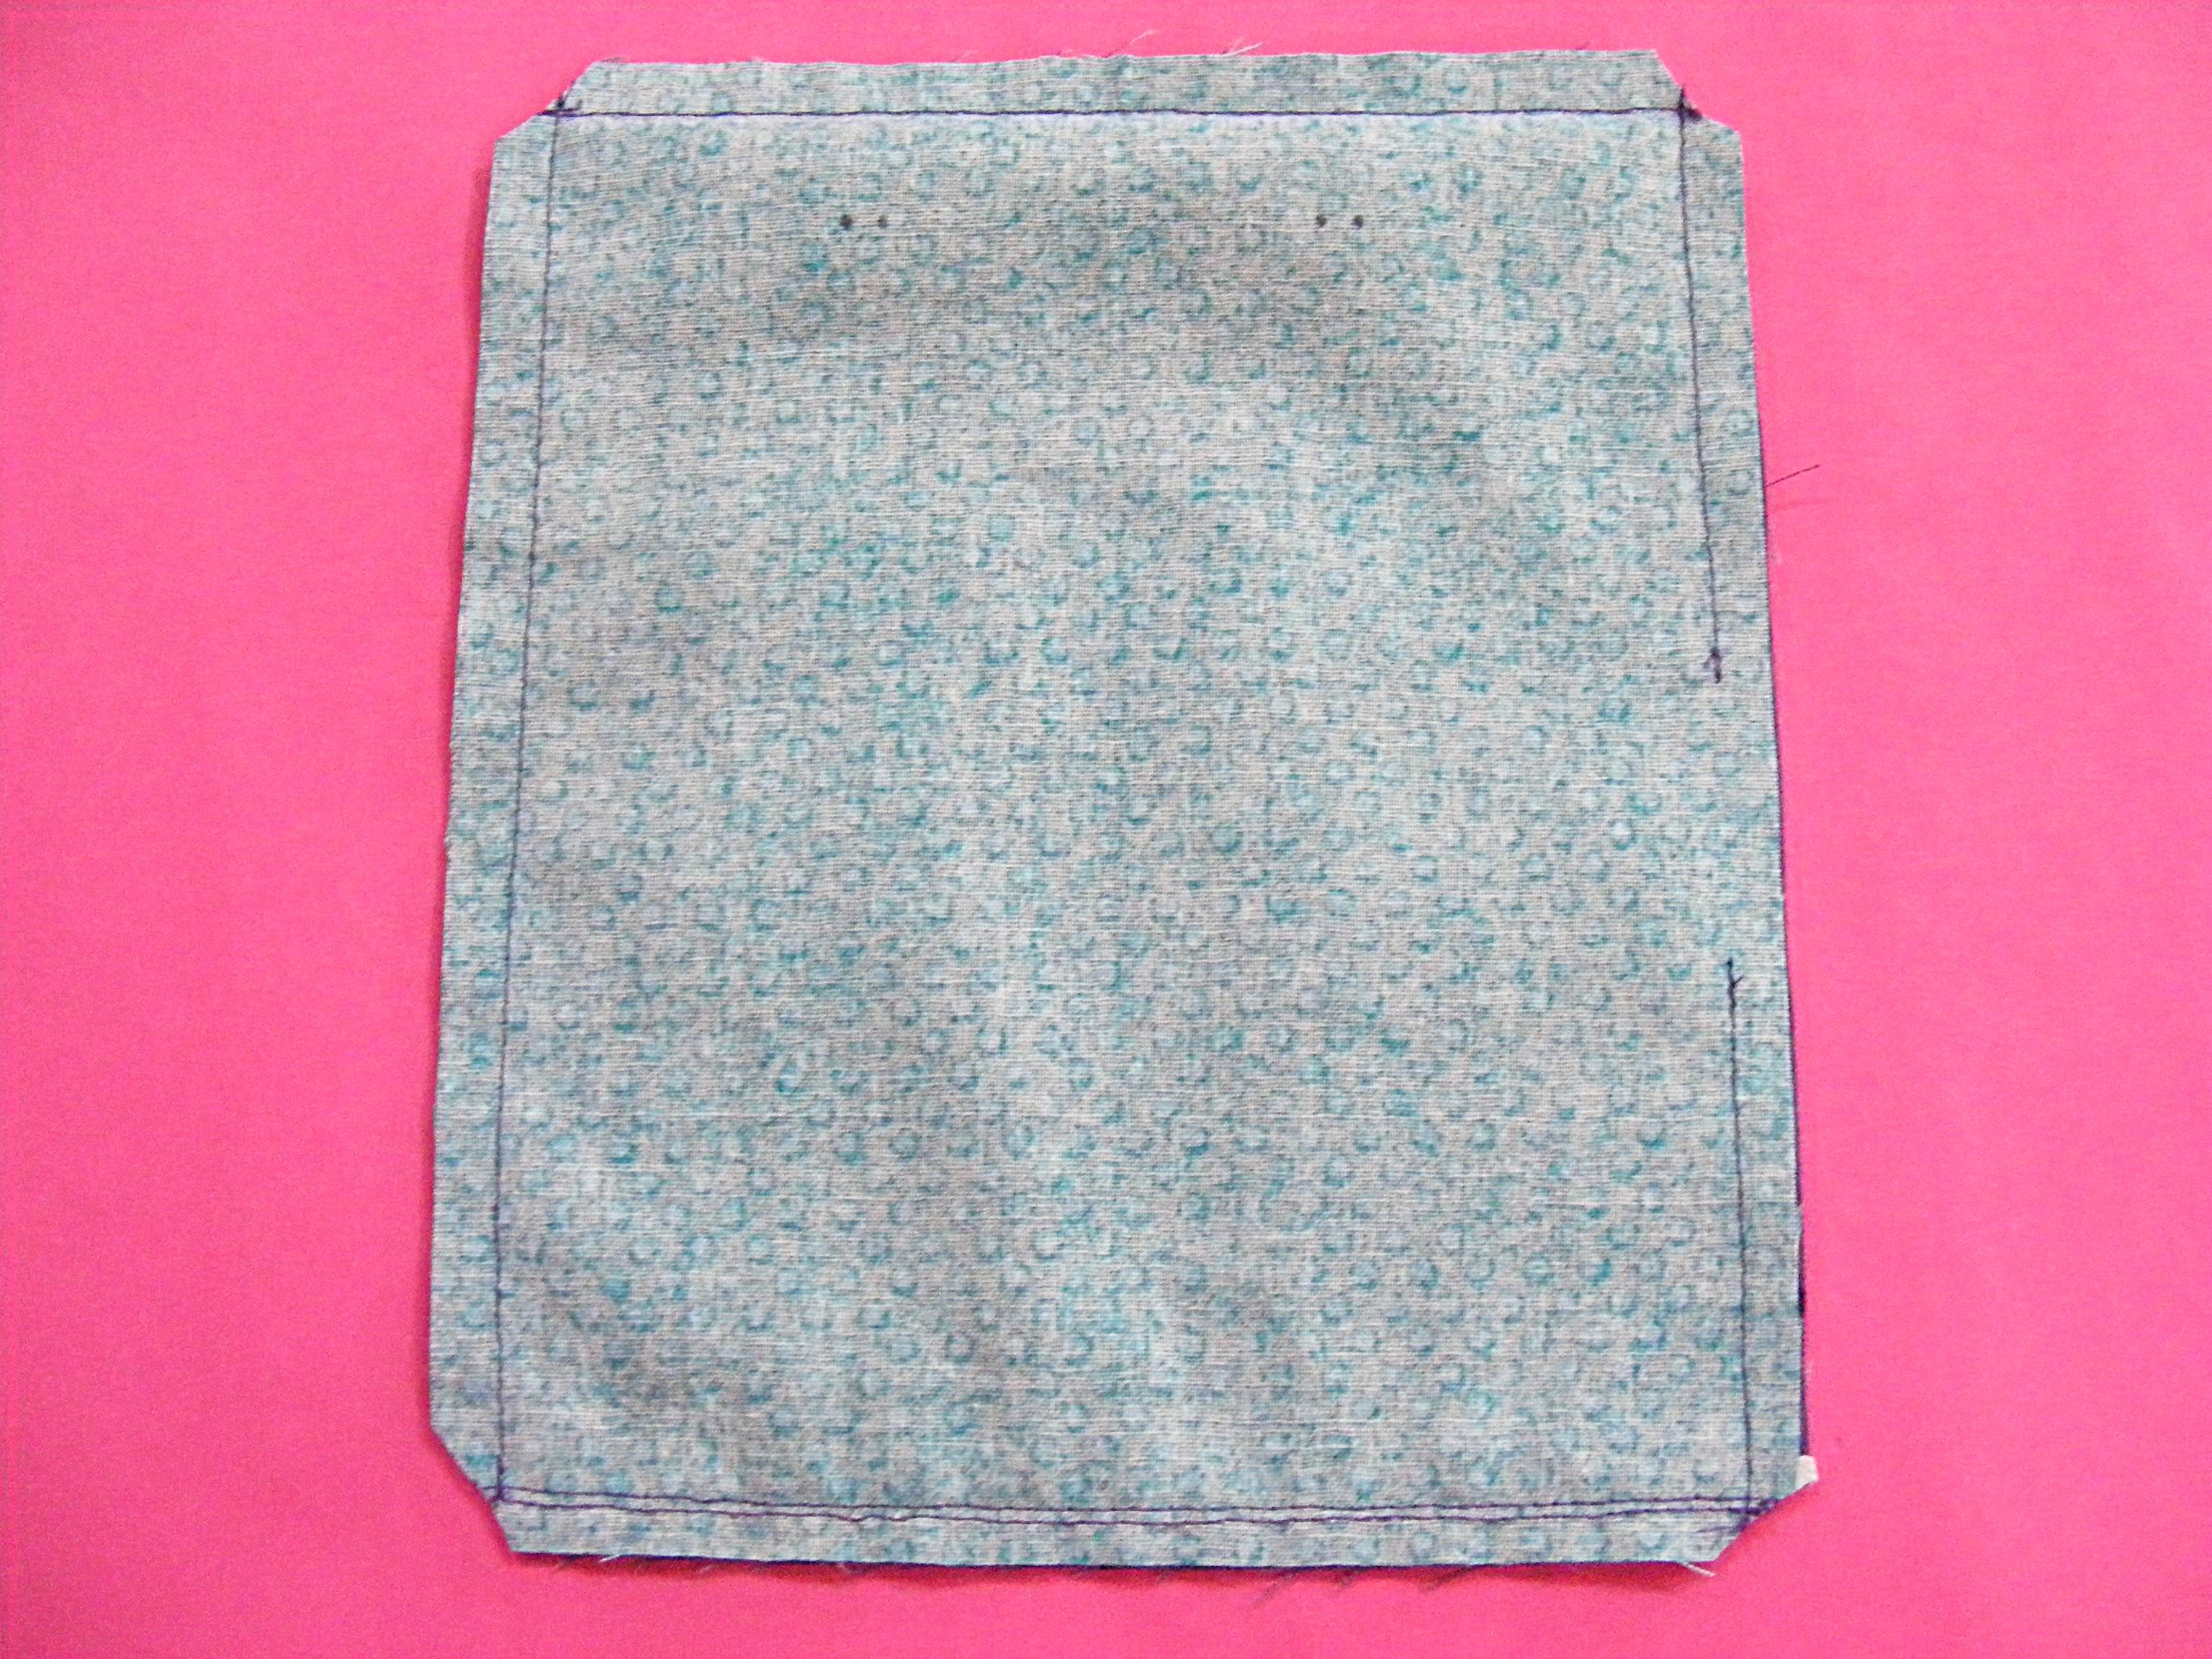
‘Tis the season for sniffles. Which means it’s the perfect time to pull out this cute little monster tissue pack cover pattern and whip up some cute gifts! It’s super easy and the pattern is free.
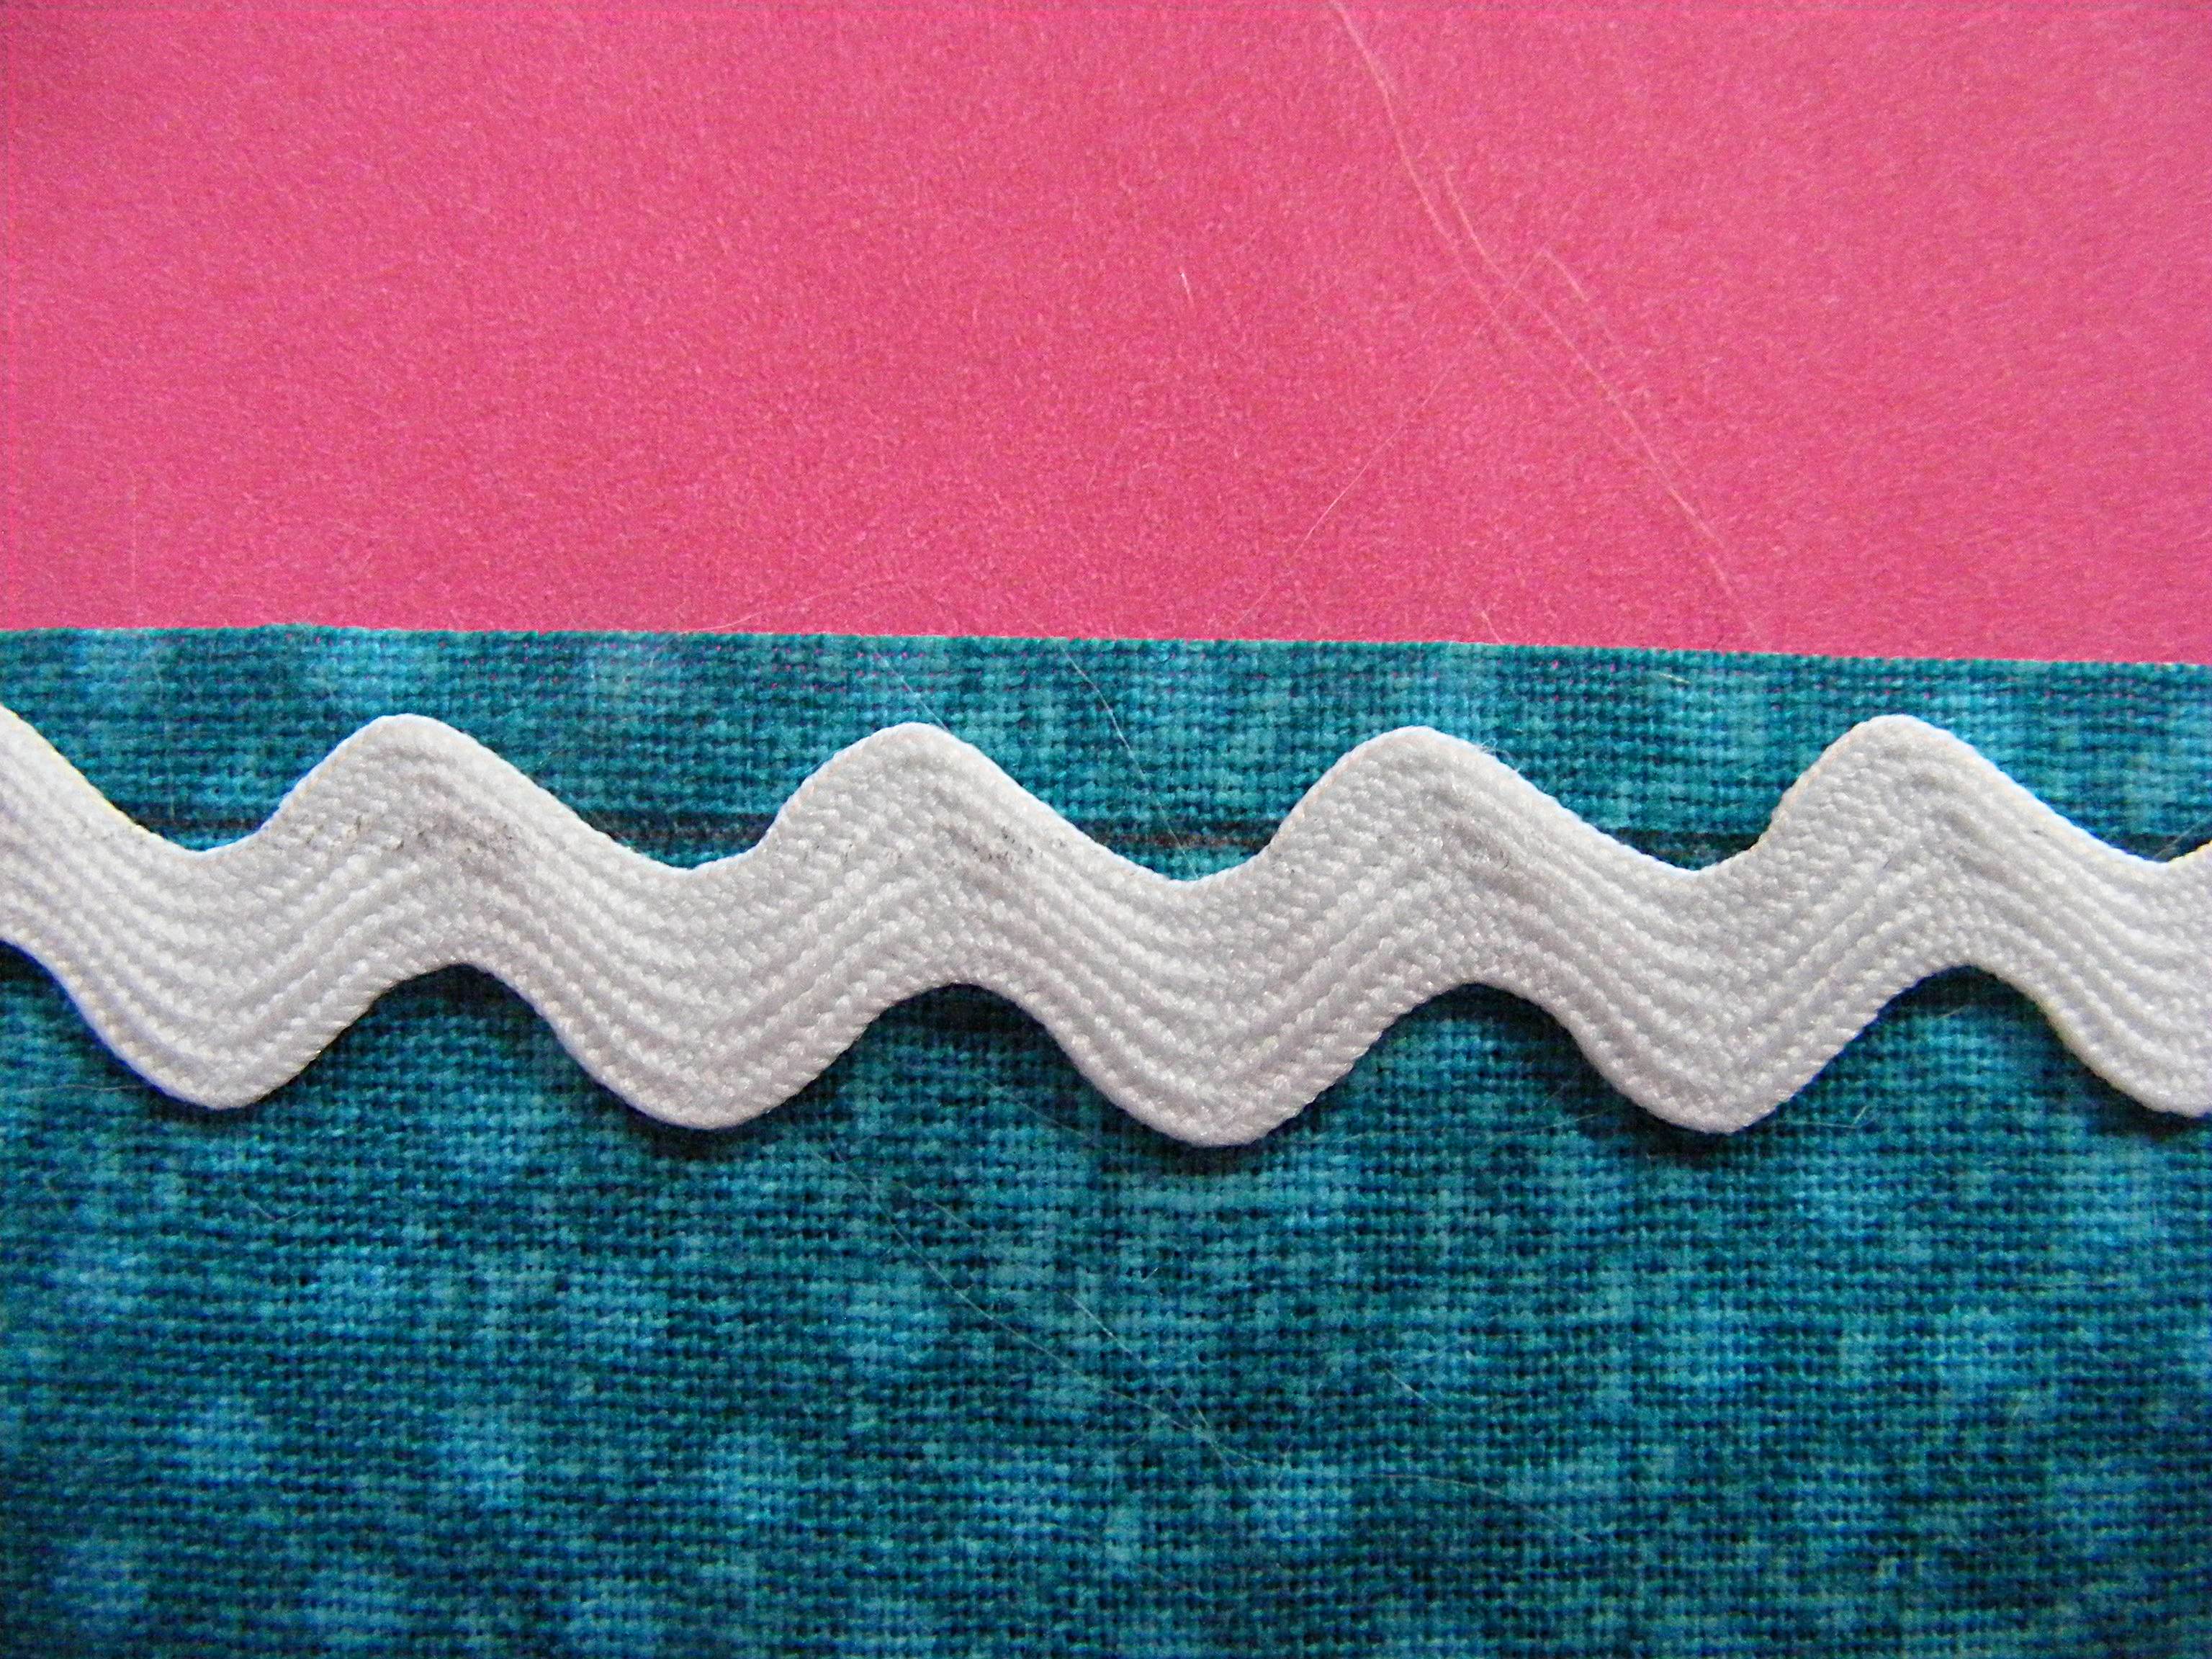
Position one of the pieces of rickrack so that the line you drew in Step 1 is just barely showing in the valleys at the top edge of the rickrack.
Step 3
Sew the rickrack in place, right along the line you drew.
Step 4
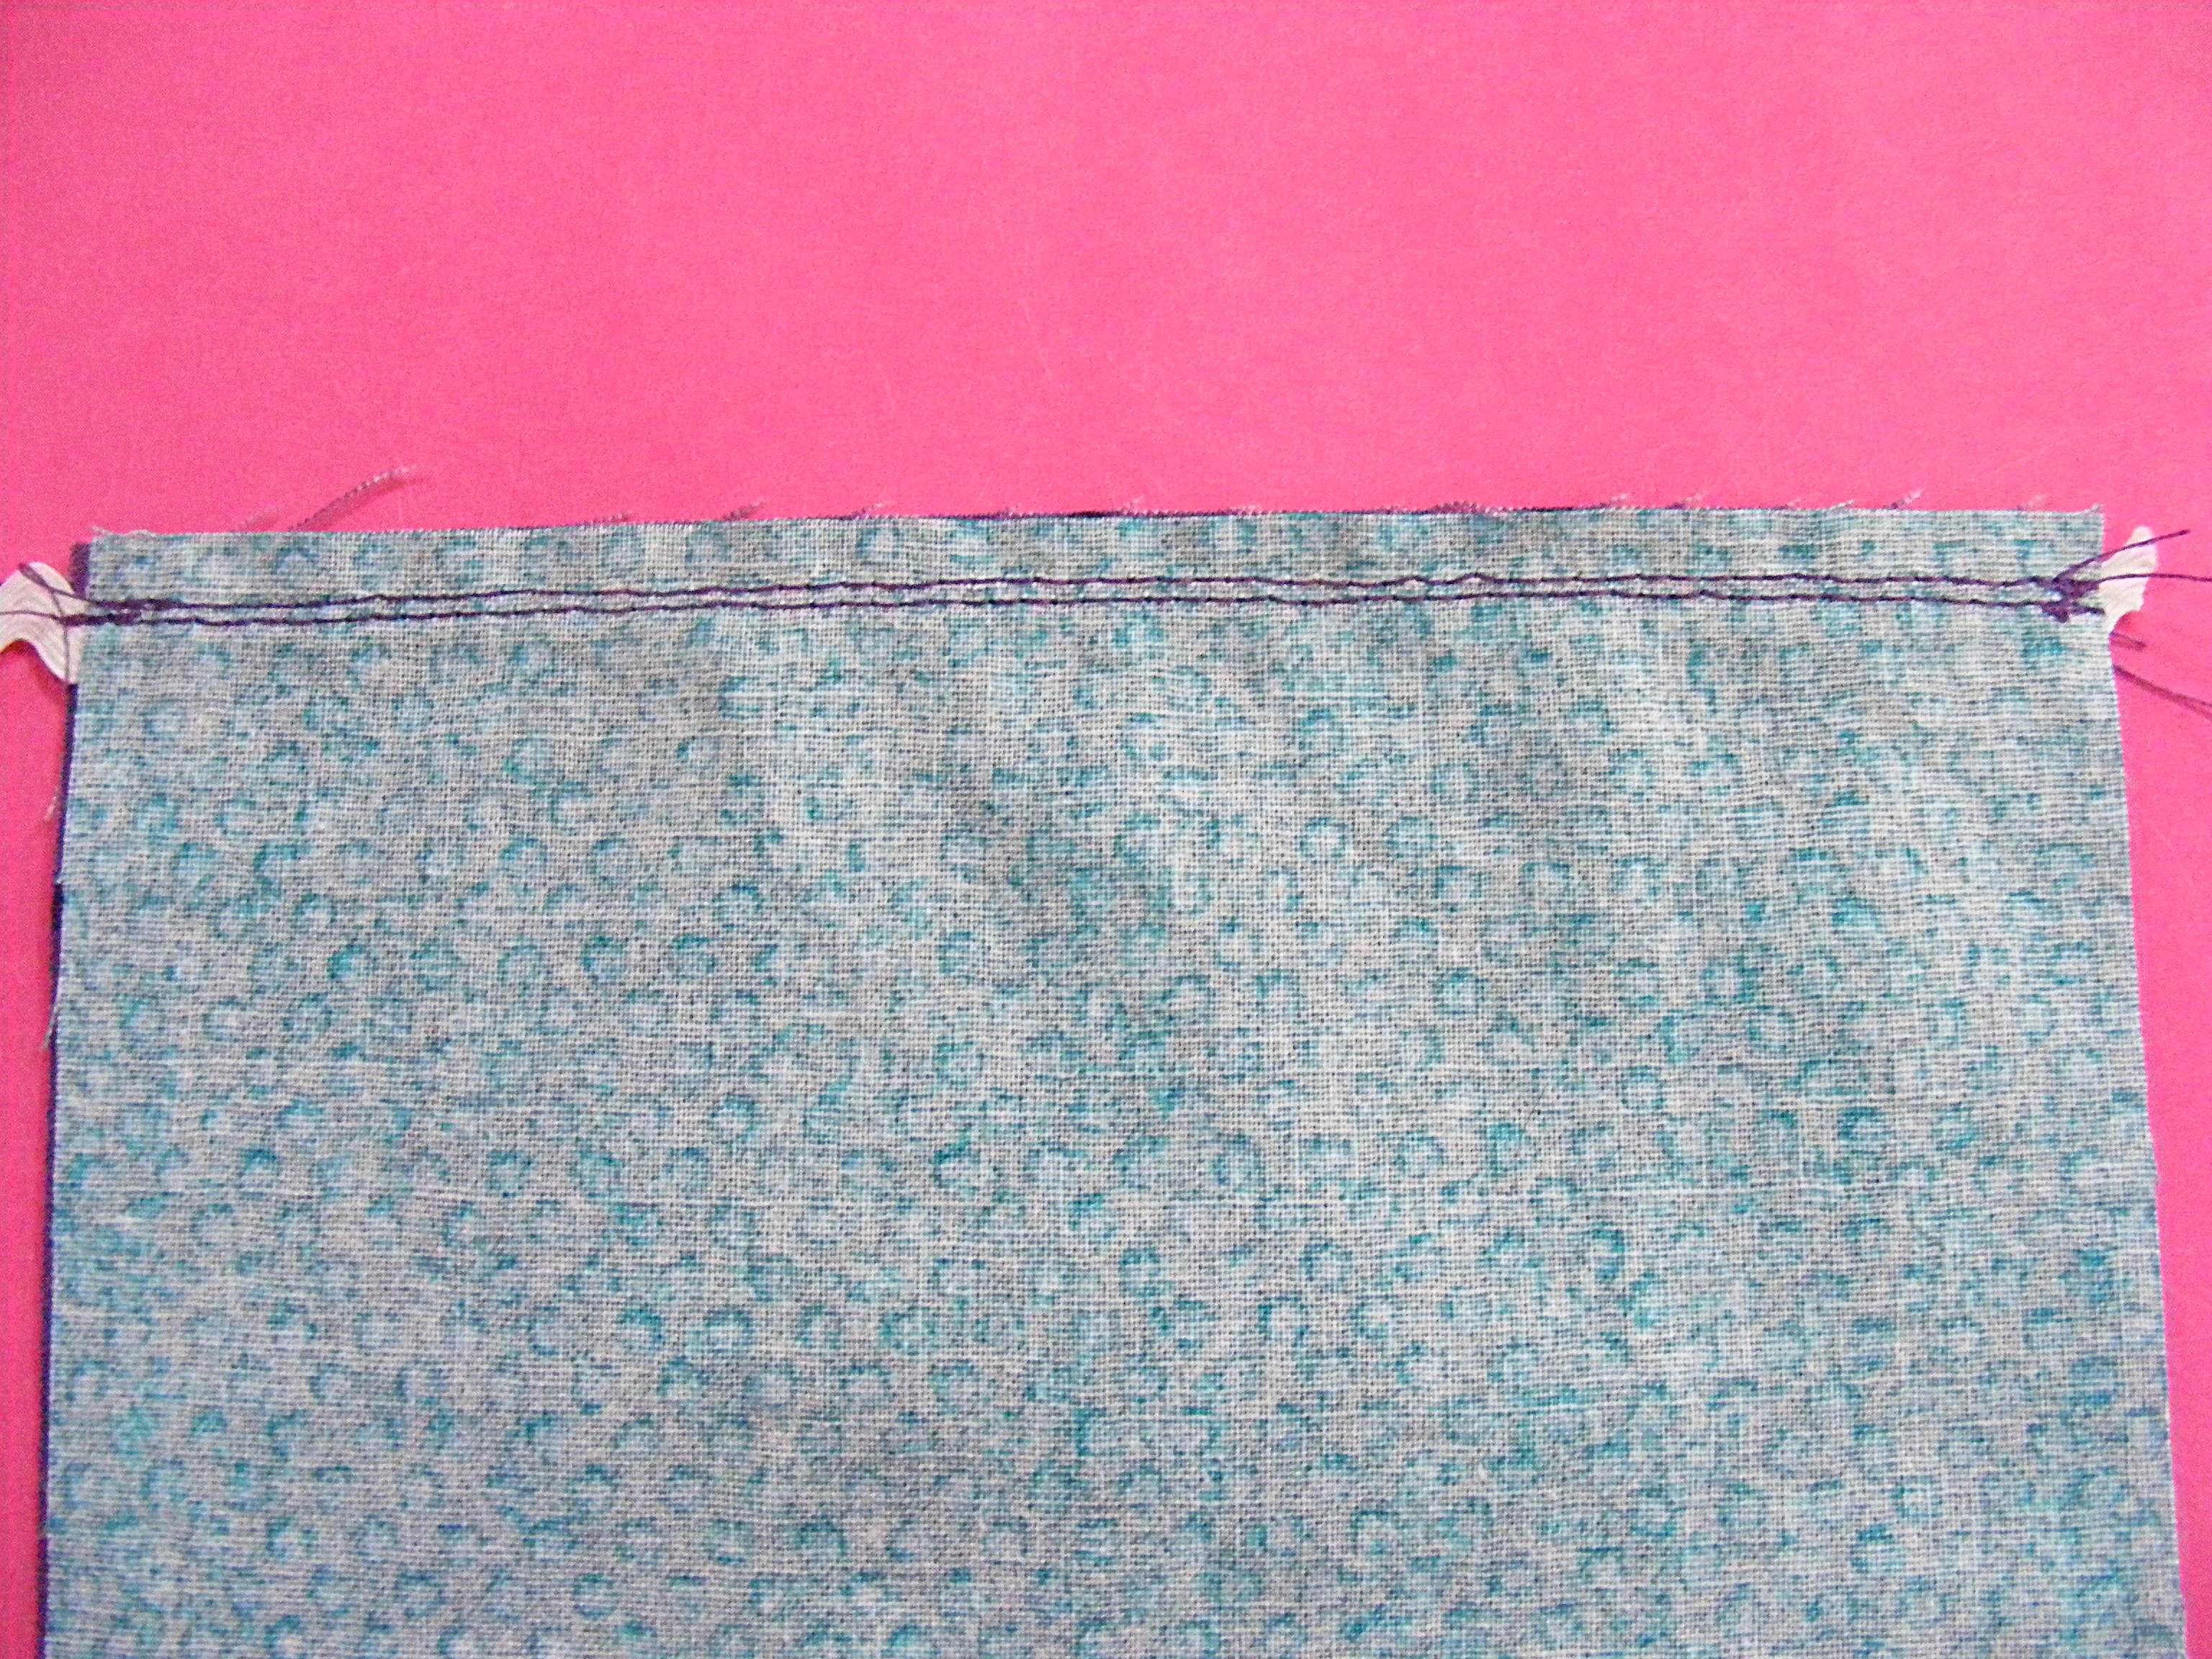
Lay the second rectangle of fabric face down over the first, with the rickrack sandwiched between the layers. Sew them together using a 1/4″ seam allowance.
Step 5
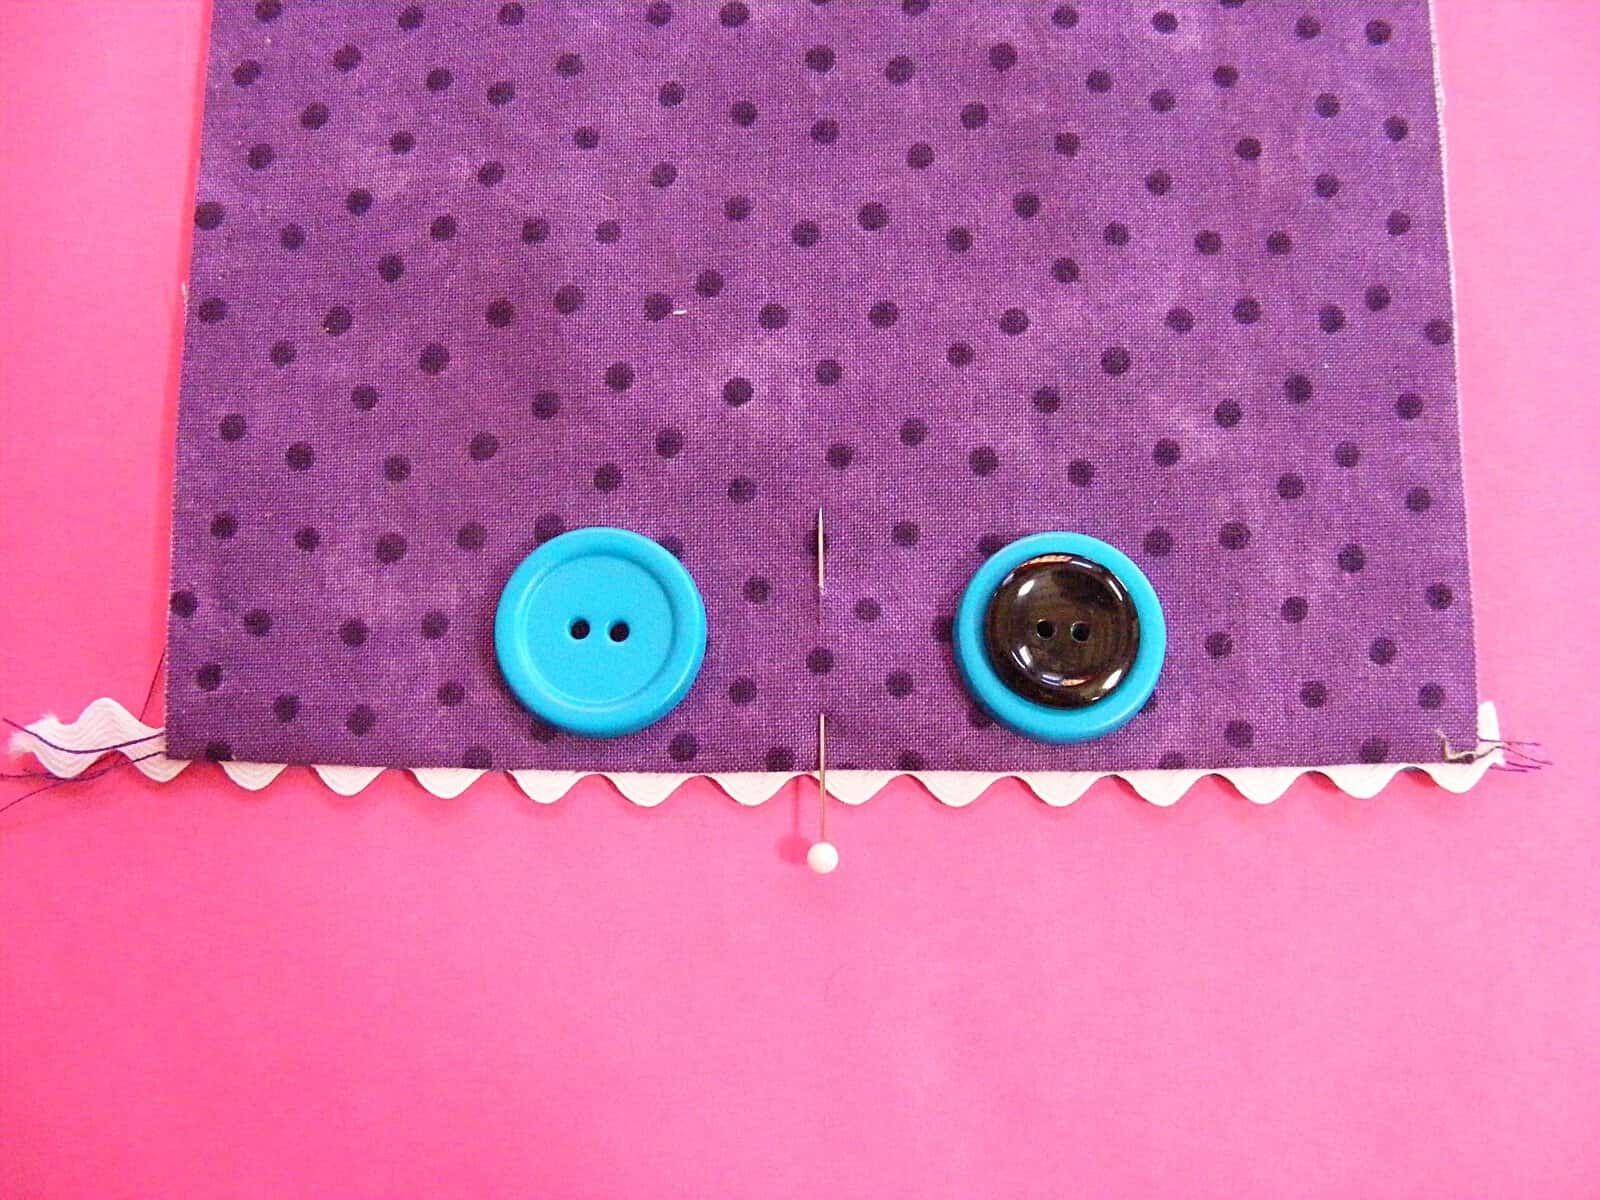
Open the piece up and flip it right side out. Press. See how the rickrack makes nice teeth?
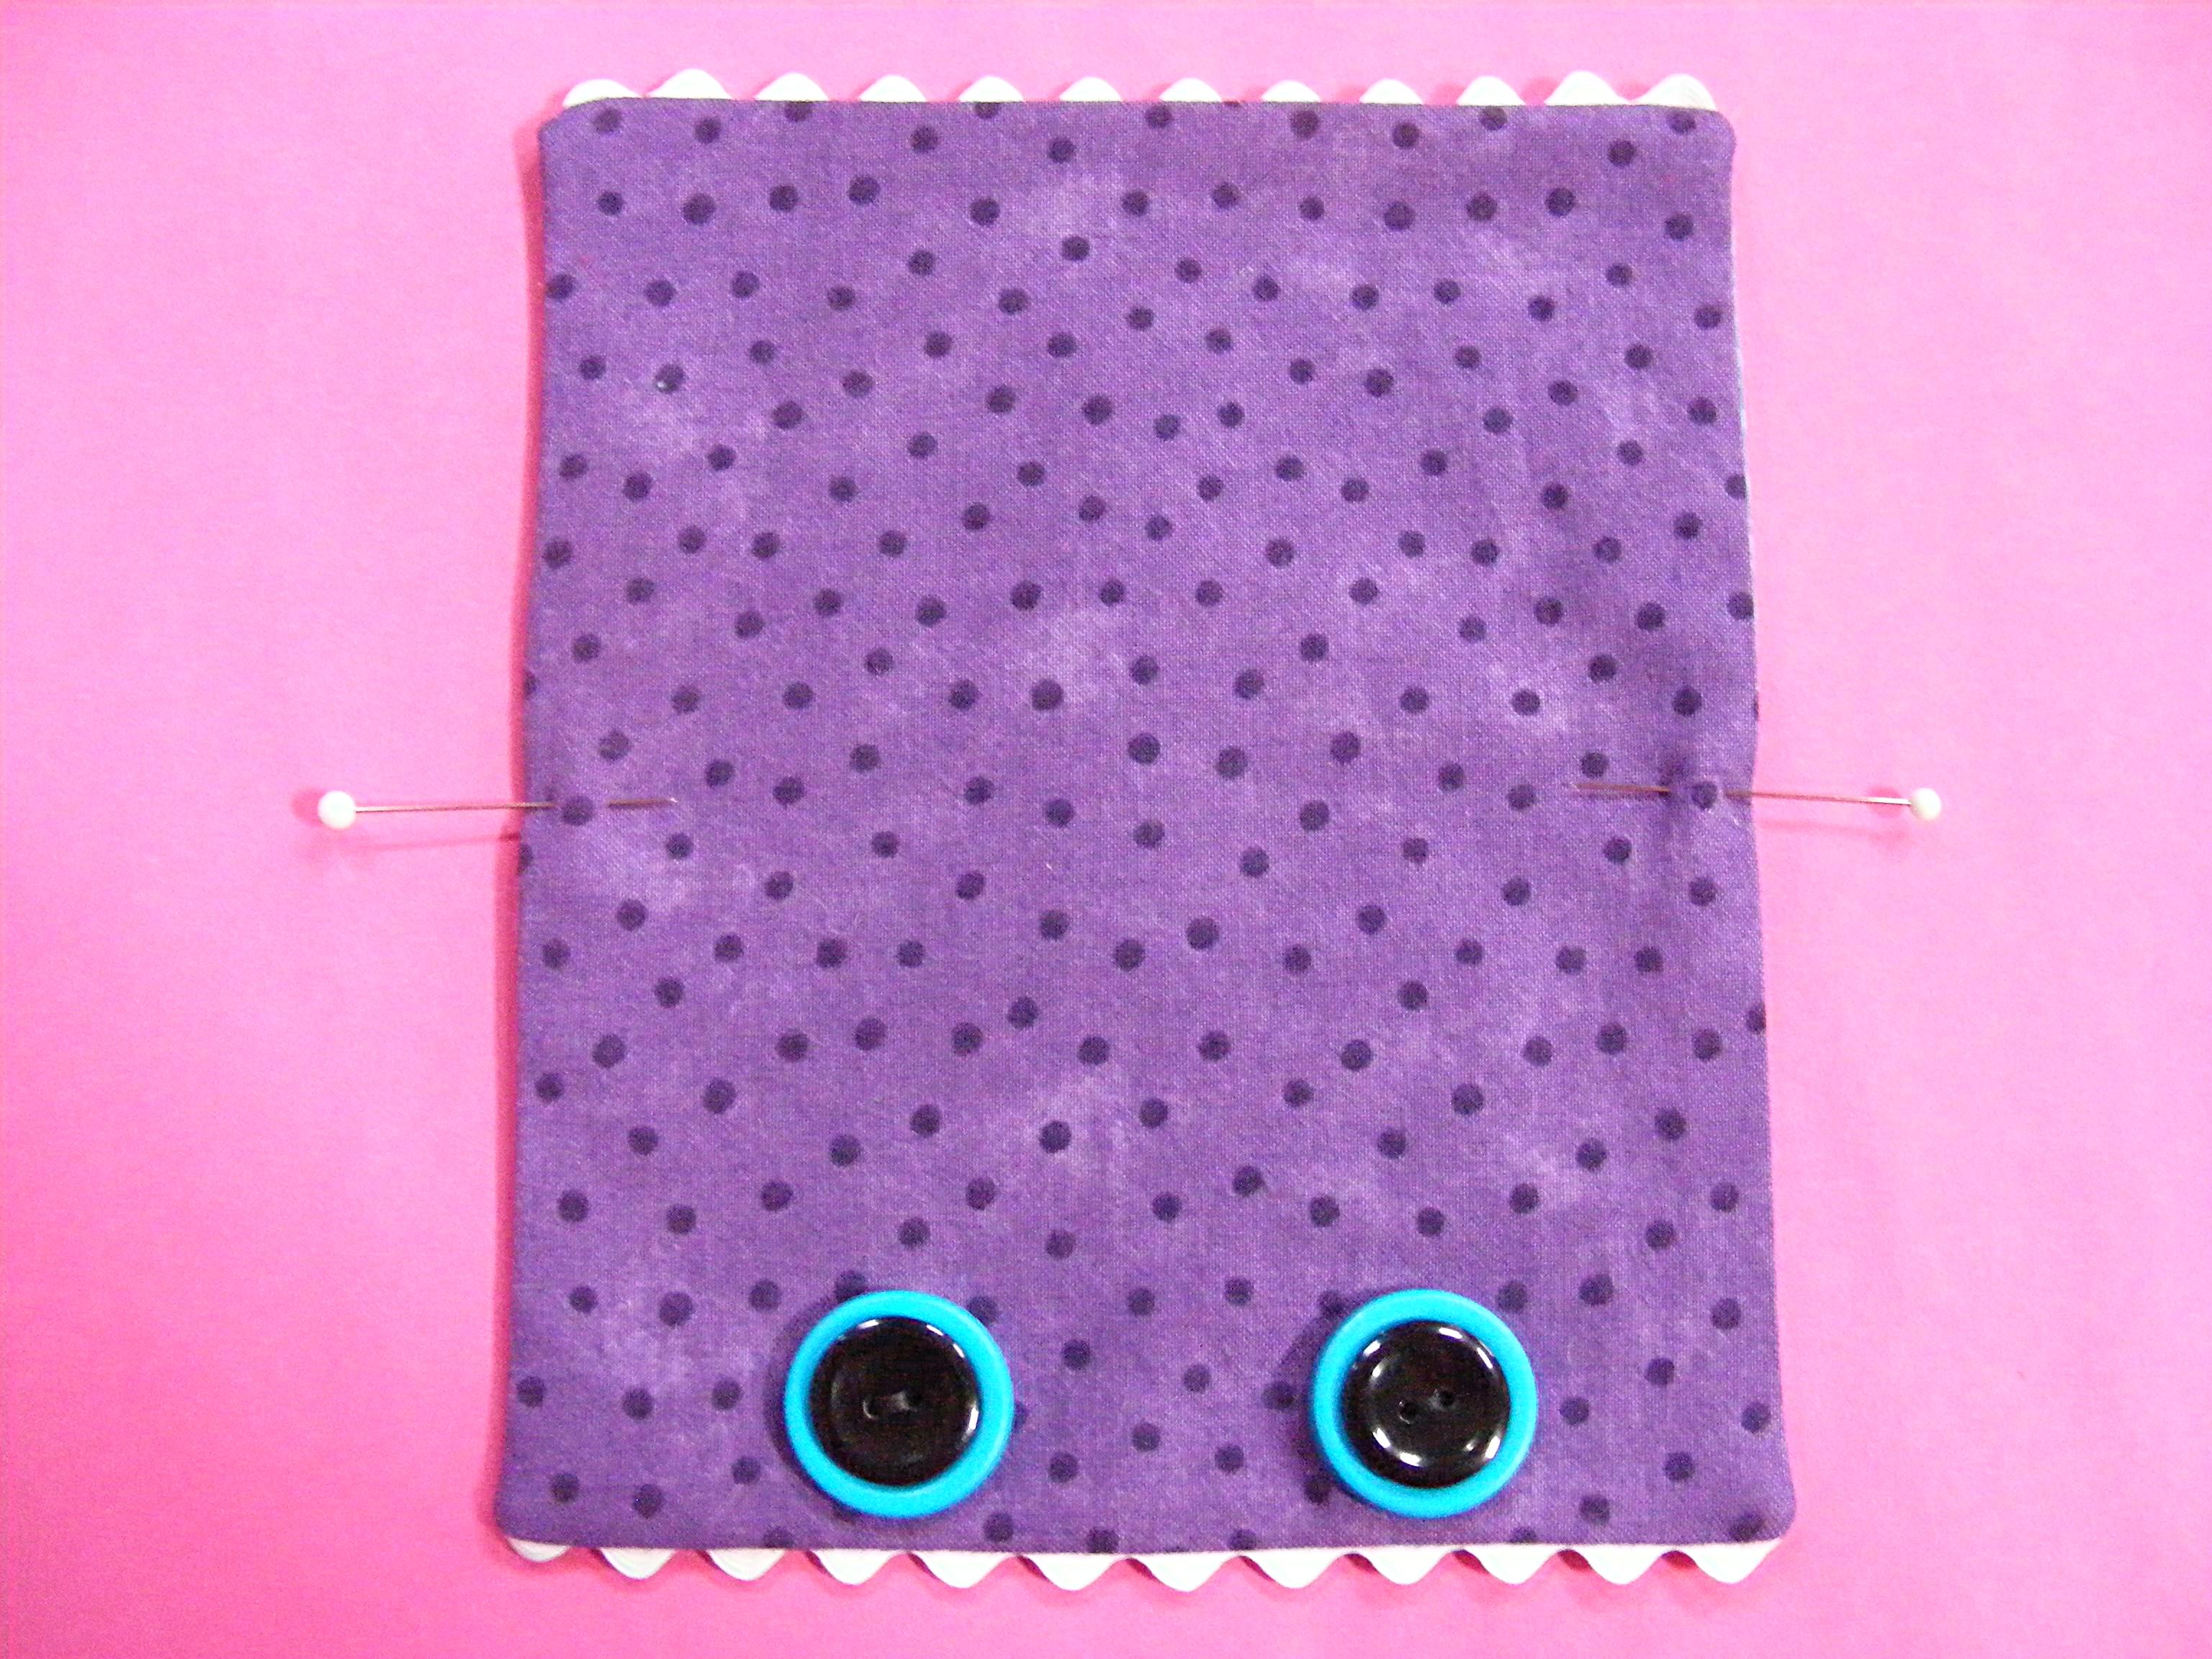
Fold the piece in half and mark the midpoint with a pin. Arrange the button eyes on either side of the center point. I’ve stacked black buttons on top of blue buttons but you can use any combination of buttons and felt you like to get the effect you want.
Sew the buttons in place, sewing only through the top (purple) layer of fabric.
Step 6
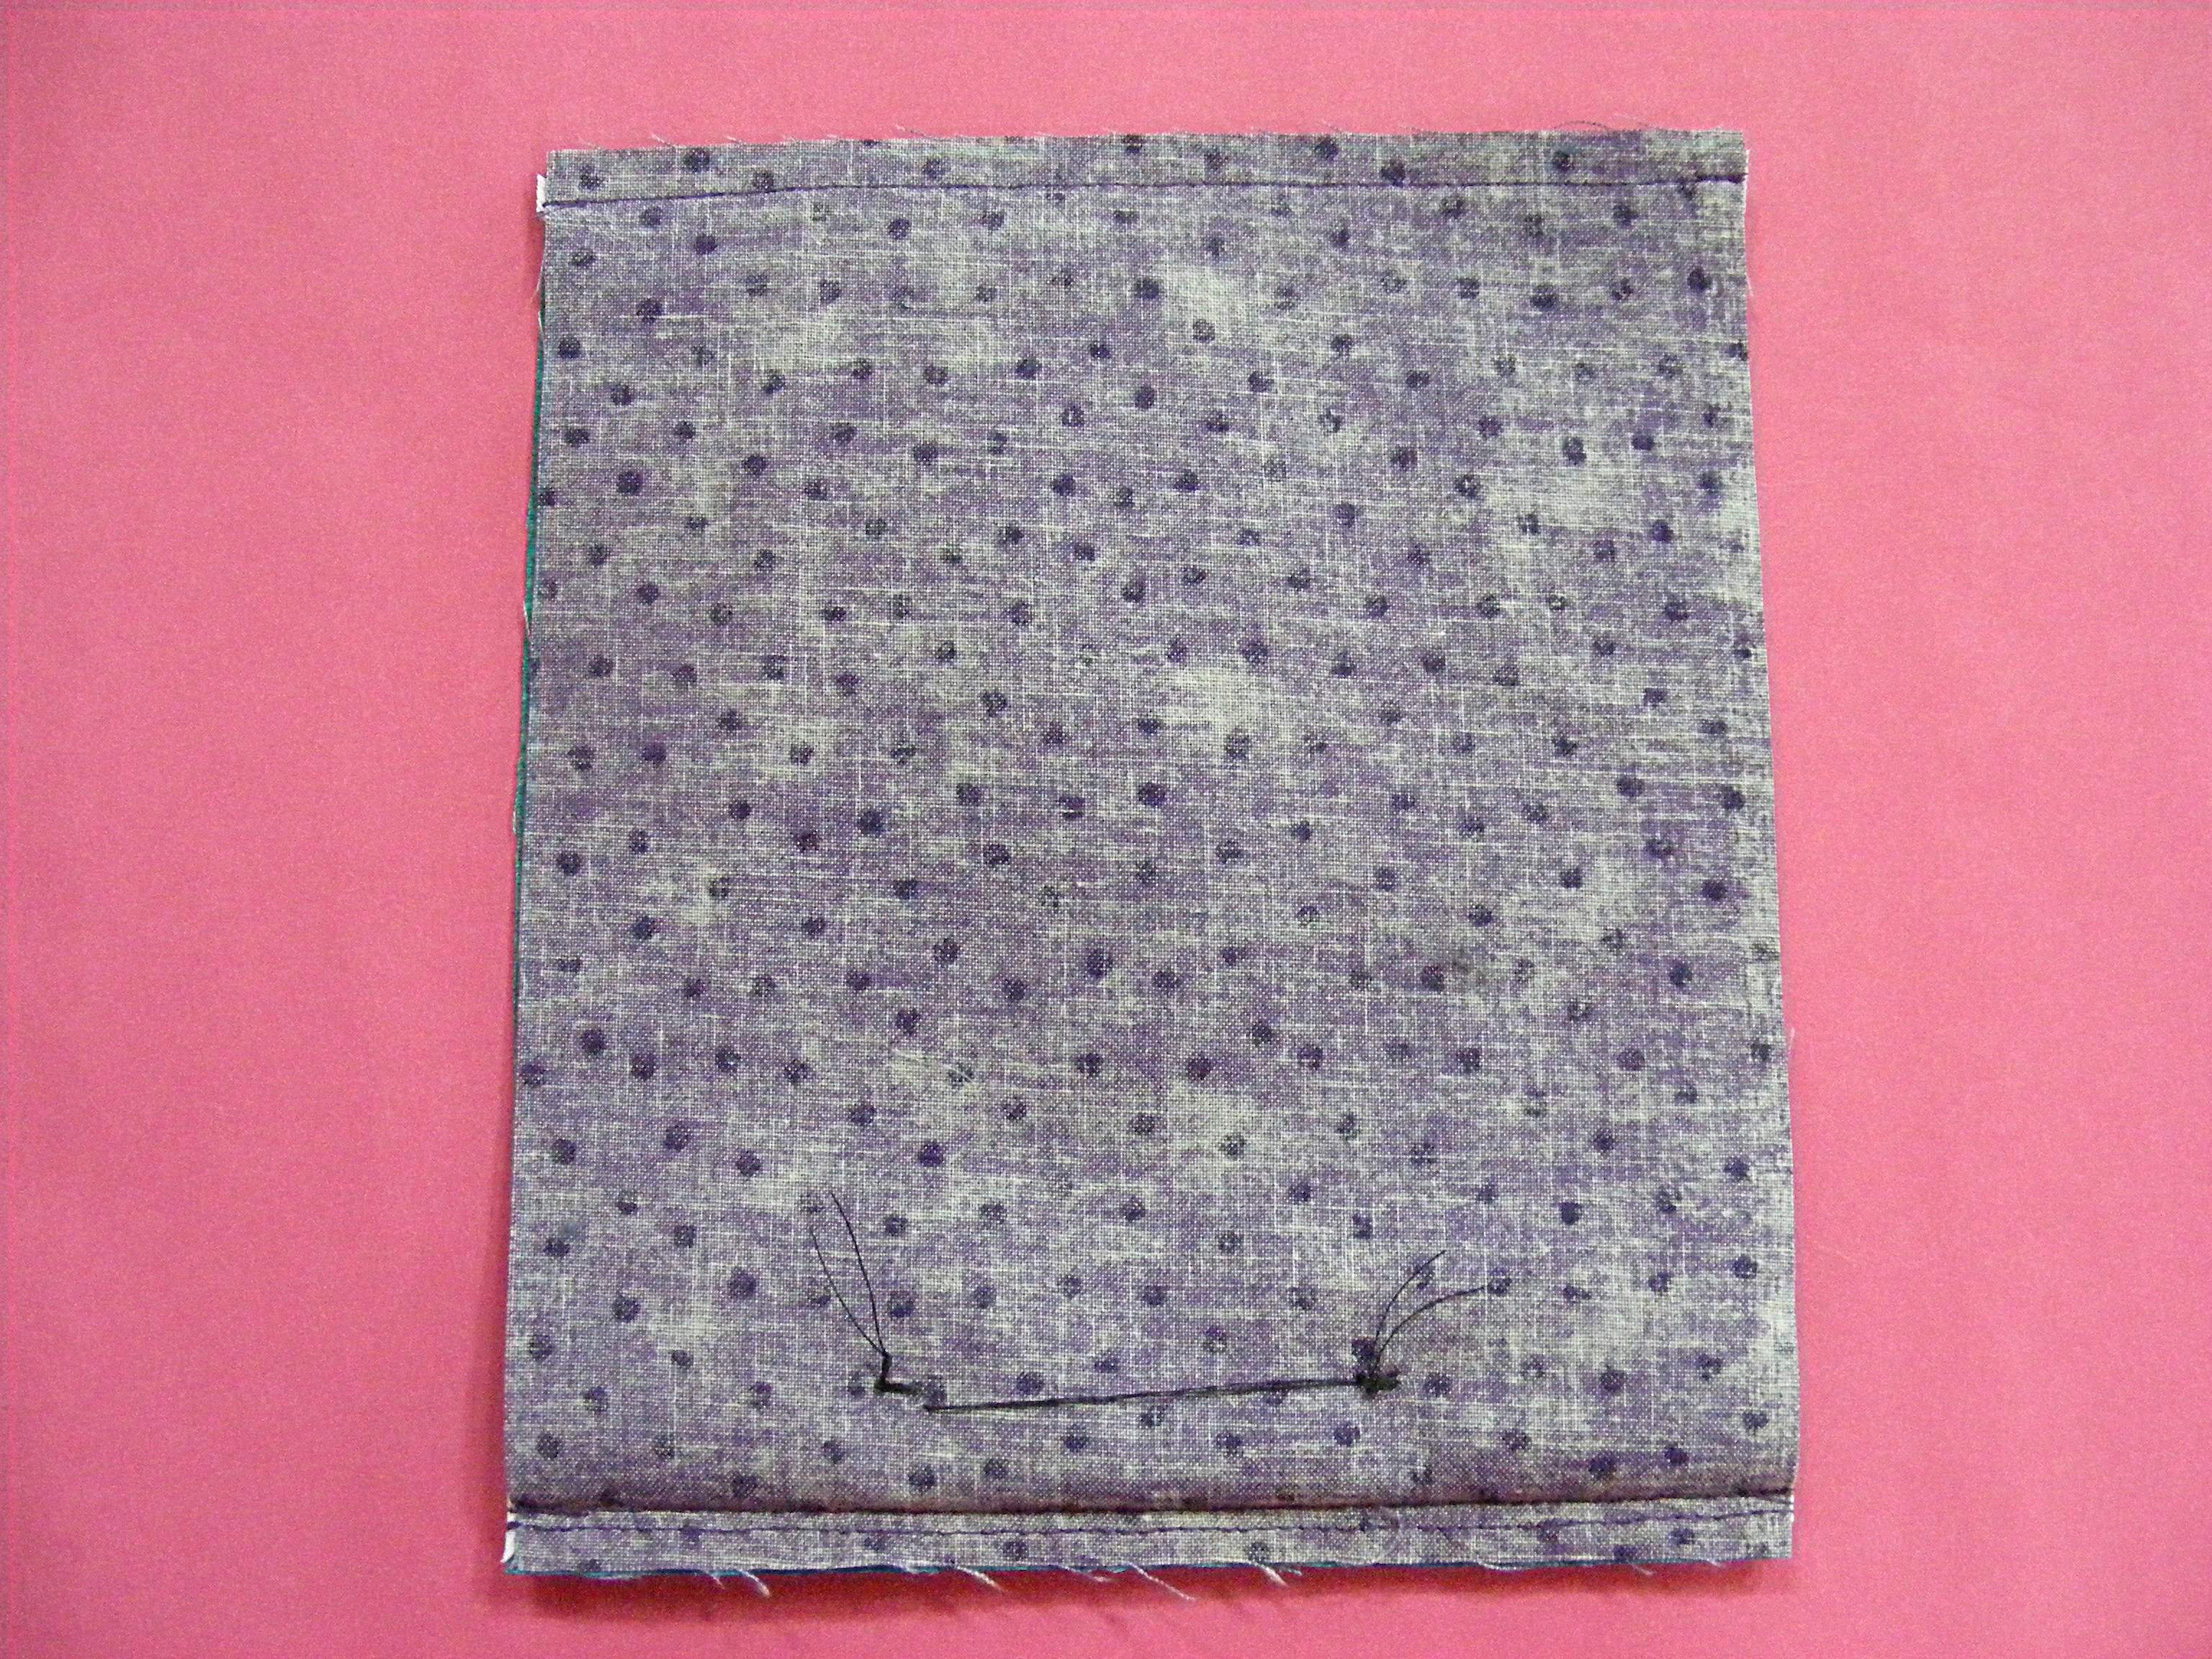
Repeat Steps 1 – 4 to embed rickrack in the seam at the other end of the rectangle.
The two rectangles of fabric should be right sides facing, with both short ends sewn together (with rickrack embedded in the seams) and eyes sewn to the purple layer at one end only. At this point, the long sides of the rectangles should still be unsewn.
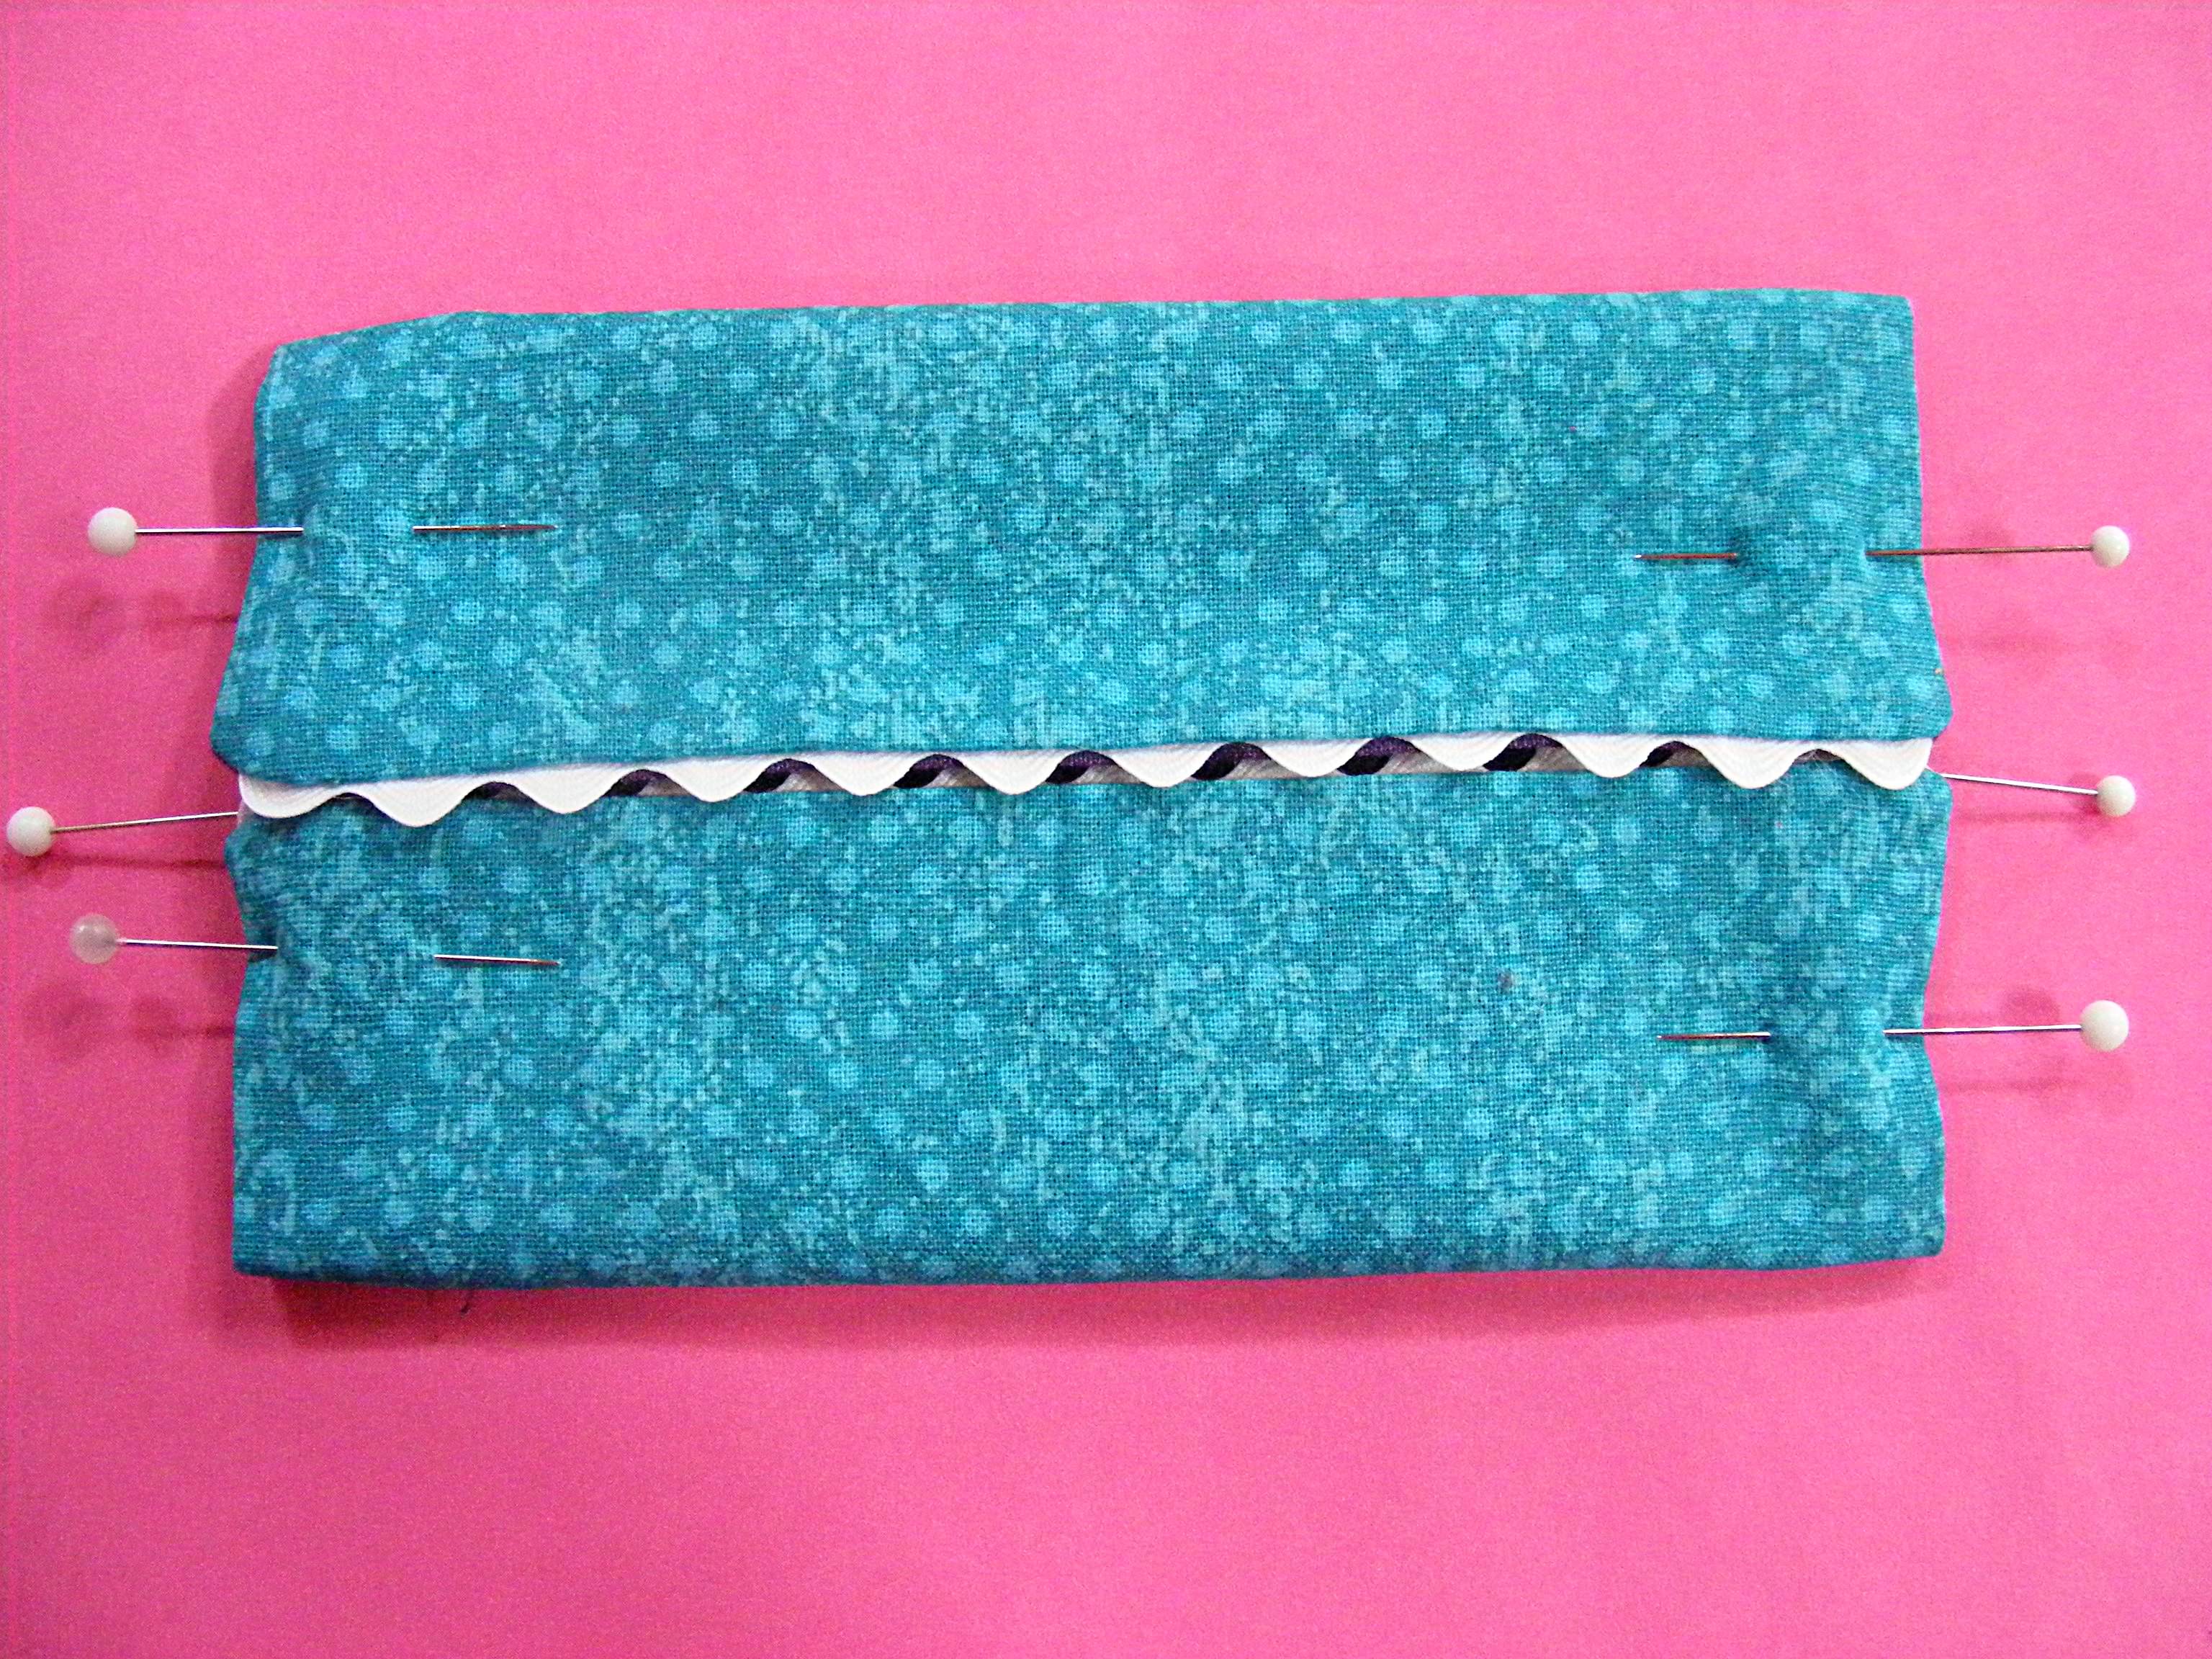
Step 7
Sew the long side seams. Leave a couple of inches unsewn in the center of one side so you can turn it right side out.
Clip the corners up to (but not into) the stitching to eliminate extra bulk.
Step 8
Turn it right side out and use a chopstick to carefully poke out the corners so they’re flat. Press the whole thing.
Fold it in half and mark the center points on both sides with pins.
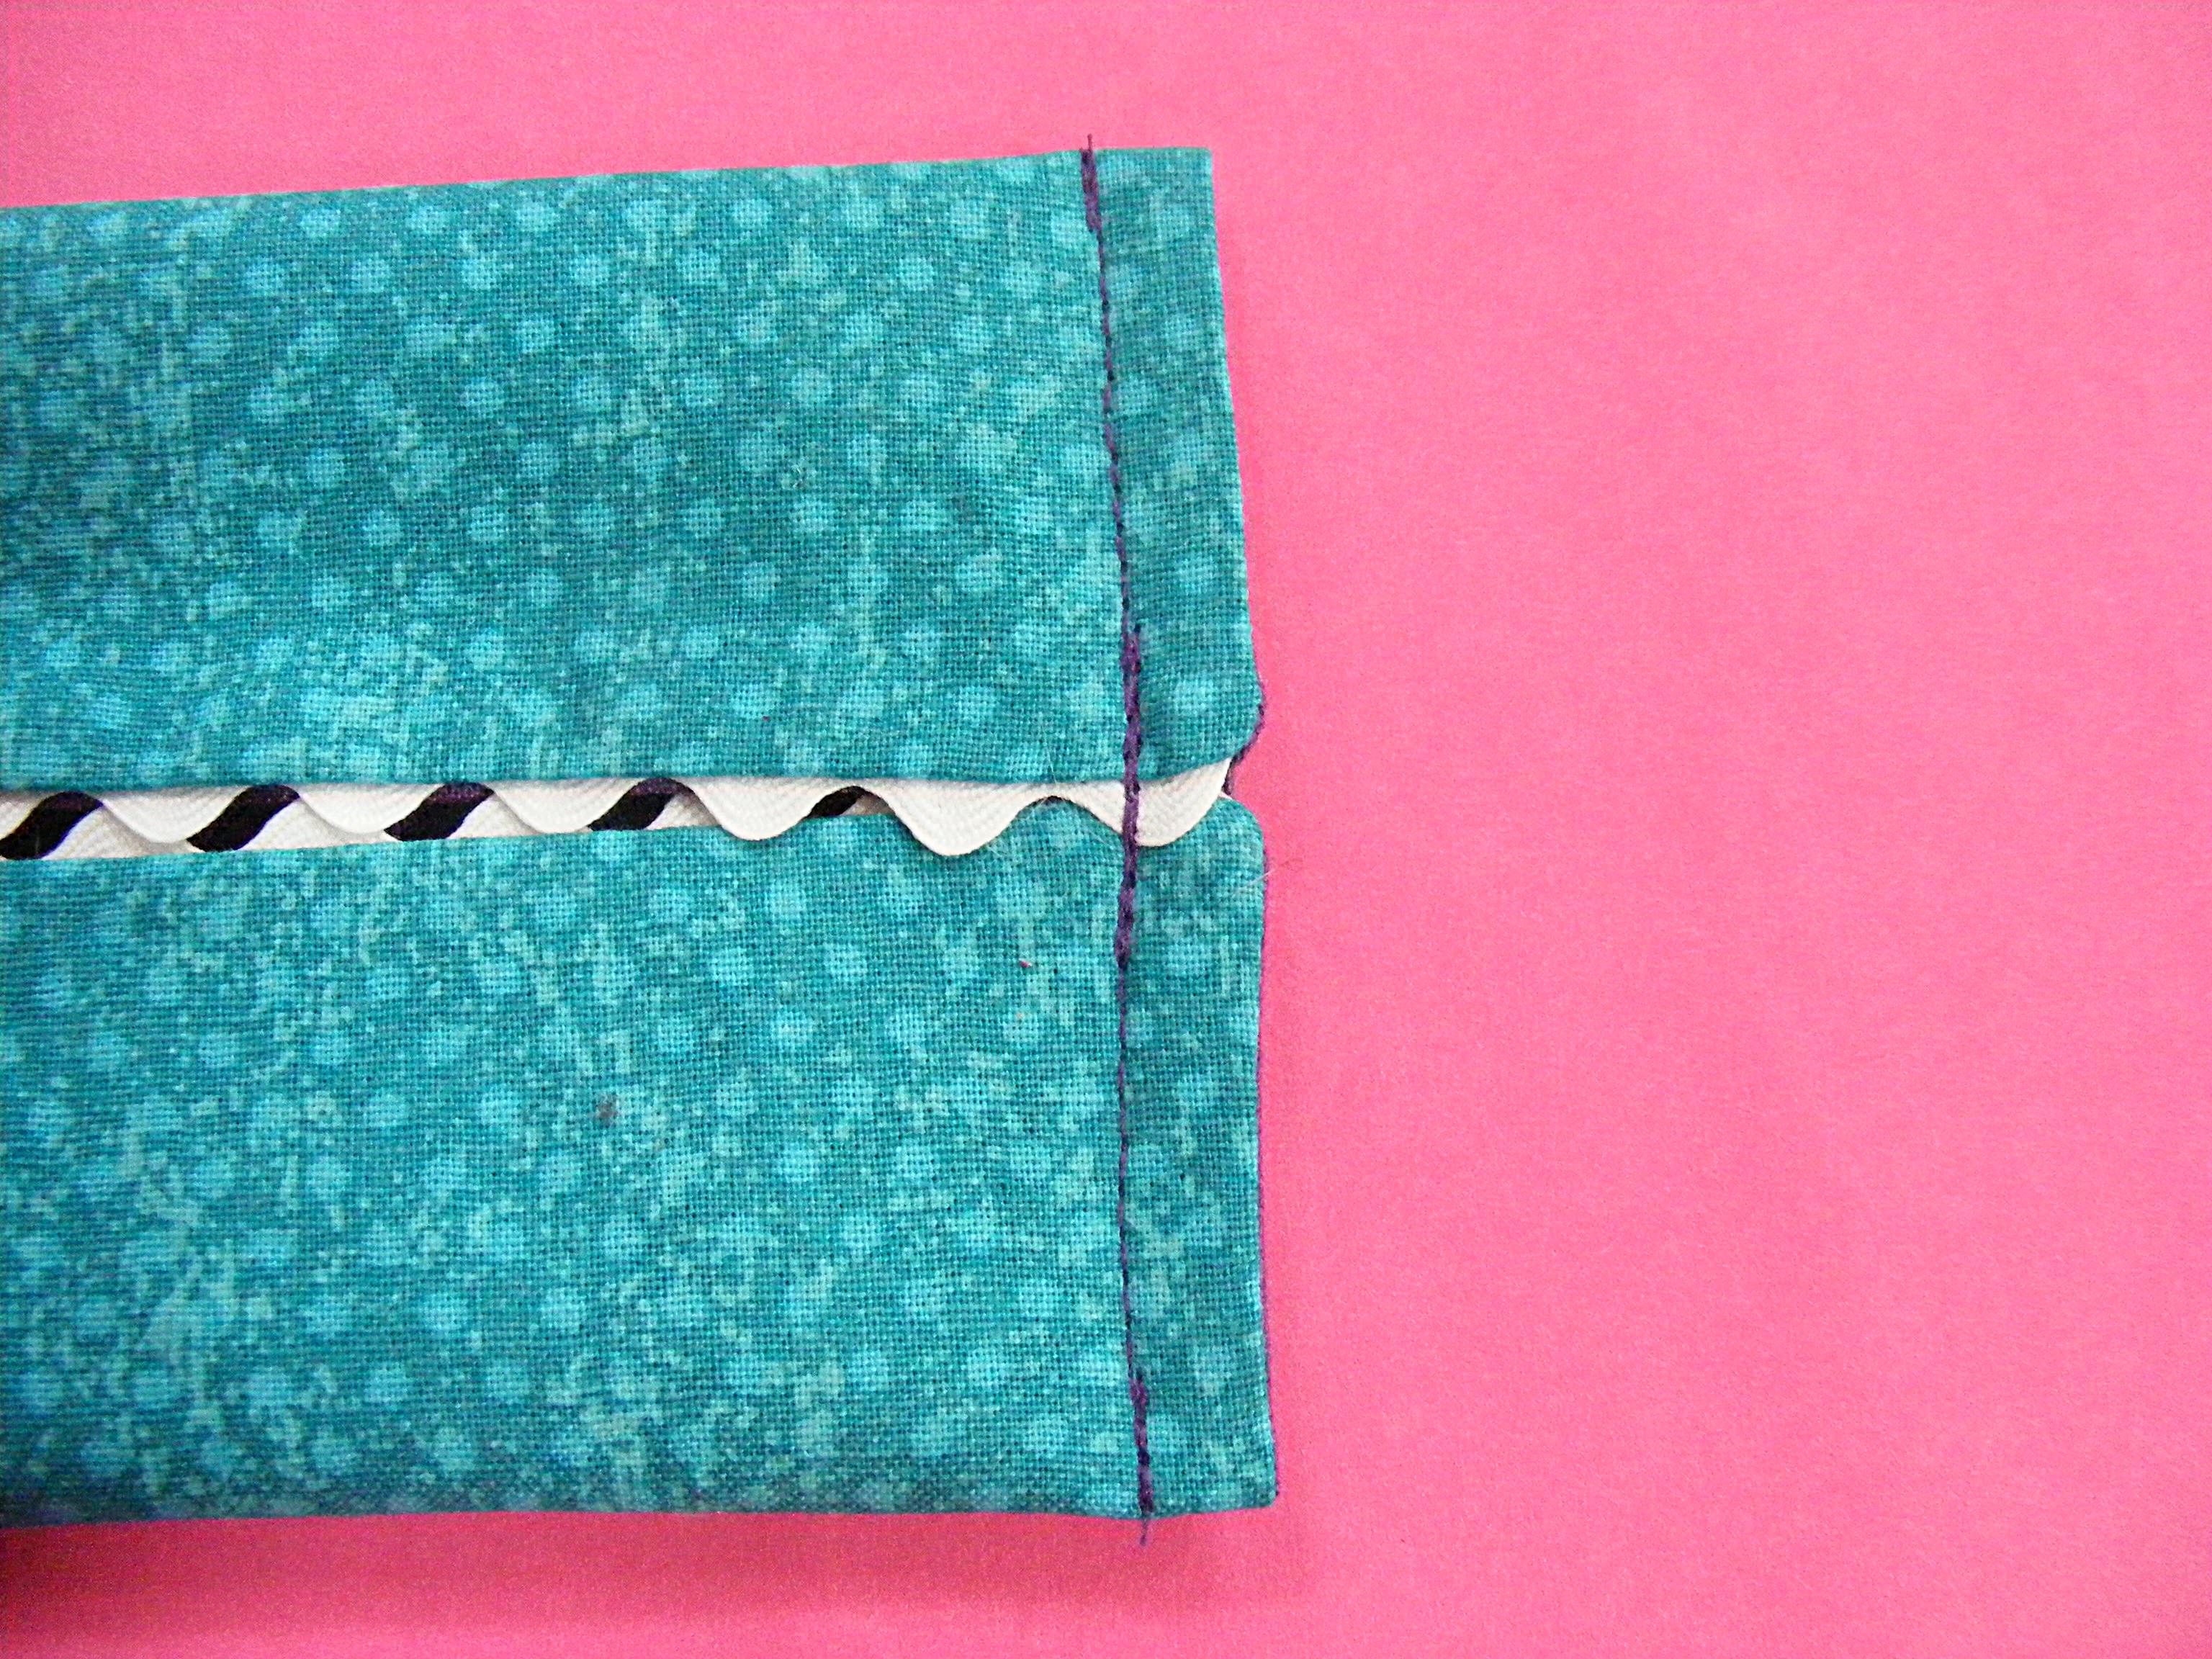
Step 9
With the eyeball (purple) side facing up, fold the toothy edges into the center.
Pin in place.
Step 10
Sew the short edges using a 1/4″ seam allowance. This will close up the turning hole and sew the sides of your pack in one move.
Repeat for the other side.
Step 11
Turn it right side out. Ta daa! A tissue pack! Monstrous on the outside, nicely finished on the inside.
Fill it with a pack of travel tissues (I like to take them out of the pack first - all the different brands seem to open different ways) and he’s ready to go.
Get well soon!
If you like this silly tissue pack cover pattern, sign up for the Shiny Happy News! Members get a weekly email with crafty tips and tricks, links to free patterns, special discounts, and more. 🙂


 I’m picky about eyes – I’ve written about my obsession with eye placement