Sulky Sticky Fabri-Solvy – Embroidery Pattern Transfer and Stabilizer

How to Transfer and Stabilize an Embroidery Pattern - with my very favorite product, Sulky Sticky Fabri-solvy

I was browsing through the Sulky website recently and I saw Sulky Sticky Fabri-Solvy – a stabilizer that I’ve never seen in a store or even heard of. It sounded amazing, but it was kind of expensive and I thought it might be too good to be true so I ordered just one package to test it out.

I AM HOOKED!

I can’t get over how tremendously, perfectly useful this stuff is! Especially for those of us who buy digital patterns! It’s so amazing that I did a video just for this one product. It replaces everything I normally use. Everything!

See this video on how to transfer embroidery patterns? And this one about embroidering on stretchy fabrics? And this post about removing stabilizer? I now use Sulky Sticky Fabri-Solvy instead of all the products I showed you in those old videos. It works on light fabrics, dark fabrics, napped fabrics, and stretchy fabrics. It’s MAGIC!

I say it all in the video – but it’s worth saying here again. Here’s what’s so great about it. . .

  1. It’s 8 1/2 x 11 inch sheets that can go through your inkjet printer or a photocopy machine. (Update – it now goes through a laser printer as well!) No more tracing patterns. Ever! Tracing patterns is my least favorite part of an embroidery project and I Will Never Do It Again!
  2. Peel off the paper back and stick your pattern to your fabric. It sticks REALLY well, but doesn’t leave even a trace of adhesive on your thread or needle. (Update – I’ve since learned that if you leave your embroidery sitting in a hot car in the summer, it will affect the adhesive and make it leave a slight gummy residue on your needle as you work. Yuck! But if you use a little Thread Magic conditioner on your needle and thread it eliminates that residue completely. Yay!)
  3. Stitch right through the pattern and fabric. The pattern sheet actually stabilizes your fabric, making your stitching even neater. And it works on stretchy fabrics too!
  4. Dunk your finished embroidery in water and swish it around for a minute or two and every trace of the stabilizer dissolves away.

Watch how it works. . .

(You can find that You Are My Sunshine embroidery pattern here.)

I love this stuff! One package contains 12 sheets and costs $14.99. That works out to a little bit more than $1 per sheet. At first I thought that was a little on the pricey side and I’d just use it on more complicated patterns, but now that I’ve used it on a few projects I’m totally hooked. Pay a buck and I don’t have to trace the pattern, my fabric is beautifully stabilized, it doesn’t matter if I go off the lines a bit, and it rinses away in minutes? Yes please!

I am all about tools and techniques that make my crafting easier and more enjoyable. This is supposed to be fun – right? 🙂

You can buy the stabilizer here. You guys are going to love this stuff!

Here are all my posts about working with patterns.

Pattern Sources

How to Resize a Pattern

Return to the Learn to Embroider main Table of Contents.

Move on to the posts about knots. Yes – a whole section about knots. 🙂

What are the different kinds of sewing needles?

What are the different kinds of sewing needles?

Want to learn the basics of hand embroidery with an easy online workshop – totally free?

Sign up for Embroidery 101 here. You’ll learn how to get started, the tools and supplies you’ll need, the four most basic stitches, how to transfer your pattern and how to display your work.

If you already know the basics – sign up for Embroidery 201. It’s also free! You’ll learn how to stitch on specialty fabrics like felt and stretchy T-shirts. Plus you’ll learn lots and lots and LOTS more stitches – all my favorites!

Liz recently asked me. . .

I have a question for you – what sort of sewing needles do you use? I am experimenting with different sorts but haven’t yet found the  perfect one. It looks like you are using six strands in your eyes video – which needle are using for that? And what would you recommend for three strands?

I’m going to use this as an opportunity to talk about sewing needles in general. See that photo up there? I loaded it up in a large file size so you can click on it to see it closer – and that’s a sewing bobbin in there for size reference. The three needles there are the ones I use most often (which is why they’re the hand sewing needles I sell in my shop).

Types of Hand Sewing Needles

Let’s start from the top. . .

The top needle is a size 5 embroidery needle. That’s the size I most often use for regular embroidery because I like to stitch with 4 strands of thread and it’s perfect for that. It doesn’t hurt to use fewer, and if I concentrate really hard (and remove my glasses) I can get six strands through that eye.

I often use a size 8 embroidery needle when I’m sewing or embroidering on felt. The needle hole can actually be visible in felt, and I’m usually only stitching with 2 strands of thread – so it’s better to switch to a smaller needle for that.

I also use a size 8 embroidery needle for Big Stitch quilting.

The middle needle is a size 4 sharp. That’s a basic sewing needle. (Basic sewing needles are called sharps – just to confuse you. All the needles in the photo are sharp, but the middle one is actually called a sharp.) If you click on the photo to see it larger I hope you can see that the eye is much smaller than the embroidery needle. In a pinch you could maybe fit 3 strands of embroidery thread through there, but it would be tough. That said, I have used a sharp to embroider with 1-2 strands of thread and lightning didn’t strike me for using the wrong needle. 🙂

The bottom needle is a size 8 between or quilting needle. I have no idea why quilting needles are called betweens. I think it’s just one more thing to scare away the people who opted out of Home Ec. Anyway – this is a good small size for traditional hand quilting, but I often recommend for beginners to start with something larger and work their way down. That’s why the quilting needles I sell in my shop come in a pack of assorted sizes.

This needle is also sharp, with a small eye like a sharp, but it’s shorter and thinner. I’ve been known to sew with a between, but I never quilt with a sharp.

And now one more thing to confuse you – as needle size numbers get bigger, the needles get smaller and vice versa. So a size 5 embroidery needle is smaller than a size 3. It’s like wire gauges.

So there you go – an intro to the basic types of sewing needles I use most often – along with many (many!) asides reminding you that you can use whatever kind of needle you like best. The needle police will not come and lock you up. 🙂

Got any other sewing or embroidery questions? Send them to me here.

Happy stitching!

Best,
Wendi
Applique Wendi (with fabulous hat)


Do I need to prewash my tea towels?

Reader Question: Do I have to wash new tea towels before I embroider them? And then should I iron them before I stitch them?

I pre-wash everything. Everything. I don’t mess around. When I come back from the fabric store, everything I just bought goes straight into the laundry hamper and isn’t allowed in my sewing room until it’s been washed, dried and ironed. I’m a little obsessive about it – but I have a good reason.

The very first thing I ever sewed was a tablecloth. Truly, the ugliest, worst-made tablecloth the world has ever seen. One of the many things I did wrong was that I didn’t pre-wash my fabric. So the first time I threw the tablecloth into the wash, it shrank just enough for every seam to pucker and look terrible. This was exacerbated by the fact that I had a seam running right down the middle of the table – the long way – but that’s a whole other sewing problem. 🙂

Now I always pre-wash everything.

Including tea towels.

They’ll come out all wrinkly and you’ll definitely want to iron them before you stitch on them. The hoop will leave rings in your fabric and you can press them out – but I usually throw the whole thing in the wash again. It’s a towel, right? And it’s going to be washed a million times. Just go ahead and wash those creases out. If you need to iron them after you’ve done the embroidery, do it carefully.

There’s a video here showing how to iron finished embroidery without squishing the stitches – but I don’t iron my finished tea towels because I’m lazy and I really USE them.

Good luck!

Got any other sewing or embroidery questions? Send them to me here.

Happy stitching!

Best,
Wendi
Applique Wendi (with fabulous hat)

What kind of fabric can I use for embroidery?

What kind of fabric can I use for embroidery?

Every week I get questions from all of you. Good questions! And I try to answer them as quickly as I can. But I figure for every one of you that actually sends a question – a bunch of other readers have been wondering the exact same thing. So I’ll still answer your questions directly – but I’ll also pick some of them to answer here on the blog too.

I’m starting out with a question I hear a lot. . .

What kind of fabric can/should I use for embroidery?

I never really addressed this in the post about embroidery tools and supplies – because the answer is anything. You can embroider on anything.

If you’re just starting out, I recommend a smooth, woven (non-stretchy) fabric. It’s easiest to transfer your pattern to light fabric, but there are tricks to working with darker fabrics. Watch this video.

I said non-stretchy, but you can embroider stretchy fabrics too. It just takes an extra step in preparation – you have to stabilize the fabric. I show you how in this video.

I love stitching on velvet and other napped fabrics (those are fabrics with a pile like a rug – velvet, corduroy, terry cloth, etc.) Stitching on them is easy, though you may need to use an extra strand or two in your thread so your stitching doesn’t disappear into the pile of the fabric. The real trick is transferring your image. I have used Sulky Solvy Water Soluble Stabilizer in the past. It’s a water-soluble translucent film. You draw your image on that, then hoop it together with the fabric and stitch through both layers. Swish your finished embroidery in some water and the film just melts away. Easy peasy! I show you this stuff in action in this video.

Update: Since writing this post I discovered what I like to call The Magical Embroidery Stuff. Its real name is Sulky Sticky Fabri-solvy. It’s a pattern transfer tool AND stabilizer that works on dark fabrics, stretchy fabric, and napped fabrics. I use it now for EVERYTHING! Watch this video to see it in action.

If you want to stitch on some very fine, thin fabric, I recommend stitching through a double layer. You can also fuse some lightweight interfacing to the back. It helps keep your threads in the back from showing through to the front.

Want to stitch something extra thick like paper or leather? I have some earrings that I embroidered on metal! Poke your stitching holes first and then stitch. I show you how to stitch paper in this video. The process is the same for anything thick.

You really can embroider anything!

Got any other questions? Send them to me here.

Happy Stitching!

Organizing Embroidery Thread

How I organize my embroidery thread

Way back in March I wrote a newsletter post and then a blog post about how I organize my embroidery thread. I had tried a few different methods – but none really gave me exactly what I was looking for so I asked you all for your advice. Wendi from Sew Cat Sew had a genius approach I had never tried before – and I pounced, with a tiny variation of my own because I couldn’t find the exact product she mentioned at any of the sewing or craft stores in my area.

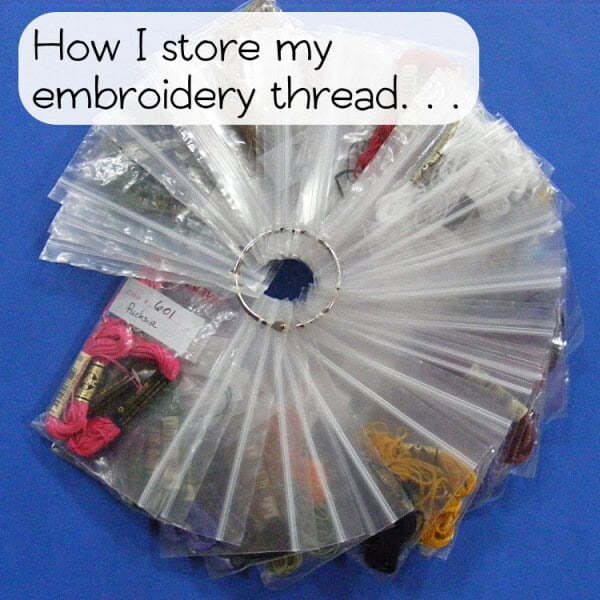
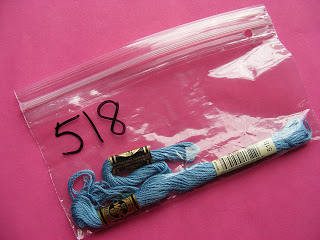
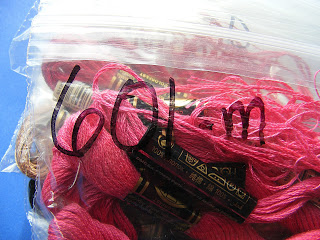
Each color thread goes in its own ziploc bag.

I couldn’t find the special bags Wendi used, so I just used snack-sized ziplocs from the grocery store. I punch a hole in the bag with a regular hole punch, then I write the DMC # on the bag with a fat Sharpie.

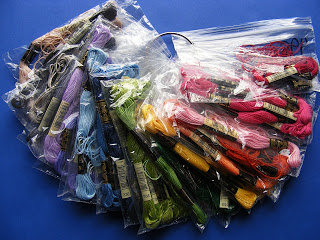
I put all the same colors together onto a binder ring (available at any office supply store). I have separate rings for red, orange, yellow, green, blue, purple, brown, white and off-white, black and gray. I dump all the bundles into a pretty basket. Easy peasy.

When I choose all the threads for a project, I pull them off their rings and create one ring with everything I need for that project. This makes it super-portable, which I love.

I realized I was constantly pulling off the same colors over and over again, so I took a good hard look at my enormous thread collection and created a ring with all my favorite lights, mediums, darks, and neutrals. Now I start here and only pull from the other rings when I need something outside my normal range. You can find some of my favorite embroidery thread and matching felt bundles in my shop!

There was still one slightly annoying problem. Even though I wrote big, and with a nice fat black marker, the numbers on the baggies were sometimes difficult to read at a glance – especially if there were threads visible behind the number, which is usually the case when they’re all ringed together.

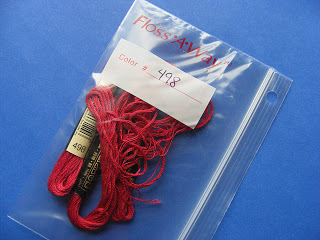
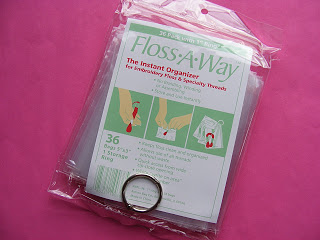
So I went back to Wendi’s note and found the baggies she used. Floss-A-Way. They have a handy little white area to write on. The bags are smaller (and therefore easier to schlepp around). And the holes are already punched. Handy!

Happy stitching!

Best,
Wendi
Applique Wendi (with fabulous hat)

How to Embroider with Glow in the Dark Thread – video

How to Embroider with Glow in the Dark Thread - a video tutorial from Shiny Happy World

There are some tricks to working with Glow In The Dark embroidery thread. I show you how to make it “shine” in this video tutorial!

The embroidery pattern in the video is my Firefly Tree Embroidery pattern.

The thread I’m using in the video was from the awesome Jenny Hart at Sublime Stitching, but she doesn’t make it anymore. I’ve seen others from Sulky and DMC, but I haven’t tried them yet. They do seem less “crunchy” than what I used. 🙂

Jo’s a big fan of this stuff (I think all kids love glow in the dark anything) and she’s asked me to use it on one of her nightgowns.  What will you use it for?

Here are links to all my posts about embroidery tools and supplies.

For Beginners

Specialty Fabrics

Threads

Stabilizers and Pattern Transfer Tools

Return to the Learn to Embroider main Table of Contents.

Move on to the posts about working with patterns.

Organizing Your Embroidery Thread

How I organize my embroidery thread

In a newsletter a couple of weeks ago, I showed you all how I organize my embroidery thread. It’s not perfect, and I asked you to tell me your methods. Wendi (not me, though I admire her spelling flair) from SewCatSew shared her method and I’ve decided that she is a genius. I’m going to adopt her method as soon as I get some of these little baggies. Here’s what she had to say. . .

Here’s a picture of my “system”.  I bought a 100-pack of Floss-A-Way bags YEARS ago.  Recently I took it up a notch by getting colored rings and sorting all my floss by color family.  I now have a ring for each color range in order from light to dark (for the most part).  I can toss them in my basket and easily pull out the group I need.  I also have a ring for the colors that are custom matched to the felt I use from a particular supplier.  The bags are labeled by DMC color number and the felt color name so I’m sure to get the right one when I want an exact match.  When I’m working on a project with multiple colors I can also take the bags I need from their color group ring and put them on a ring of their own for the duration of the project rather than go back to the basket every time I want a different thread.

I’ve seen the bags sell for as little as $3.49 or 100 (JoAnn Fabric), I got the basket at the Target dollar section and probably paid $2-3 for the rings.  So for about $7-8 I got a flexible, usable way to feel like I’m in control of SOMEthing  🙂

I LOVE this! The major drawback to my system is that it isn’t very portable. That’s especially irritating because one of the things I love about embroidery is its portability! Wendi was even kind enough to send a link to a few sources for the baggies (that’s an affiliate link) though I think I can do this same thing with some snack-sized ziplocks from my grocery store, a sharpie and a hole punch.

(Updated to note – the names and numbers were hard to read on the clear bags so I invested in the Floss-Away bags and they were worth every penny.)

I already have a bunch of the binder rings left over from a camp bookbinding project I taught last summer. I can’t wait! Organizing my craft supplies sometimes makes me giddy – in a good way. 🙂

I wrote up a new post about a year later showing a couple of small modifications to this system. Years later, this is still the system I use. You can read it here.

Embroidery Tools

embroidery supplies

One of the great things about embroidery is that you don’t need many tools at all to get started..

Needles, thread, and some fabric and you’re good to go. Here’s a bit more info on each tool.

Needles
Sewing needles are called sharps. Quilting needles are called betweens. Tricky, no?

But embroidery needles are easy. They’re just called embroidery needles and you can find them in any fabric or craft store. They’re sharp and they have a slightly larger eye than a sewing needle – to hold the thicker thread you use for embroidery.

Start off with a pack of assorted sizes and use the smallest needle you can easily thread. You’ll probably find that you gravitate toward mostly stitching with a certain number of strands and so always use the same size needle. That’s the size you’ll end up buying more of later on.

To give you a bit of a guideline about sizes, I use a size 5 needle for four strands of floss, a size 8 needle for 2 strands of floss or Sulky Petites 12-wt. thread.

Read this post for even more info about needles.

Thread
I mostly use your basic 6-strand embroidery thread. There are a few different brands, but they all reference the DMC color numbers and DMC is the brand I usually buy. It’s easy to split strands off to make the thread just the right thickness for the effect you want.

All of my patterns include a complete color and stitch guide – where I also tell you how many strands I used. If you’re doing your own designs just do a little experimenting. I’ll often stitch an inch or so of a design and then decide that my thread is a touch too thick or too thin.

There’s a post here with more info about deciding how many strands of thread to use.

Don’t be afraid to pick out your stitches and start over if you need to. I do it all the time.

Hoop
For most fabrics you’ll want to use a hoop to hold it stretched tight while you stitch. I have several hoops in all different sizes – some are plastic and some are wood – all are fine.

Some people use square “hoops” made of PVC pipe but I find that they don’t hold the fabric as tight as I like. These are called Q-snap frames and I use them for hand quilting.

If the fabric is heavyweight and fairly stiff – like denim or thickish felt – you can probably stitch it without a hoop.

That’s it! You can set yourself up with plenty of embroidery supplies for less than ten bucks.

One thing that’s not necessary but that I won’t stitch without is Sulky Sticky Fabri-Solvy (also sometimes called Stick & Stitch). It’s a fabulous product that’s a rinse away pattern transfer and stabilizer all in one. I love it! It’s great for transferring patterns to difficult fabrics (like dark colors and napped surfaces) and it also does a super job of stabilizing stretchy fabrics – but I use it for everything I stitch. Everything.

If you use Sulky Sticky Fabri-Solvy in a hot or humid climate, you’ll also want to get in inexpensive little tub of Thread Magic. It’s a thread conditioner that completely eliminates the “sticky needle” you can get when you leave your embroidery in a hot car.

Here are links to all my posts about embroidery tools and supplies.

For Beginners

Specialty Fabrics

Threads

Stabilizers and Pattern Transfer Tools

Return to the Learn to Embroider main Table of Contents.

Move on to the posts about working with patterns.