
Want to learn the basics of hand embroidery with an easy online workshop – totally free?
Sign up for Embroidery 101 here. You’ll learn how to get started, the tools and supplies you’ll need, the four most basic stitches, how to transfer your pattern and how to display your work.
If you already know the basics – sign up for Embroidery 201. It’s also free! You’ll learn how to stitch on specialty fabrics like felt and stretchy T-shirts. Plus you’ll learn lots and lots and LOTS more stitches – all my favorites!
 I have a question–I just bought your bird sampler pattern and I want to include them in pairs around a quilt that I am making. I have the top finished and I was wondering–what do you recommend–embroidering before I make the quilt sandwich, and then do the actual quilting–stitch in the ditch etc, or do you think it is better to do the embroidering as actual hand quilting and pull it all the way to the back. I am not sure, as I haven’t embroidered on any of the quilts I have made. The quilt is a combo of flying geese and Chinese coins patterns and the focus fabric has chattering birds on a telephone line–so I think random pairs of embroidered birds will be great. Thanks for your help with this question!!
Sandy emailed me a while ago with this question. As is almost always the case – my answer is longer than you might expect. (I ended up doing a full-blown tutorial showing you how to start and stop without knots, hide your tails, and carry thread invisibly from place to place. Keep reading and you’ll get there.) I’ve actually done both methods – and like them both – but they do look very different. So. . . it depends. . .
It depends on what design you want to stitch, what stitch you’ll be using, and how much interior detail there is.
I thought the best way to illustrate this would be to show the backs of some of my embroidered pieces.
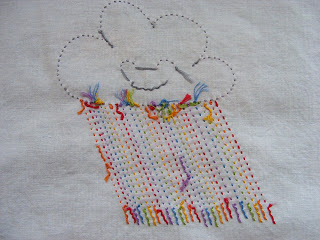
Running stitch looks the same back and front – so it’s a good candidate for something you’ll see from both sides. Read on and I’ll share a tutorial for hiding your threads when you carry from place to place (like between the eyes and mouth).
Backstitch doesn’t look bad either. It’ll be chunkier on the back than on the front, but with some care on your carrying and hiding thread tails, it can look pretty good.
Notice – what the image above has is nice, simple, open shapes. Not a lot of detail. Now for the opposite. . .
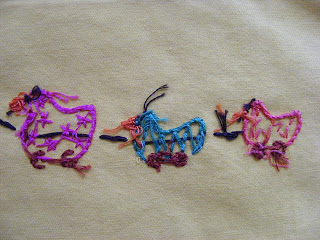
Aaaaack! Run away! This is quite ugly from the back – and that’s because the shapes are filled with cute chain stitches, French knots, and lazy daisies. Here’s another. . .
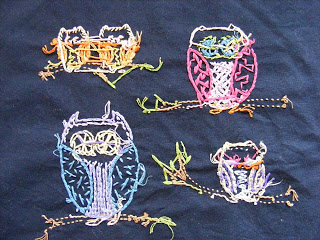
Again, this one has lots of detail inside the main shapes and it looks bad, bad, bad from the back.
So, quilting first and then embroidering through all three layers can be nice. Choose a nice, simple shape to stitch and stitch it in running stitch, backstitch, or split stitch. The quilt will “puff” nicely around the stitching and in the larger open areas of the design.
If you want to do some fancier embroidery – like the owls or the birds – embroider first and then layer and quilt. Otherwise the embroidery will be hideous from the back – and it will also compress the layers of your quilt too much and can distort the whole lay of things.
So – about that carrying? I said if you’re careful with carrying your thread and hiding your tails you can have something that looks pretty nice. Well, I ended up doing a full-blown tutorial on this.
Here begins the tutorial
This is a quilt sandwich, ready for quilting. Instead of the usual quilting thread, I’m going to embroider one pink line with running stitch, and the other with backstitch and split stitch. I’ll use 4 strands of embroidery thread. I won’t use any knots, there will be no hanging tails, and you won’t see the thread carried from one line to the other. Ready to learn some sneaky magic?
Start by inserting your needle about an inch from where you want to start stitching. The needle goes in just through the top layer of fabric, then travels between the two layers of fabric (and the batting) until I bring it up where I want to start visible stitching. So if I flipped this over right now you wouldn’t see any needle (or thread) at all from the back.
Pull the thread until the tip of the tail just disappears into the starting hole your needle made. Careful! Don’t pull it all the way through!
Now – take a tiny stitch through all layers. This is going to secure the thread instead of a messy knot.
Bring the needle back up through the start of that tiny stitch. I should have photographed this better, but that needle is pointing up.
Now the thread is coming back up at the original desired starting point. There’s no knot, but that tiny stitch is holding it in place. You can yank really hard on this and it’s not coming loose. The tail of the thread is buried in the batting between the two layers of fabric. Neat!
OK. I stitched a whole bunch of running stitches and I’m ready to jump over to the other line. But I don’t want anyone to be able to see the thread between the two lines! So I get sneaky again and thread the needle between the two layers of fabric, right there in the batting. Easy peasy! The only drawback is that you can’t carry the thread any farther than the length of your needle. (Actually, there is a way. But I find it so tedious and irritating to do that I’d rather just tie off here and start over in the new space.)
OK. I did some more stitching. Some backstitches and then some split stitches. Now I’m ready to tie off. I take another tiny stitch. See how the needle is coming up really close to the end of that stitch? I’m talking that tiny of a stitch. Tiny is what makes it tight and work like a knot.
I put the needle back in at the end of the stitching (really close to where it came up – remember – tiny!) but only through the top layer of fabric. Carry your tail through the batting for about an inch, then bring the needle back up and out.
There’s the thread tail, veering up off the top, waiting to be cut.
Snip it off really close to the surface of the fabric. Careful! Don’t cut your fabric. It’s ok if a tiny bit of thread shows above the surface.
Rub your finger over it once and it will pop right into the batting and disappear from the front.
So here’s the finished stitching from the front. That’s running stitch on top, backstitch on the lower left, and split stitch on the lower right.
And here they are from the back. Again – running stitch on top, but now the back of the backstitch is in the lower right and the back of the split stitch is in the lower left.
No knots, no tails, and no thread carries. Neat and tidy. 🙂
Whew! That answer was even longer-winded than I expected. And I know how I can be. 🙂 I hope you all find it helpful!
Best,
Wendi

