How to Blanket Stitch with NO KNOTS – video

Cute blue monster softie wearing bunny slippers and holding a teddy bear and a blankie. Test reads: How to Blanket Stitch with No Knots

Want to learn the basics of hand embroidery with an easy online workshop – totally free?

Sign up for Embroidery 101 here. You’ll learn how to get started, the tools and supplies you’ll need, the four most basic stitches, how to transfer your pattern and how to display your work.

If you already know the basics – sign up for Embroidery 201. It’s also free! You’ll learn how to stitch on specialty fabrics like felt and stretchy T-shirts. Plus you’ll learn lots and lots and LOTS more stitches – all my favorites!

You all liked this adorable little Oddball with his bunny slippers, his teddy bear, and his blankie. But you have to blanket stitch around the edge of the blankie and several of you reminded me that I haven’t done a video for that yet (even though you’ve been asking very nicely).

Done!

Not only do I show you how to blanket stitch – I show you how to do it without any knots. No knots! So it looks perfectly perfect everywhere! And for those who are really obsessed with perfection, I show you how to mark the fabric before stitching so all your stitches are perfectly spaced.

Here’s the video. . .

I show this on felt because I’m currently obsessed with felt, but you can use the same technique on fleece if you like.

Ready? Go blanket stitch something! Here’s the Floyd pattern if you want to start with his blankie. 🙂 And here’s some felt if you have a different project in mind.

Happy stitching!

Applique Wendi (with fabulous hat)

Best,
Wendi

Play with some felt! Try the Oddballs – a fun pattern for silly monsters.

Felt! For sale in the shop and a video showing some great products to use with it

Wool Blend Felt - and two great products to use with it - video
I love working with wool blend felt – and I’m going to be doing more of it this year so I finally started carrying it in the shop. Lovely, luscious wool blend felt in 48 gorgeous colors! It feels so nice in the hands, it embroiders beautifully, and it’s so nice for hand sewing small softies. And wool felt wears so much better than the icky acrylic felt that you find in the big box craft stores. It’s just lovely!

Not so lovely is the trick of transferring an embroidery pattern to it and cutting out fussy small pieces. There are a couple of tricks and products that make these things so easy – and that’s what I’m sharing with you today.

Let’s take embroidery first. You can’t trace the pattern – the felt is too thick to see through. You don’t want to simply draw on it – that lifts the fibers on the surface. But there is a magical solution!

For all stitching on felt I use Sulky Sticky Fabri-solvy. Yes – it works beautifully on felt too! Just make sure to soak it off in COLD water. Hot (or even very warm) water will pebble the surface of the felt and shrink it a bit. I don’t use ice cold water, but I definitely stick to tepid or cold. Just let it sit in the bowl for a good bit and it will dissolve away nicely – then rinse off the clingy bits under running water. DON’T wring it out. DON’T twist it. Just take it out of the water, set it on a towel and walk away. It will dry – I promise. The Magical Embroidery Stuff also works great on darker colors. You can see it in action in this video.

What about cutting small felt pieces for patterns? Pinning little pieces distorts the felt, making it hard to cut out small shapes nicely. You can’t use pattern weights – they’re too big for small pieces. I use freezer paper. Trace the pattern pieces to freezer paper, iron to the felt so they stick in place with no shifting, cut them out and peel off the paper. Magic! Except for the tracing bit. I’ve been known to print out my pattern pieces and then glue the pages to freezer paper so I don’t have to trace. I hate it that much. The last time I was doing that I thought to myself, “Wouldn’t it be nice if I could print the pattern directly onto freezer paper? I wonder if anyone makes printable freezer paper?” Well, guess what? THEY DO! I’m in love! And I bought some for my shop so you can fall in love too. 🙂 You can find it here.

What if you’re embroidering and cutting out pattern pieces? For that I go back to The Magical Embroidery Stuff. Man – that stuff really is magical. 🙂

I show you how to use both the printable freezer paper and Sulky Sticky Fabri-solvy with felt in this video – including talking a bit about which product is better in different situations. (That monster pattern is Byron the Oddball. I love him.)

So – enjoy the felt! Enjoy the new I’ll-never-trace-again product! And happy stitching!

Best,
Wendi
Applique Wendi (with fabulous hat)

Felt Embroidery – All My Tips and Tricks

Tips and Tricks for Embroidering Felt

I’ve gotten a few questions lately about felt embroidery – and I’m going to answer them all here today.

Most of your patterns use smallish shapes. Do I transfer the pattern, hoop them and stitch, and then cut them out?

Well – I buy the good stuff (there’s no point embroidering it if it’s going to get all pilled and nasty-looking the first time someone touches it) and I don’t like to waste any of it. That means no excess for hooping. You don’t really need to hoop felt anyway – and it’s hard to get the crimp marks out when you do. It’s stiff enough to embroider easily without a hoop. Just be careful not to pull your stitches too tight.

My method is to transfer the pattern, cut it out, and then stitch.

How do you transfer your pattern to felt? You can’t trace through this stuff, and any pen or pencil tends to lift the fibers.

I use one of my favorite embroidery products–I call it The Magical Embroidery Stuff and you can read more about it here. I use it for all of my embroidery, but it really is pure magic for felt embroidery. In fact – it’s so magical that I wrote a whole post here, just about how amazing it is with wool felt.

Where do you find wool felt in such gorgeous colors?

I recommend Benzie Design. They have an amazing selection of colors – including lots of gorgeous felt bundles.

By the way – that picture up at the top is a close up of some of the blocks from the Felt Blocks Embroidery Pattern. Those were so much fun to stitch!

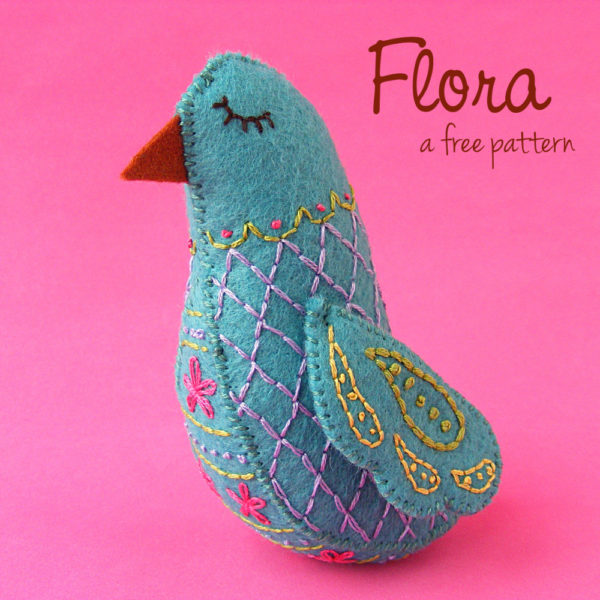
If you’re looking for a free pattern to try, I recommend Flora the felt bird.

Flora the Felt Bird - a free pattern from Shiny Happy World

She’s so pretty!

Here are links to all my posts about embroidery tools and supplies.

For Beginners

Specialty Fabrics

Threads

Stabilizers and Pattern Transfer Tools

Return to the Learn to Embroider main Table of Contents.

Move on to the posts about working with patterns.