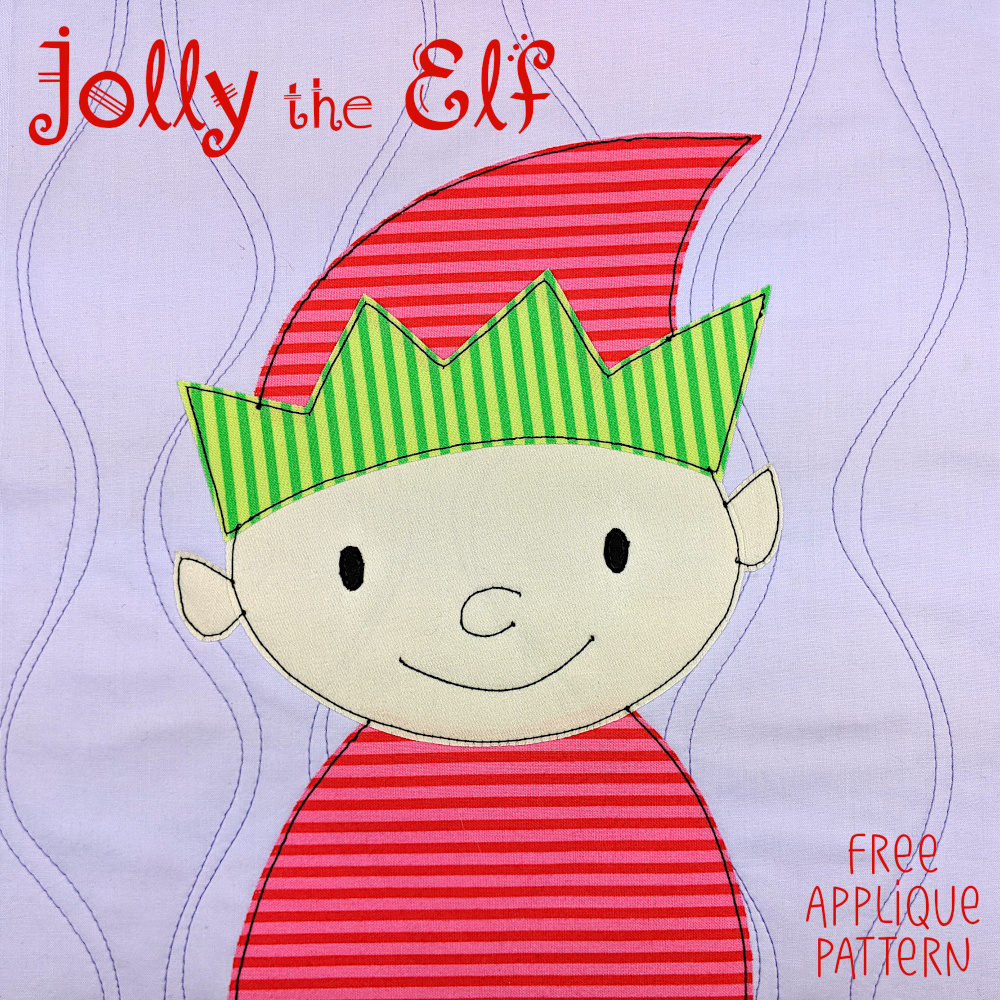
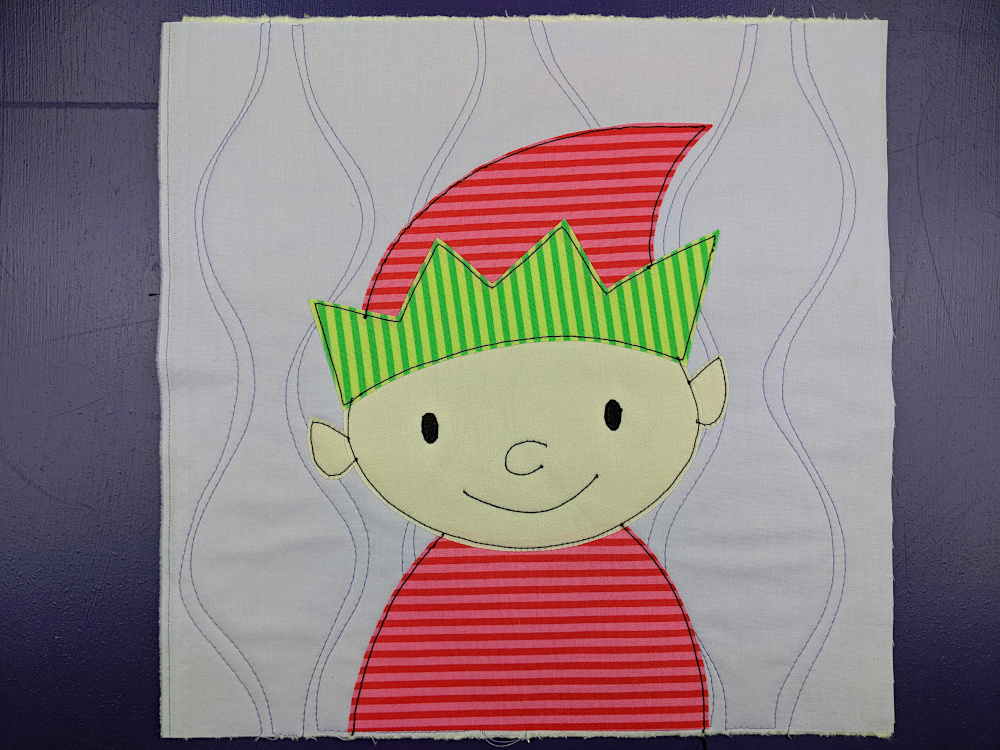
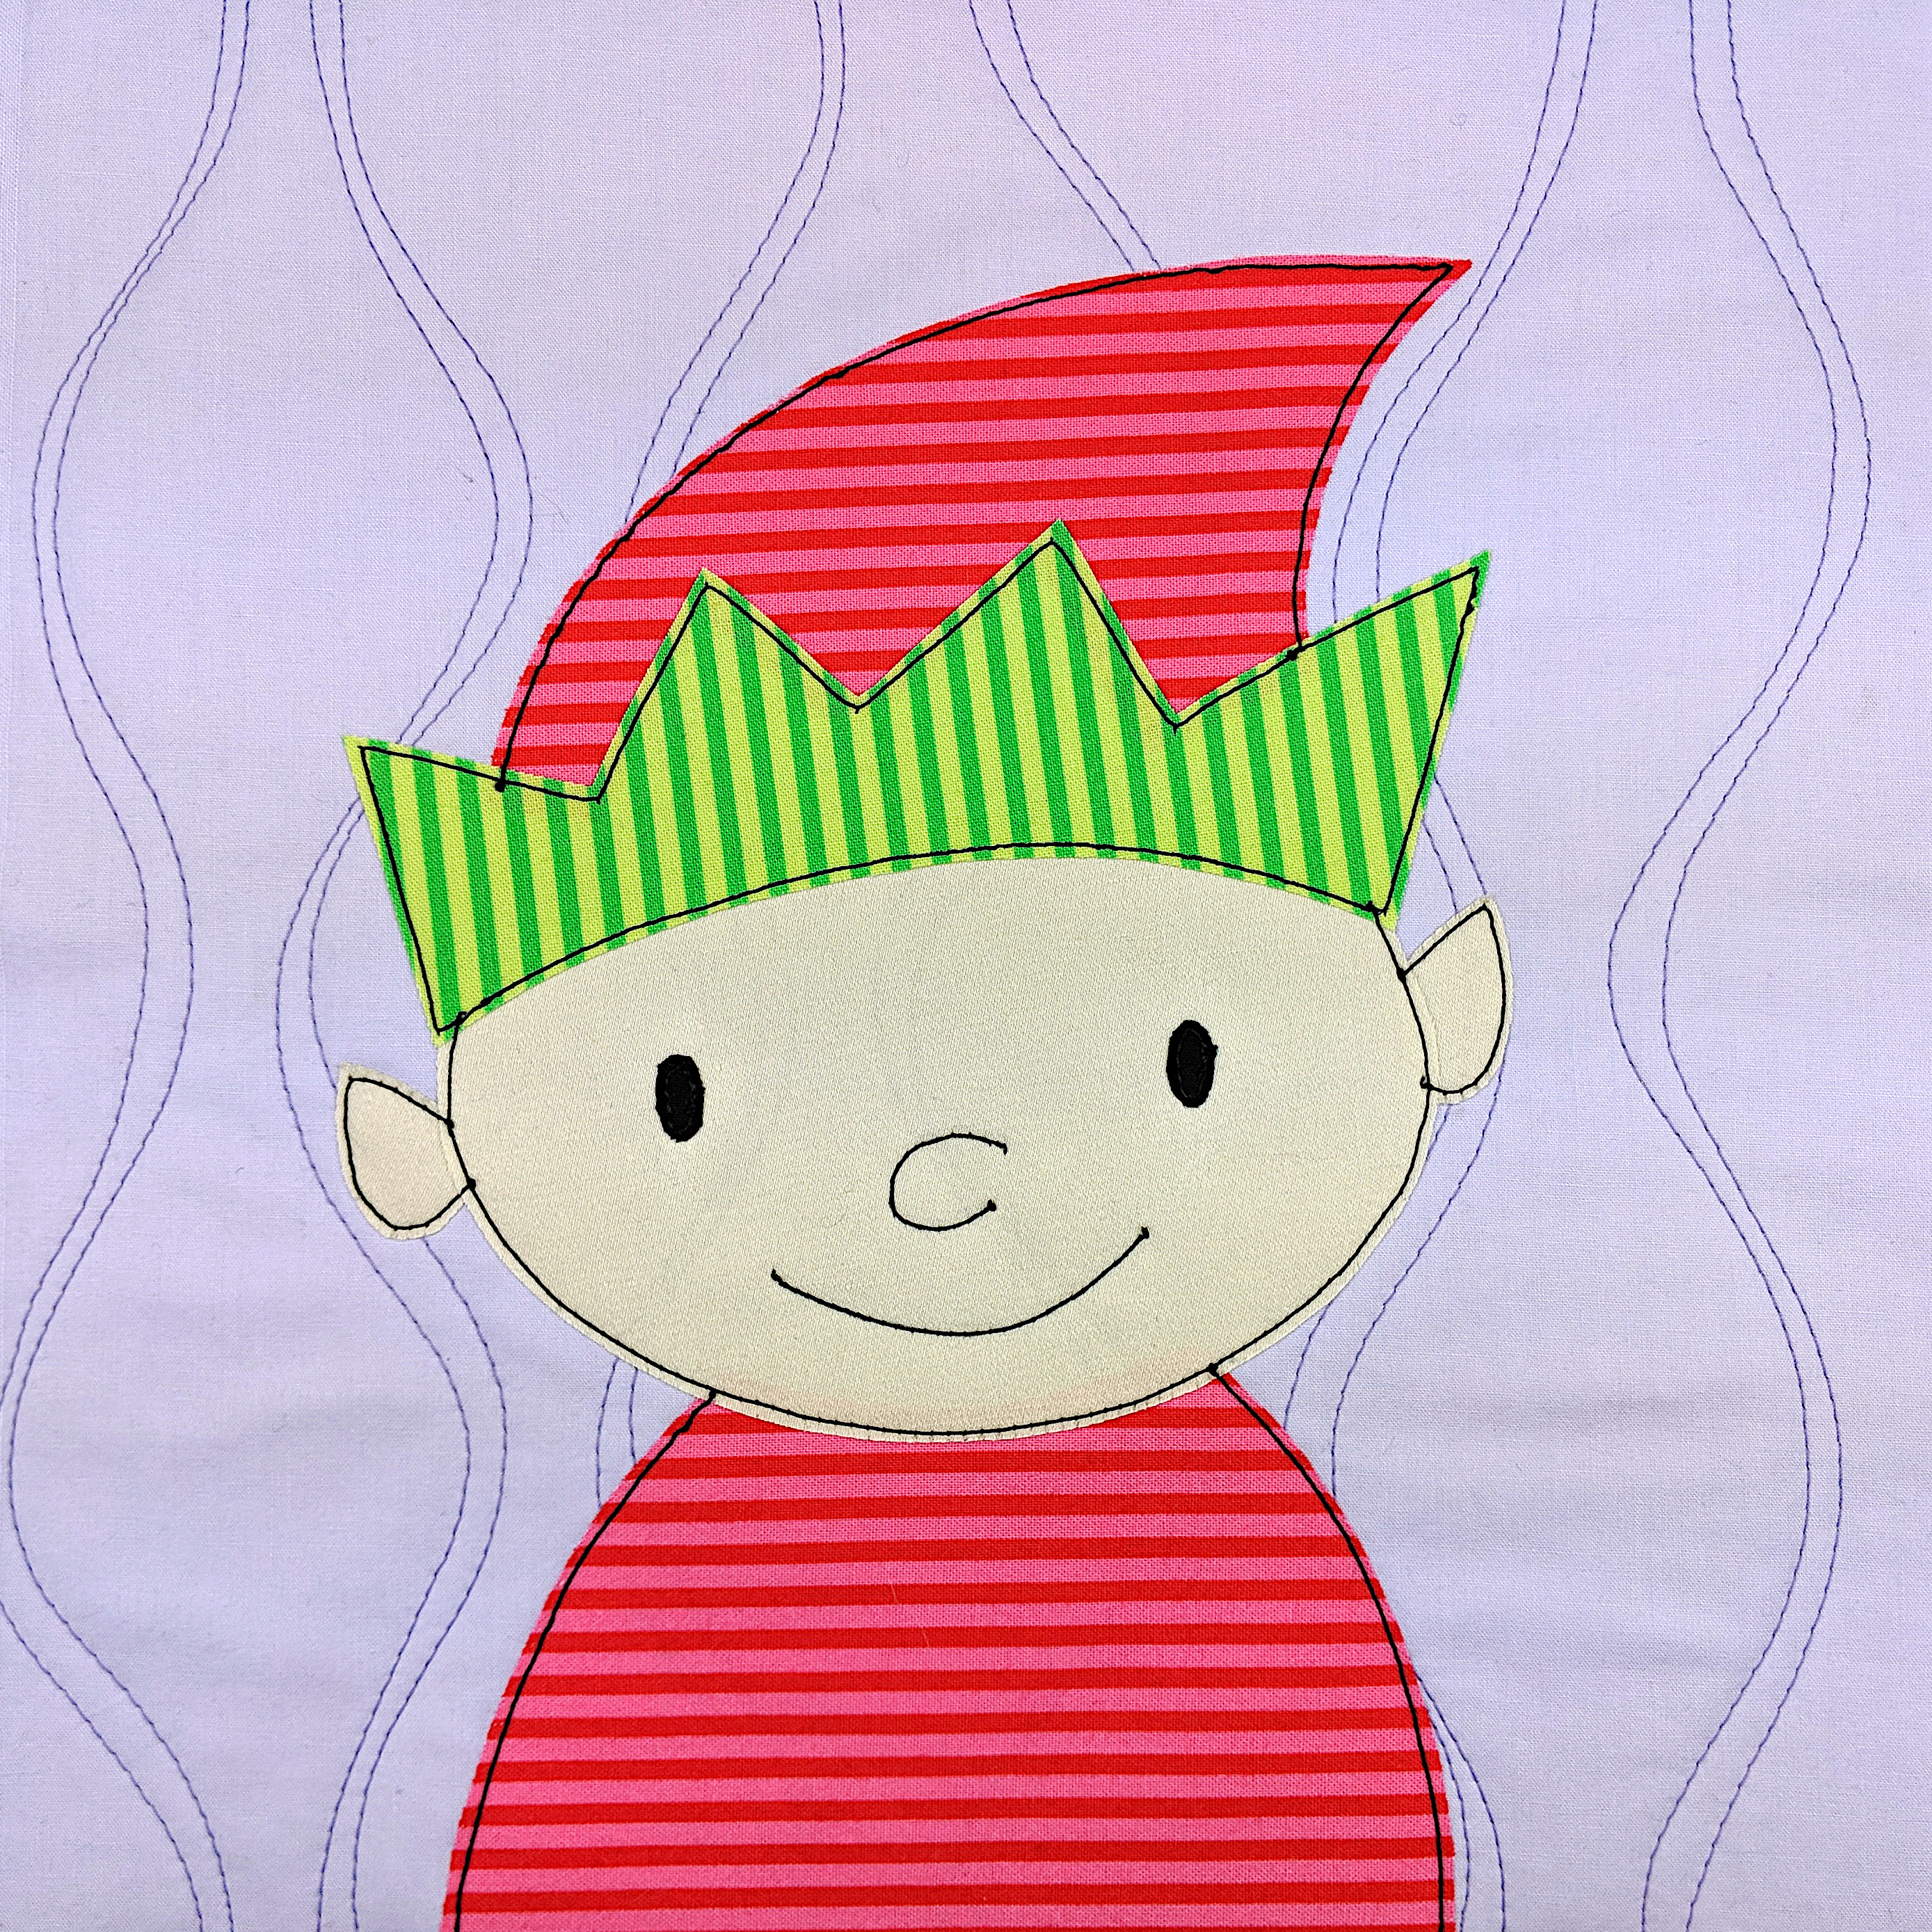
There’s a new free applique pattern for you! Merry Christmas!
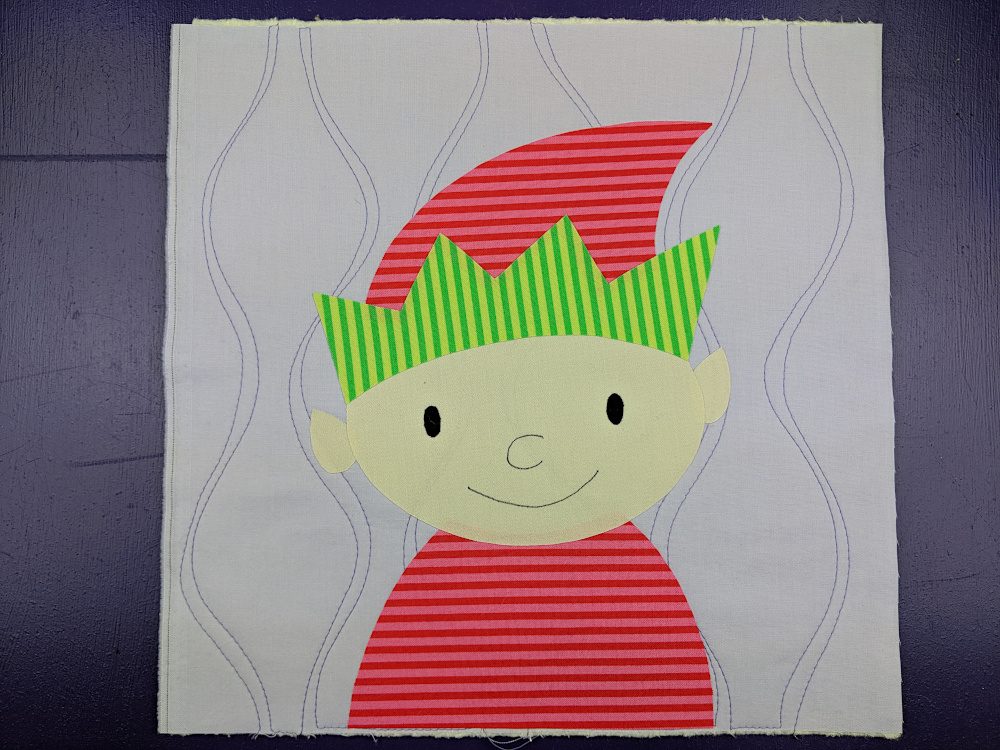
This adorable elf pattern is the same size and style as the other free Christmas applique patterns (10 inch finished blocks). There are five now! (You’ll find links to all of them at the bottom of this post.)
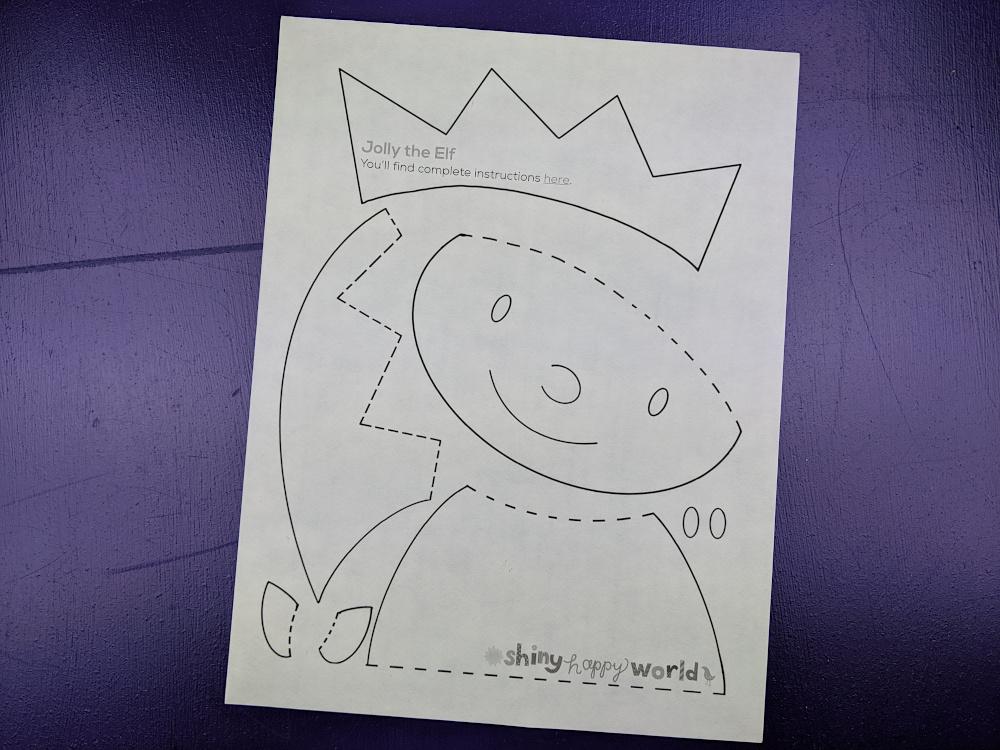
Trace or print the pattern onto the paper side of the fusible adhesive.
I use printable fusible adhesive so I just printed out the page. No tracing!
The image has already been reversed, so just trace or print. If you’re tracing, be sure to trace the facial features too. You’ll need those for Step 4.
Step 2
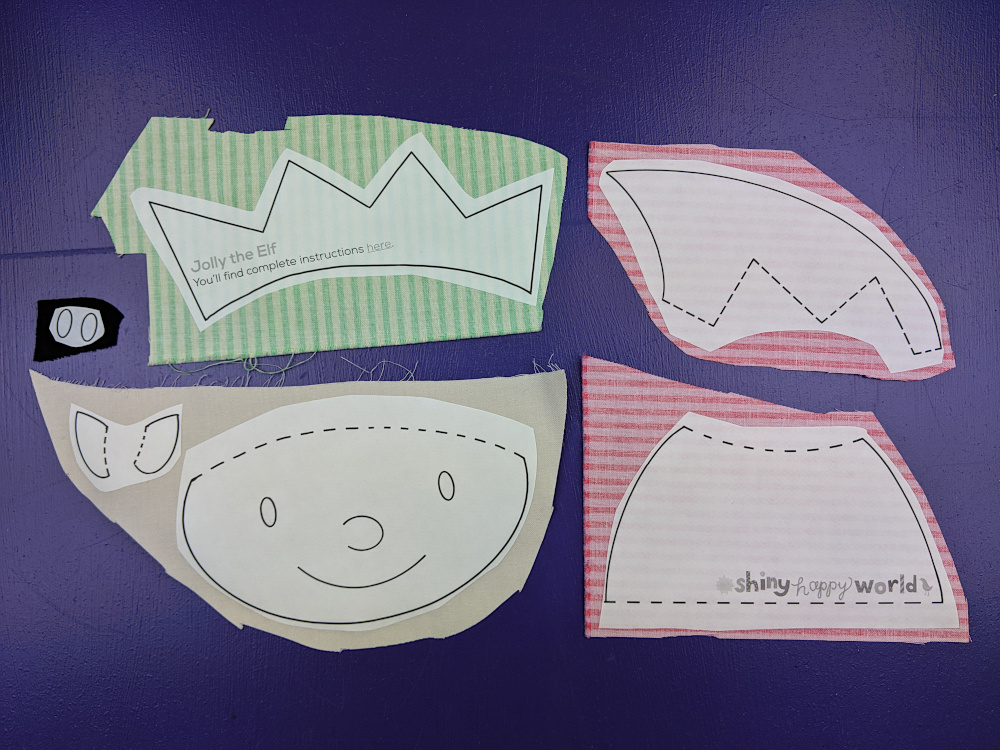
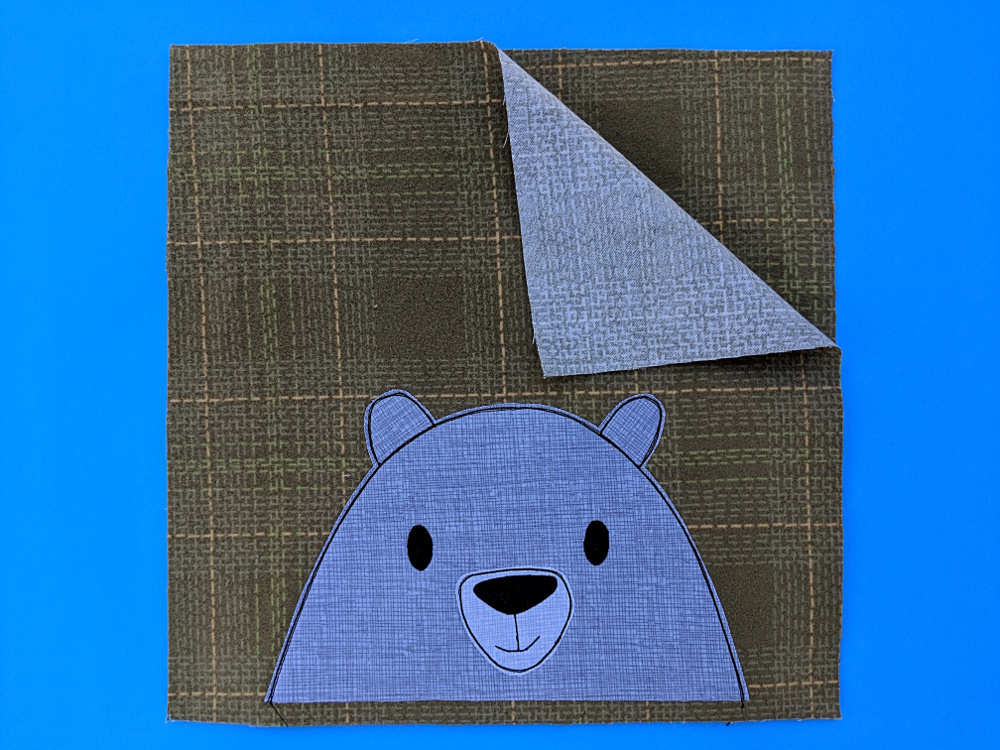
Rough cut around each shape and fuse it to the back of your fabric.
Leave a little bit extra all the way around - a little extra extra (at least 1/4 inch) where there’s a dotted line, like the top of the shoulders and the base of the ears.
Step 3
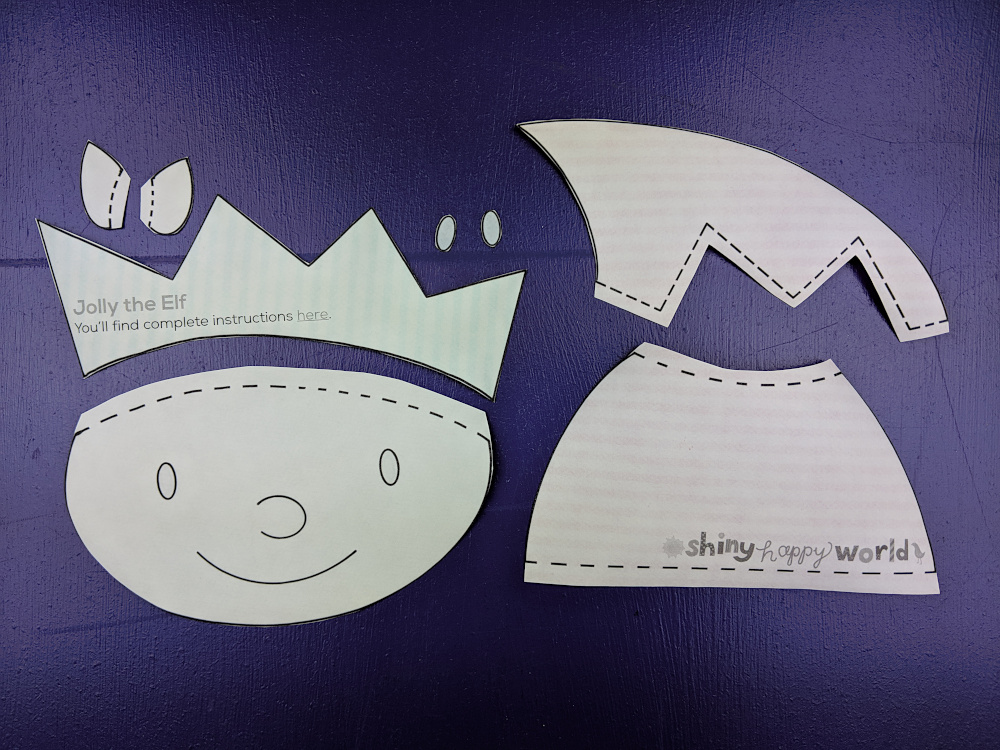
Cut around each piece neatly. Cut directly on the solid lines.
Leave a little seam allowance on the dotted lines - those are the seam allowances that will tuck behind other pieces.
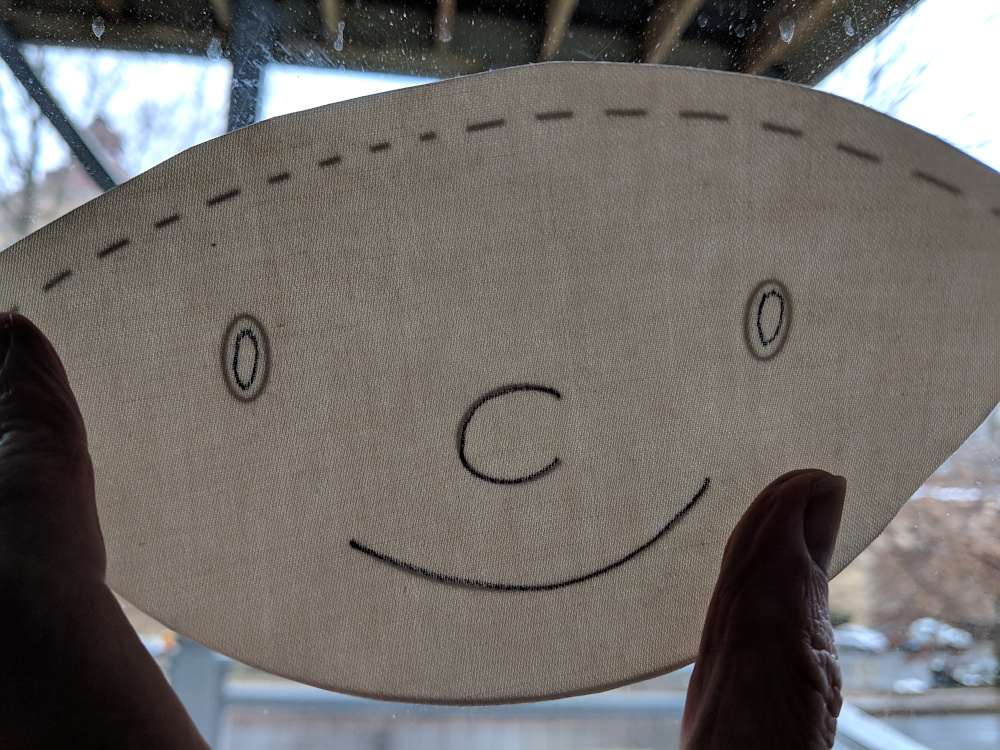
Step 4
Remember when I told you to make sure you traced the facial features in Step 1? Now you’re going to use that. Hold the face up to a window so the light shines through it. You’ll be able to see the eyes, nose and mouth, and the adhesive will stabilize the fabric so you can trace on it without it crinkling up.
I traced just inside the eyes, and directly on the nose and mouth.
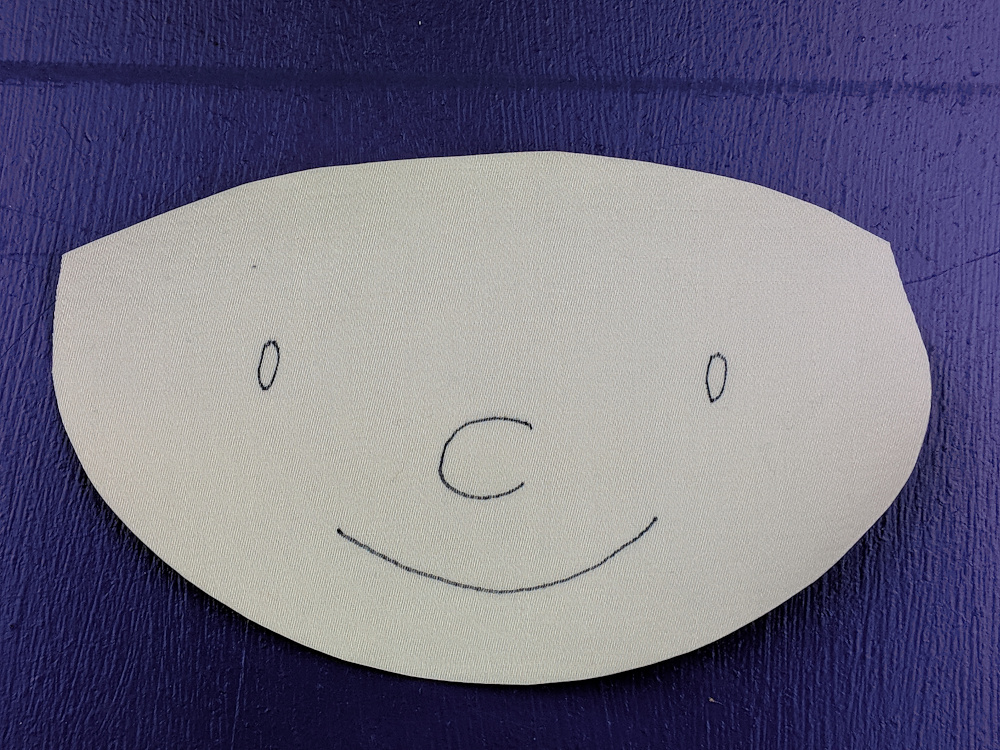
Here you can see all the tracing I did – without the light shining through.
Step 5
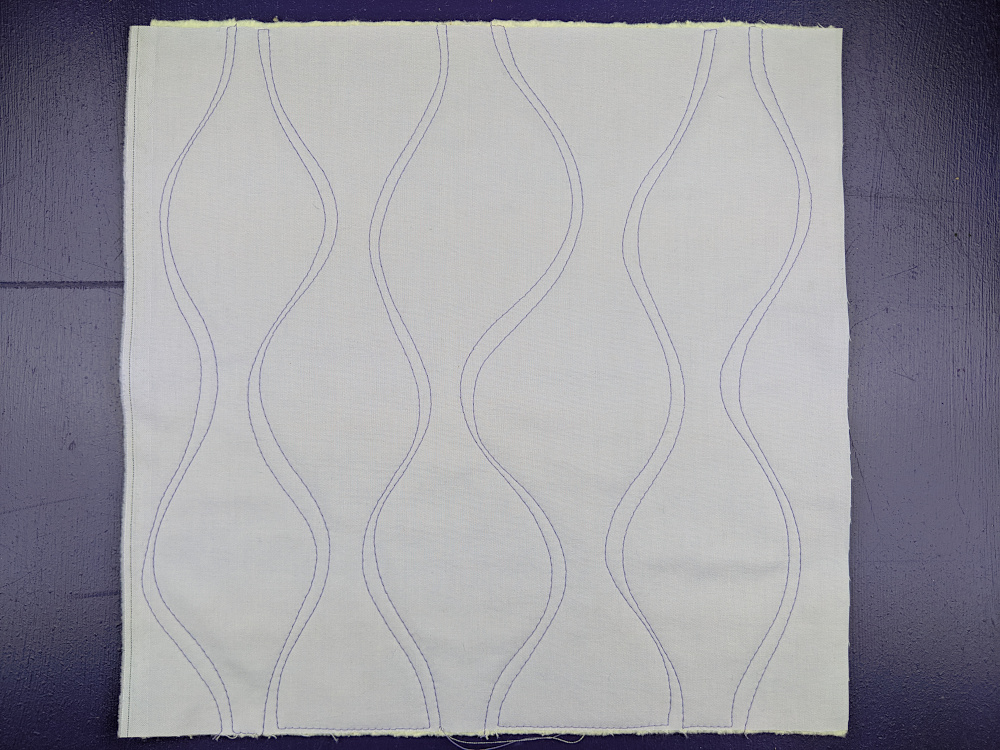
If you’re doing Quilt As You Go (I did) then you can quilt your block before adding the applique. So easy!
Cut your background fabric and a piece of 100% cotton batting 11 inches square.
Layer the block with a piece of 100% cotton batting. Quilt any pattern you like!
If you’re making a one-block project, go ahead and finish it up!
If you’re making a bunch of elf blocks to join into a quilt - have fun!
What can you do with just one block pattern? Tons of things!
Check out this page I’ve been slowly building – 100 Things to Do with an Applique Pattern. There are links to a bunch of free patterns you can use with your applique pattern to make bibs, pillow covers, tote bags, and more! 🙂
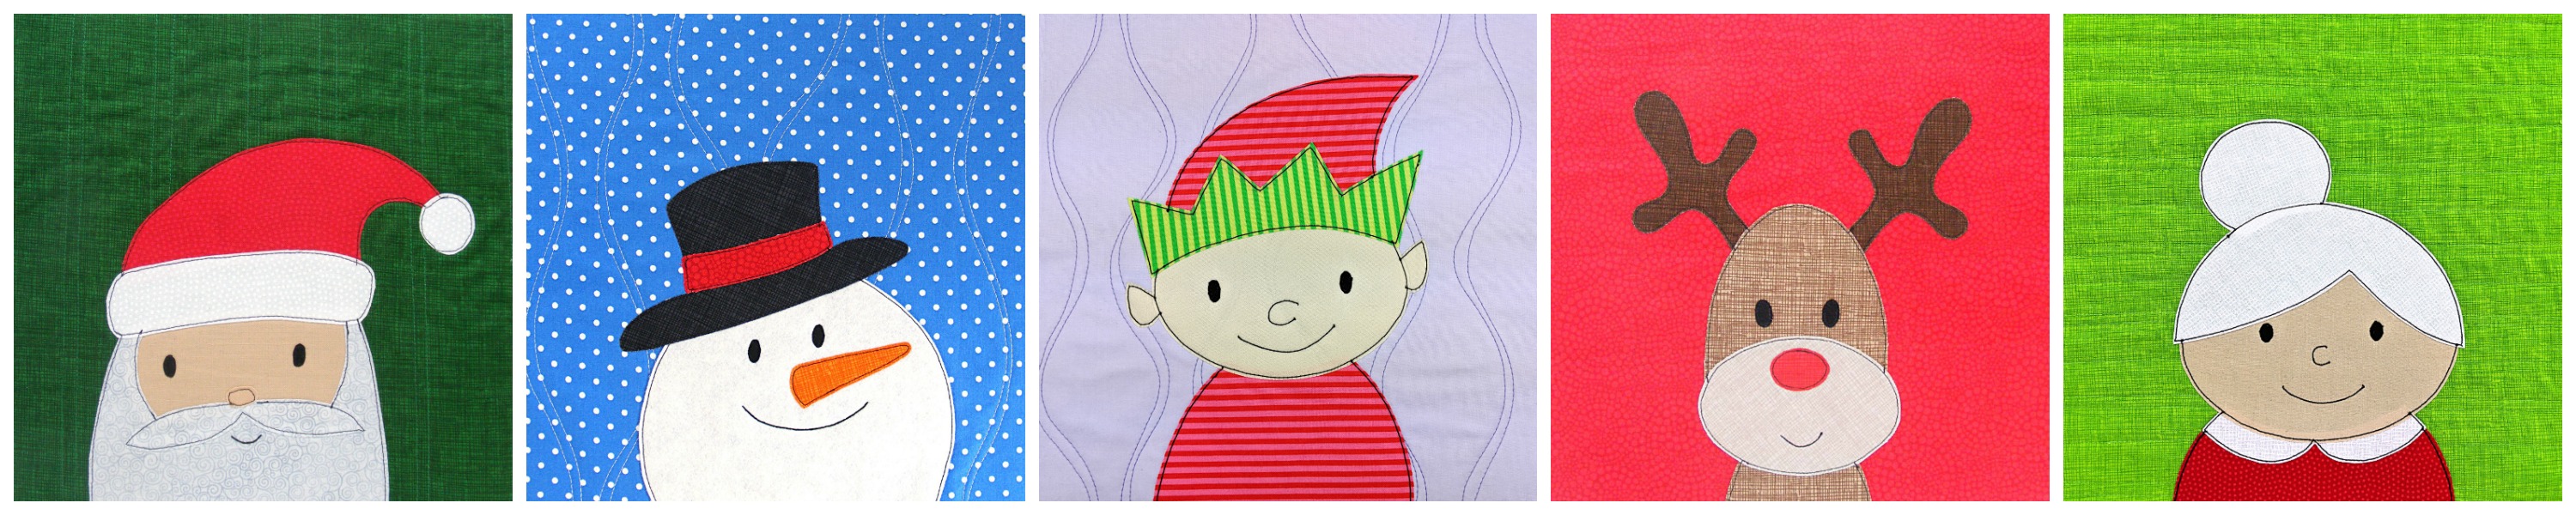
Here are all the free Christmas applique patterns so far.
If you’re looking for a different fun Christmas quilt pattern check out this post. It has a bunch of free patterns for little signs that you can add to a Shiny Happy Houses quilt to turn it into a North Pole quilt. 🙂
Have fun! And share a photo of what you make! You can share it in the Shiny Happy People group or tag it with #shinyhappyworld on Instagram.
If you like this free pattern, sign up for the Shiny Happy News! Subscribers get a weekly newsletter full of sewing tips and tricks, free patterns, special discounts, and other things to make you smile. 🙂
I’ve got free patterns below for both the tree and the hat – plus some extra fancification ideas for both at the bottom of the post. Have fun with these!
You can use these patterns for any holiday decorations – the repeat pattern is easy to follow to make them larger if you need. Or just use thicker yarn!
If you’re making a hat for a larger softie, just follow this pattern of increasing one stitch per round until the hat is big enough to fit, then stitch at least four rounds of straight single crochet for the contrasting band. You may need to add more rounds of contrast to feel like it’s in the right proportion with the hat, depending on how much bigger you make it. Trust your judgement. 🙂
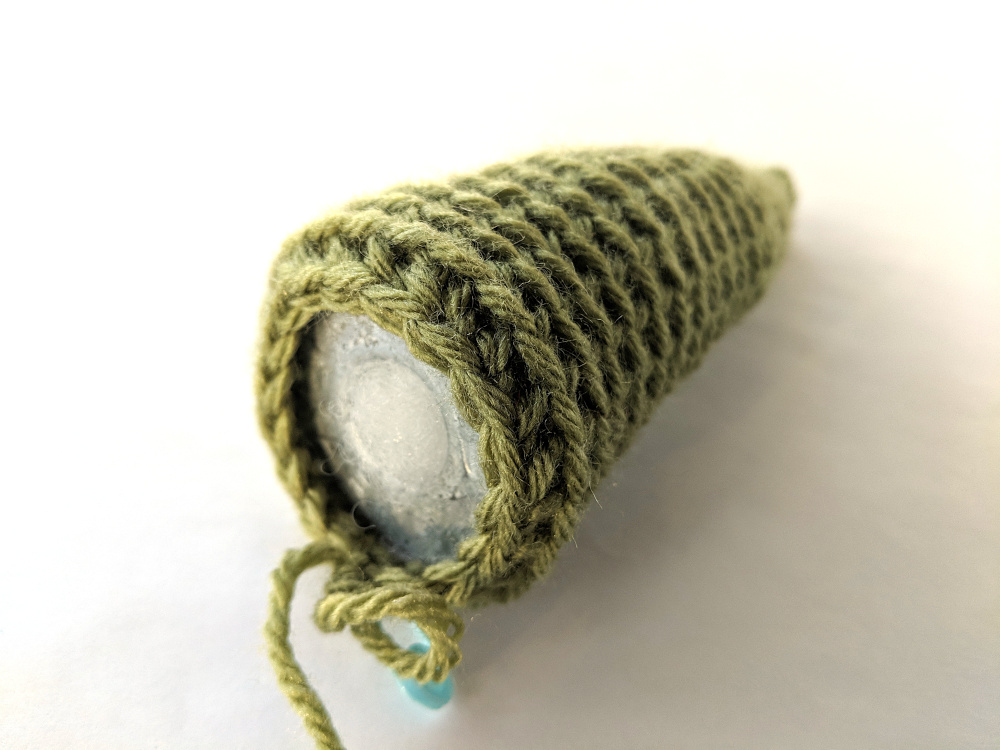
For the tree. . .
Picking up after round 16 above.
Round 17 sc twice in next st, sc in next 18 sts (20)
Round 18 sc twice in next st, sc in next 19 sts (21)
Round 19 sc twice in next st, sc in next 20 sts (22)
Round 20 sc twice in next st, sc in next 21 sts (23)
Round 21 sc twice in next st, sc in next 22 sts (24)
Stuff the tree and slip a large washer across the stuffing at the base of the tree. This will give your tree a nice flat base and the washer adds a nice weight.
Round 22 [sc2tog, sc in next 2 sts] 6 times (18)
Here’s what it looks like after that first decrease round wraps around the edge of the washer.
If you don’t have a metal washer, you can cut a circle of cardboard. It will give you the flatness without the weight.
If you want to make your tree bigger, keep following the same increase pattern after round 21. To make your decrease rounds easier to calculate, make sure to make your last increase round one whose stitch count is evenly divided into 6.
I dressed up my tree with some simple white-headed pins – but there are tons of possibilities to dress up both the tree and the hat!
If your hat is kind of stiff and you want it to flop down like the one in the photo, you can drop a metal nut into the tip of the hat. The weight will keep it dipping down. I use a surprising amount of hardware store items in my softies. 🙂
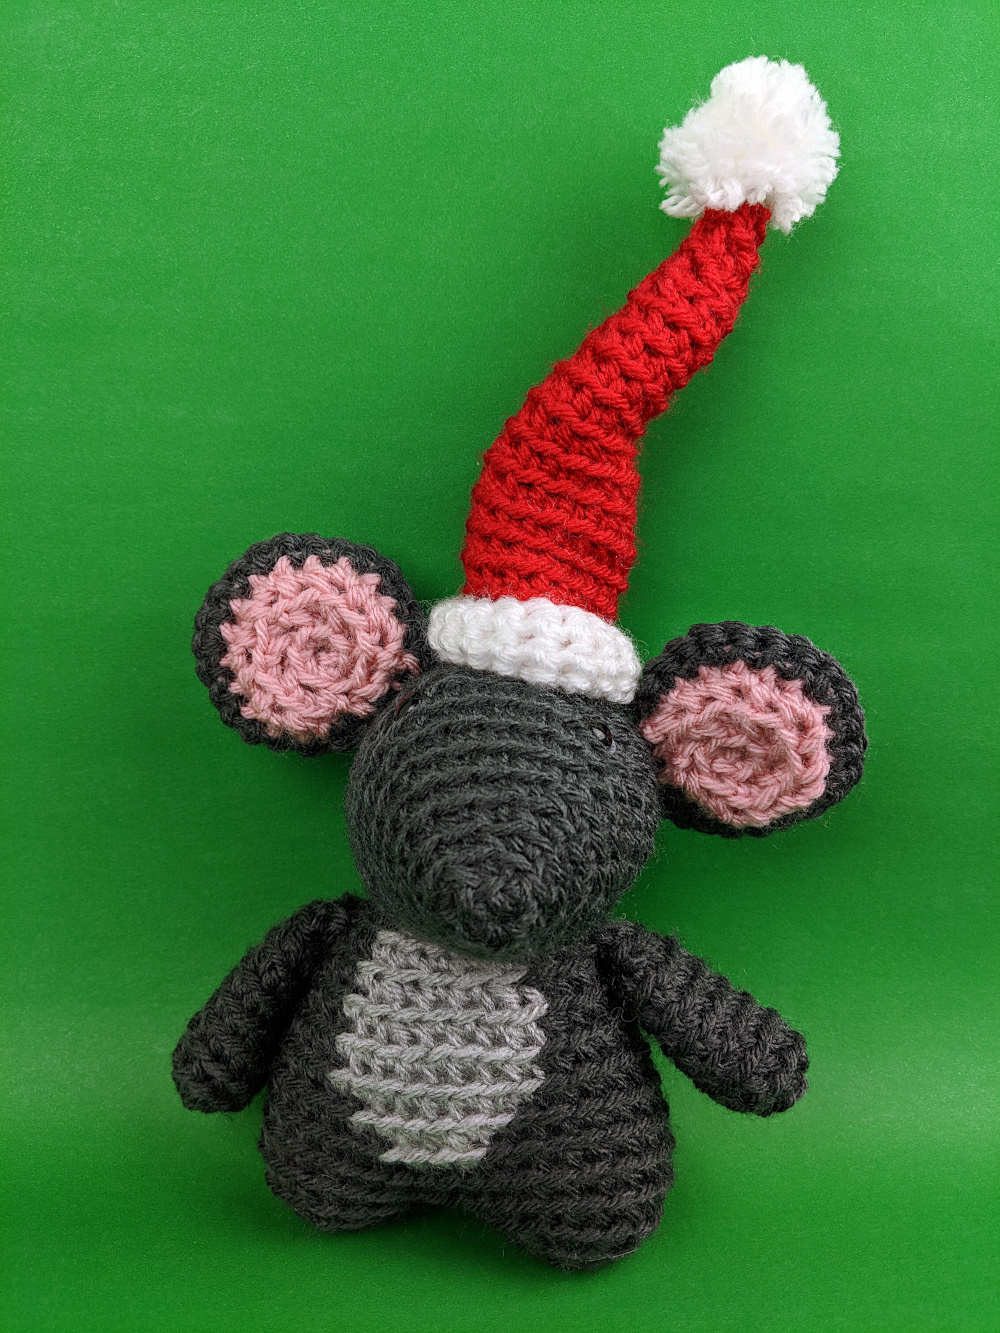
If you decide to give a holiday Milo Mouse as a gift, I suggest pairing it with these books.
The Night Before Christmas – I had the line “Not a creature was stirring, not even a mouse” in my head as I designed Milo. There are so many beautiful editions of this story available – the link goes to one with very traditional illustrations.
This project uses just one fancy skill – stitching one row below to get that mouth. Don’t worry – there’s a link in the pattern to a video showing how, right at the spot where you’ll need it.
You can go through all those posts now, or just hop to them as you get to those points in the pattern – whatever works best for you!
Yarn
This pattern can be used with any weight yarn. The samples are crocheted with Big Stitch worsted weight yarn, and all yardage/hook recommendations are calculated based on the sample. If you use a different weight yarn you may need to adjust how many plastic pellets you use to fill it.
Materials
Size H crochet hook (or size needed to get a tight fabric)
two 12mm black animal eyes
tapestry needle
1/2 cup plastic poly pellets (optional – can use polyester fiberfill instead)
nylon knee high (optional – only needed if you use plastic pellets for squishiness)
yarn
Gauge Notes
This pattern doesn’t specify a gauge. It’s a stuffed toy, and you don’t need to be too picky about exact sizing. The most important thing is that you use a hook size that creates a nice looking fabric for your yarn. If you use the recommended hook size, and your fabric looks very loose (so that stuffing would show through), then you will want to use a smaller hook. Other than that, no measuring required!
Stitch into the Back
All stitches in this pattern (that are worked in the round) are worked through the back loop only, unless otherwise directed. Look at this picture.
See how one loop is highlighted in black? This is the back loop, and it’s what you’ll stitch into. Stitching into the back loop creates ridges on the right side of the piece.
Want to see crocheting through the back loop in action? Check out this blog post. It talks all about why Stacey crochets through the back loop and even has a handy dandy video showing how to find that loop. 🙂
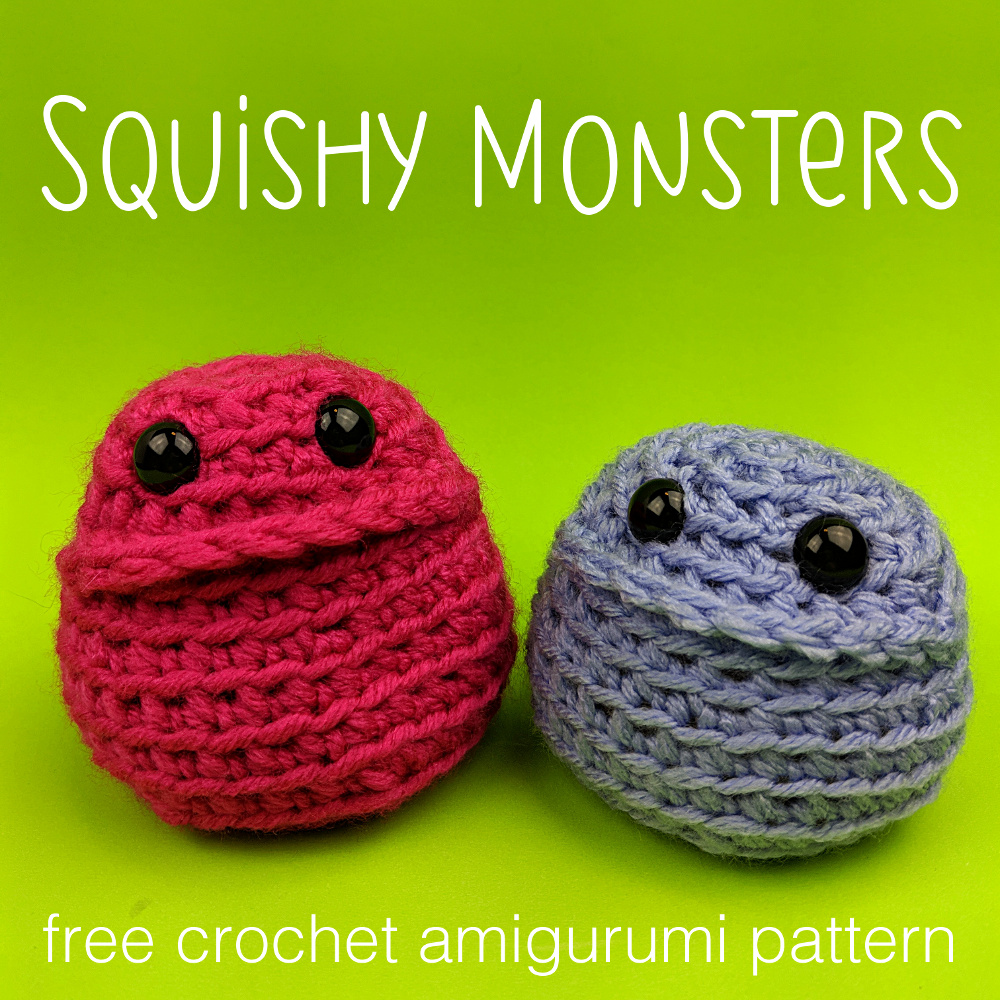
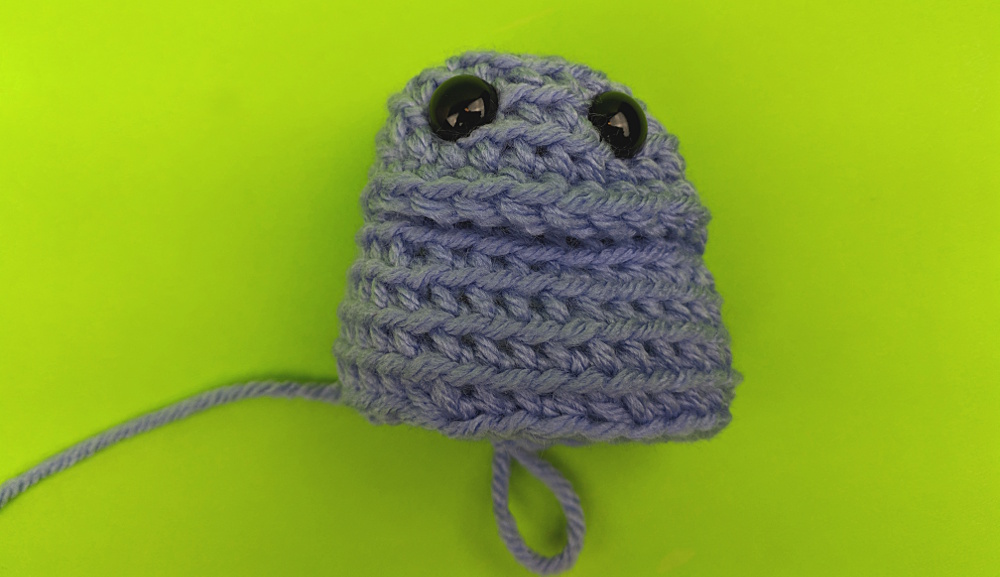
Round 3 [sc twice in next st, sc in next st.] 6 times (18)
Round 4 [sc twice in next st, sc in next 2 sts.] 6 times (24)
Round 5-6 sc in each st. (24, 2 rounds)
The next two rounds give your squishy monster that lip. If you’re just getting started and want to skip that – no problem! Just repeat rounds 5-6 instead of following the instructions for rounds 7-8.
Round 8 sc in next 7 sts. Sc in next 10 sts, back in the original (inner) round of stitching. Sc in last 7 sts. (24)
Round 9 [sc twice in next st, sc in next 3 sts.] 6 times (30)
Round 10-11 sc in each st. (30, 2 rounds)
Insert the eyes in round 4, centered on the lip, with 3 stitches between them.
Round 12 [sc2tog, sc in next 3 sts.] 6 times (24)
Round 13 [sc2tog, sc in next 2 sts.] 6 times (18)
Fill a section of nylon knee high with 1/2 cup plastic pellets. Tie the end closed in a knot.
Stacey has a post here about using plastic pellets in amigurumi. Again, if you’re a beginner and want to skip the plastic pellets this time, that’s just fine. Just use some polyester fiberfill stuffing instead. Your monster won’t have that squishy beanbag feel, but it will still be adorable.
Stuff the bag of pellets into the monster body. It will be a very tight fit.
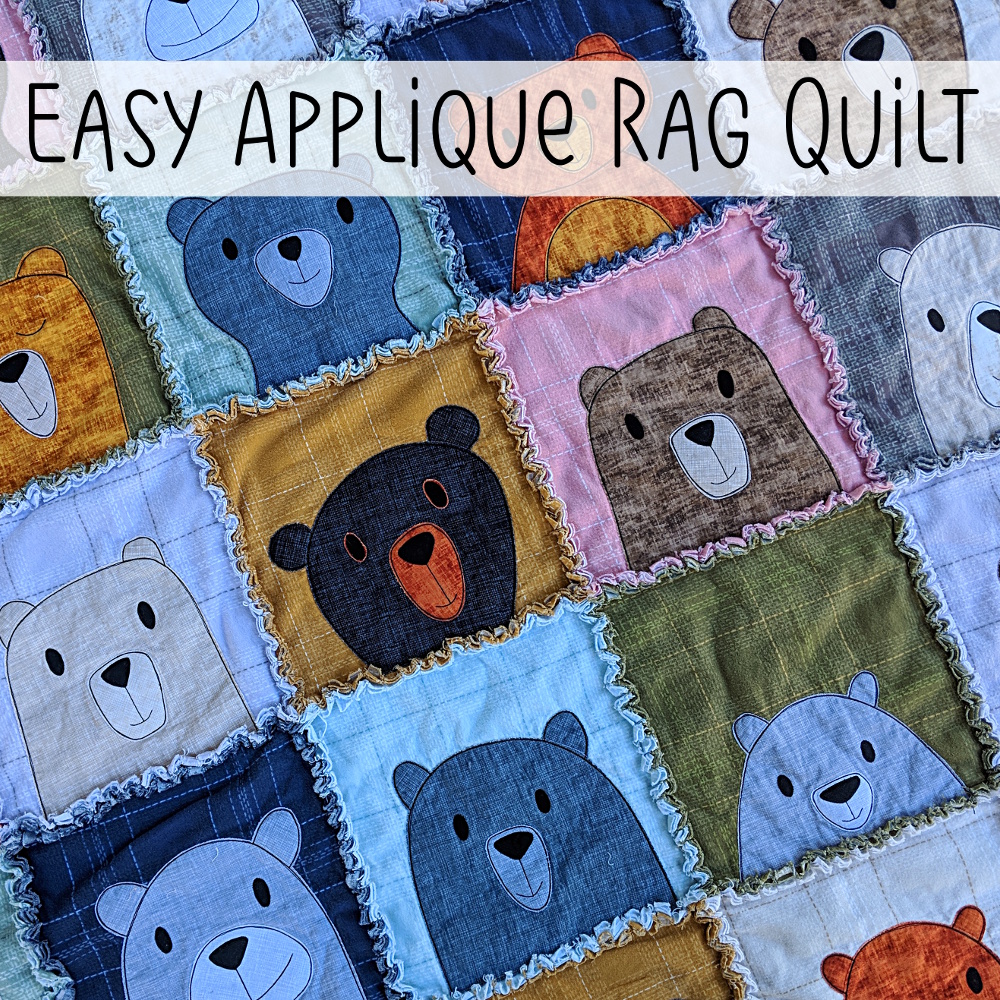
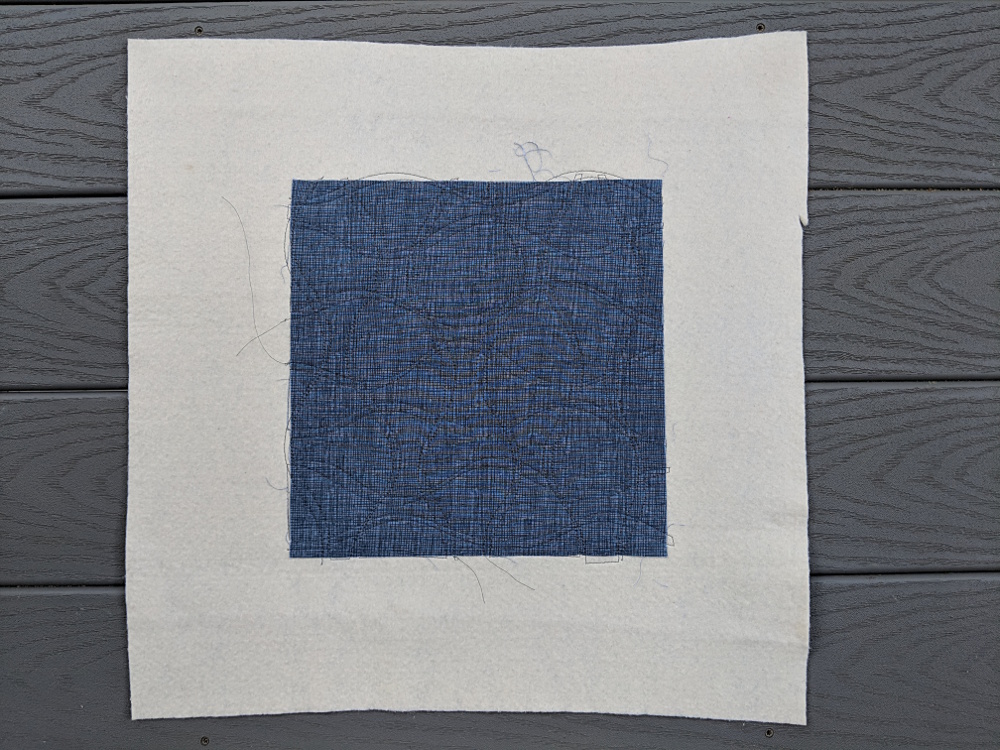
Several years ago my mother-in-law made us a fantastic flannel rag quilt. We use it all the time, and every time I look at it I think that it would be super easy to add applique to that style of quilt.
I finally did it!
And it was just as fun and easy as I thought. 🙂
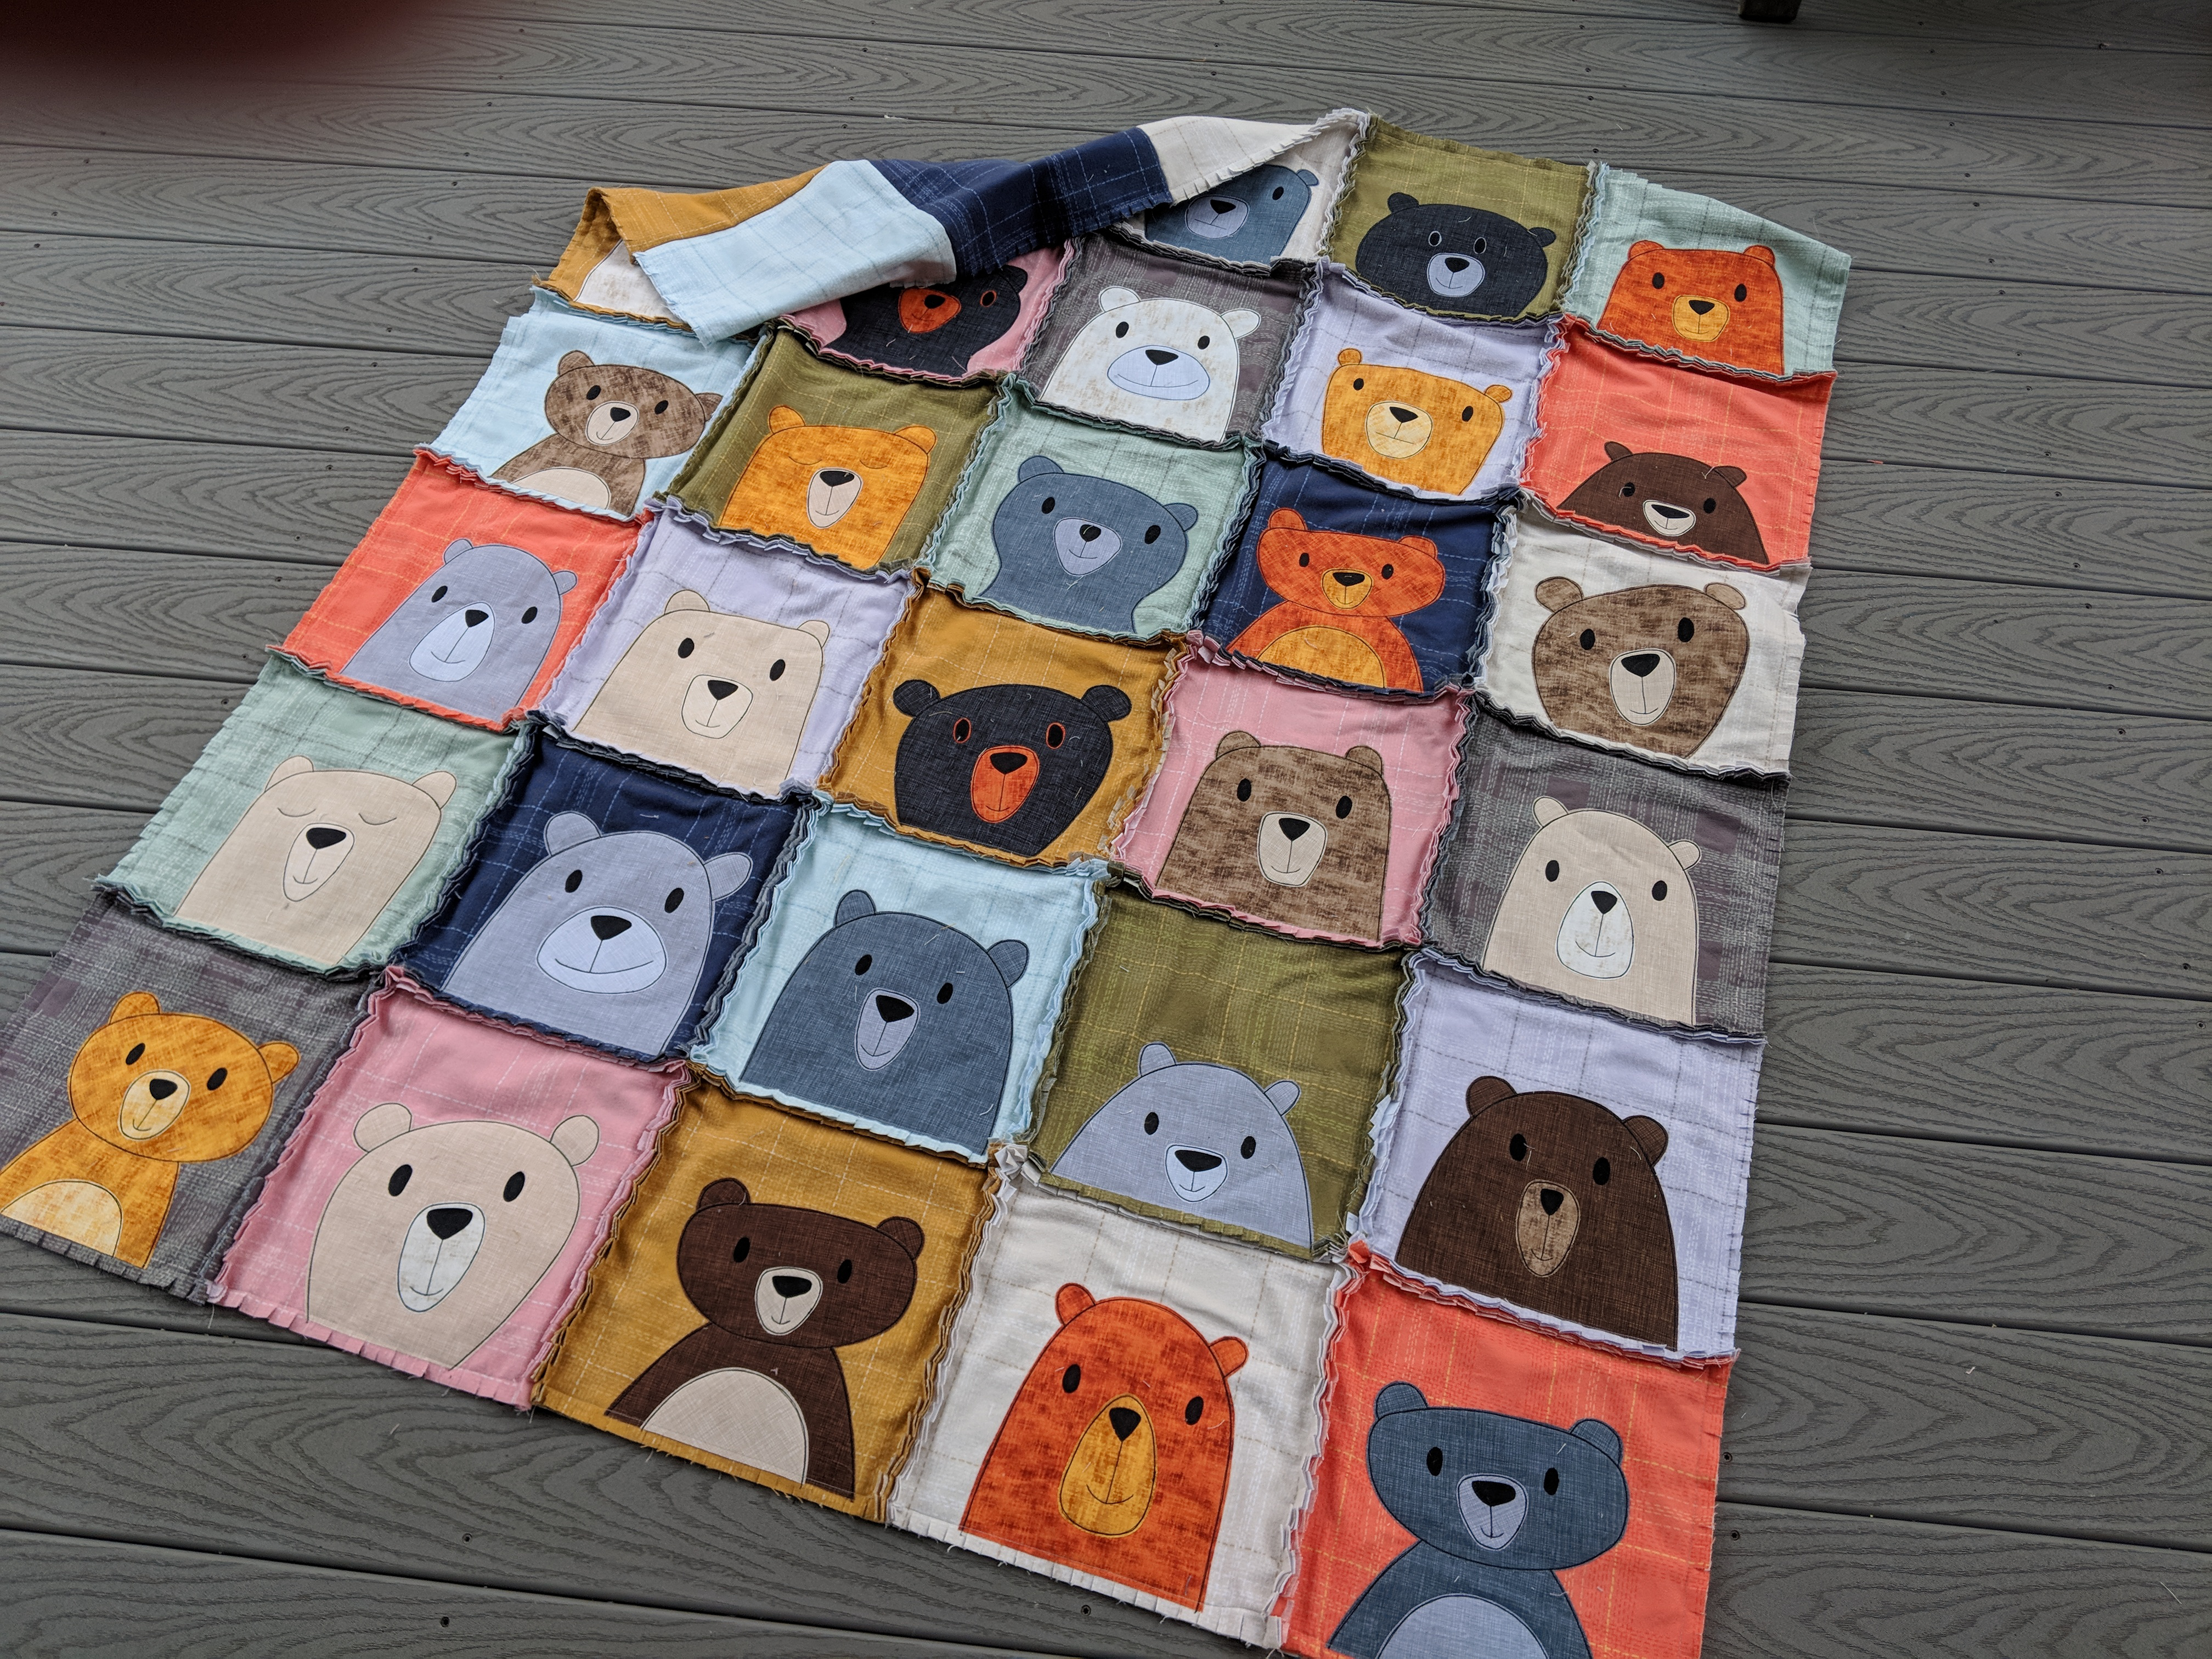
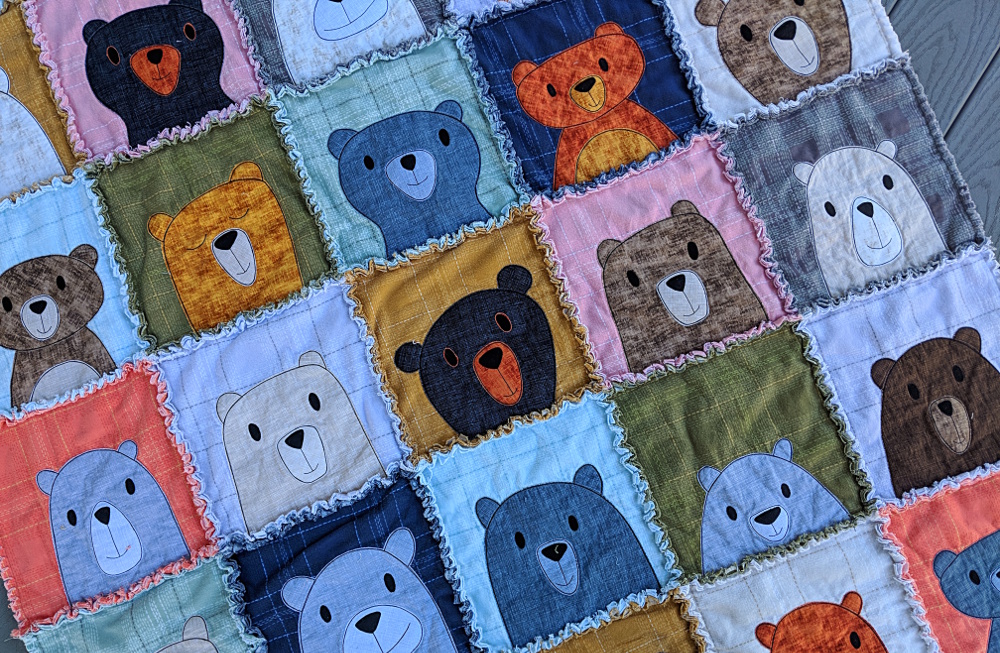
I made mine using the Bunches of Bears quilt pattern, but you could use any quilt pattern you like. All the square quilt blocks in my own patterns are already sized for 10 inch blocks. If you’re using someone else’s pattern you may need to enlarge or reduce the images.
So let’s go!
My quilt is nap sized – 50 x 60 inches – perfect for using on the couch. It’s 5 blocks wide and 6 blocks tall and the blocks all finish at 10 inches.
You can resize the pattern by changing the size of the blocks or by changing the number of blocks. 🙂
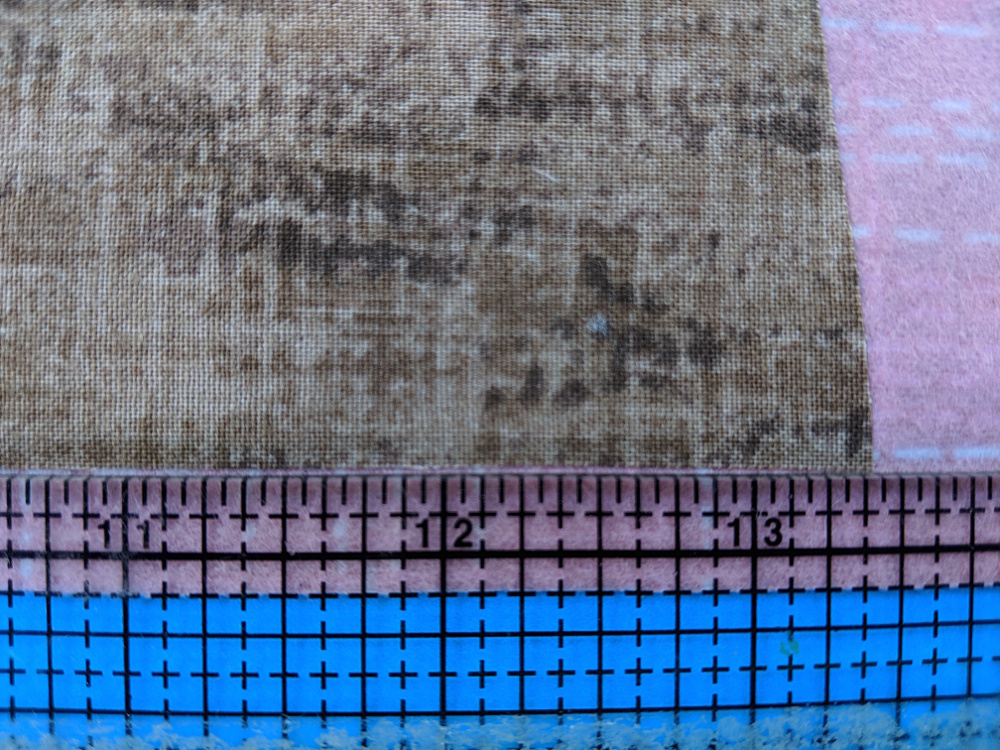
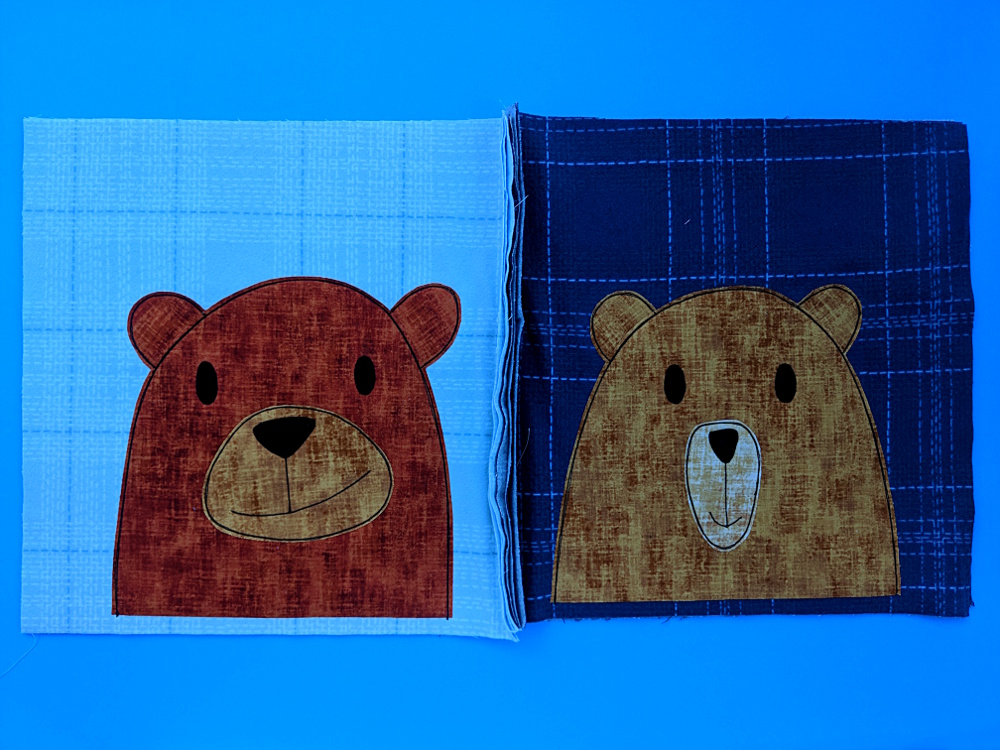
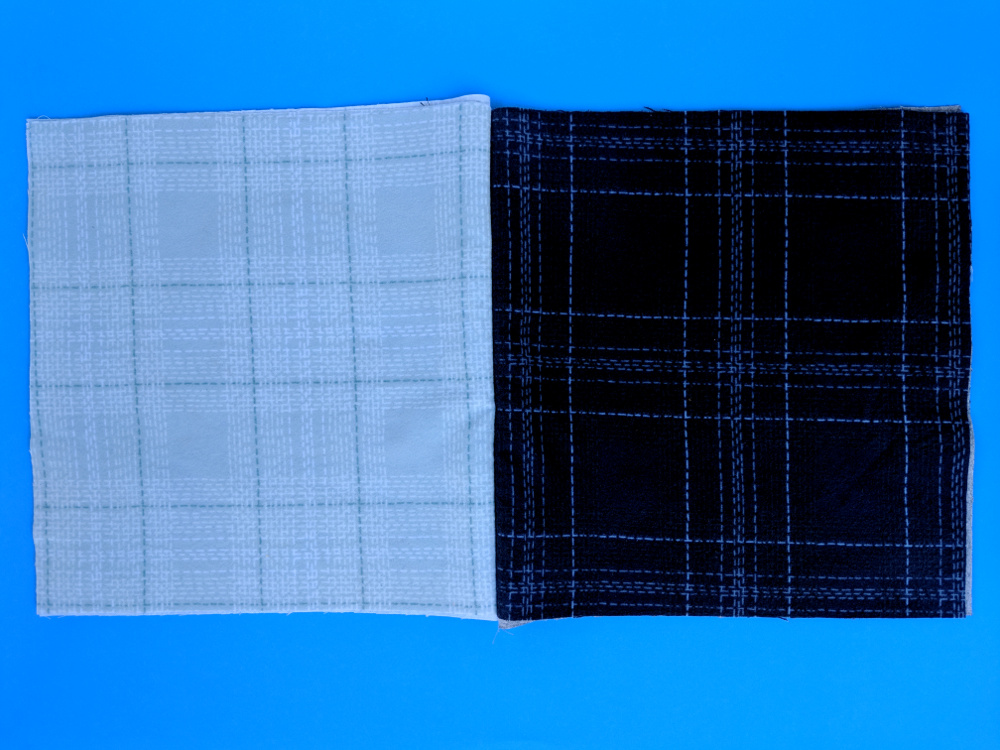
I used ten flannel colors (one of each color in the Dash Plaid collection from Dear Stella Fabrics) and bought one yard of each.
I prewashed my flannel. I think people don’t usually do that for rag quilts, but flannel is notorious for shrinking a lot and I didn’t want the shrinking to distort the applique. Don’t use fabric softener in the wash – it can resist the fusible adhesive. Dryer sheets are fine.
Each block is three layers of flannel, so you’ll need to cut 90 blocks, each 11 inches square. You can get nine from one yard of fabric.
Sneaky tip – if you have some ugly flannel that you can’t figure out how it got into your stash, cut 30 of the squares out of that and hide it in the middle of your layers. 🙂
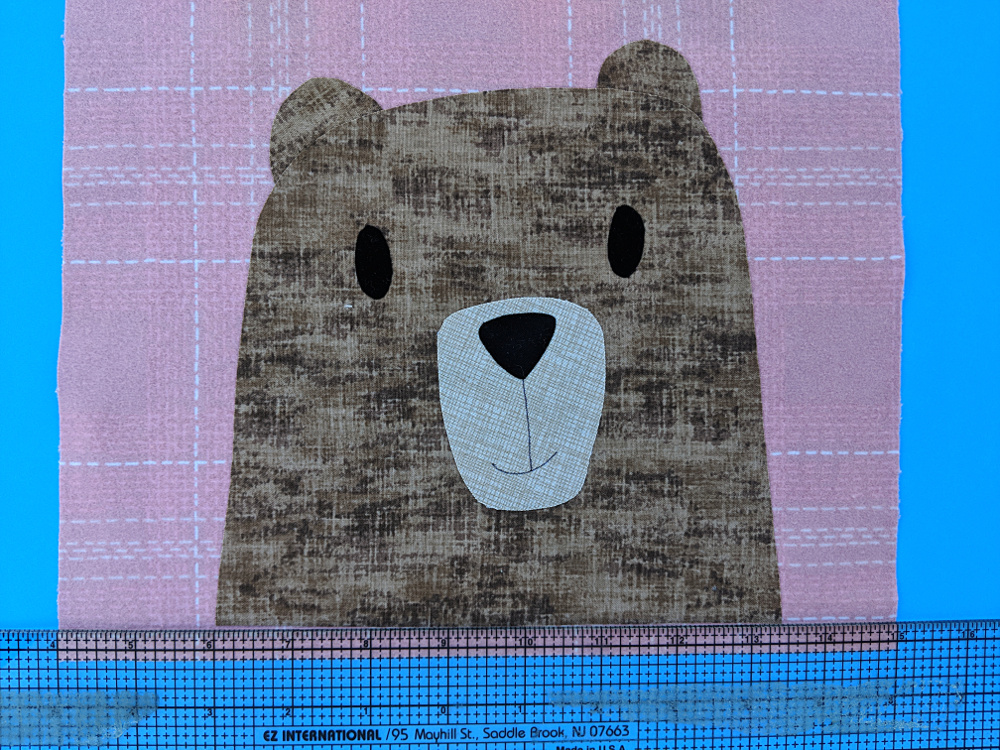
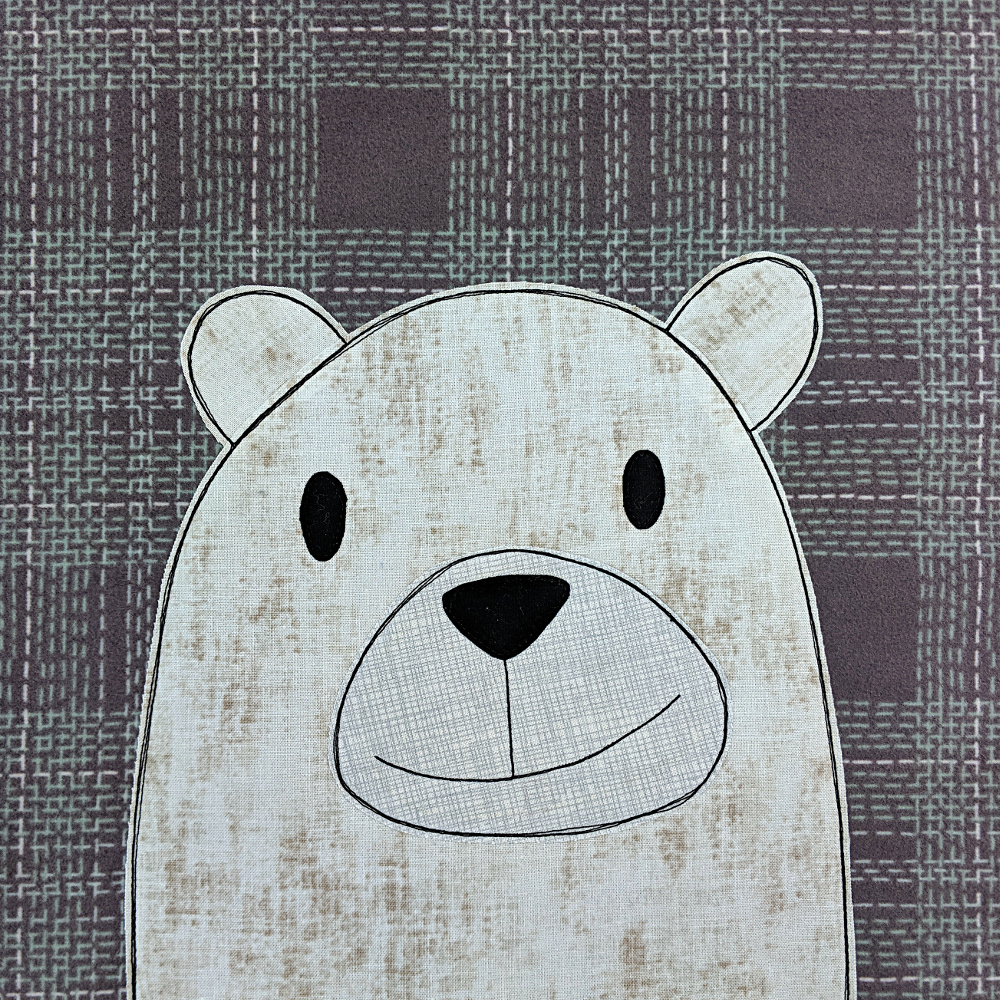
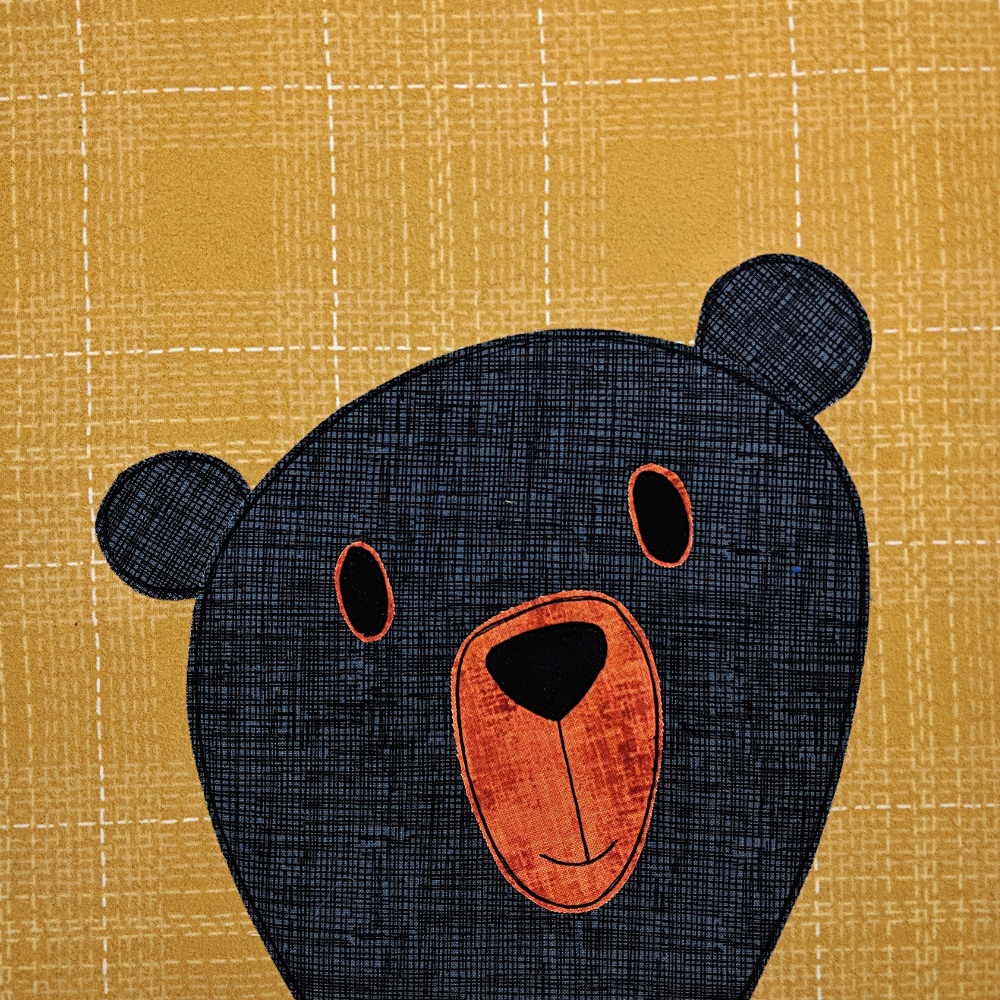
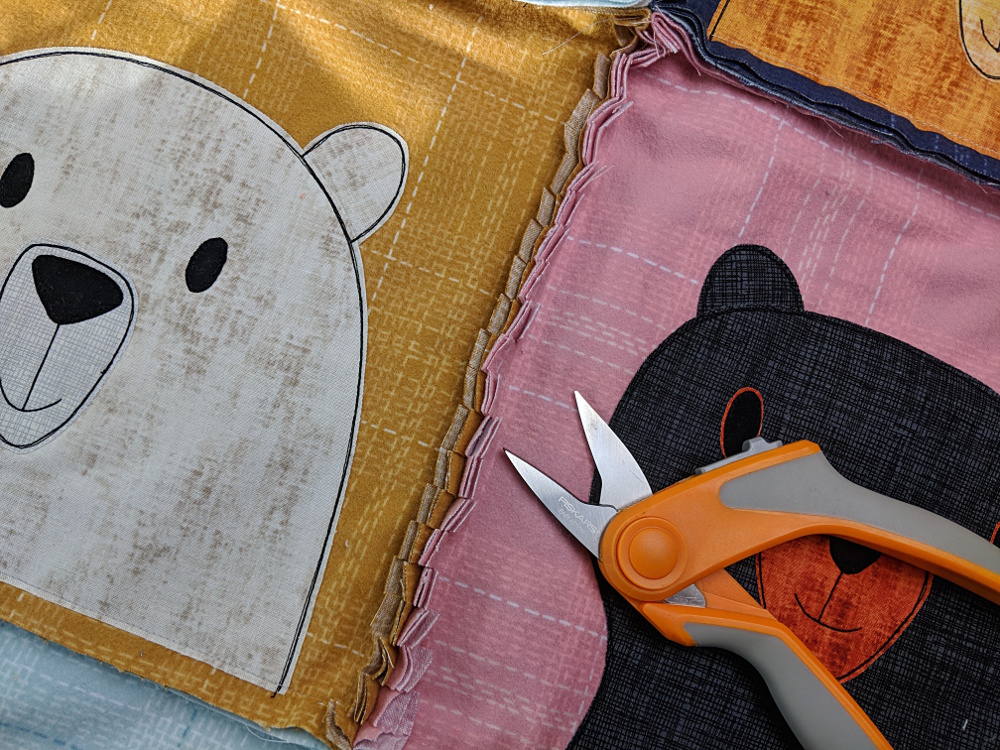
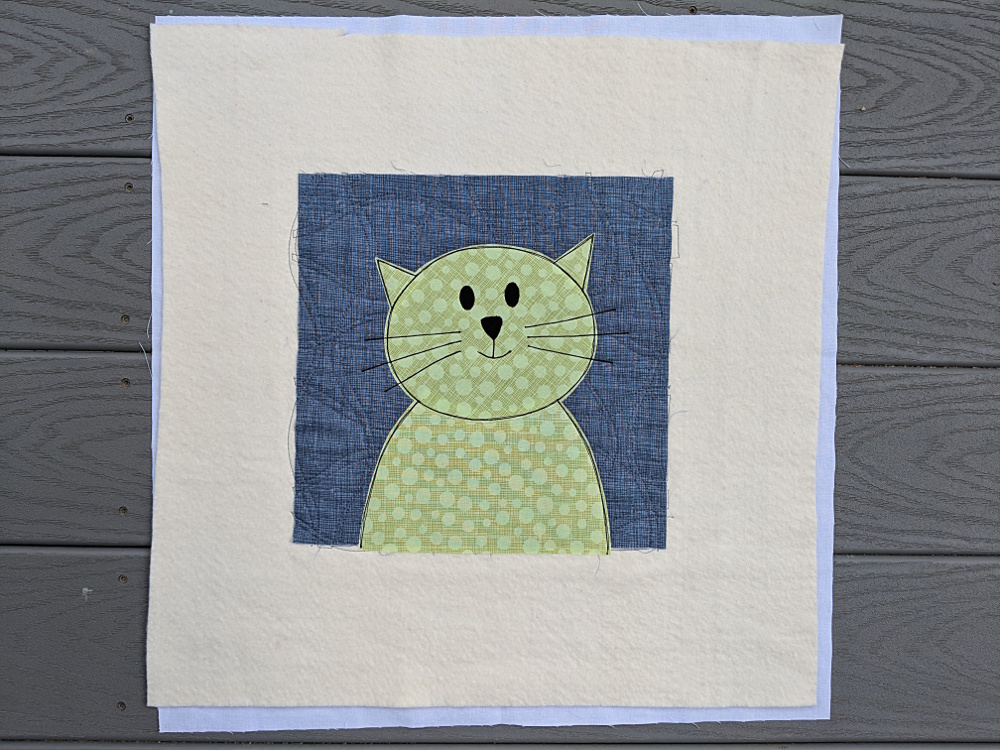
Applique 30 of the squares using any method you like. I used my favorite fusible adhesive method. There’s a video tutorial here. I used Heat & Bond Lite printable fusible adhesive sheets and regular cotton here. You could use flannel for the appliques too if you like, but I wanted to play with the contrasting textures. 🙂
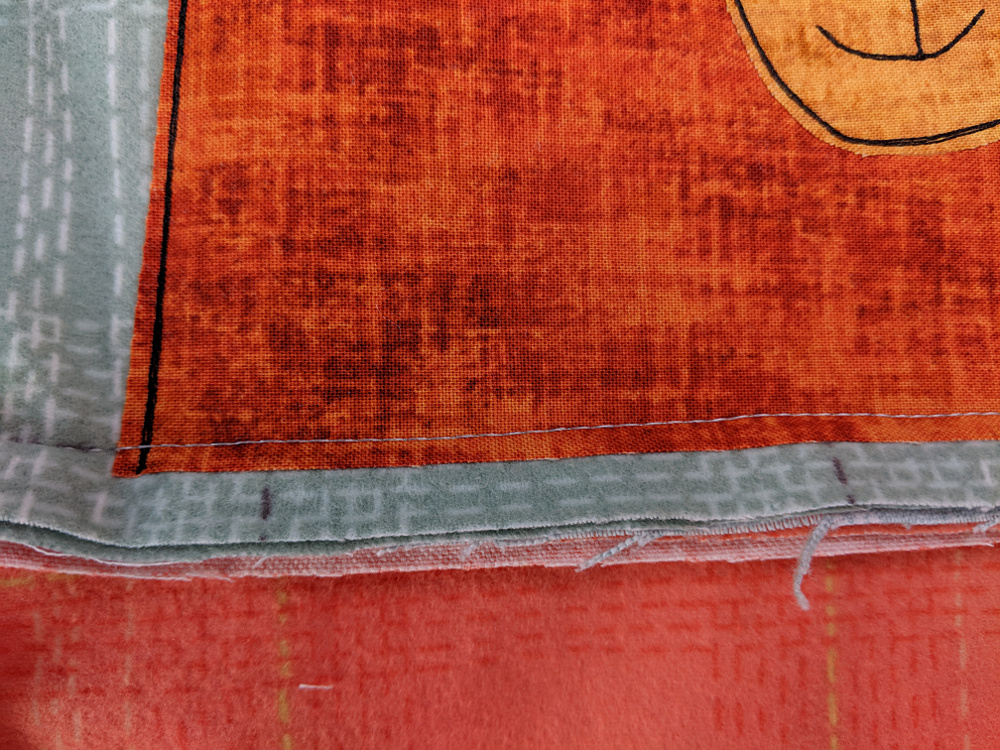
When you position your faces, line up the bottom edge 3/8 inch up from the bottom edge of the block. That way, when you sew the blocks together using 1/2 inch seam allowance, you’ll catch the bottom edge of the applique in the stitching and it will be nice and secure.
Fuse the face into place.
Layer a second square of flannel behind the one with the applique (both facing right side up).
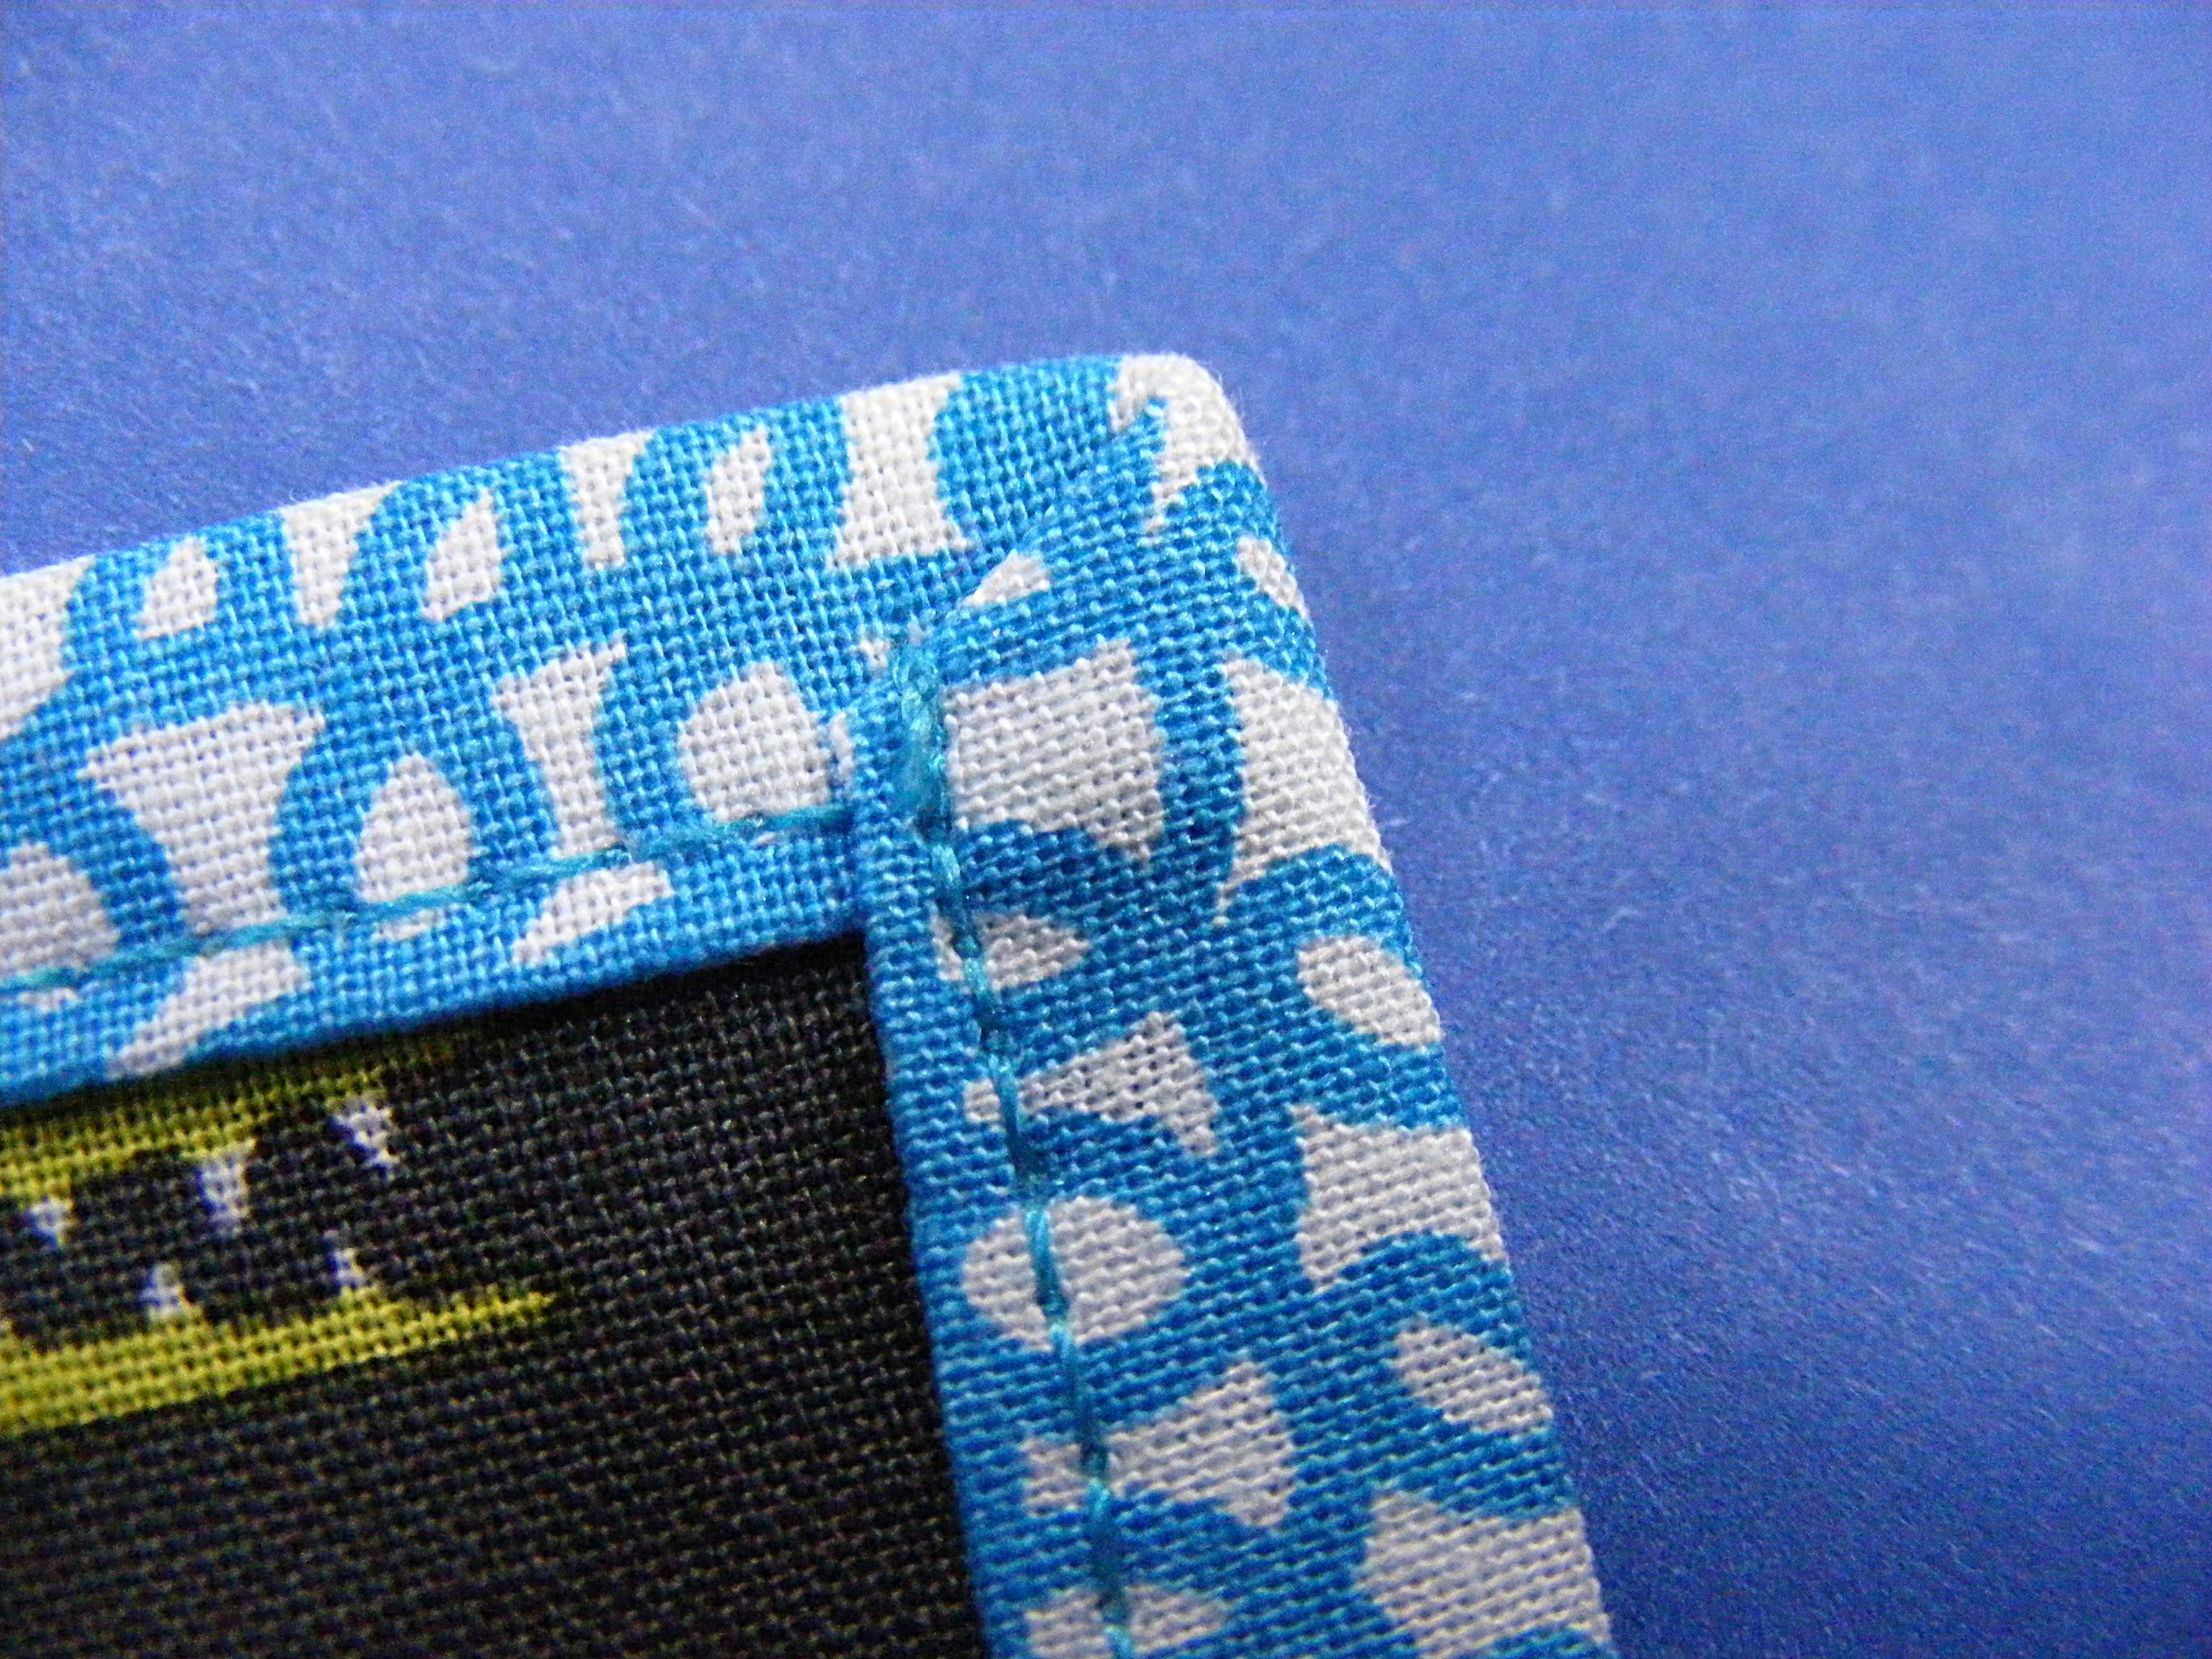
Stitch down all the edges on your applique. Outlining through both layers of flannel adds just a little bit of poof and dimension to your block – not as much as quilting with batting, but similar.
I used the “scribbly” method of going around each bit three times with regular weight black thread and a simple straight stitch. There’s a post here with more detail about that, and one here with more info about using a heavier weight thread if you prefer that.
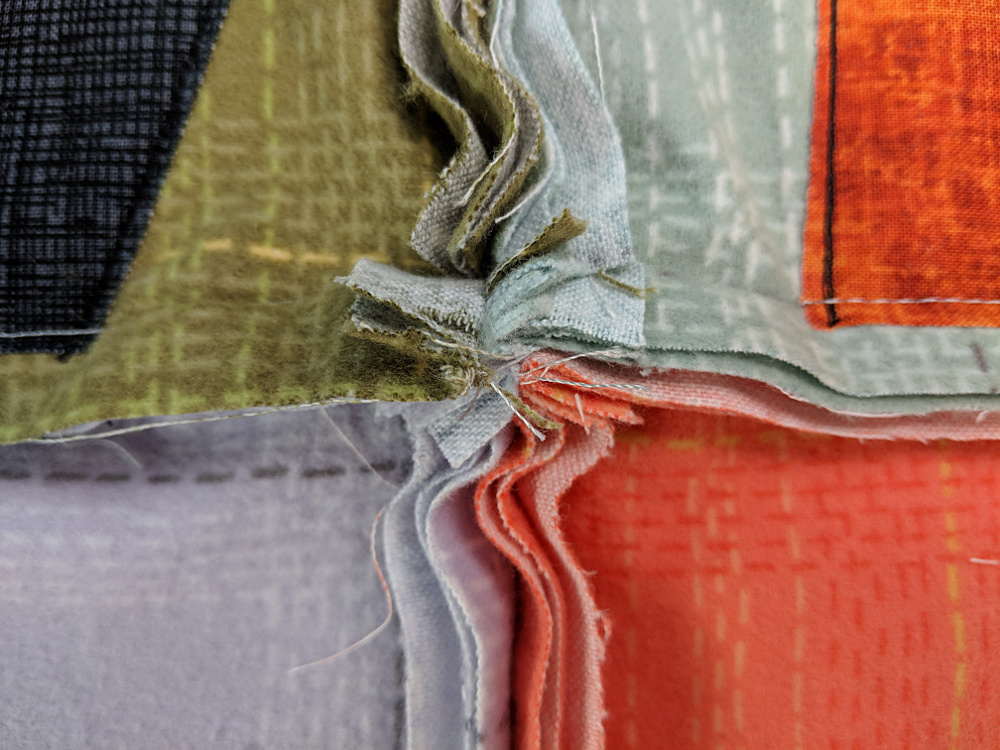
After you get all 30 blocks appliqued, it’s time to sew them together. This was actually the hardest part, because it’s backwards from any other kind of sewing you’ll do normally.
Add a third layer of flannel to each block, this time with the right side facing the back of the quilt. (It’s going to become your quilt back.)
Using 1/2″ seam allowance, sew two blocks wrong sides together so that the seam allowance is on the right side of the quilt.
Here’s what it looks like from the back.
See? That last layer of flannel makes a nice quilt back, and you have a nice clean seam.
I joined all of my blocks into rows of five, then sewed those rows together for the finished quilt.
The intersections can get very bulky, so I snipped into the seam allowance 1/2″ from each edge and sewed my crossing seam through that slit so I wasn’t stitching the seam allowance down.
And look – my seam secures the bottom edge of each bear, just like I planned. 🙂
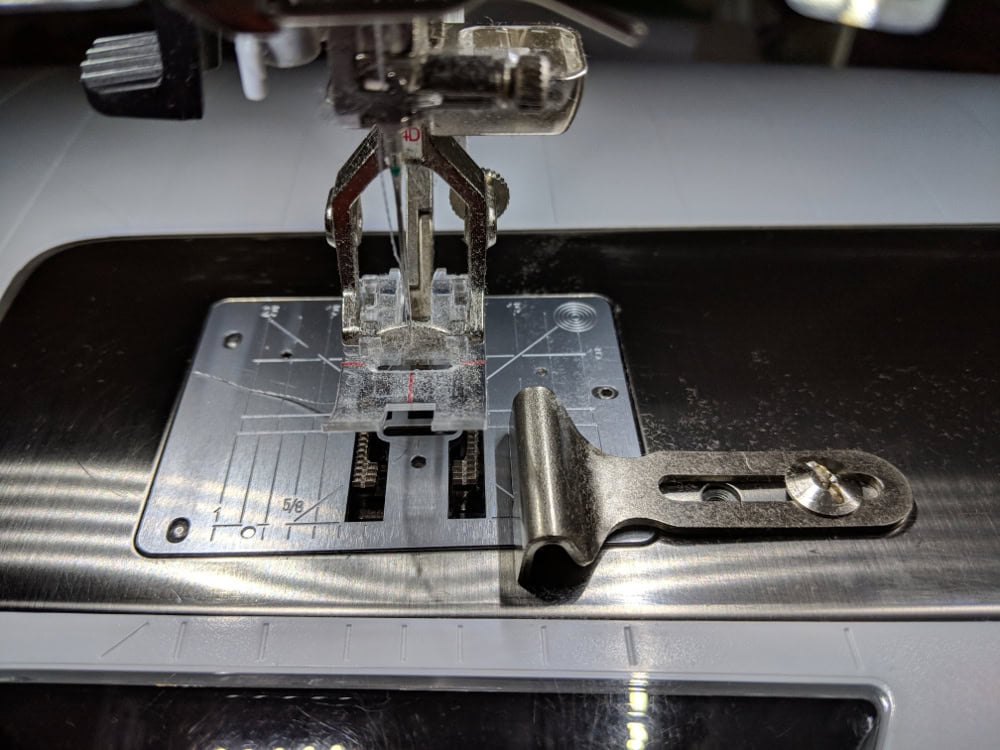
I found it helpful to use my quarter inch foot, but adjust it out to 1/2 inch for sewing all those layers together.
I also lengthened my stitch to 3.0 and reduced the pressure on my presser foot to keep the layers from creeping. If you can’t make that adjustment on your machine, just use a lot of pins or clips, as if you were sewing napped fabrics together.
Once all the blocks are sewn together, sew all the way around the outside edge of the quilt, one half inch in from the raw edge.
Now it’s time to snip all those seams.
Snip 1/2 inch apart all along all the seam allowances, almost up to the stitching line. Be very careful not to cut into your stitching. If you slip and snip it, repair it now by sewing over the snipped seam.
If you’re trying to snip with regular scissors, you’ll need to take a LOT of breaks. They’re really not designed for this kind of work.
If you can afford to buy a special set of snips just for this kind of work, it is absolutely worth it. I tried several brands and the Fiskars Easy Action Tabletop Rag Quilt Snips were by far my favorite. They have a spring action, so their default setting is open, which saves a surprising amount of strain on your wrist. They’re super sharp, and the blades are slightly serrated, so they really grip the fabric well, helping them cut right up to the tips of the blades without “pushing” the fabric out at all.
Even with the fancy snips I took a break between snipping the horizontal and vertical seams. It took about two hours total.
Don’t forget to snip around the outside edges too.
When you’re done snipping, throw it in the wash and tumble dry.
Ta daa!
All those snipped edges fray in the wash and you get a really soft, fluffy ridge between each block. This blanket is just begging for someone to snuggle under it.
If you make an applique flannel rag quilt, we’d love to see it! Post a photo in the Shiny Happy People group so we can all oooh and aaah. 🙂
Find links to all the posts about pattern size and layouts here.
Print or trace the pattern out onto a sheet of Sulky Sticky Fabri-solvy at 100% size. The rectangle should be 4 x 9 inches.
Step 3
Peel off the paper backing and stick the pattern onto the fabric. Make sure you position it so that the whole image will fit in the hoop, with fabric all the way around.
Step 4
Choose your threads!
So many pretty colors. 🙂
Step 5
Embroider the design using two strands of Sulky 12 wt. thread. Stitch right through the stabilizer and the fabric.
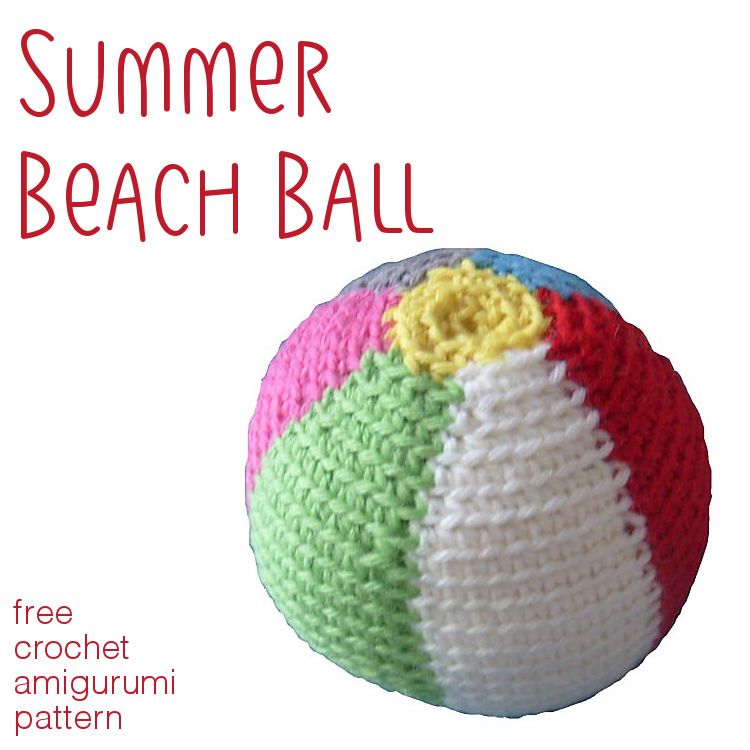
Get ready to have fun in the sun with this great stuffed beach ball! This beach ball measures about 4 inches tall when completed with worsted weight yarn – the perfect size for lots of different amigurumi softies. 🙂
To complete this pattern, you will need. . .
7 colors of worsted weight yarn (assign each a number, C1, C2, C3, etc.)
size H (5 mm) crochet hook – or size needed to get a good tight fabric with your chosen yarn
polyester stuffing
The skills you’ll need for just about any amigurumi are. . .
You can go through all those posts now, or just hop to them as you get to those points in the pattern – whatever works best for you!
Yarn
This pattern can be used with any weight yarn! Just use the hook recommended on the ball band, and adjust as needed (see ‘gauge notes’ below). For a bigger, human-sized beach ball, try a bulky weight yarn! Just keep in mind that you’ll use more yardage than recommended. The sample is crocheted in worsted weight yarn, and all yardage/hook recommendations are calculated based on the sample.
Materials
Size H crochet hook (or size needed to get a tight fabric)
7 colors of worsted weight yarn (fewer if you’d like to repeat colors)
a couple of handfuls of stuffing
Gauge Notes
This pattern doesn’t specify a gauge. It’s a stuffed ball, and you don’t need to be too picky about exact sizing. 🙂 The most important thing is that you use a hook size that creates a nice looking fabric for your yarn. If you use the recommended hook size, and your fabric looks very loose (so that stuffing would show through), then you will want to use a smaller hook. Other than that, no measuring required!
In case you’re curious about getting the exact gauge Stacey does, it’s 5 rounds=2 inches.
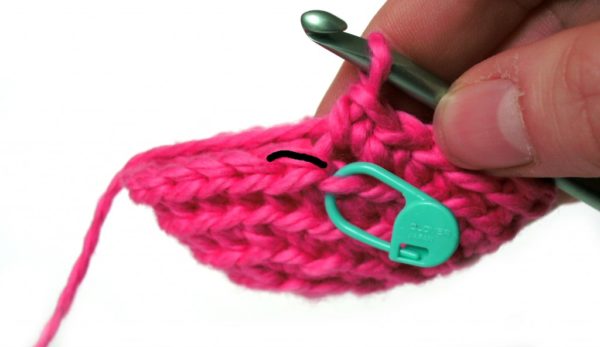
Stitch into the Back
All stitches in this pattern are worked through the back loop only. Look at this picture.
See how one loop is highlighted in black? This is the back loop, and it’s what you’ll stitch into. Stitching into the back loop creates ridges on the right side of the piece.
Want to see crocheting through the back loop in action? Check out this blog post. It talks all about why Stacey crochets through the back loop and even has a handy dandy video showing how to find that loop. 🙂
Round 5 With C2 [sc twice in next st, sc in next 3 sts.] 6 times, each time using a different color C2-C7 (30)
Round 6 With C2 [sc twice in next st, sc in next 4 sts.] 6 times, each time using a different color C2-C7 (36)
Round 7 With C2 [sc twice in next st, sc in next 5 sts.] 6 times, each time using a different color C2-C7 (42)
Round 8 With C2 [sc twice in next st, sc in next 6 sts.] 6 times, each time using a different color C2-C7 (48)
Round 9 With C2 [sc twice in next st, sc in next 7 sts.] 6 times, each time using a different color C2-C7 (54)
Round 10 With C2 [sc twice in next st, sc in next 8 sts.] 6 times, each time using a different color C2-C7 (60)
Round 11-20 With C2, sc in next 10 sts. With C3, sc in next 10 sts. With C4, sc in next 10 sts. With C5, sc in next 10 sts. With C6, sc in next 10 sts. With C7, sc in next 10 sts. (60, 10 rounds)
Snap a photo and share it with us over in the Shiny Happy People group! If you share it on social media, tag with with #shinyhappyworld so I can see it. 🙂
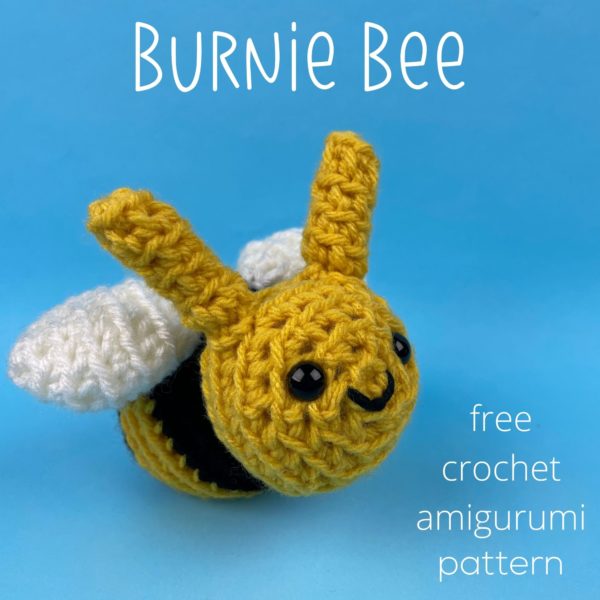
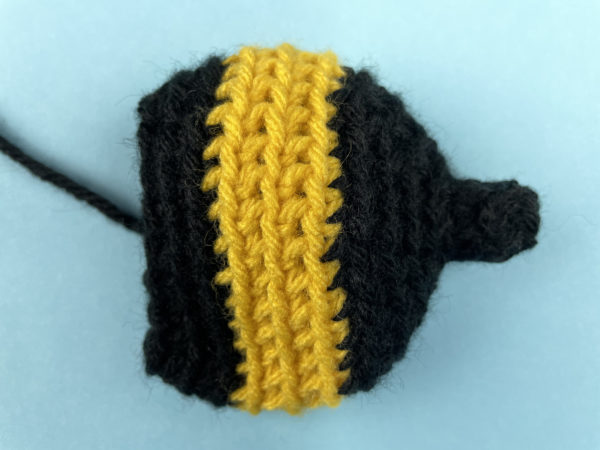
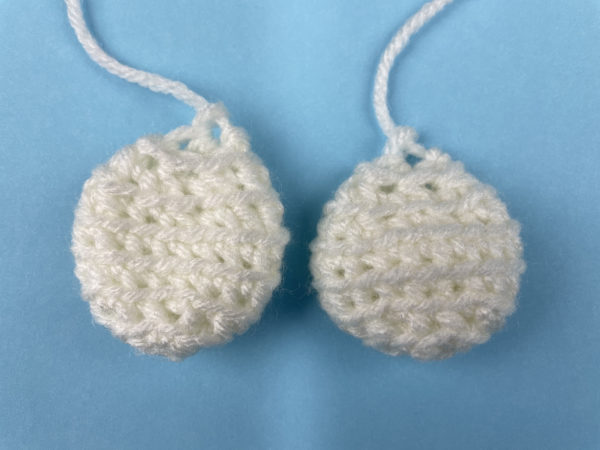
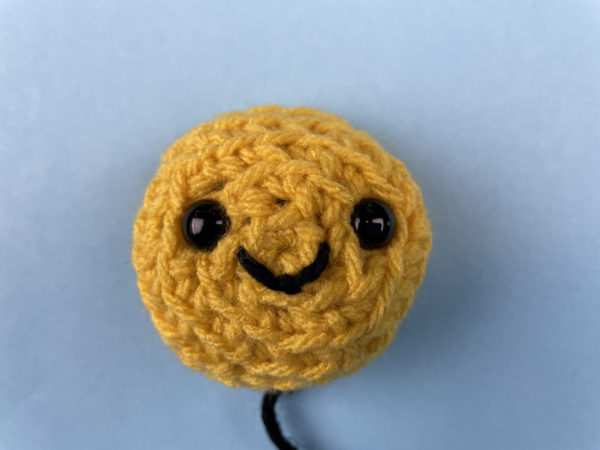
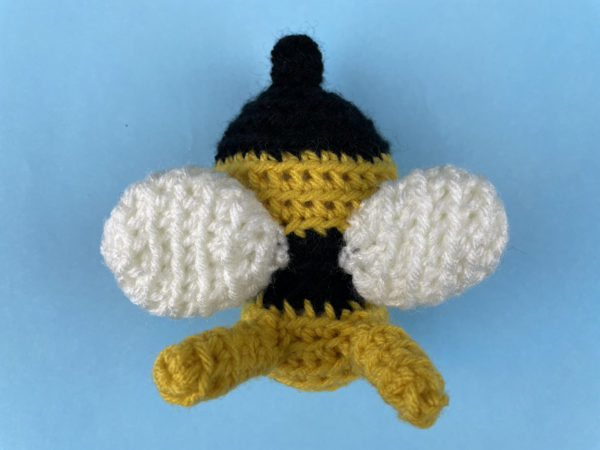
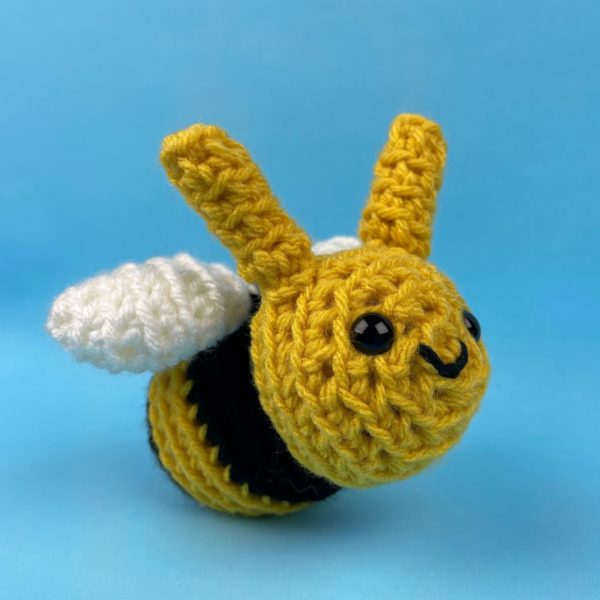
It’s a bee… but he doesn’t sting! Make a cute little bumbler with this free crochet bee pattern!
This is Burnie. (His full name is Vanburn von Bumble Bee.) He’s 3” tall and 4.5” long when made with worsted weight yarn. He’s super quick and easy to stitch up!
The skills you’ll need for just about any amigurumi are. . .
You can go through all those posts now, or just hop to them as you get to those points in the pattern – whatever works best for you!
Yarn
This pattern can be used with any weight yarn! Just use the hook recommended on the ball band, and adjust as needed (see ‘gauge notes’ below). For a bigger, super-cuddly animal, try a bulky weight yarn! Just keep in mind that you’ll use more yardage than recommended. The sample is crocheted in worsted weight yarn, and all yardage/hook recommendations are calculated based on the sample.
Materials for this crochet bee pattern
Size H crochet hook (or size needed to get a tight fabric)
two 9 mm black animal eyes
tapestry needle
a bit of stuffing
three colors yarn – black, yellow and white
Find links to sources for all my favorite supplies here.
Gauge Notes
This pattern doesn’t specify a gauge. It’s a stuffed animal, and you don’t need to be too picky about exact sizing. The most important thing is that you use a hook size that creates a nice looking fabric for your yarn. If you use the recommended hook size, and your fabric looks very loose (so that stuffing would show through), then you will want to use a smaller hook. Other than that, no measuring required!
In case you’re curious about getting the exact gauge Stacey does, it’s 5 rounds=2 inches. Note that you will need to have this gauge for the yardage suggestions to provide an accurate estimation.
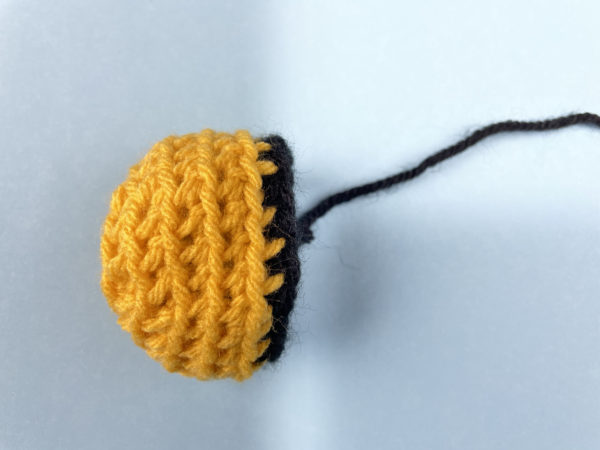
Stitch into the Back
All stitches in this pattern (that are worked in the round) are worked through the back loop only, unless otherwise directed. Look at this picture.
See how one loop is highlighted in black? This is the back loop, and it’s what you’ll stitch into. Stitching into the back loop creates ridges on the right side of the piece.
Want to see crocheting through the back loop in action? Check out this blog post. It talks all about why Stacey crochets through the back loop and even has a handy dandy video showing how to find that loop. 🙂
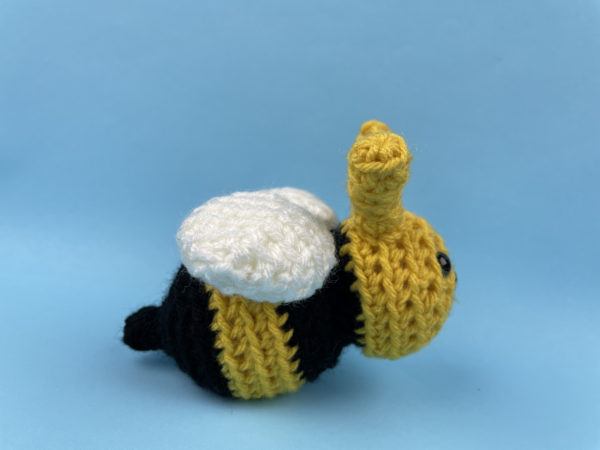
Here’s a side view so you can see that cute stinger!
I’m so glad he doesn’t sting. 🙂
Congratulations! Please post a photo over in the Shiny Happy People group! We’d love to see the adorable bumblebees you make with this free crochet bee pattern!
If you’re like most quilters – you have a LOT of patterns. 🙂
It’s always great to come up with another use for one of your favorites – especially if you can make an accessory to go WITH one of your best quilts.
You can turn a single block into a wall hanging and hang it just as it is. But it’s extra fun to give that block a special frame to really set it off and make it into a piece of art. 🙂
And it’s even more fun if that frame uses a wonky version of a traditional quilt pattern.
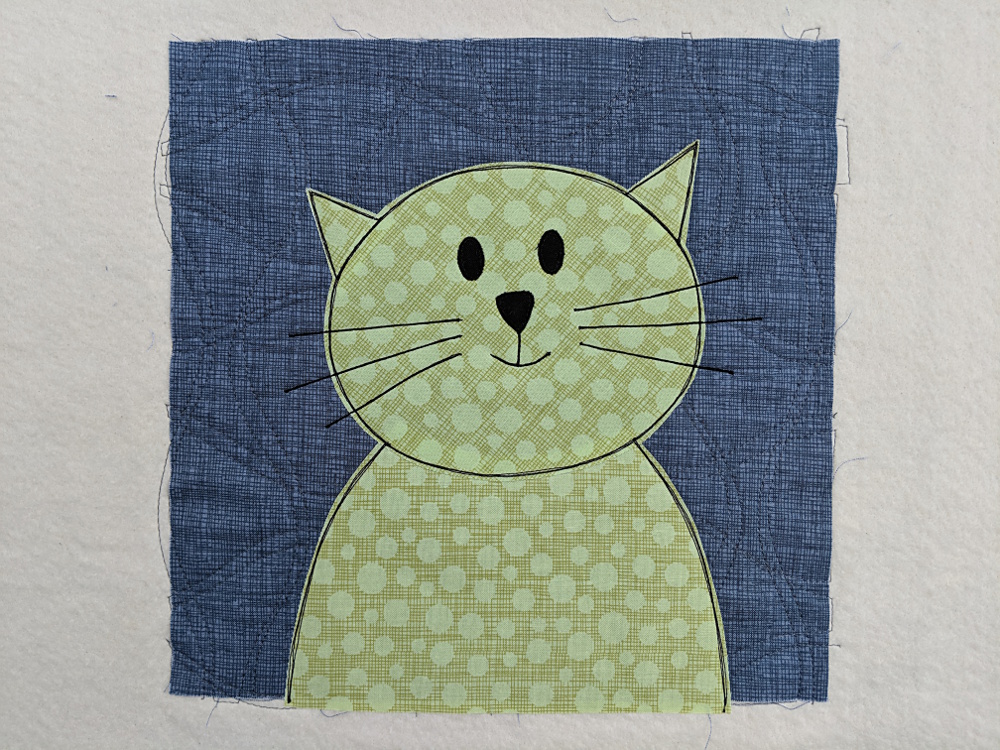
For this wall hanging I used one of my favorite blocks from the Cuddly Cats quilt pattern – no resizing. So it’s a 10 inch block in the center, with a wonky churn dash frame around it. The entire wall hanging is 16 inches square.
Press your batting square. Center your background block in the center of the batting.
Quilt the square to the batting.
I used double wavy stripes on mine. You can find a tutorial for that here.
Step 2 – Applique the Face
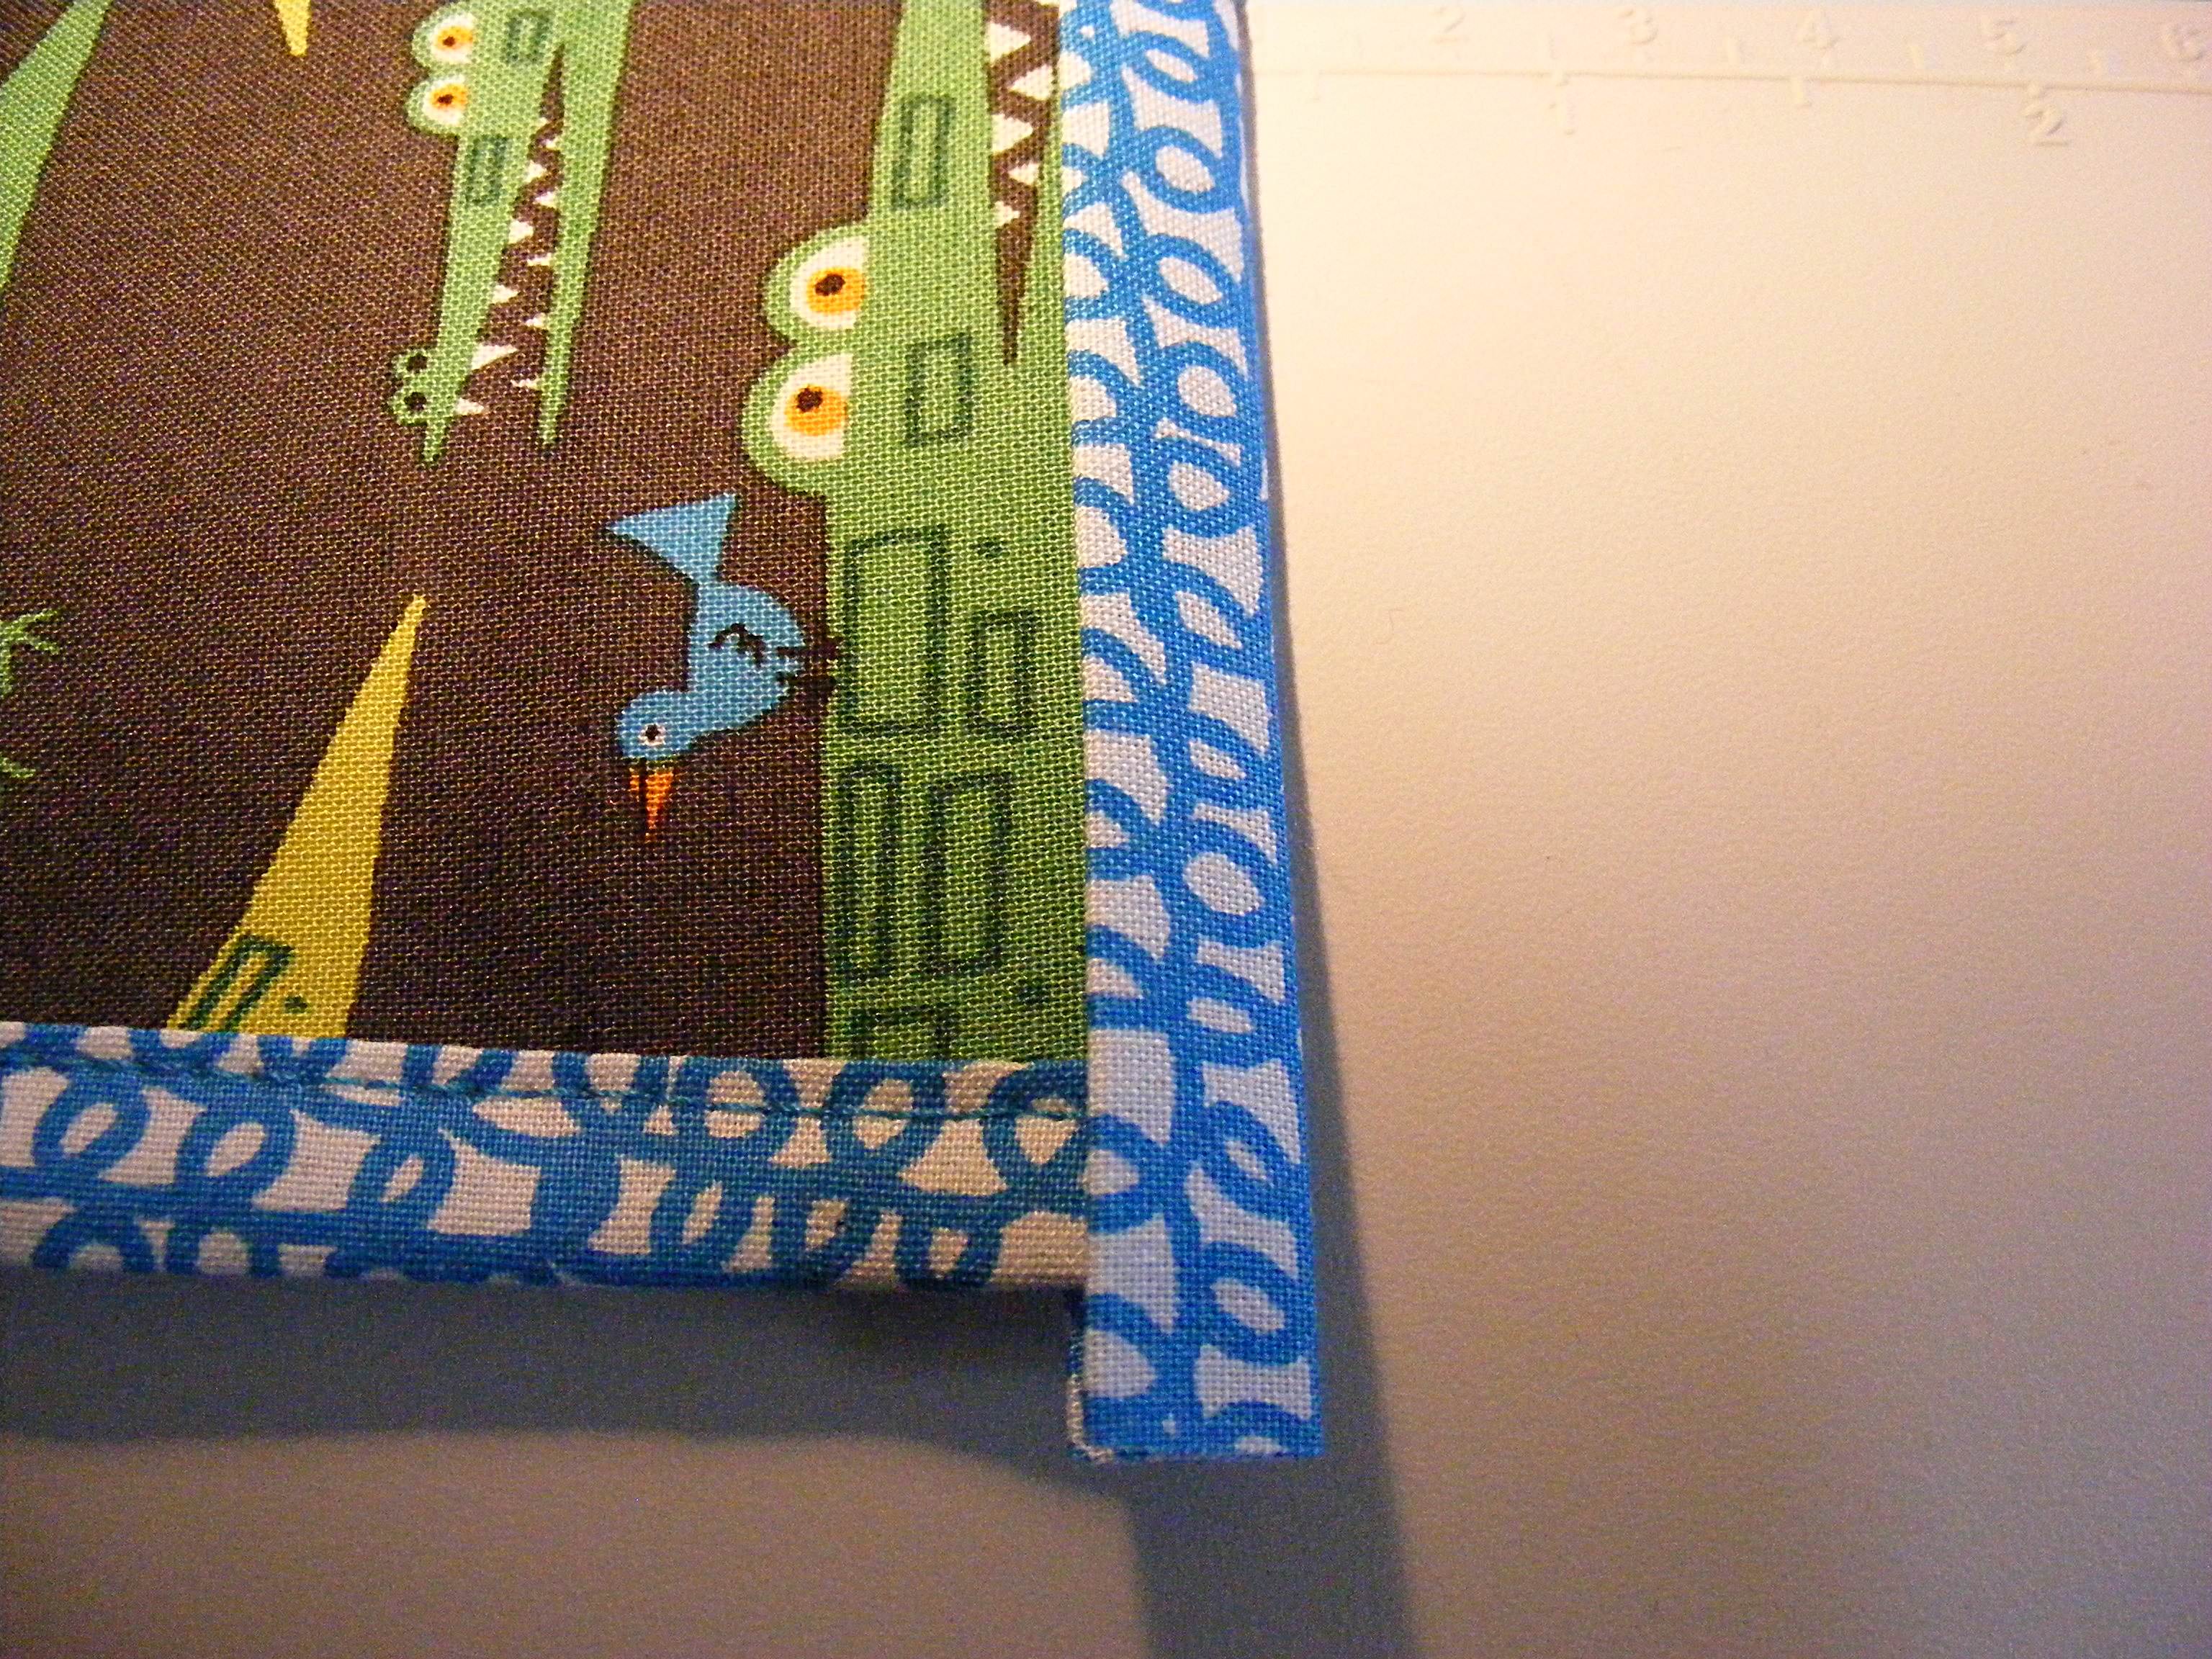
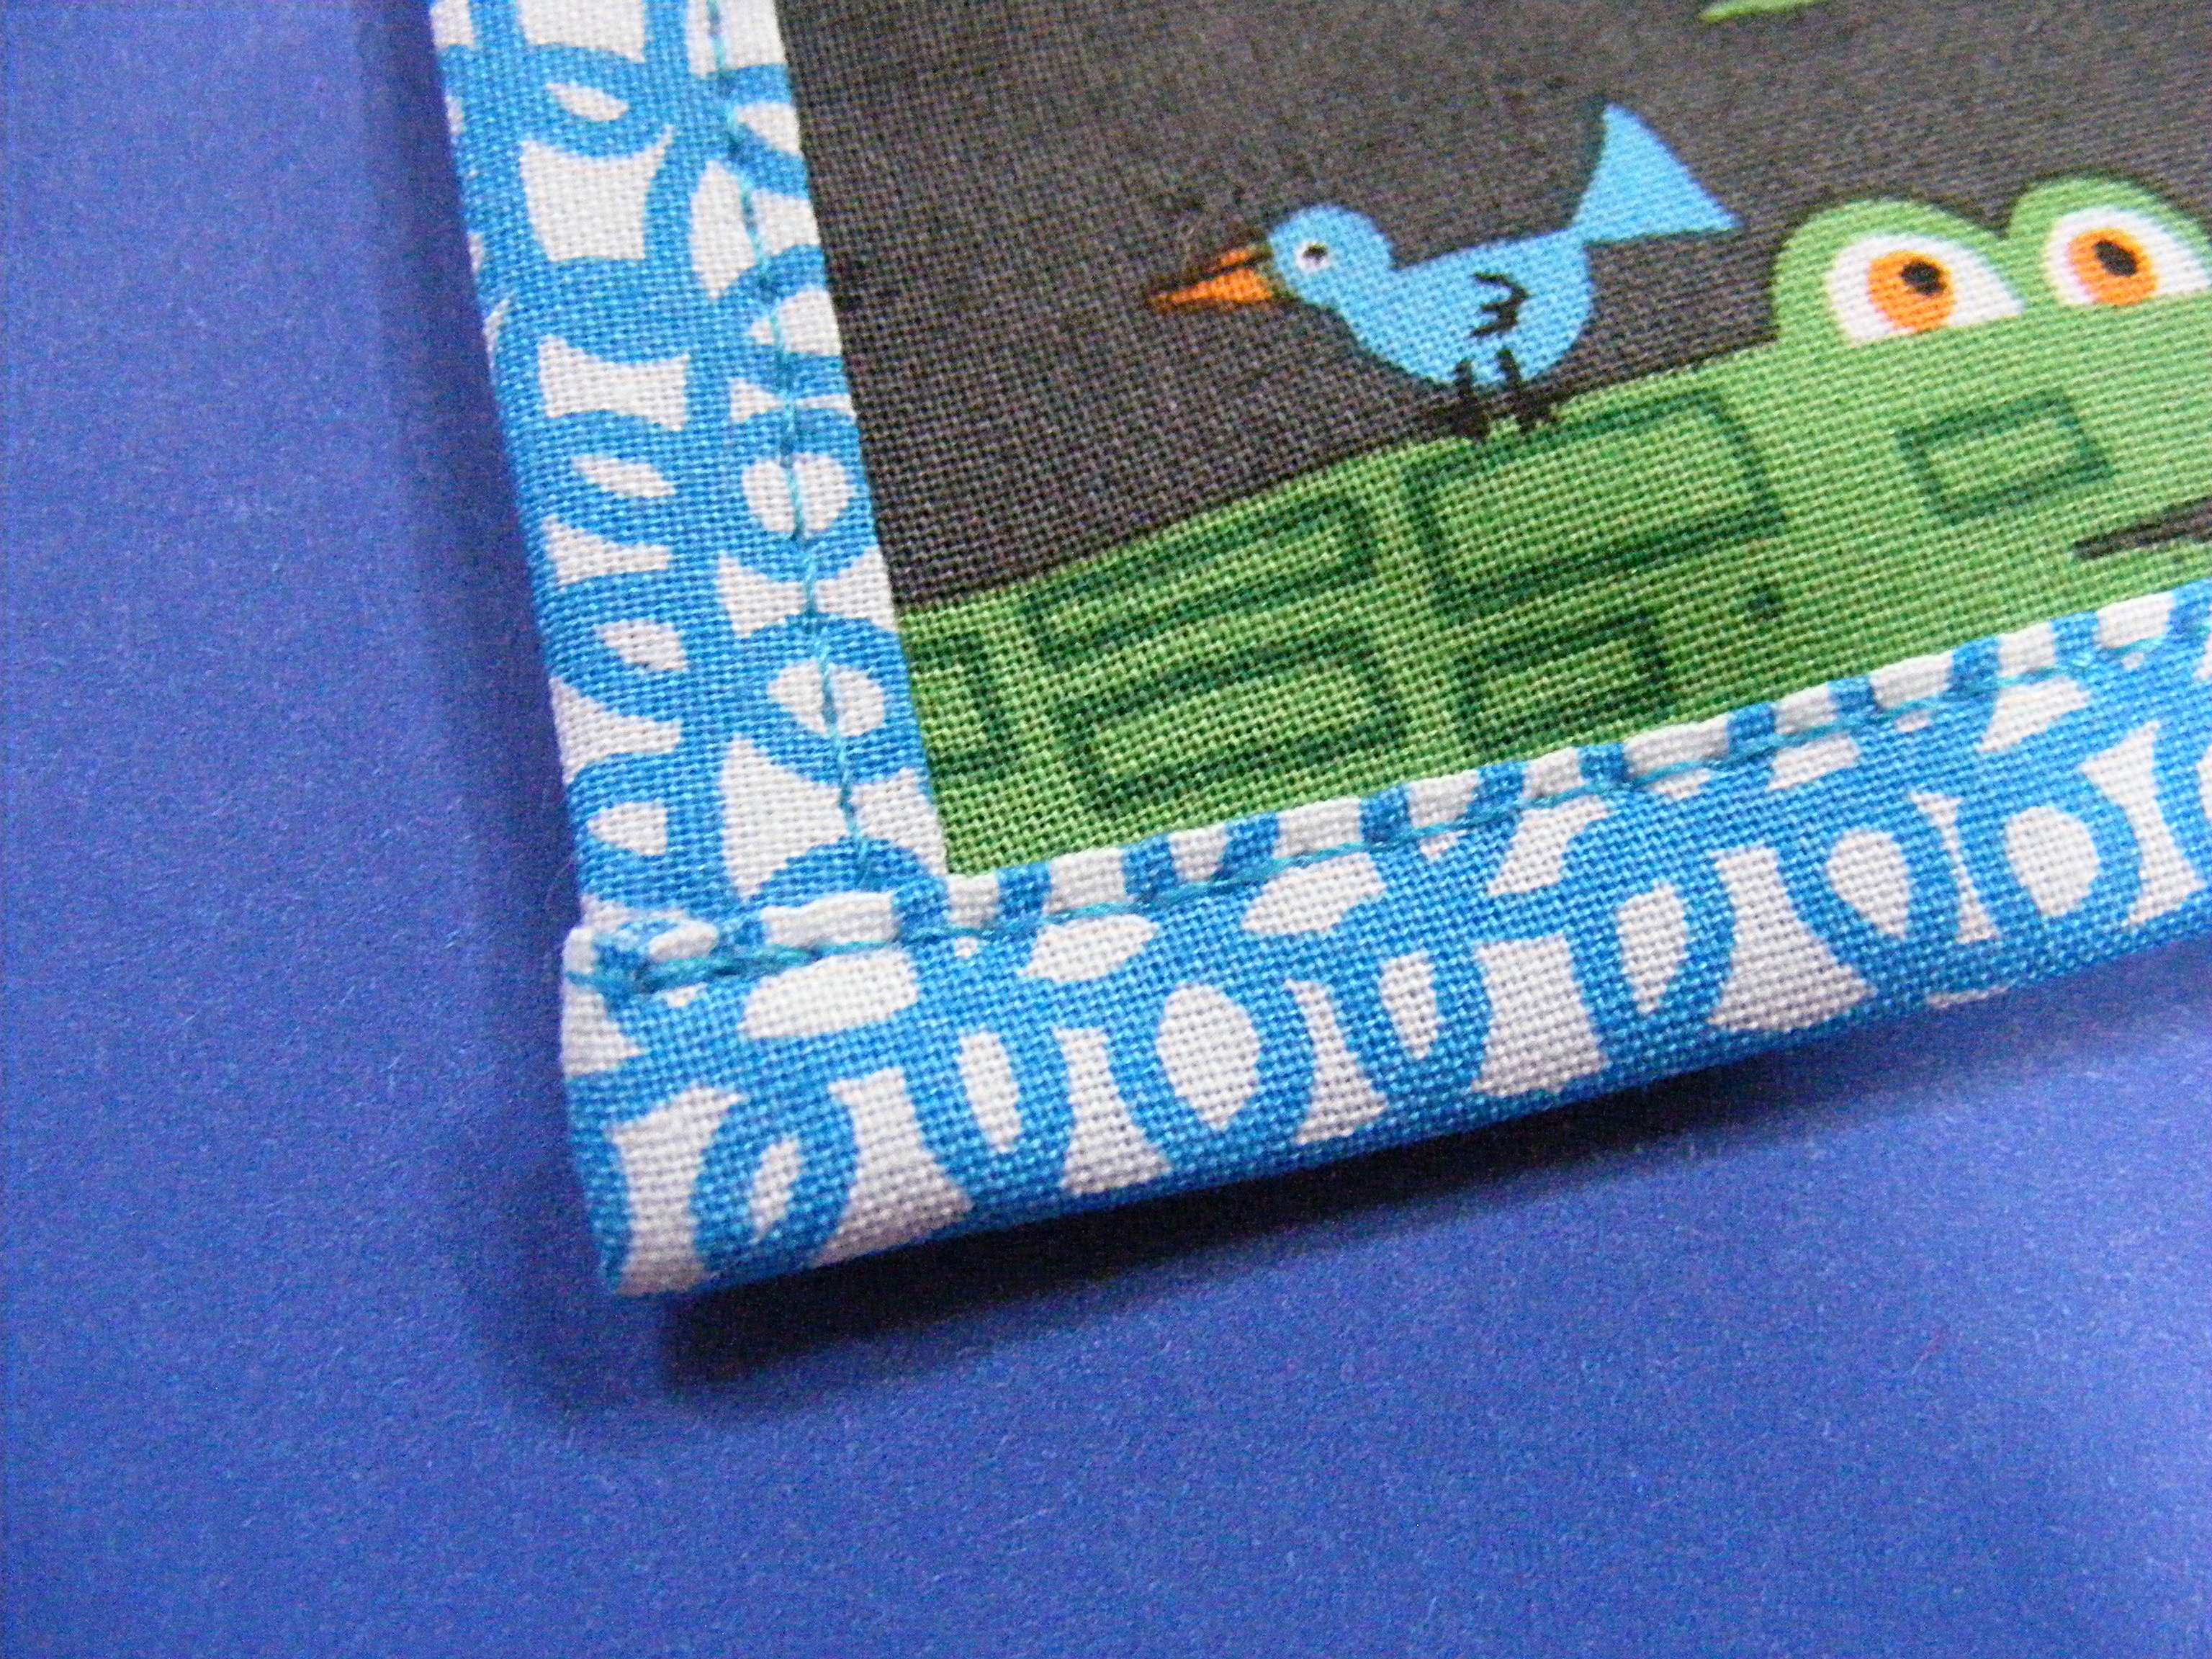
Applique the design to the block – being sure to line the lower edge of the applique up with the lower edge of the background block.
Add a backing to your wall hanging (I used spray adhesive to baste it to the batting) and outline your applique. Here’s a closer look at the placement and the outlining.
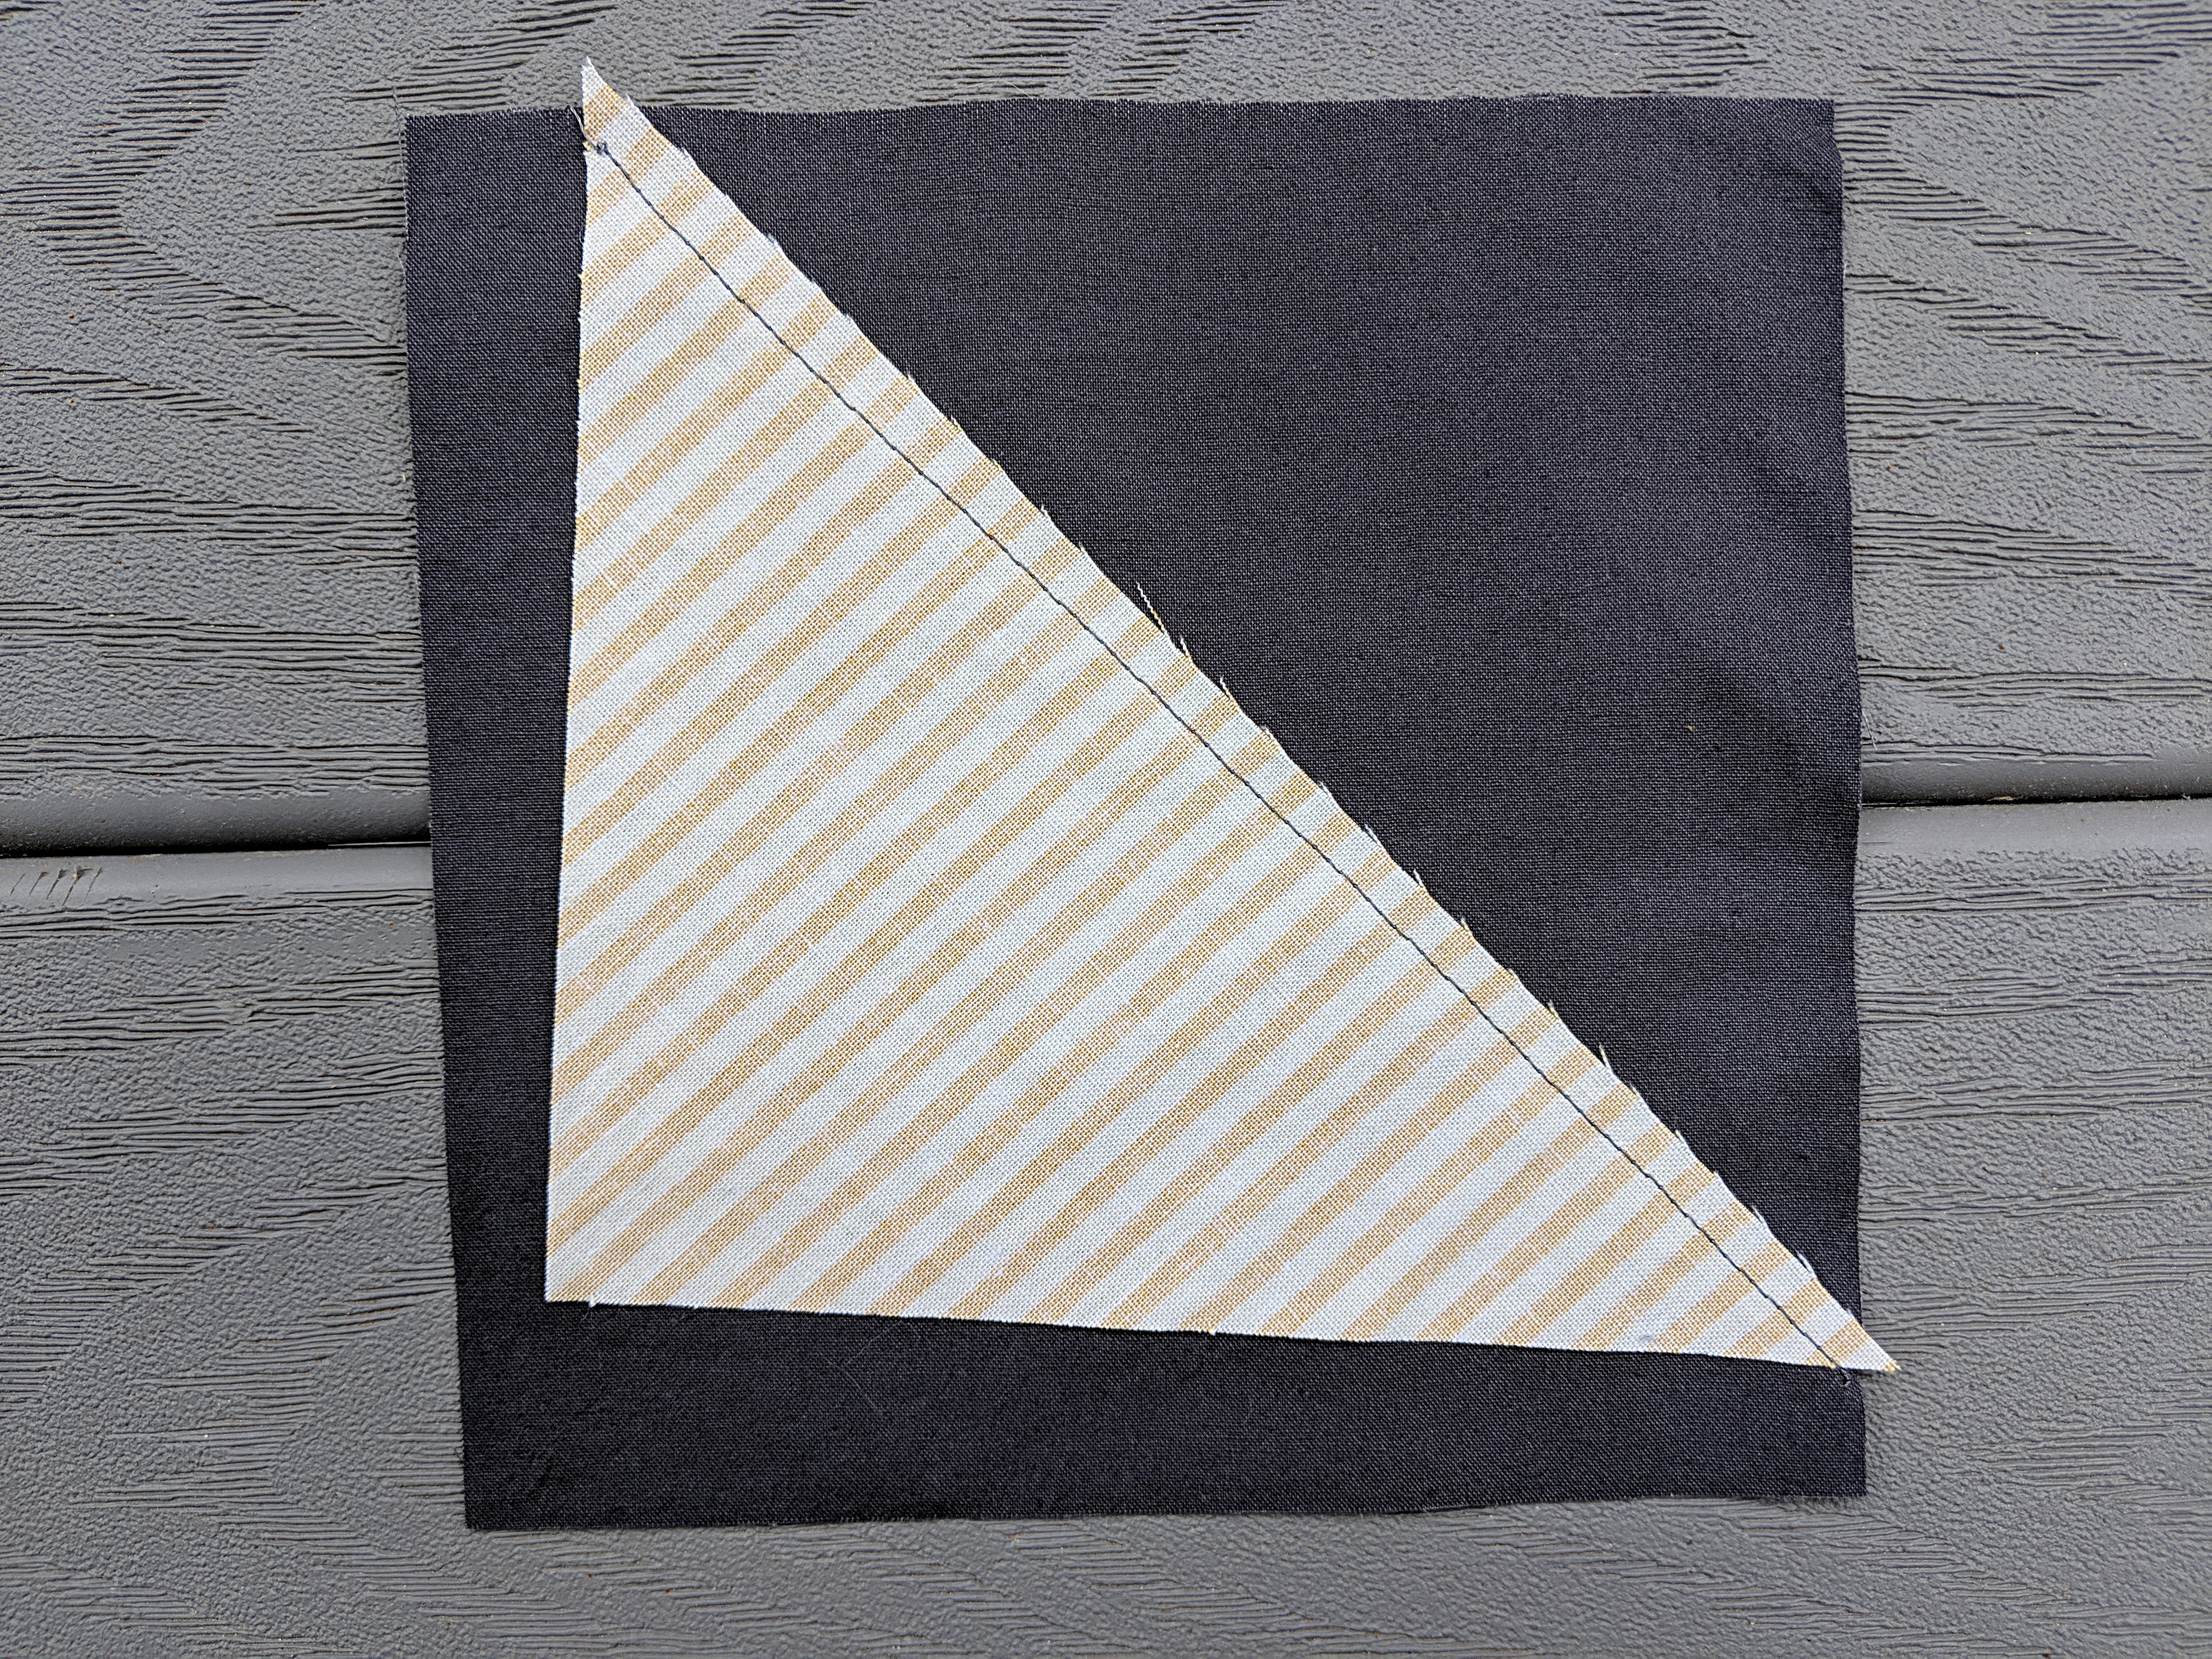
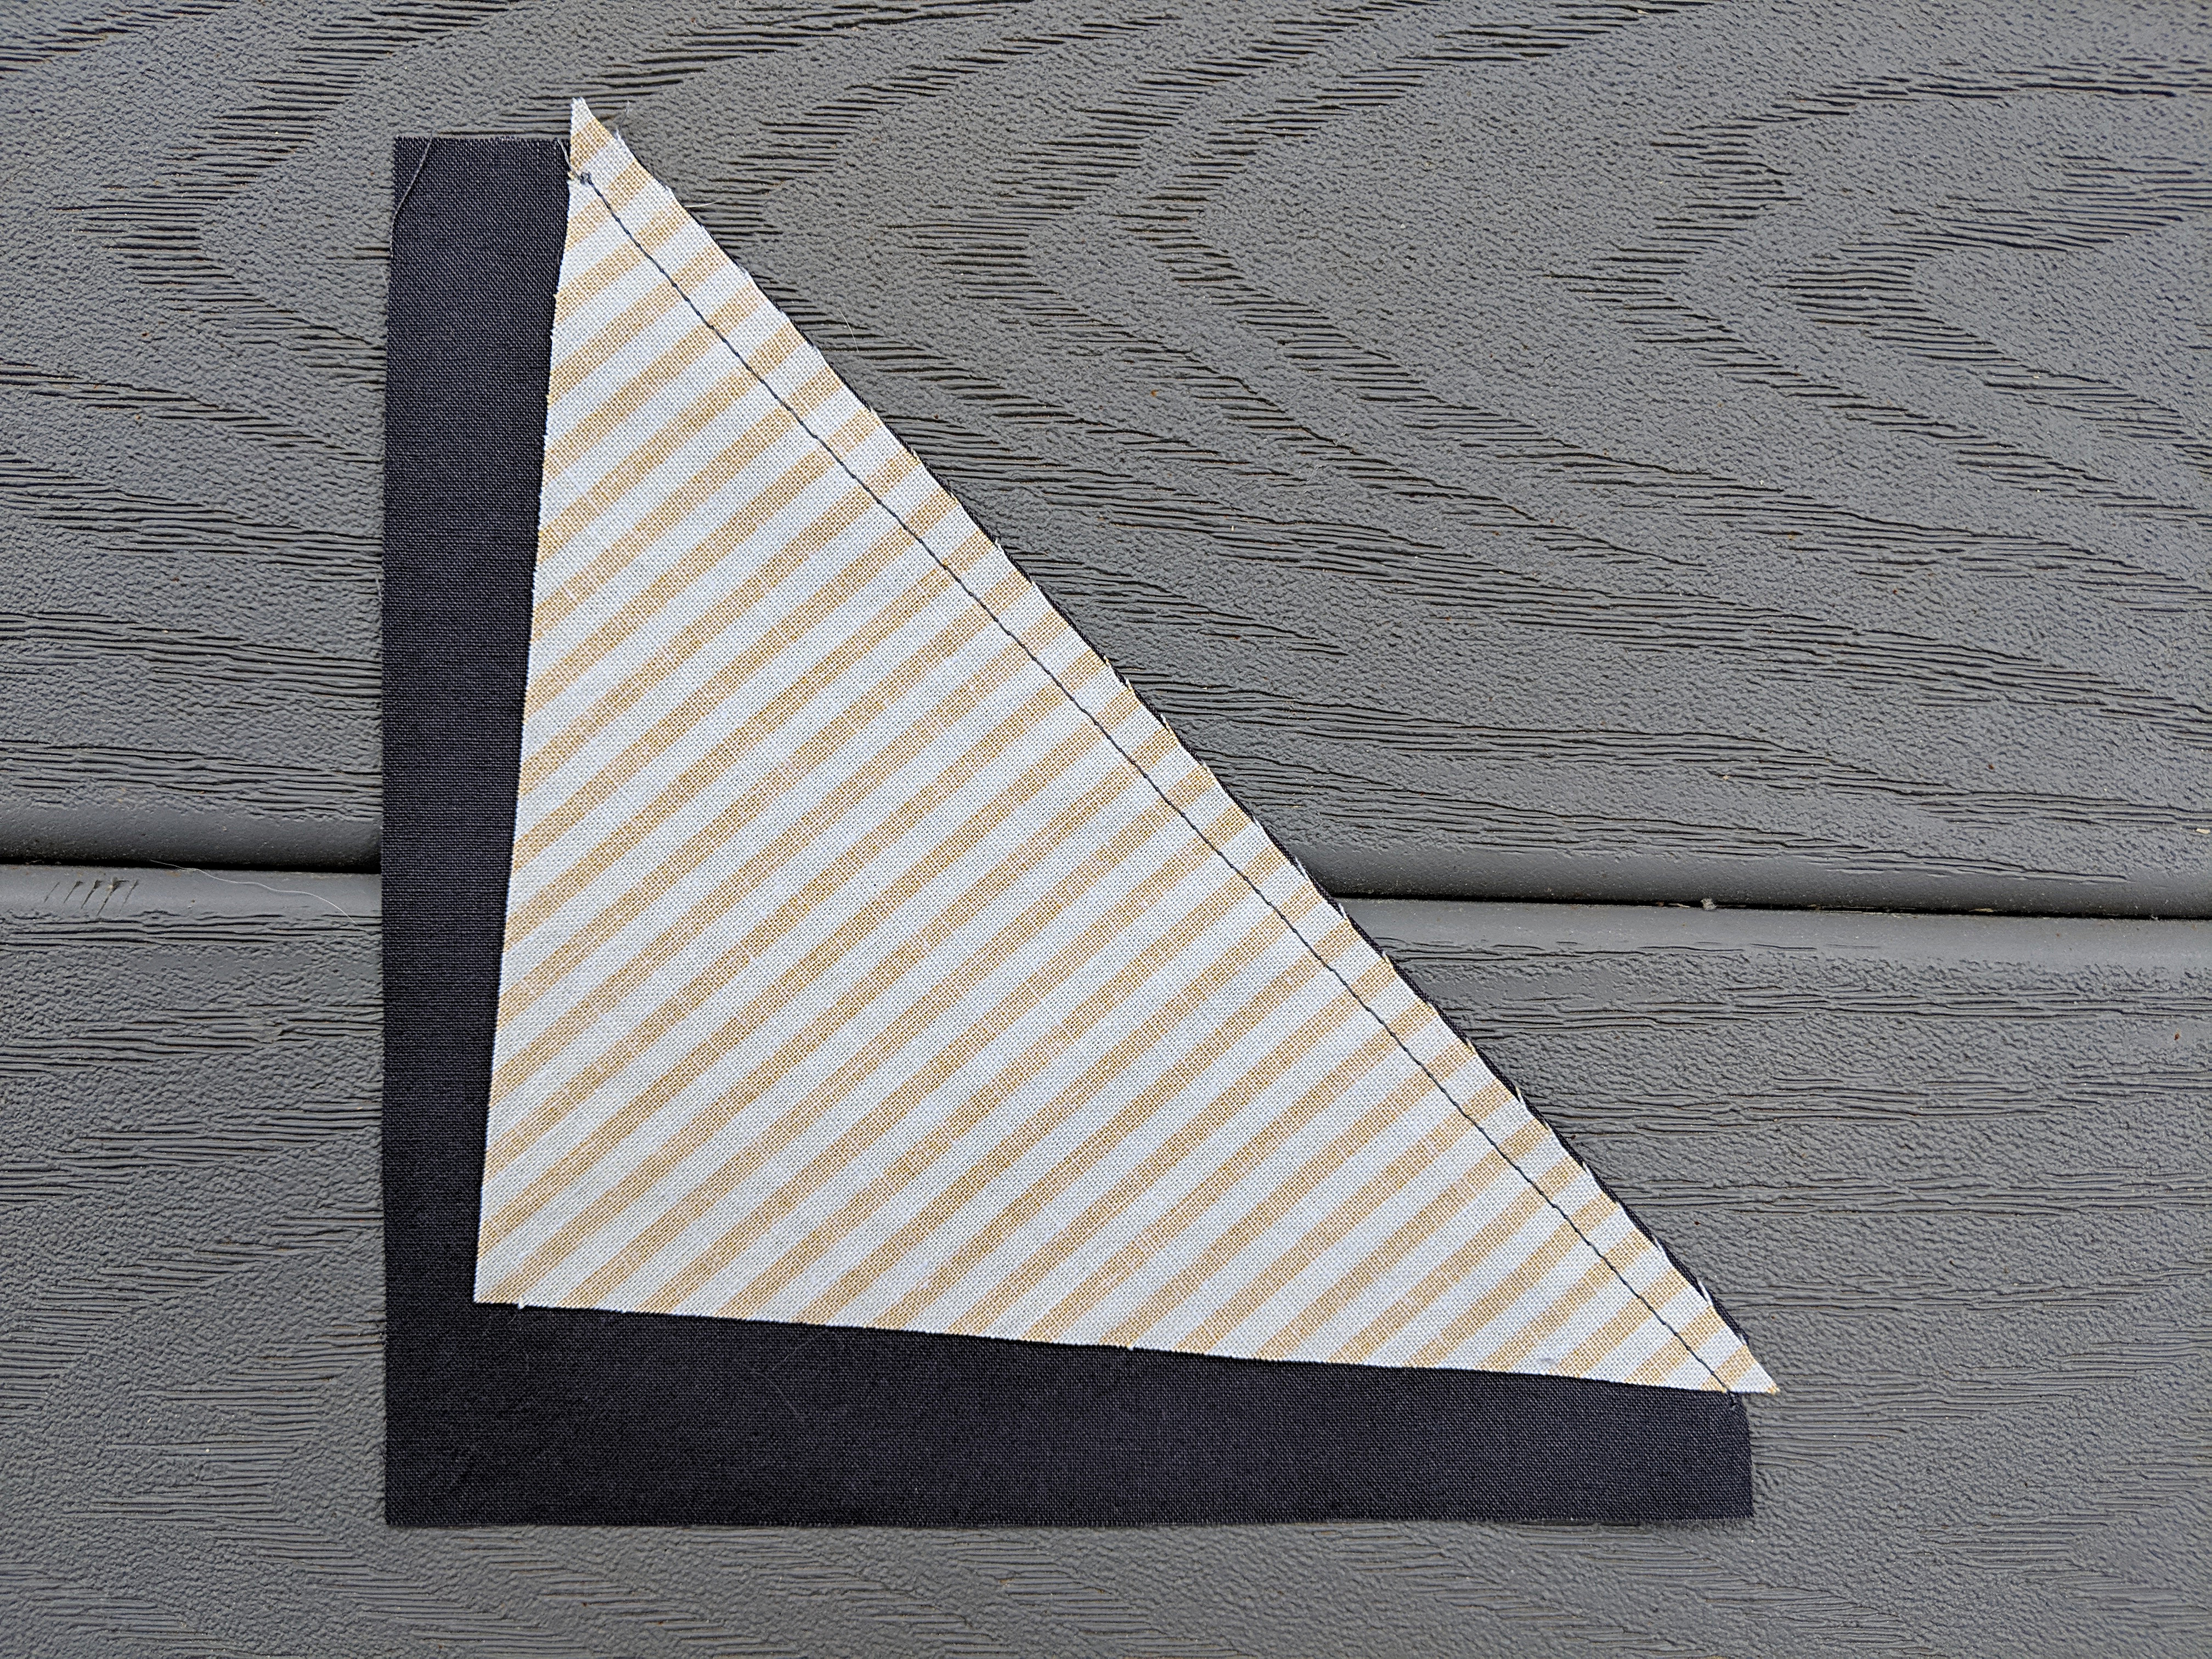
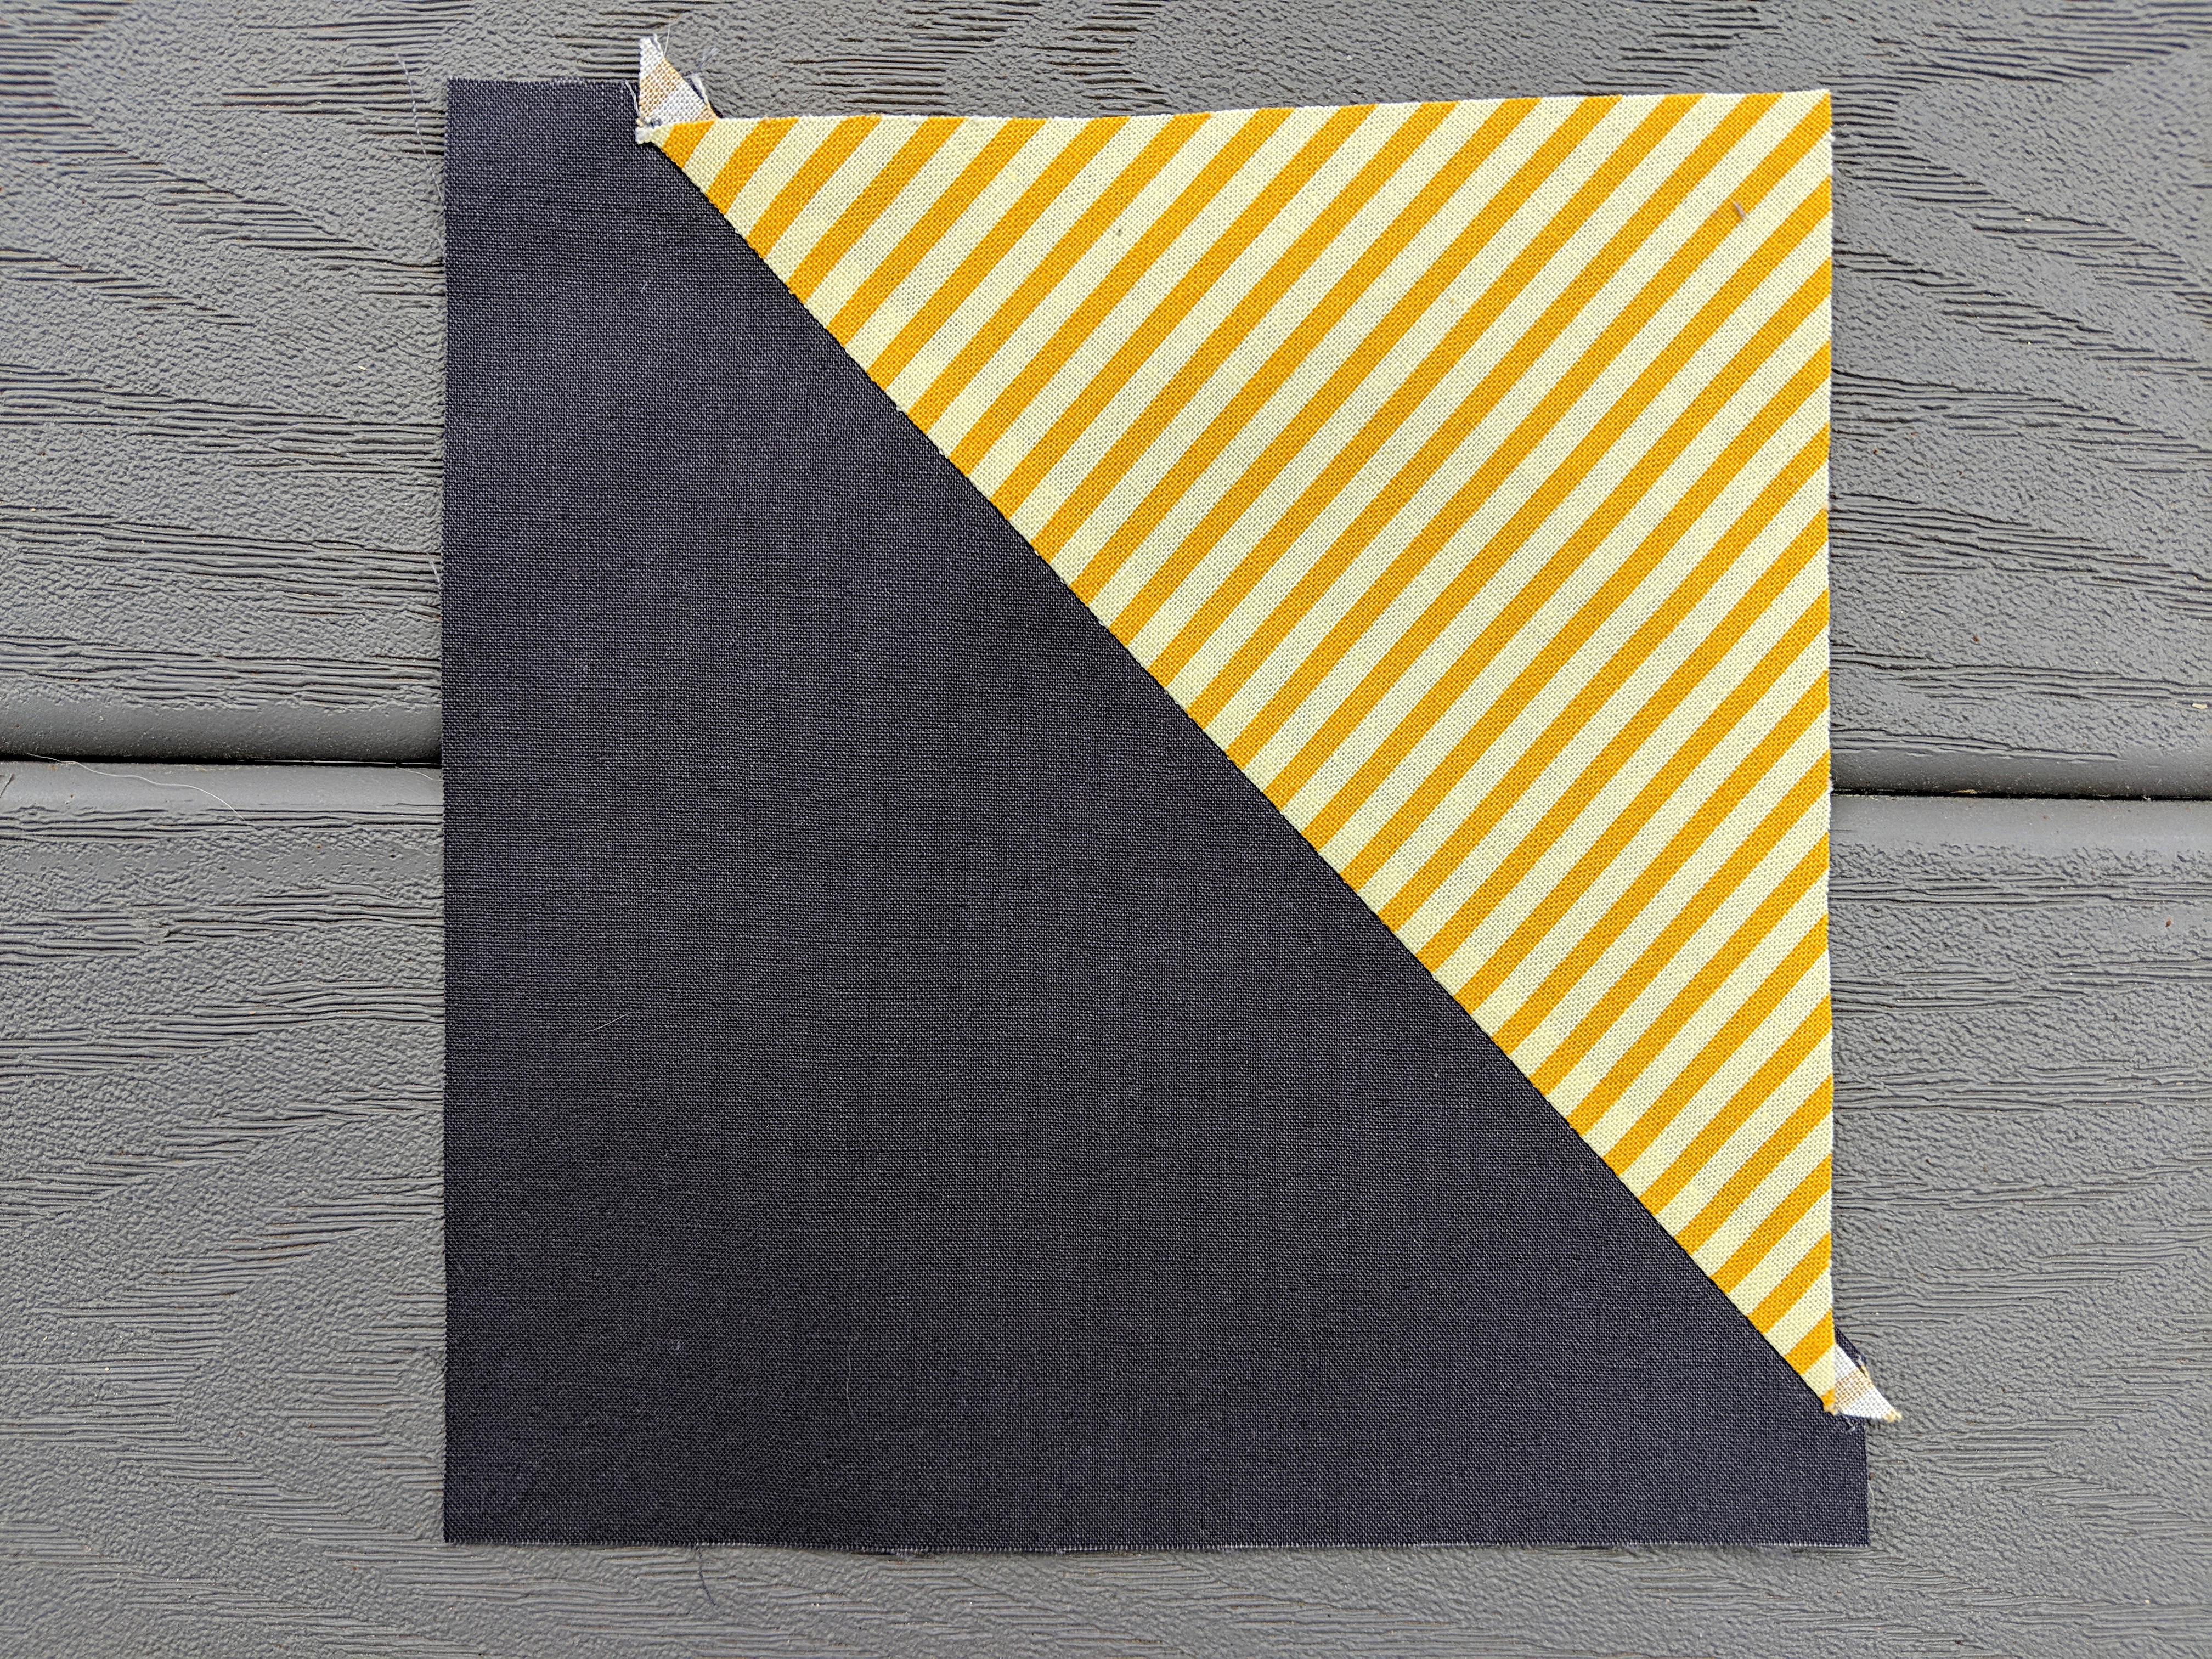
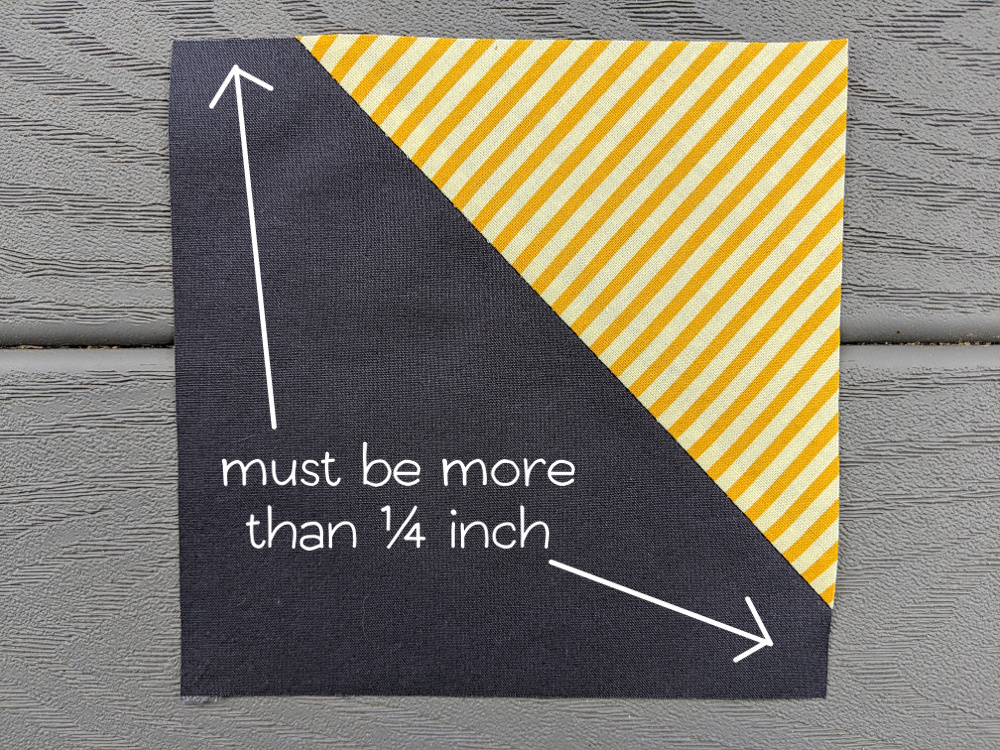
Cut four background corner pieces each 5 inches square. I used dark grey for mine.
Cut four right triangles with the legs (not the hypotenuse) anywhere between 4 and 5 inches long. The triangles should all be a little different.
Lay one triangle face down over the corner of one square, so that the points of the triangle (at each end of the hypotenuse) just hang over the edges of the square, as shown.
Sew the triangle to the square. Your seam allowance doesn’t need to be exactly 1/4 inch.
Make sure there is more than 1/4 inch between the points of the triangle and the edge of the background fabric square. That will make it impossible to accidentally chop off the points when you assemble the whole frame. 🙂 Yay for foolproof tricks!
Repeat for the other three squares, so you have the four corners of your churn dash block. The sizes and angles of the triangles should all be a little different.
Set them aside.
Step 6 – Preparing Background Rectangles
Cut four background strips 12 inches x 3 inches.
Cut four frame strips 12 inches x 2 1/2 inches.
Sew the frame strips to the background strips and then trim those rectangles down to 10 1/2 inches x 3 inches. Make the seam between the two strips go at a slight angle – and make all the angles a little different to make your finished block more interesting.
You can see my finished rectangles in the next step. See how some are wider than others? And they all slant a bit?
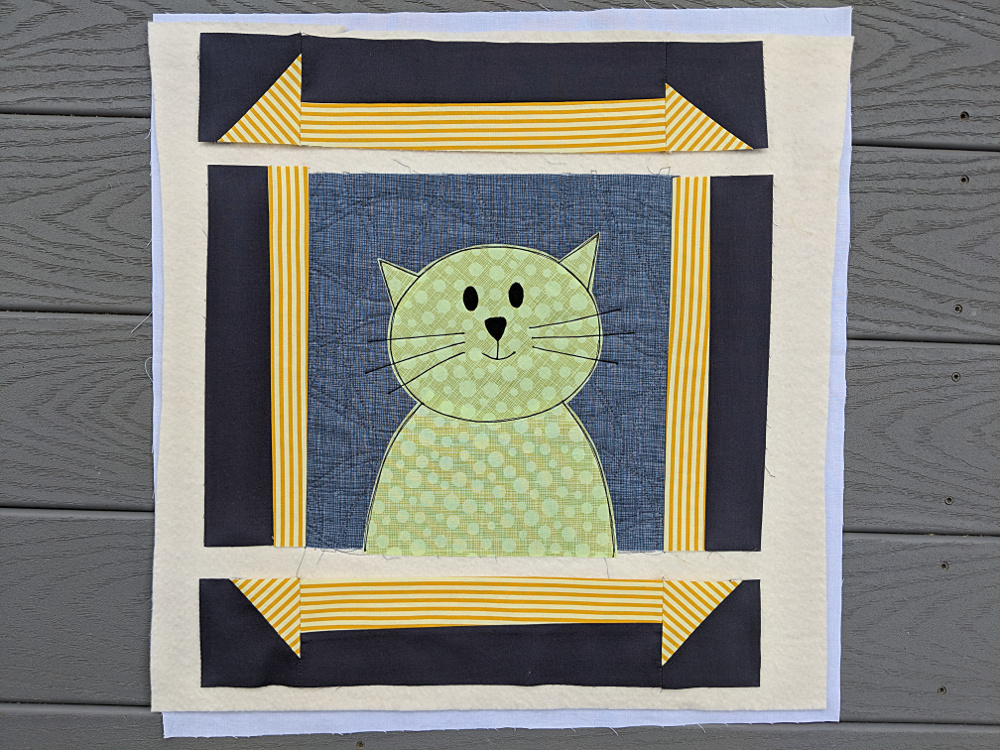
Step 7 – Laying Out the Churn Dash Block
Lay out all the churn dash components as shown.
Play around with the placement of the frame pieces until you’re happy with how things look.
Step 8 – Sew the Side Rectangles
Sew the side pieces of the frame to the sides of the block, sewing through the batting and backing too. For this and the rest of the project it’s important to use an accurate 1/4 inch seam allowance.
Press the side pieces open.
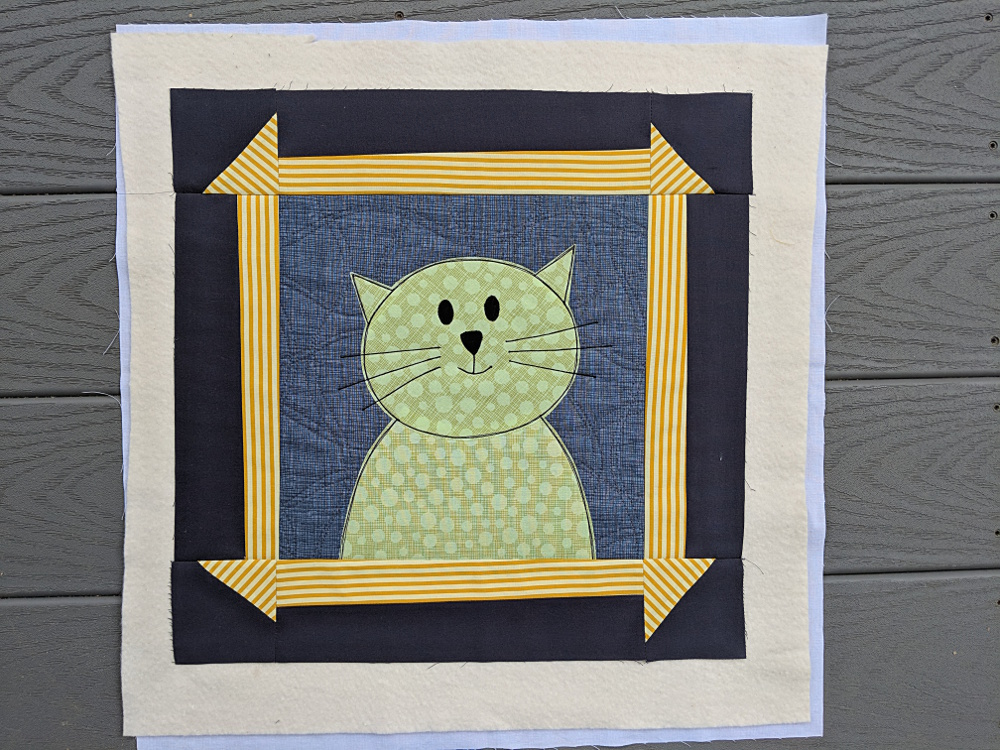
Step 9 – Sew the Top and Bottom Strips
Sew together the corners and strips for the top and bottom rows of the frame.
Press your seams in toward the strips – away from the corner triangles.
Step 10 – Finich Sewing the Churn Dash Block
Sew the top and bottom rows to the center of the block, being careful to line up the seams.
Press the whole block flat.
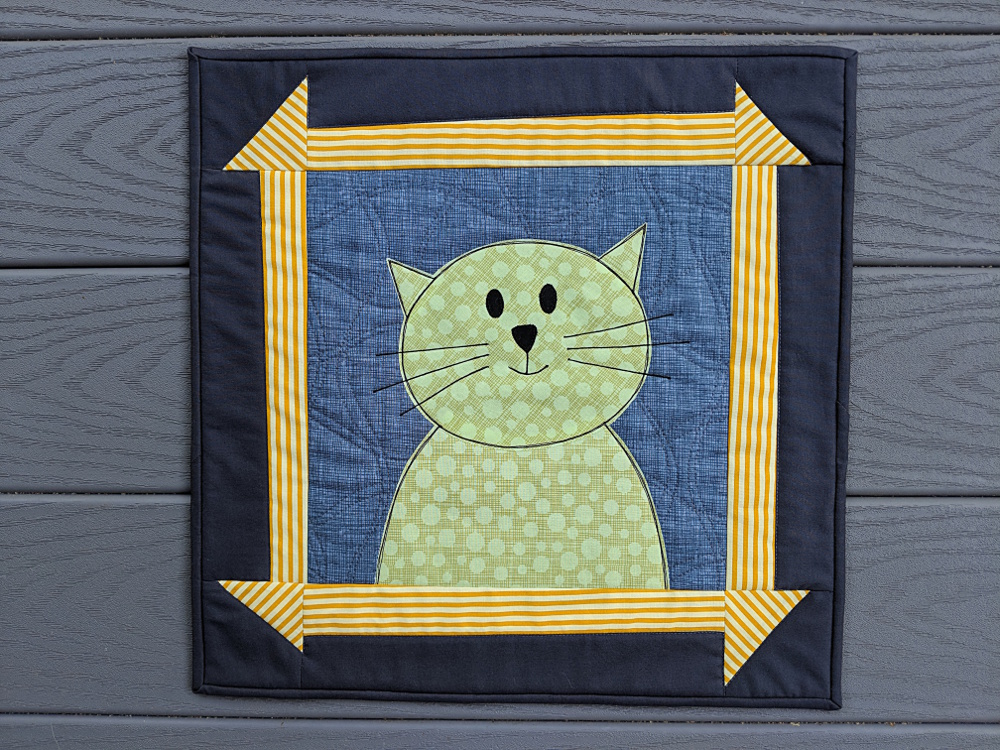
Step 11 – Quilt, Trim, and Bind
Quilt the frame if you want to. (It doesn’t need it structurally, so just do it for looks if you like.) I stitched in the ditch around the outside edge of the frame and that’s it.
Trim away the excess batting around the edges and bind your mini quilt.
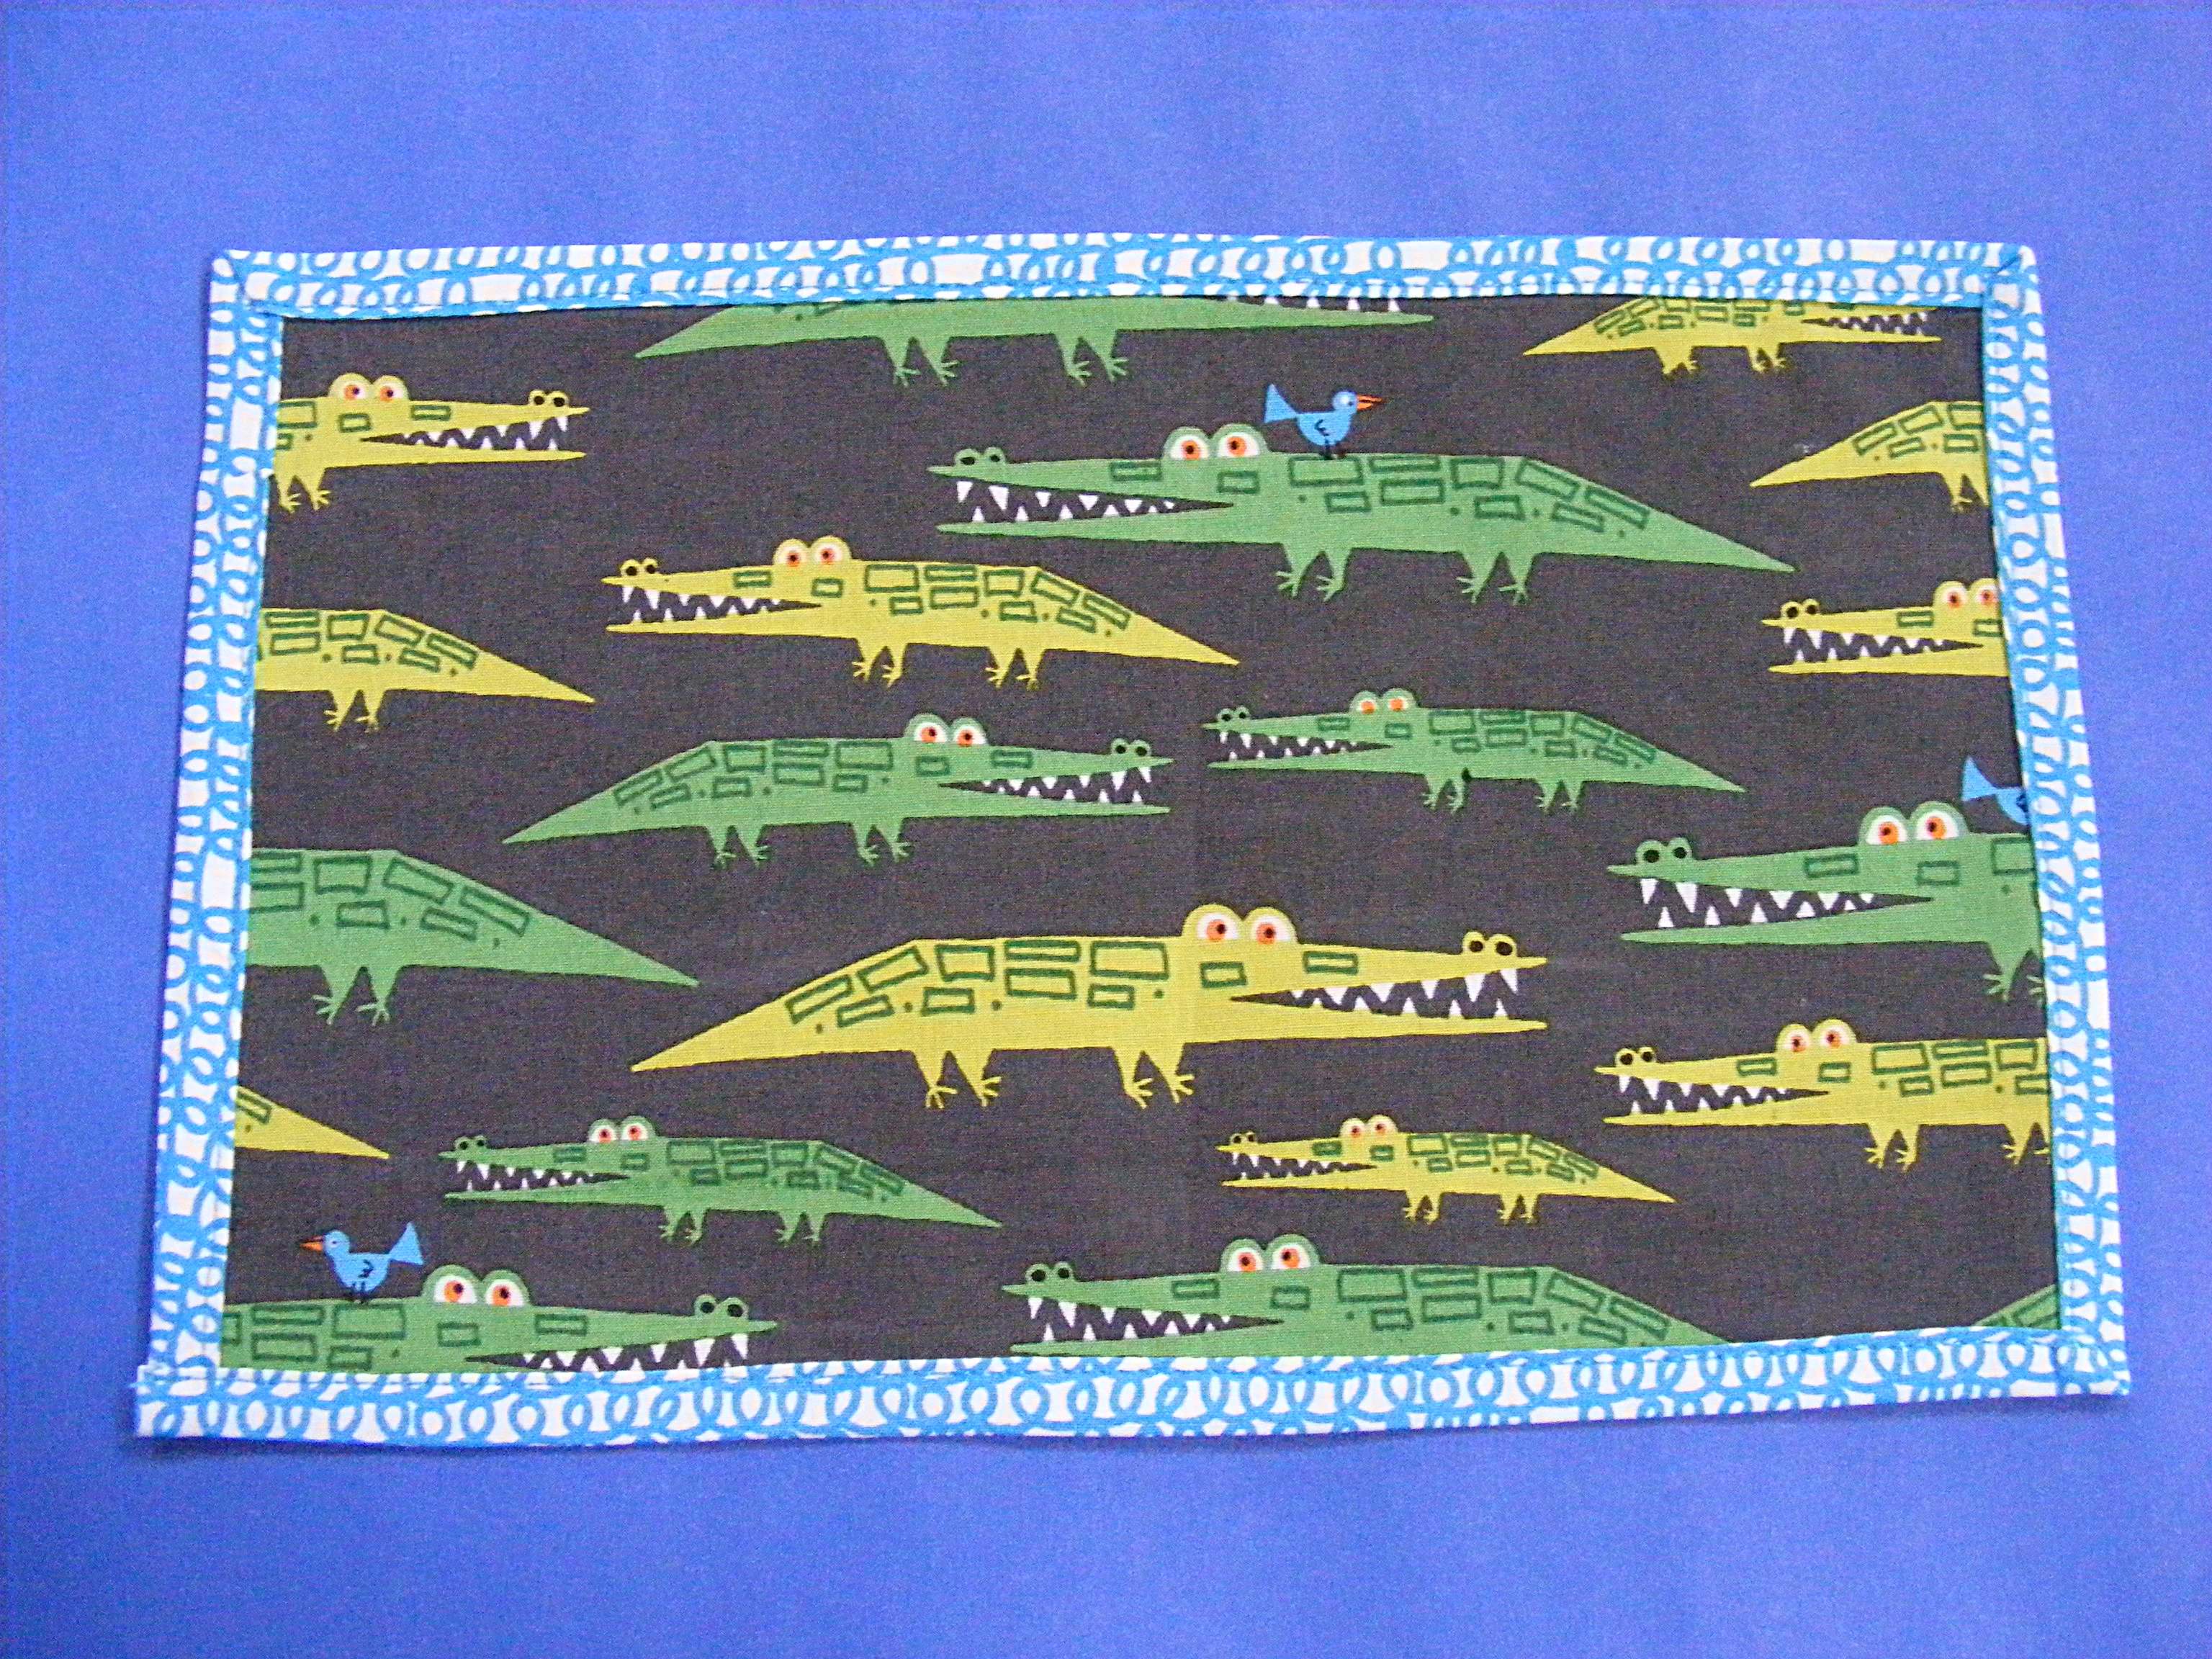
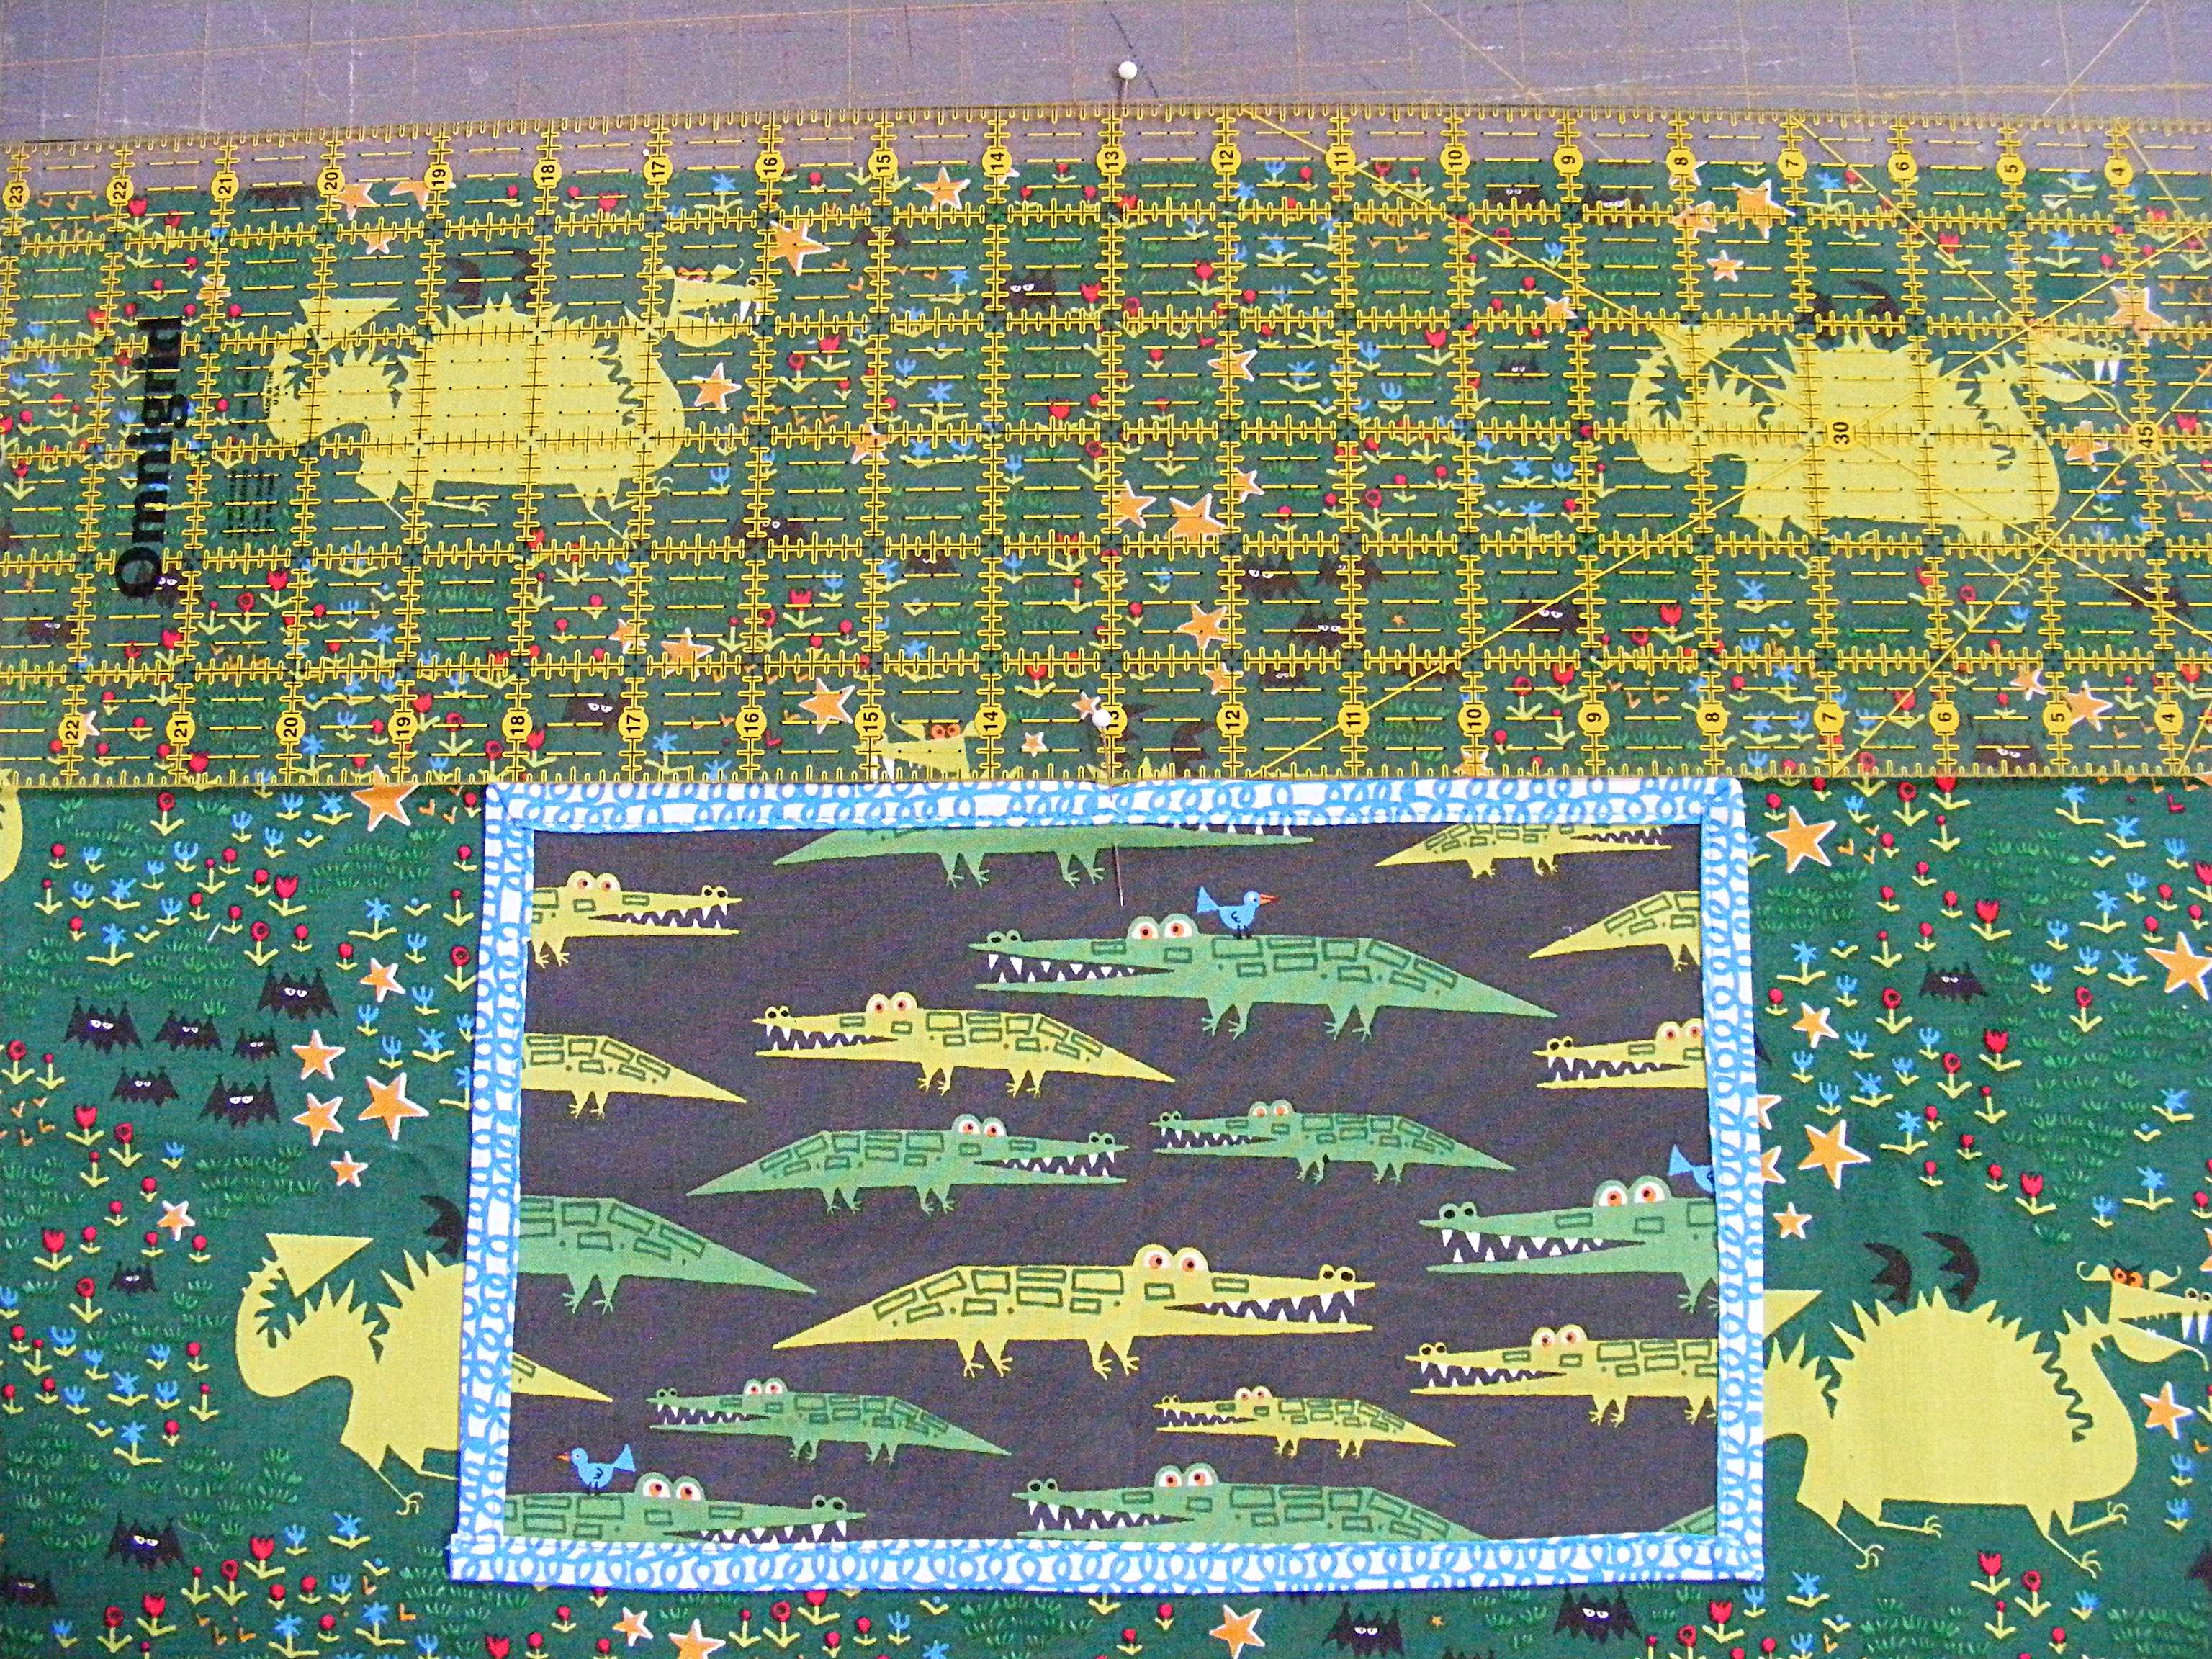
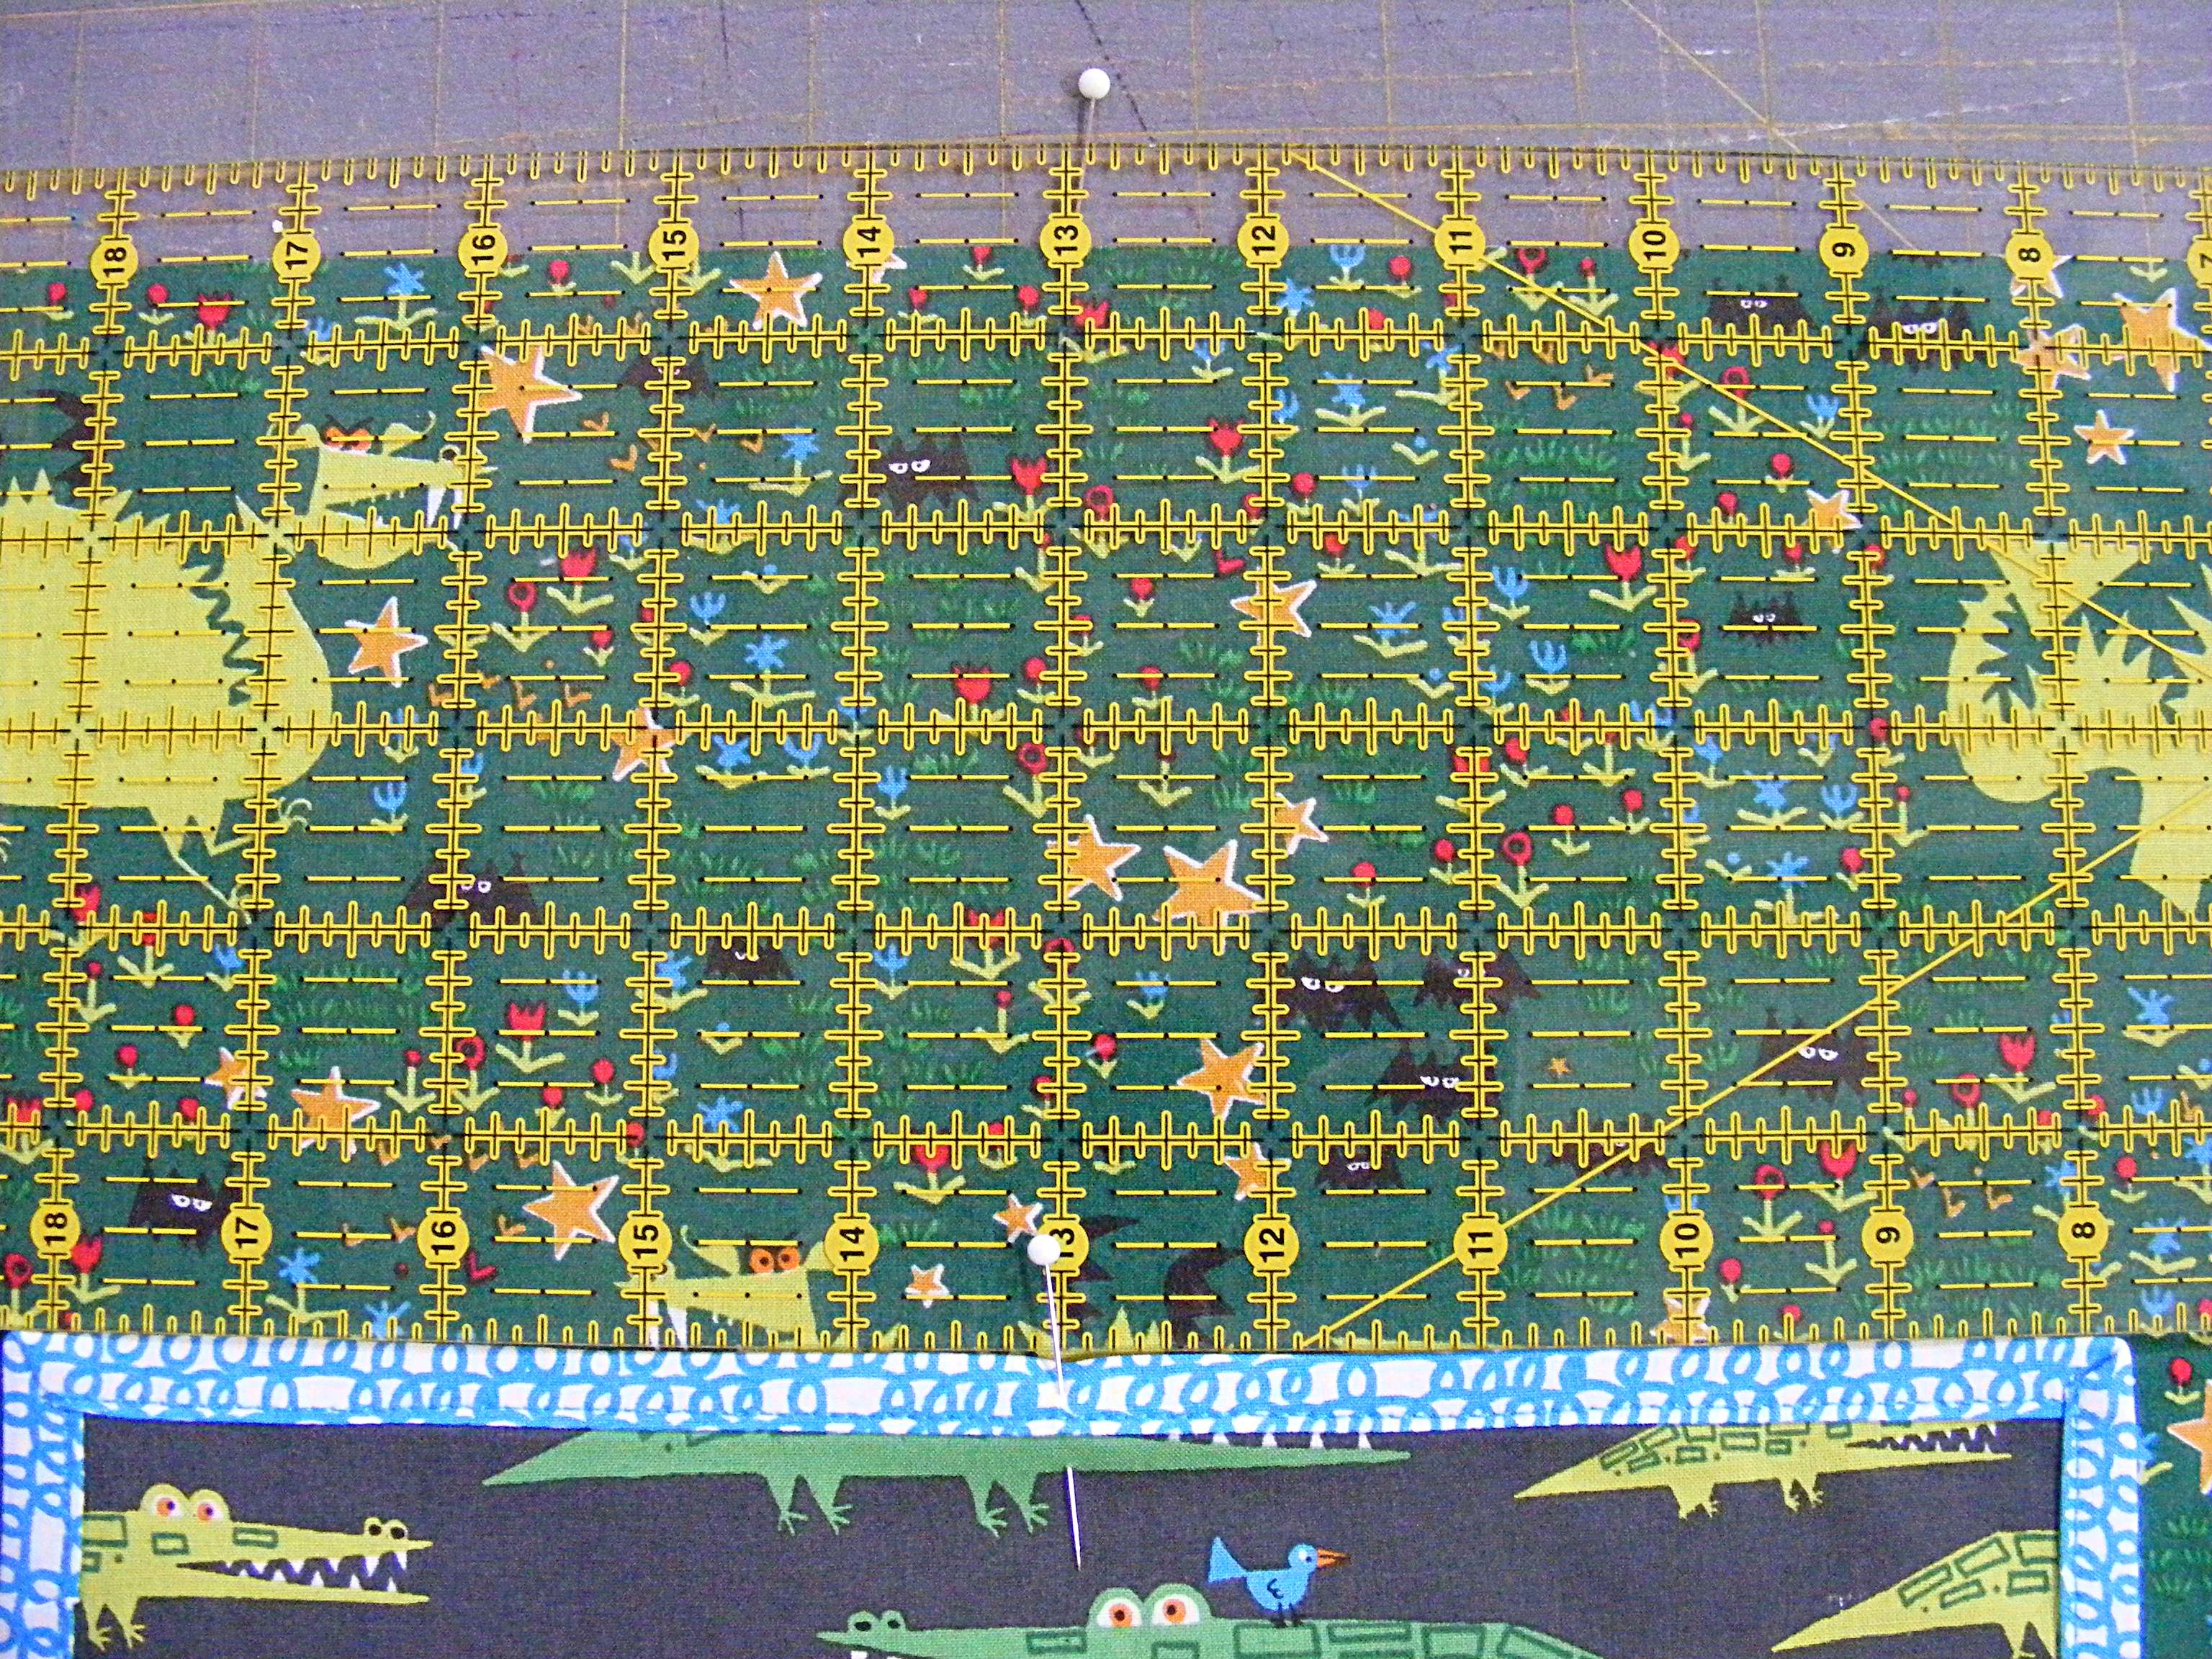
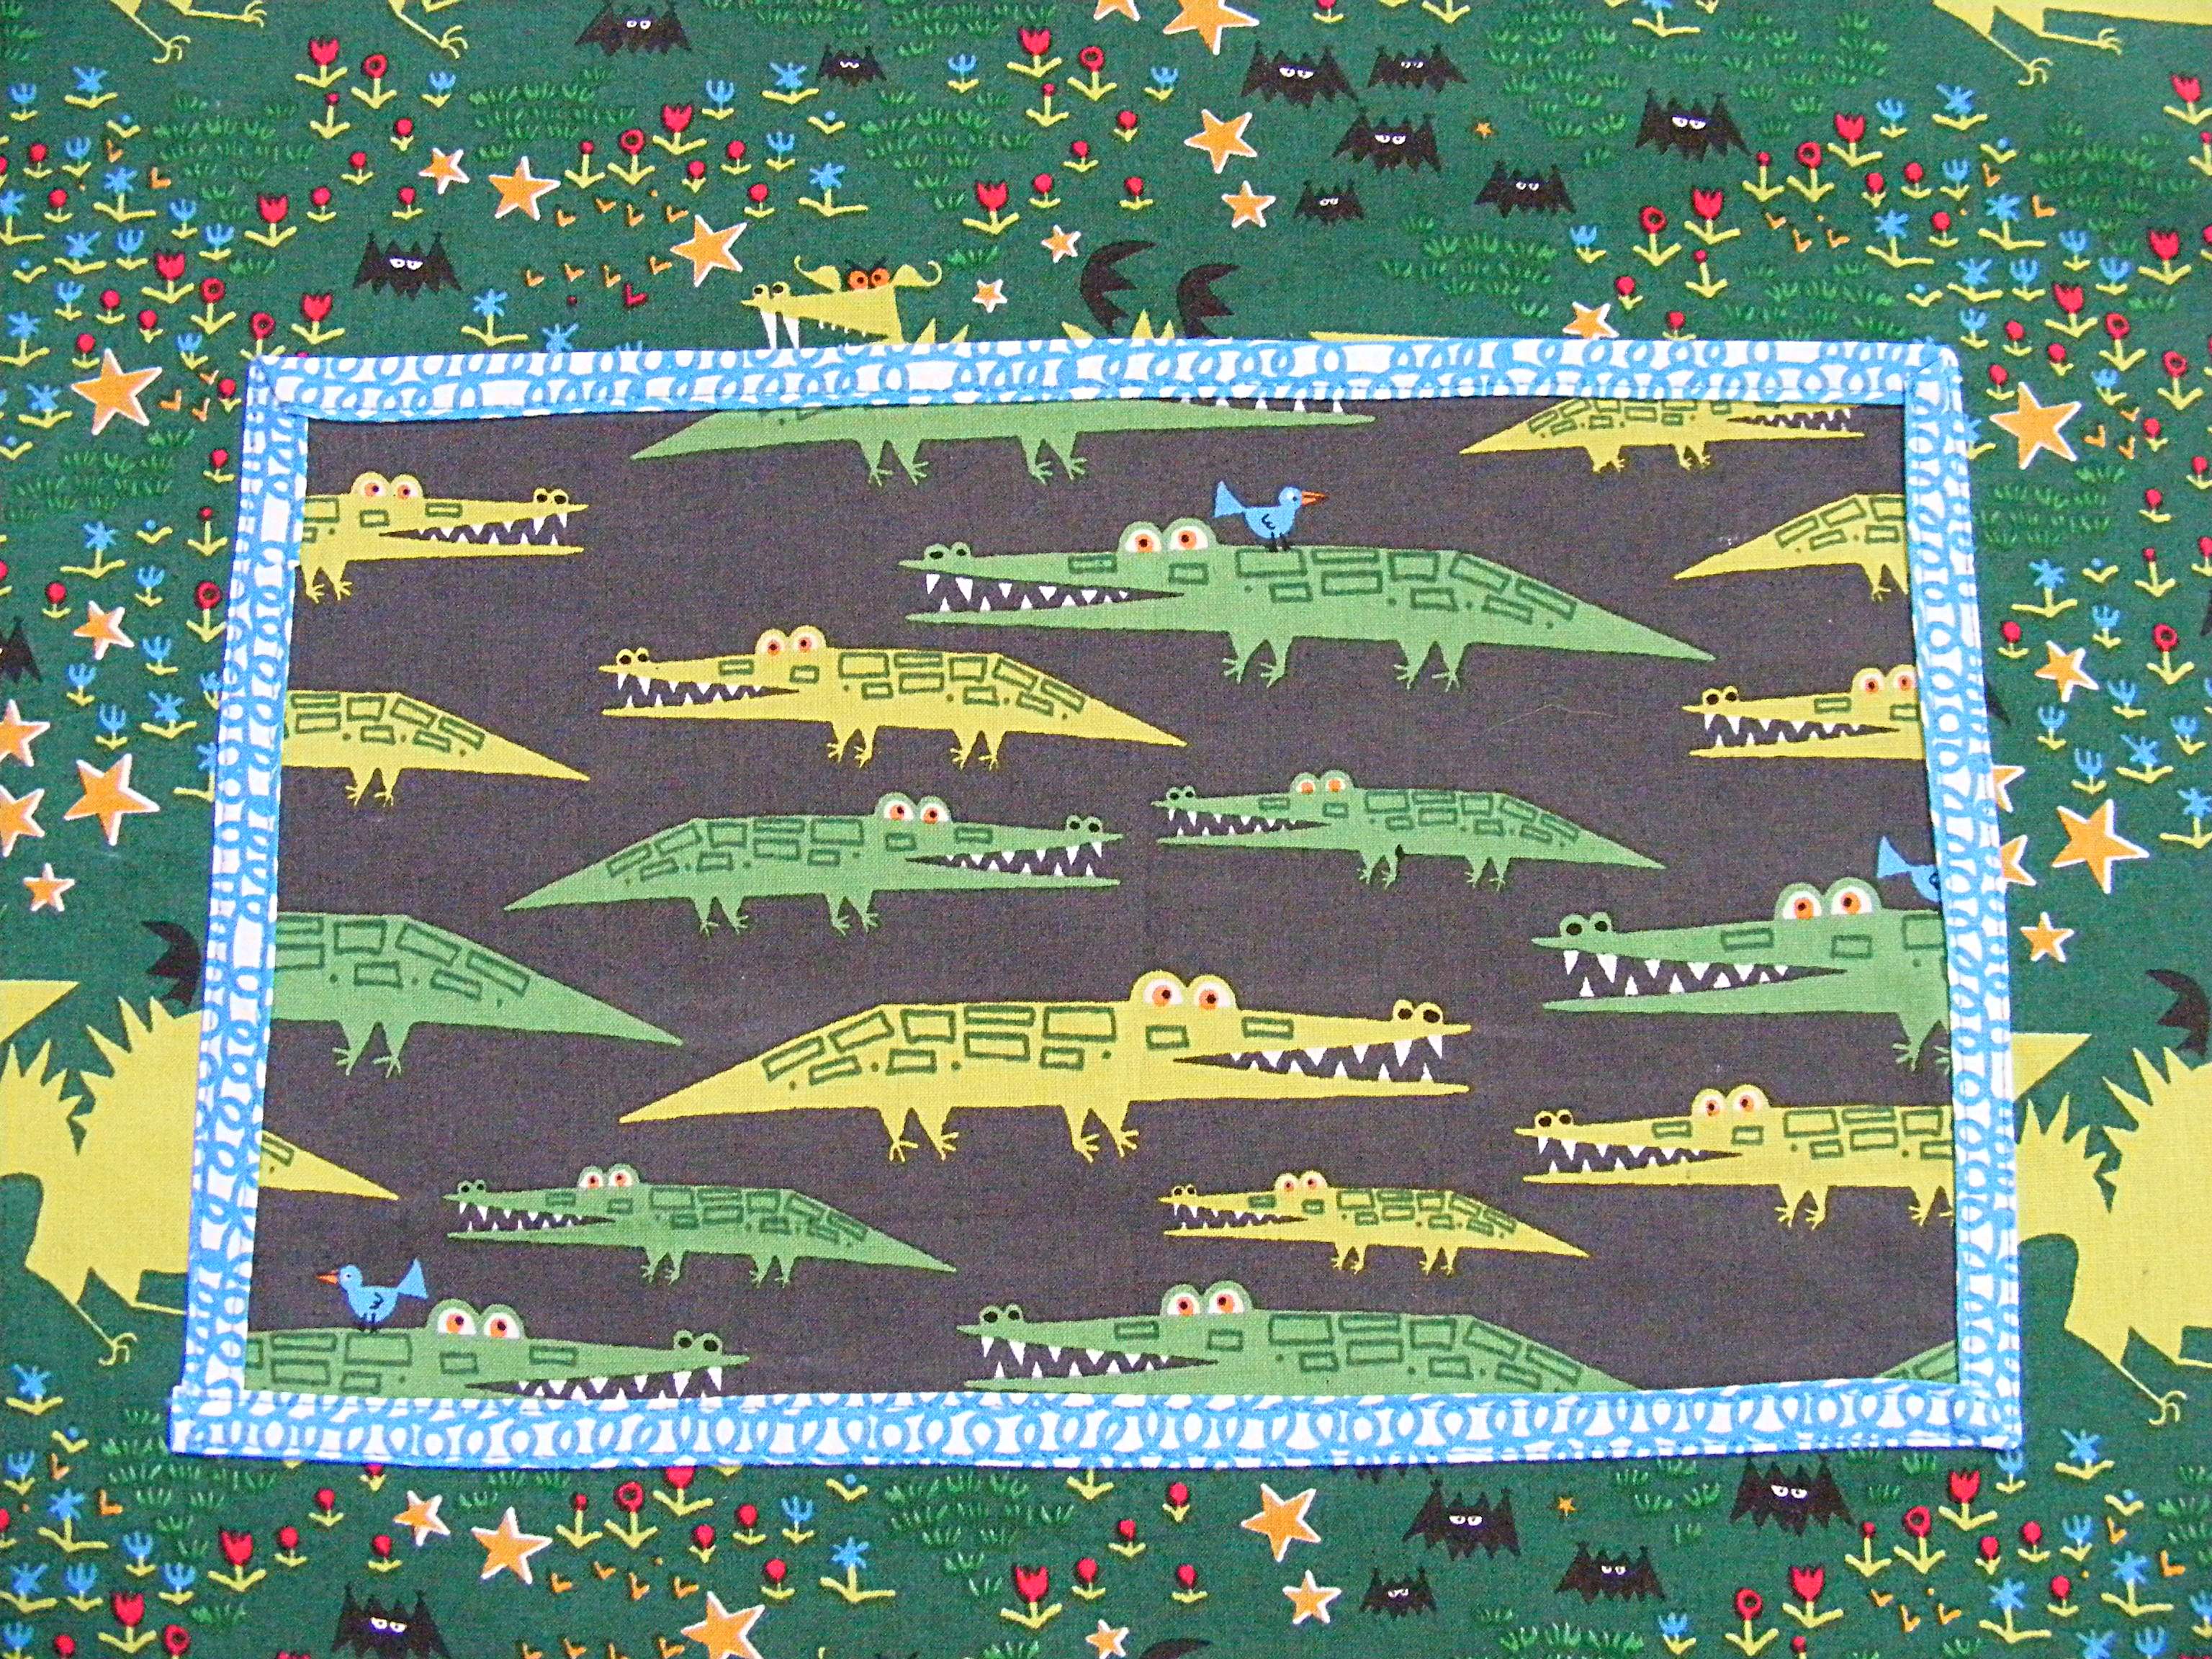
Here are several free patterns that work with just some simple resizing. This post about making coasters has info about resizing an applique pattern that can be applied to any of these projects.
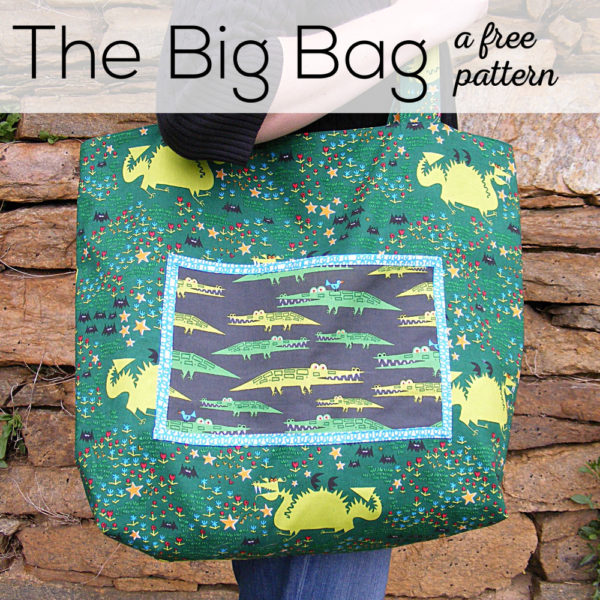
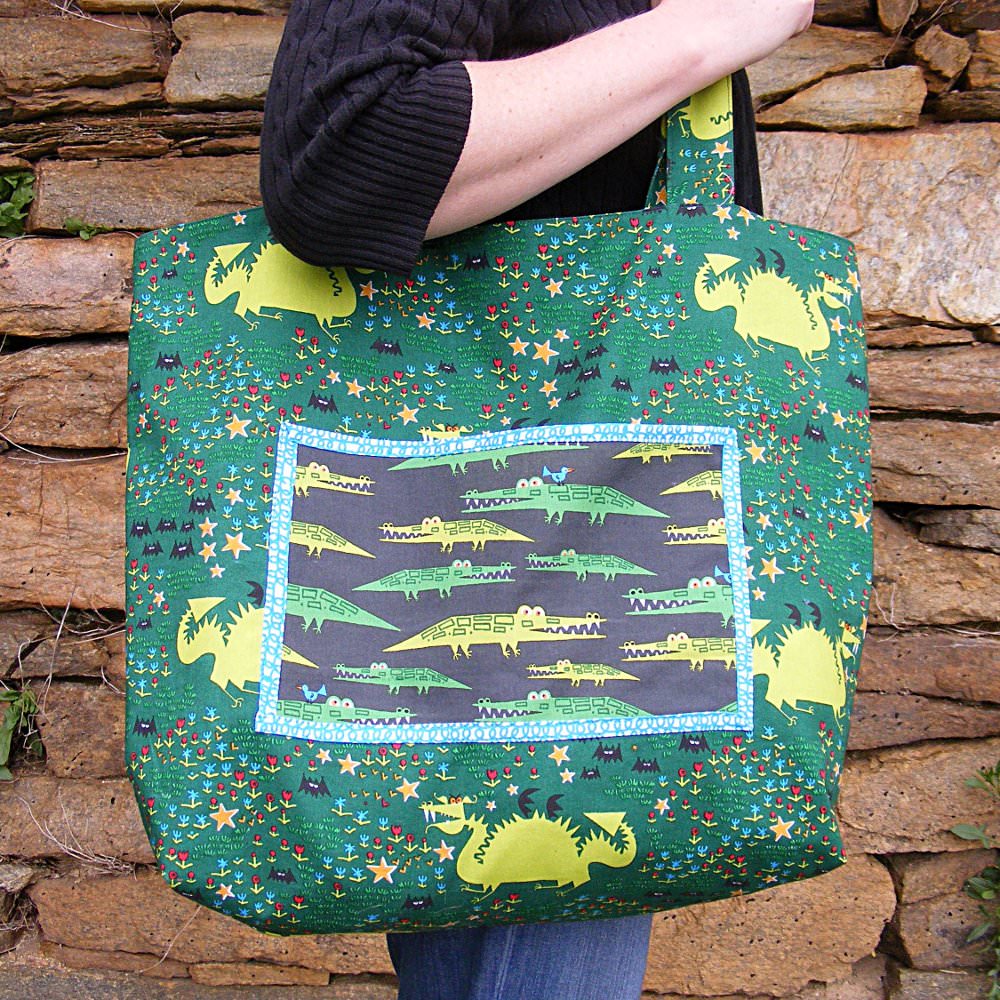
Here’s a free pattern for my favorite large tote bag.
I LOVE this roomy bag!
This one hangs in my studio to hold packages ready to ship, but I also have a few that I take grocery shopping and to the farmer’s market.
I’m a big fan of reusable bags for grocery shopping, but a lot of them are on the small side. I need something that will hold more than one bag of chips! Or one of those big bags of grapefruit! This large tote bag fits the bill exactly – and you can’t beat a free pattern!
Materials
two fat quarters of the main fabric
two fat quarters of the lining fabric
1/3 yard fabric for straps
scraps of fabric for pocket and pocket binding
Cut Out All the Pieces
These straight edges are great to cut with a rotary cutter. If you’ve never used these tools before, here’s a video showing how.
Main bag – cut two pieces, each 21 inches wide x 18 inches tall
Lining - cut two pieces, each 21 inches wide x 18 inches tall
Straps - cut two strips 6 inches wide x 28 inches long
Pocket - cut one piece 11 inches wide x 6 1/2 inches tall
Pocket binding - cut one piece 1 1/2 inches wide x 40 inches long
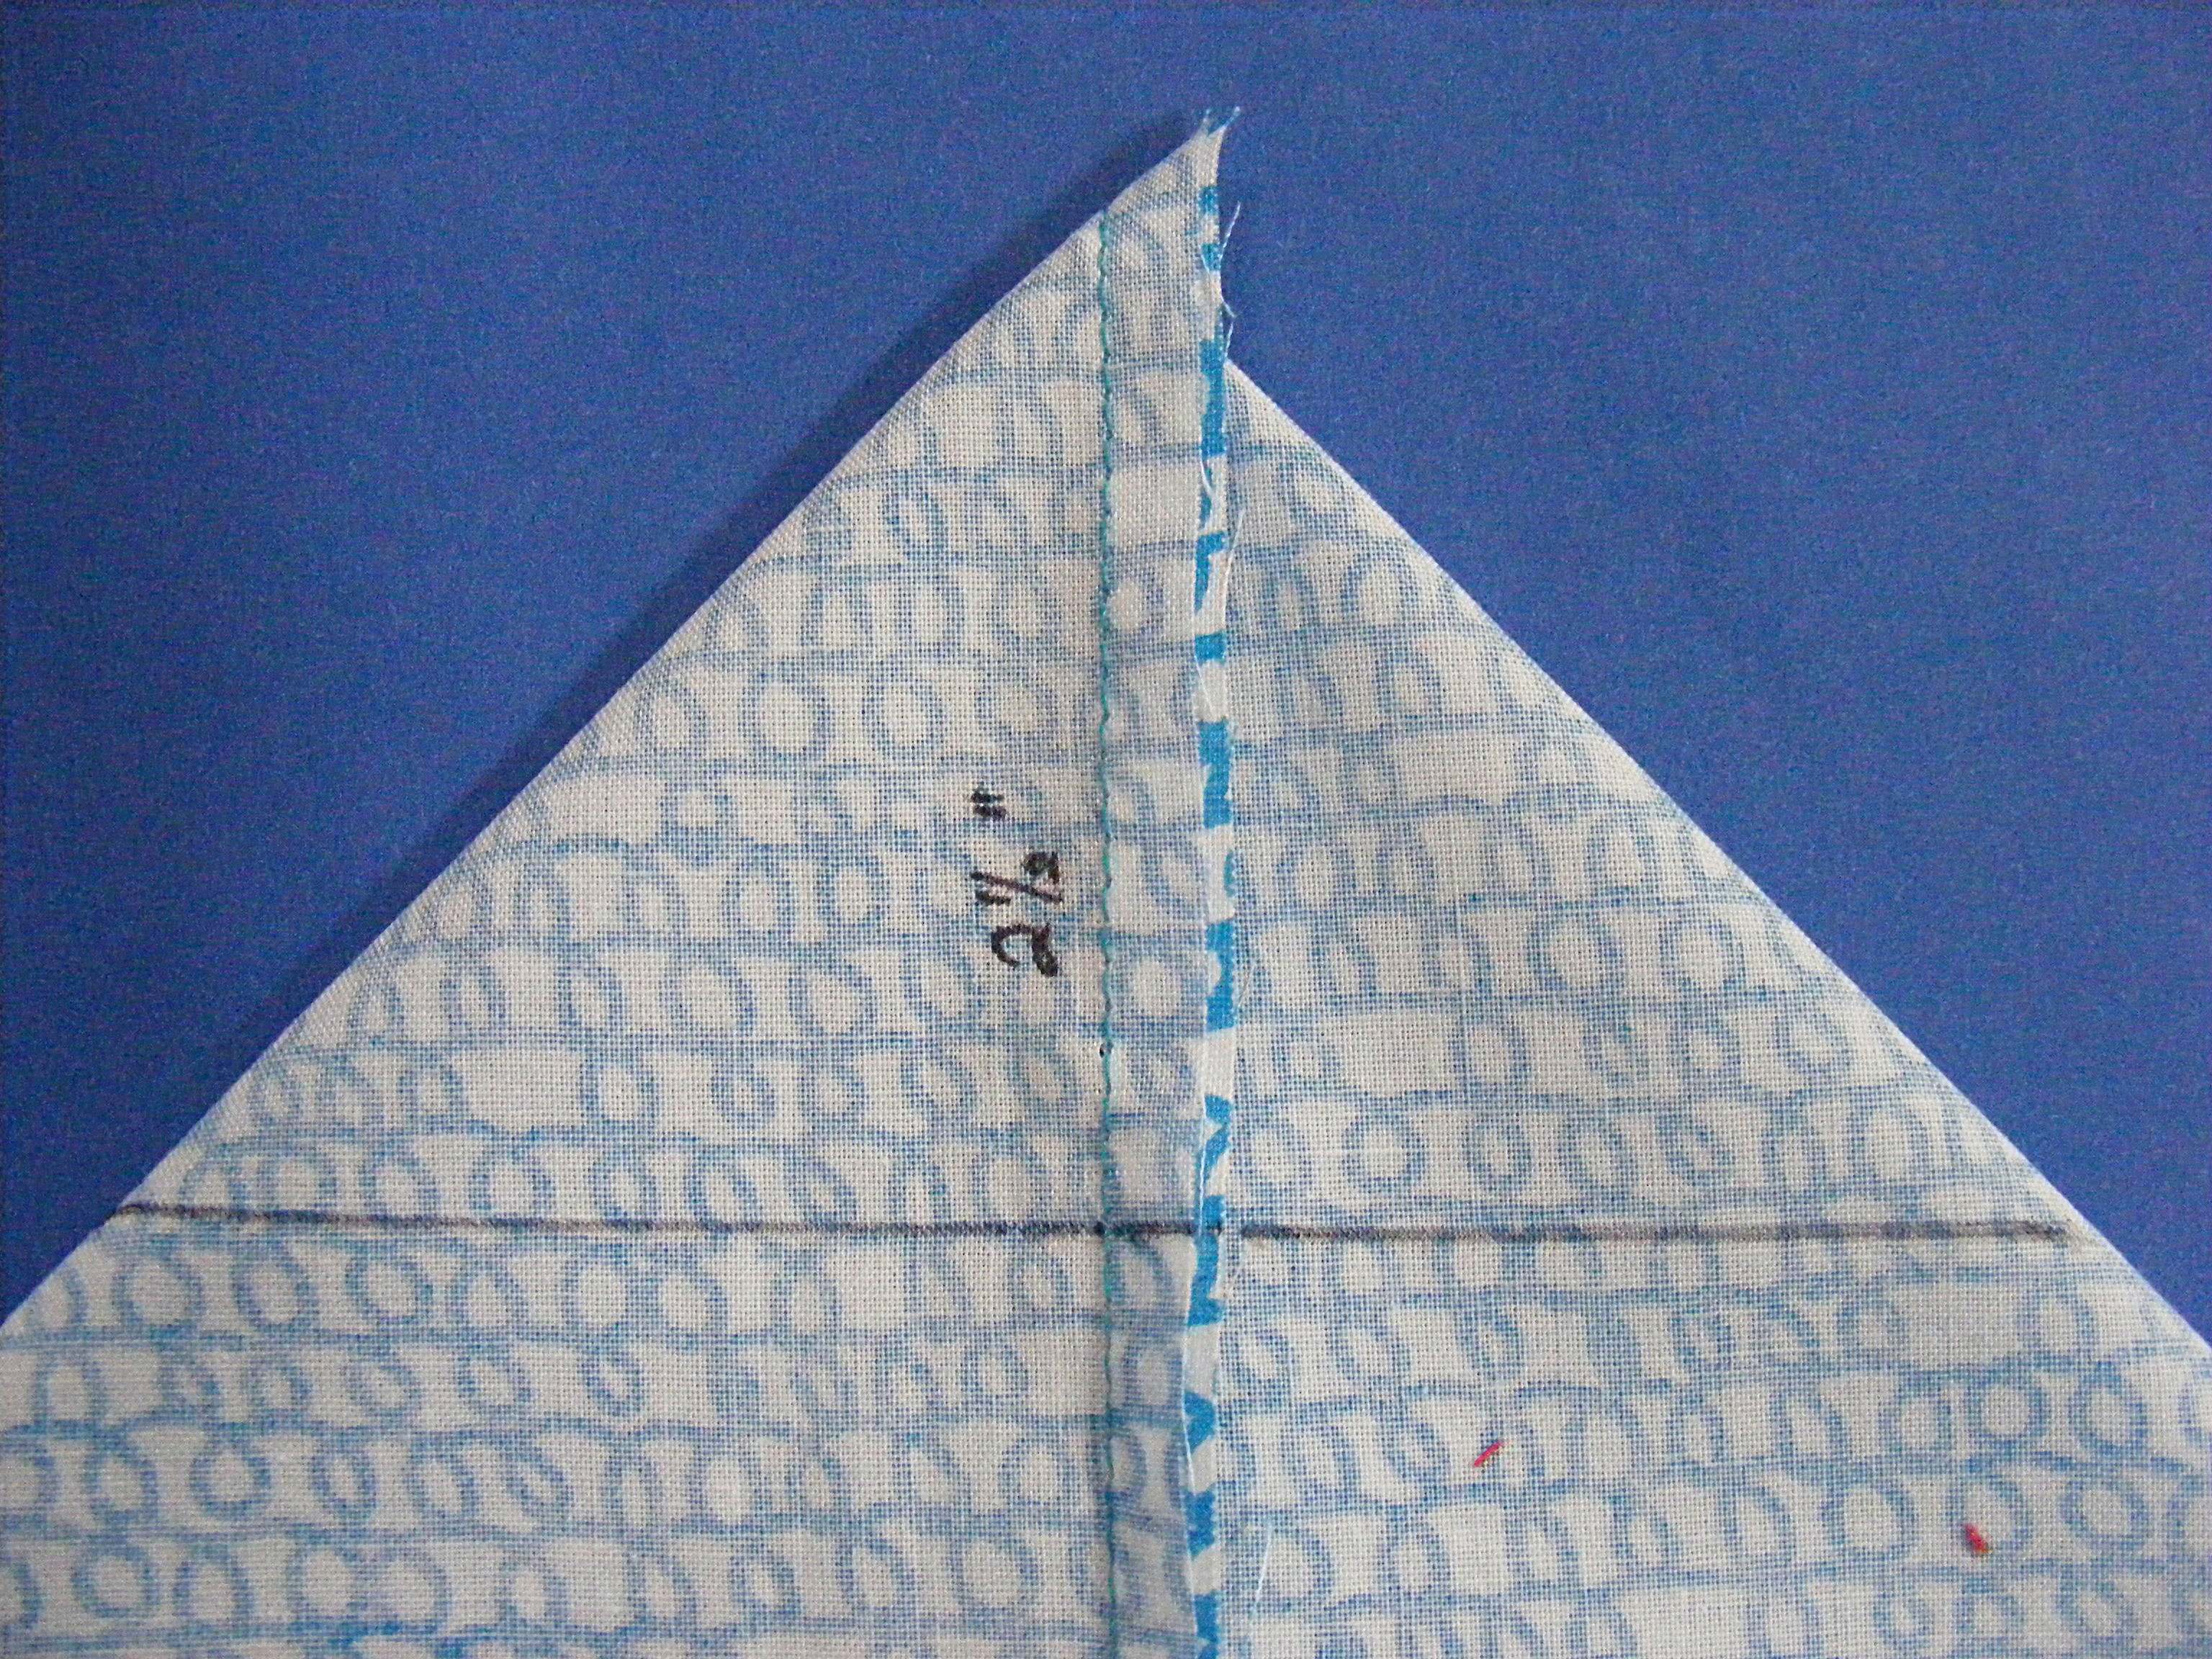
Fold one of the fabric strips in half the long way, right sides facing out. Press. Open the strip back up and fold each long edge in toward the center fold. Press. Fold in half again along the center fold so that you have one long strip, four layers of fabric thick. This makes a nice, sturdy strap. Press.
Topstitch along both long edges, about 1/8 inch from the edge.
Repeat for the second strap. Set them aside for now.
Step 2
Now to prep the pocket. Fold and press your pocket binding fabric into doublefold tape – just like the straps, but don’t topstitch the edges. Here’s that video again.
Now we’re going to fold the bias tape around the raw edge of the pocket. Start in the bottom corner of the pocket.
Step 3
Stitch down the binding right up to the edge of where the pocket fabric ends. Don’t keep stitching! If you need to stop a stitch or two before the edge that’s ok, but don’t stitch farther.
Stop. Backstitch a bit. Take it out of the machine.
Step 4
Open up the binding and fold it into a neat miter, wrapping it right around the corner of the fabric. Slide it back under the presser foot, backstitch a bit, then stitch down to the next corner.
Repeat steps 3 and 4 until you’re back where you started.
Step 5
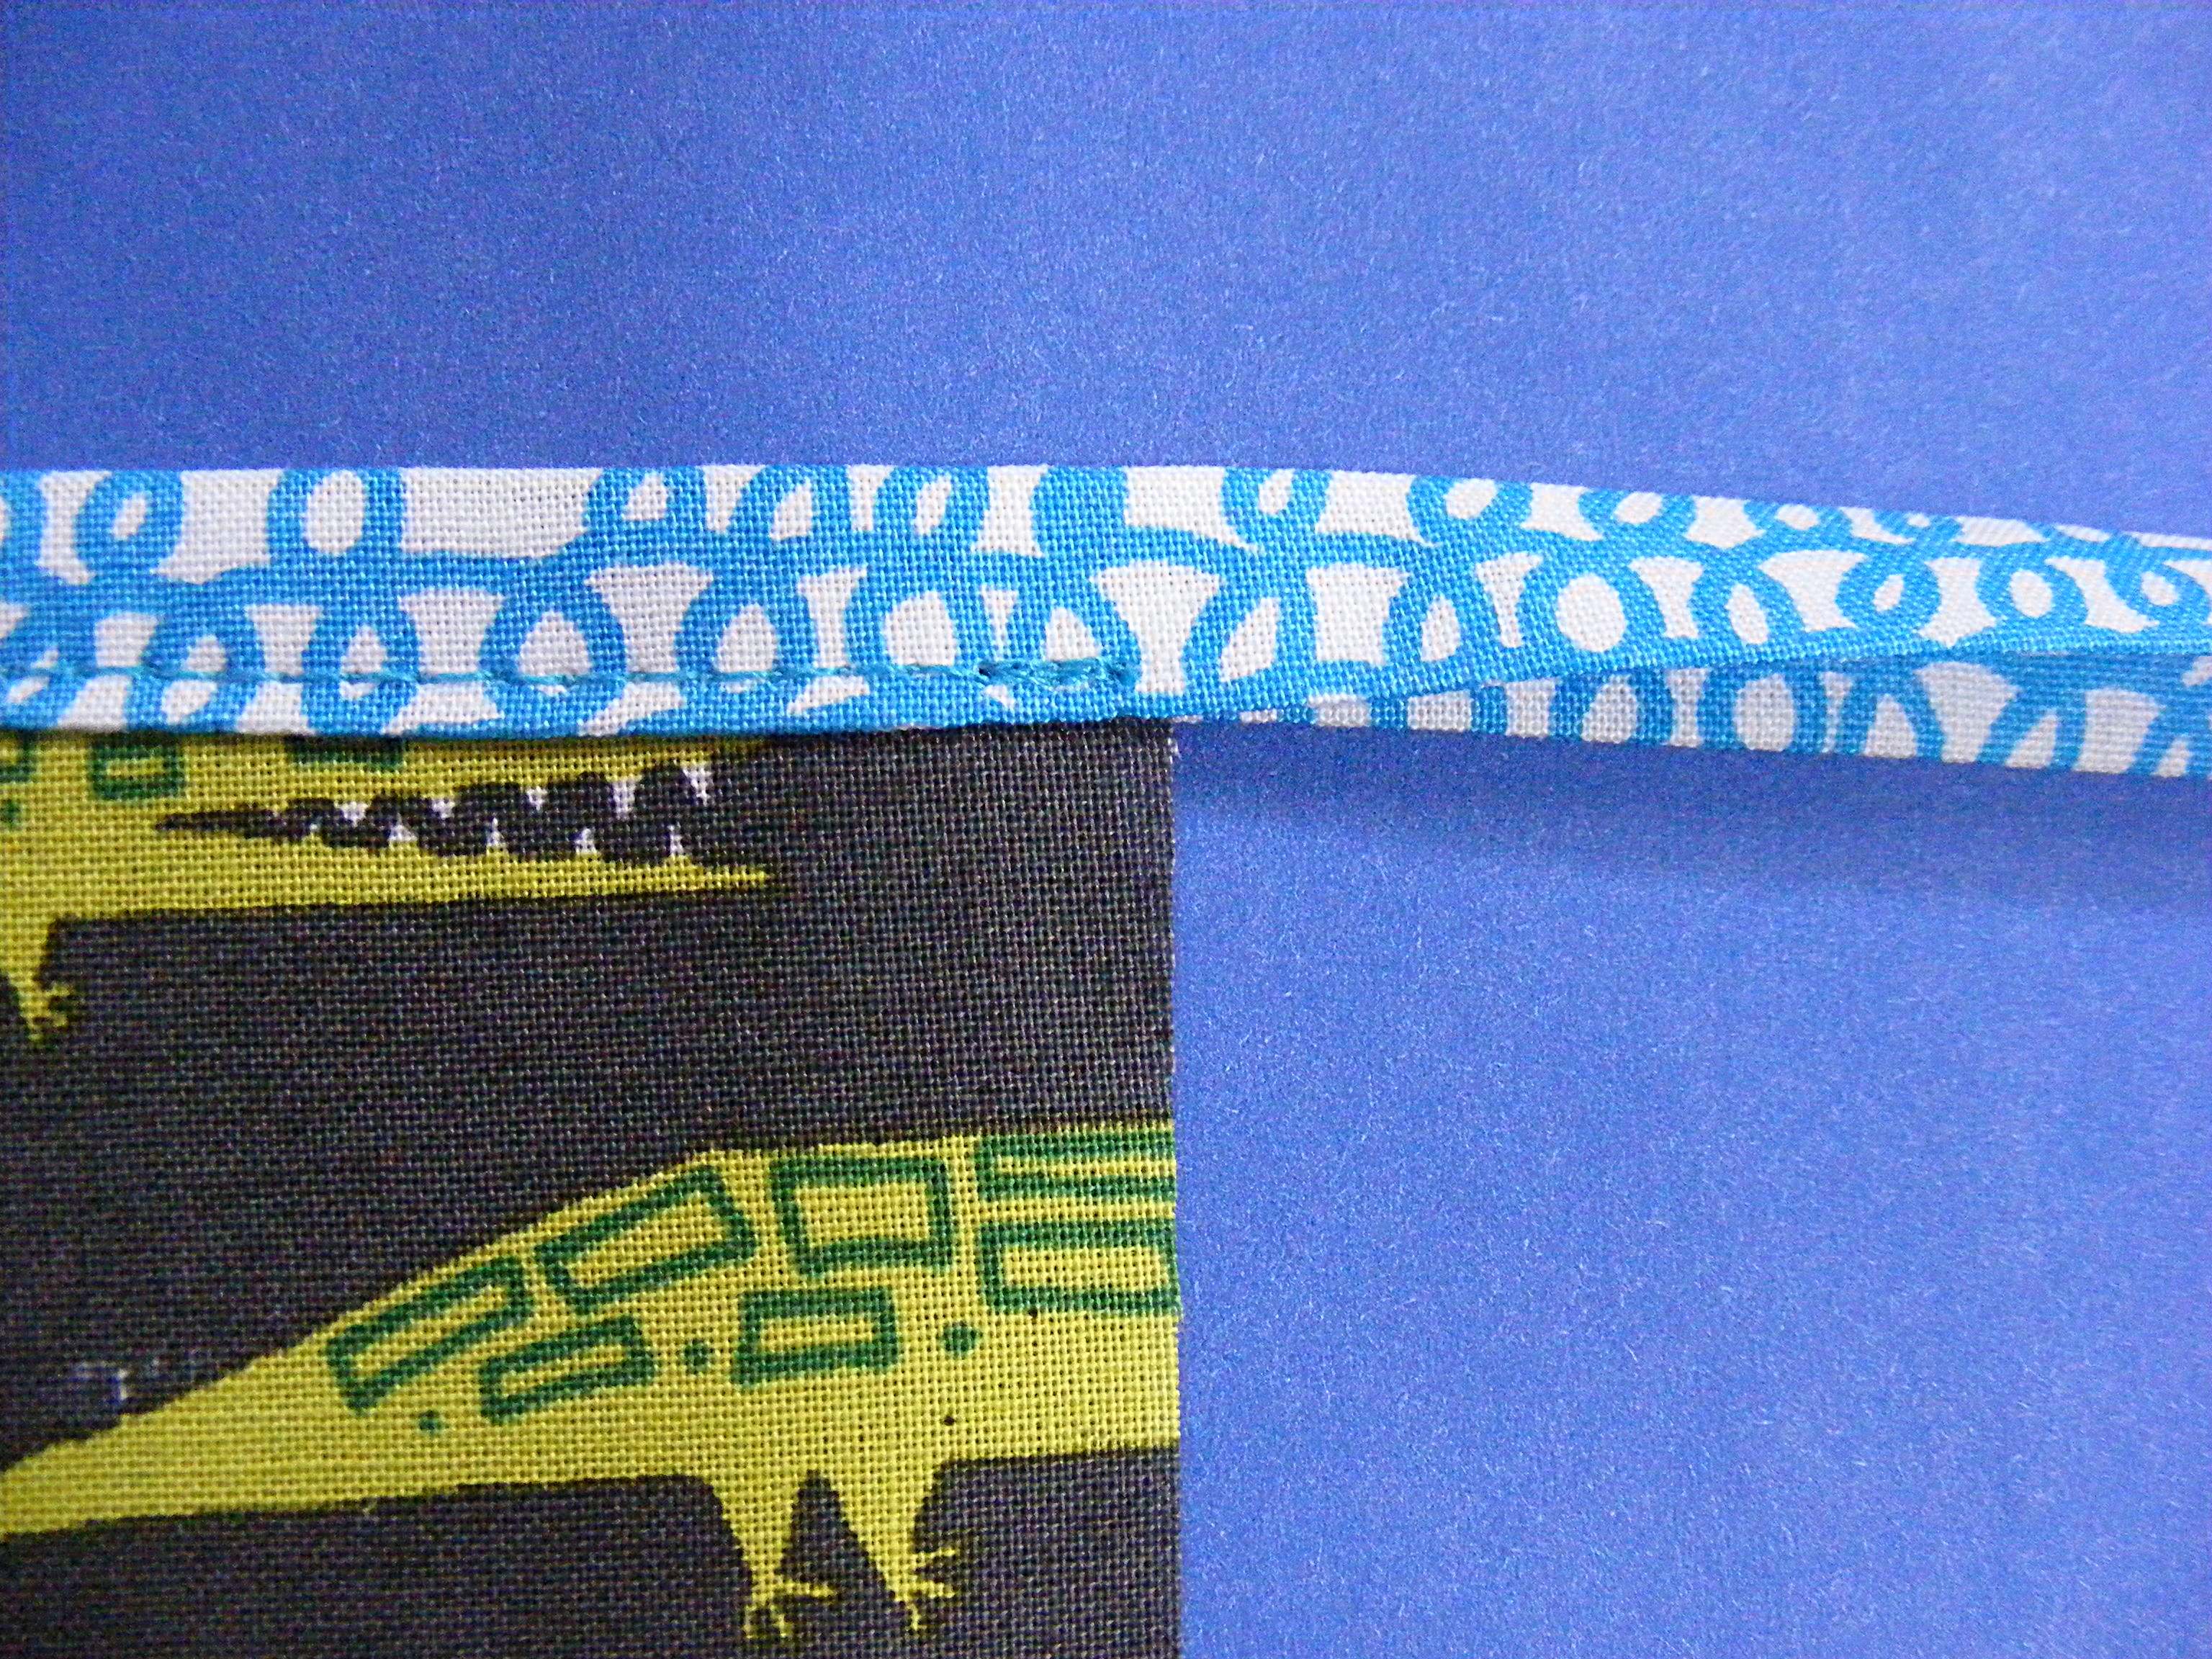
Trim off the excess binding, leaving about 1/4 inch extra to finish the raw edge.
Stop stitching a few inches before the end so you have room to open up a bit of the binding at the end.
Step 6
Open up the last bit of the binding and fold that extra raw edge under.
Make it so it’s even with the edge of the pocket.
Step 7
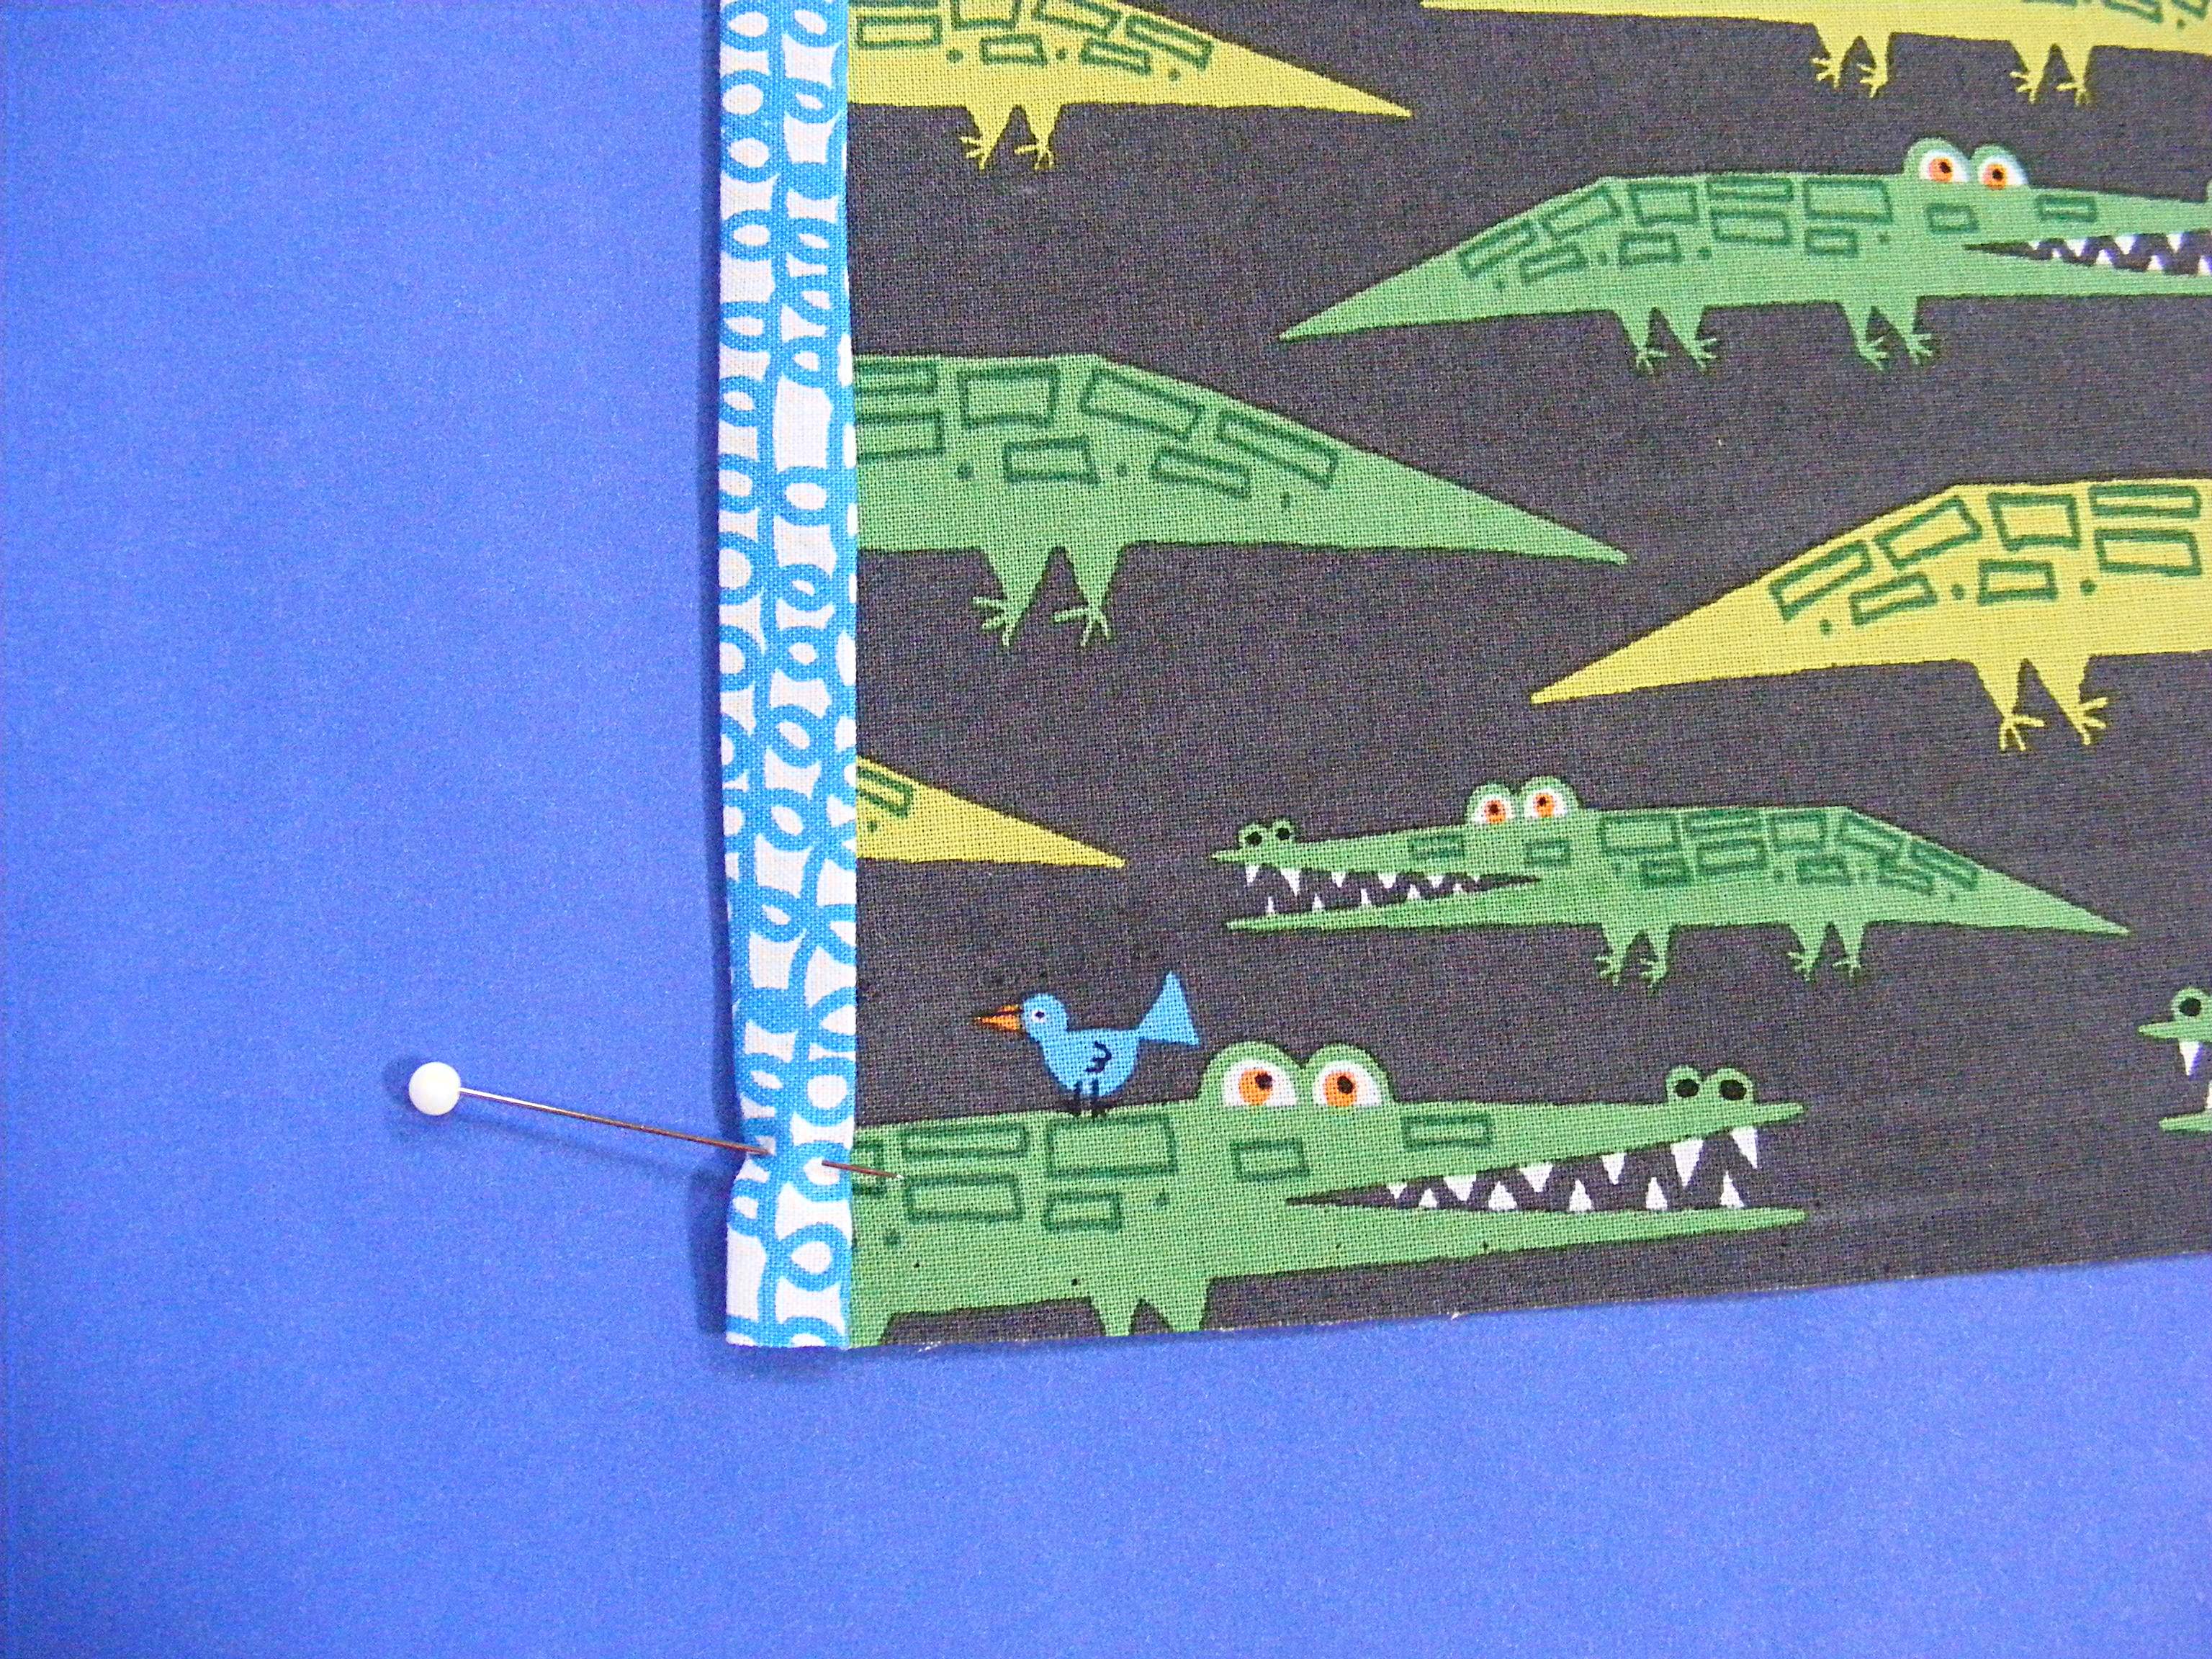
Wrap the folded end back around the edge of the pocket piece and stitch it in place.
The pocket should be bound on all four sides and ready to attach to the bag.
The binding is especially nice to have at the top edge of the pocket to help reinforce it and keep it from stretching over time.
You’re almost done!
Want to add a cute applique face to that pocket? You can use any of my single block patterns here. Just print the pattern at 60% of the normal size and it will be a perfect fit.
Step 8
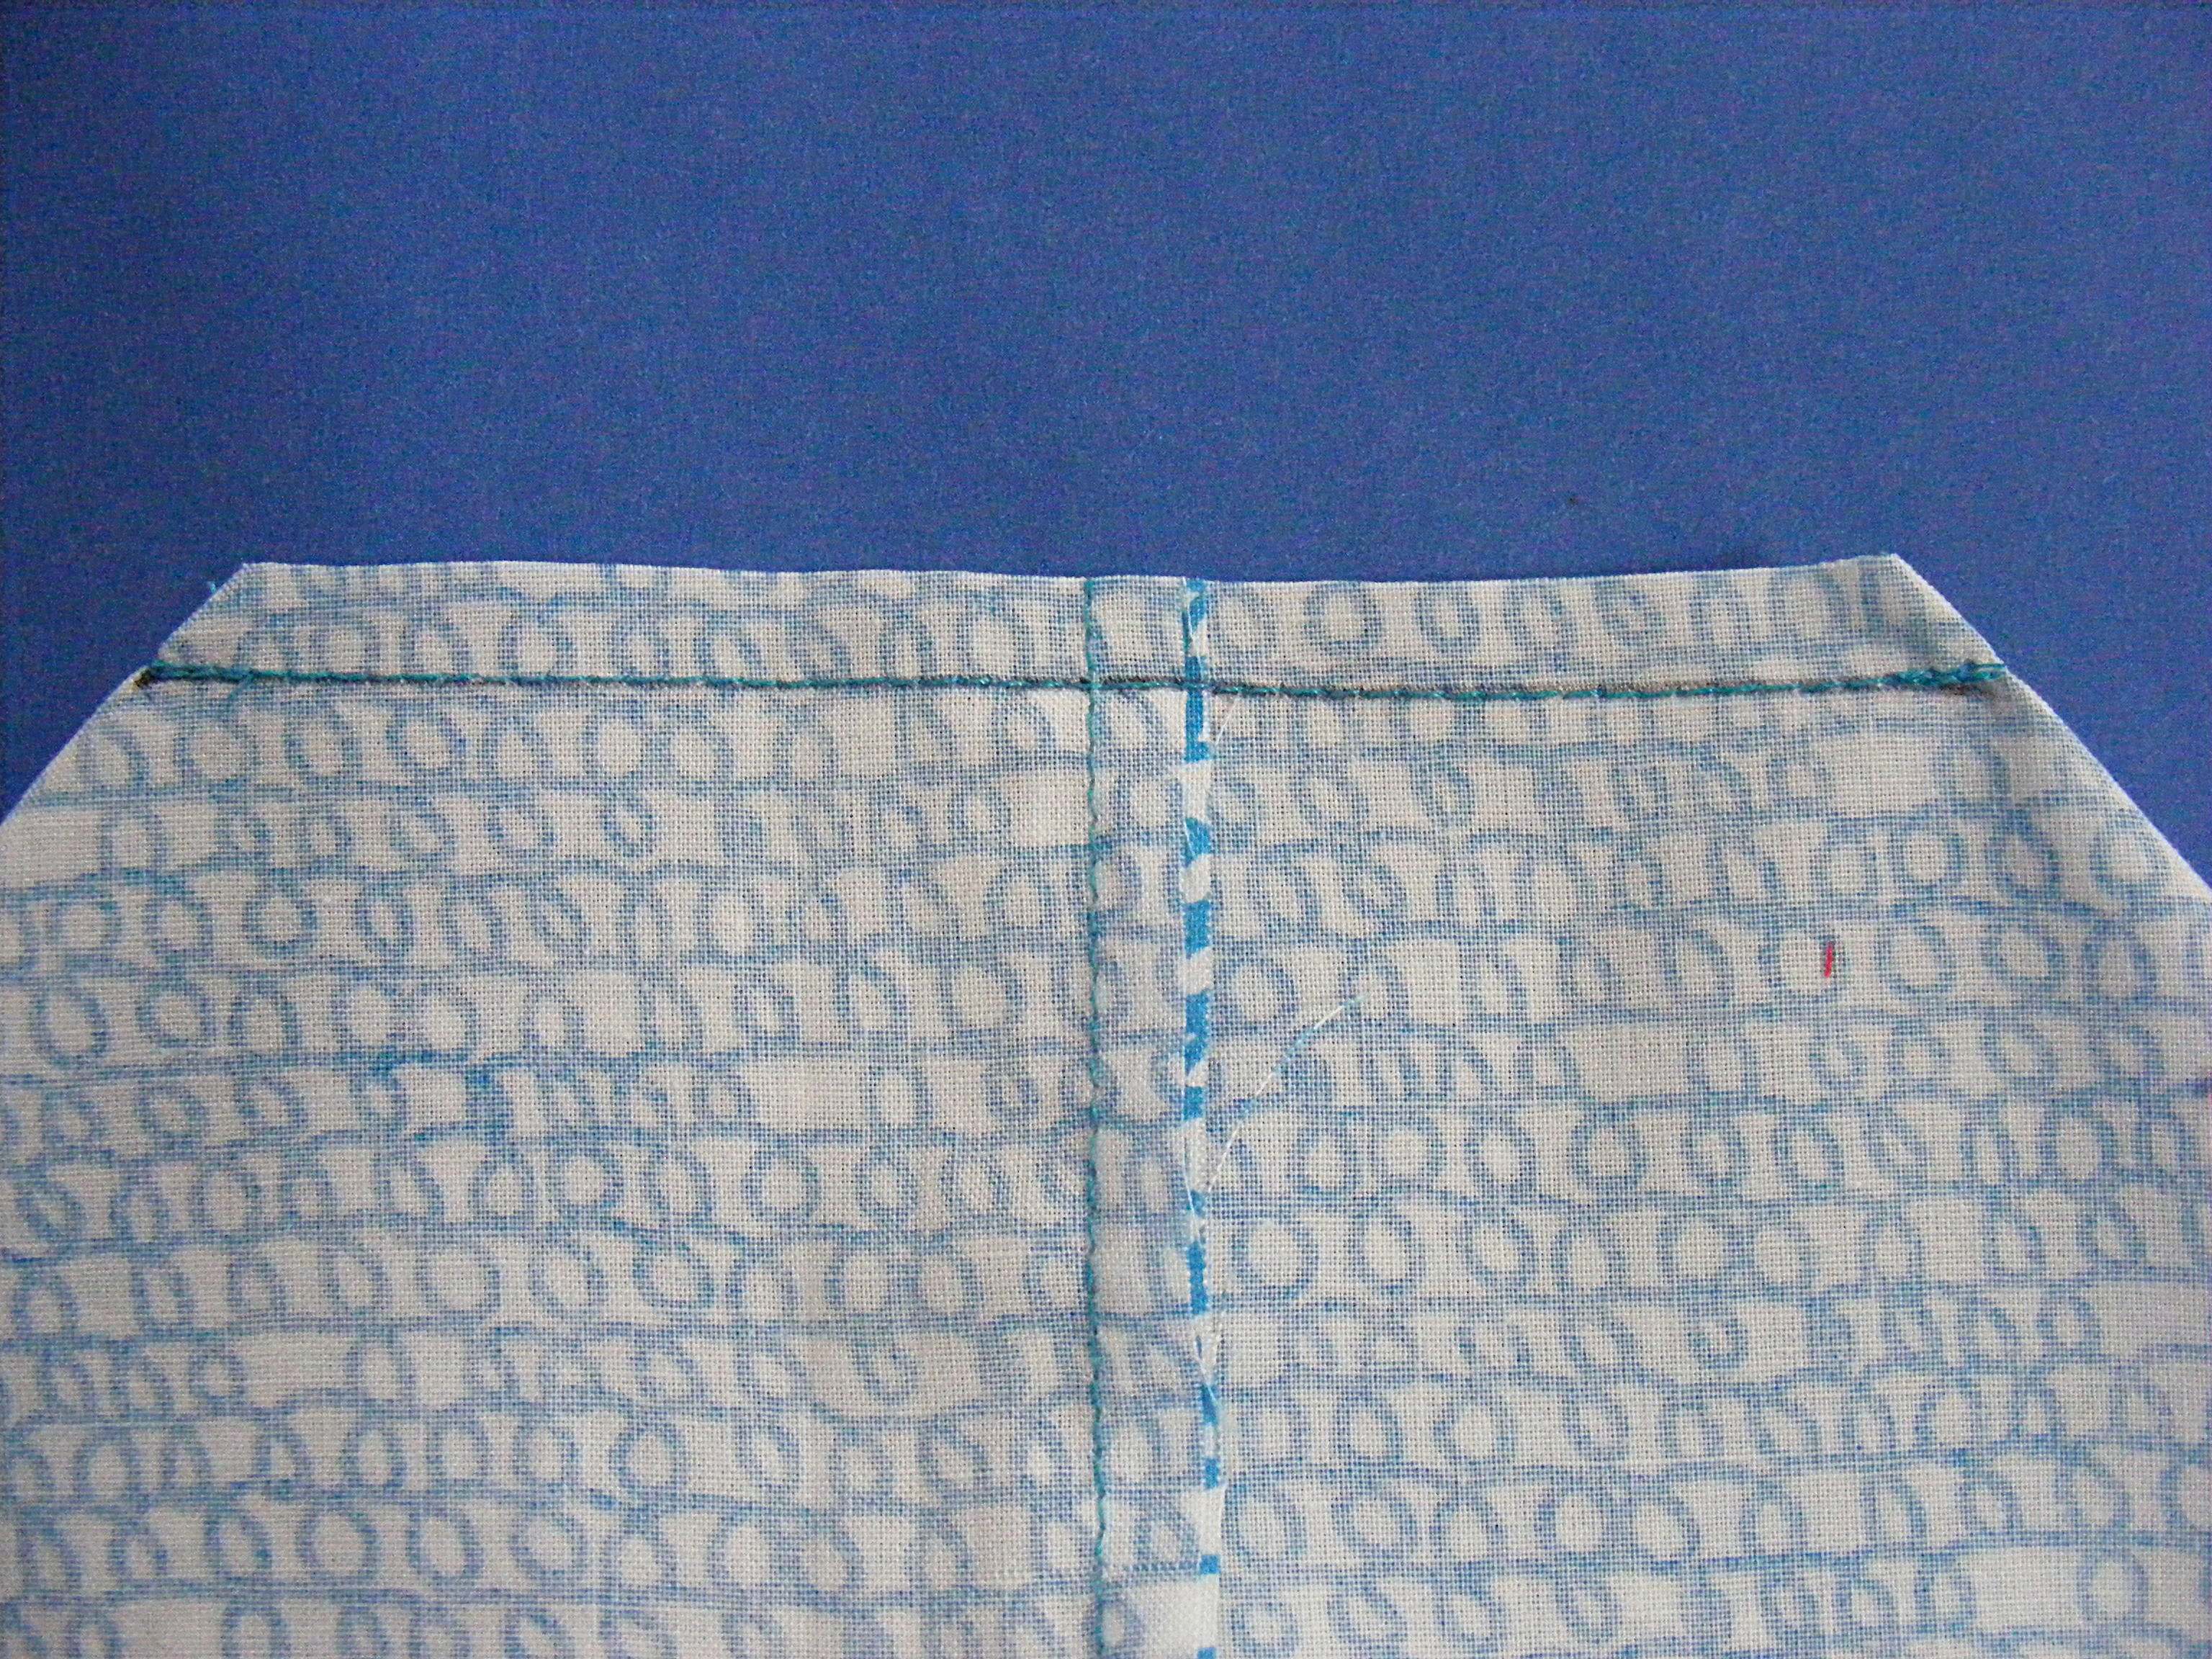
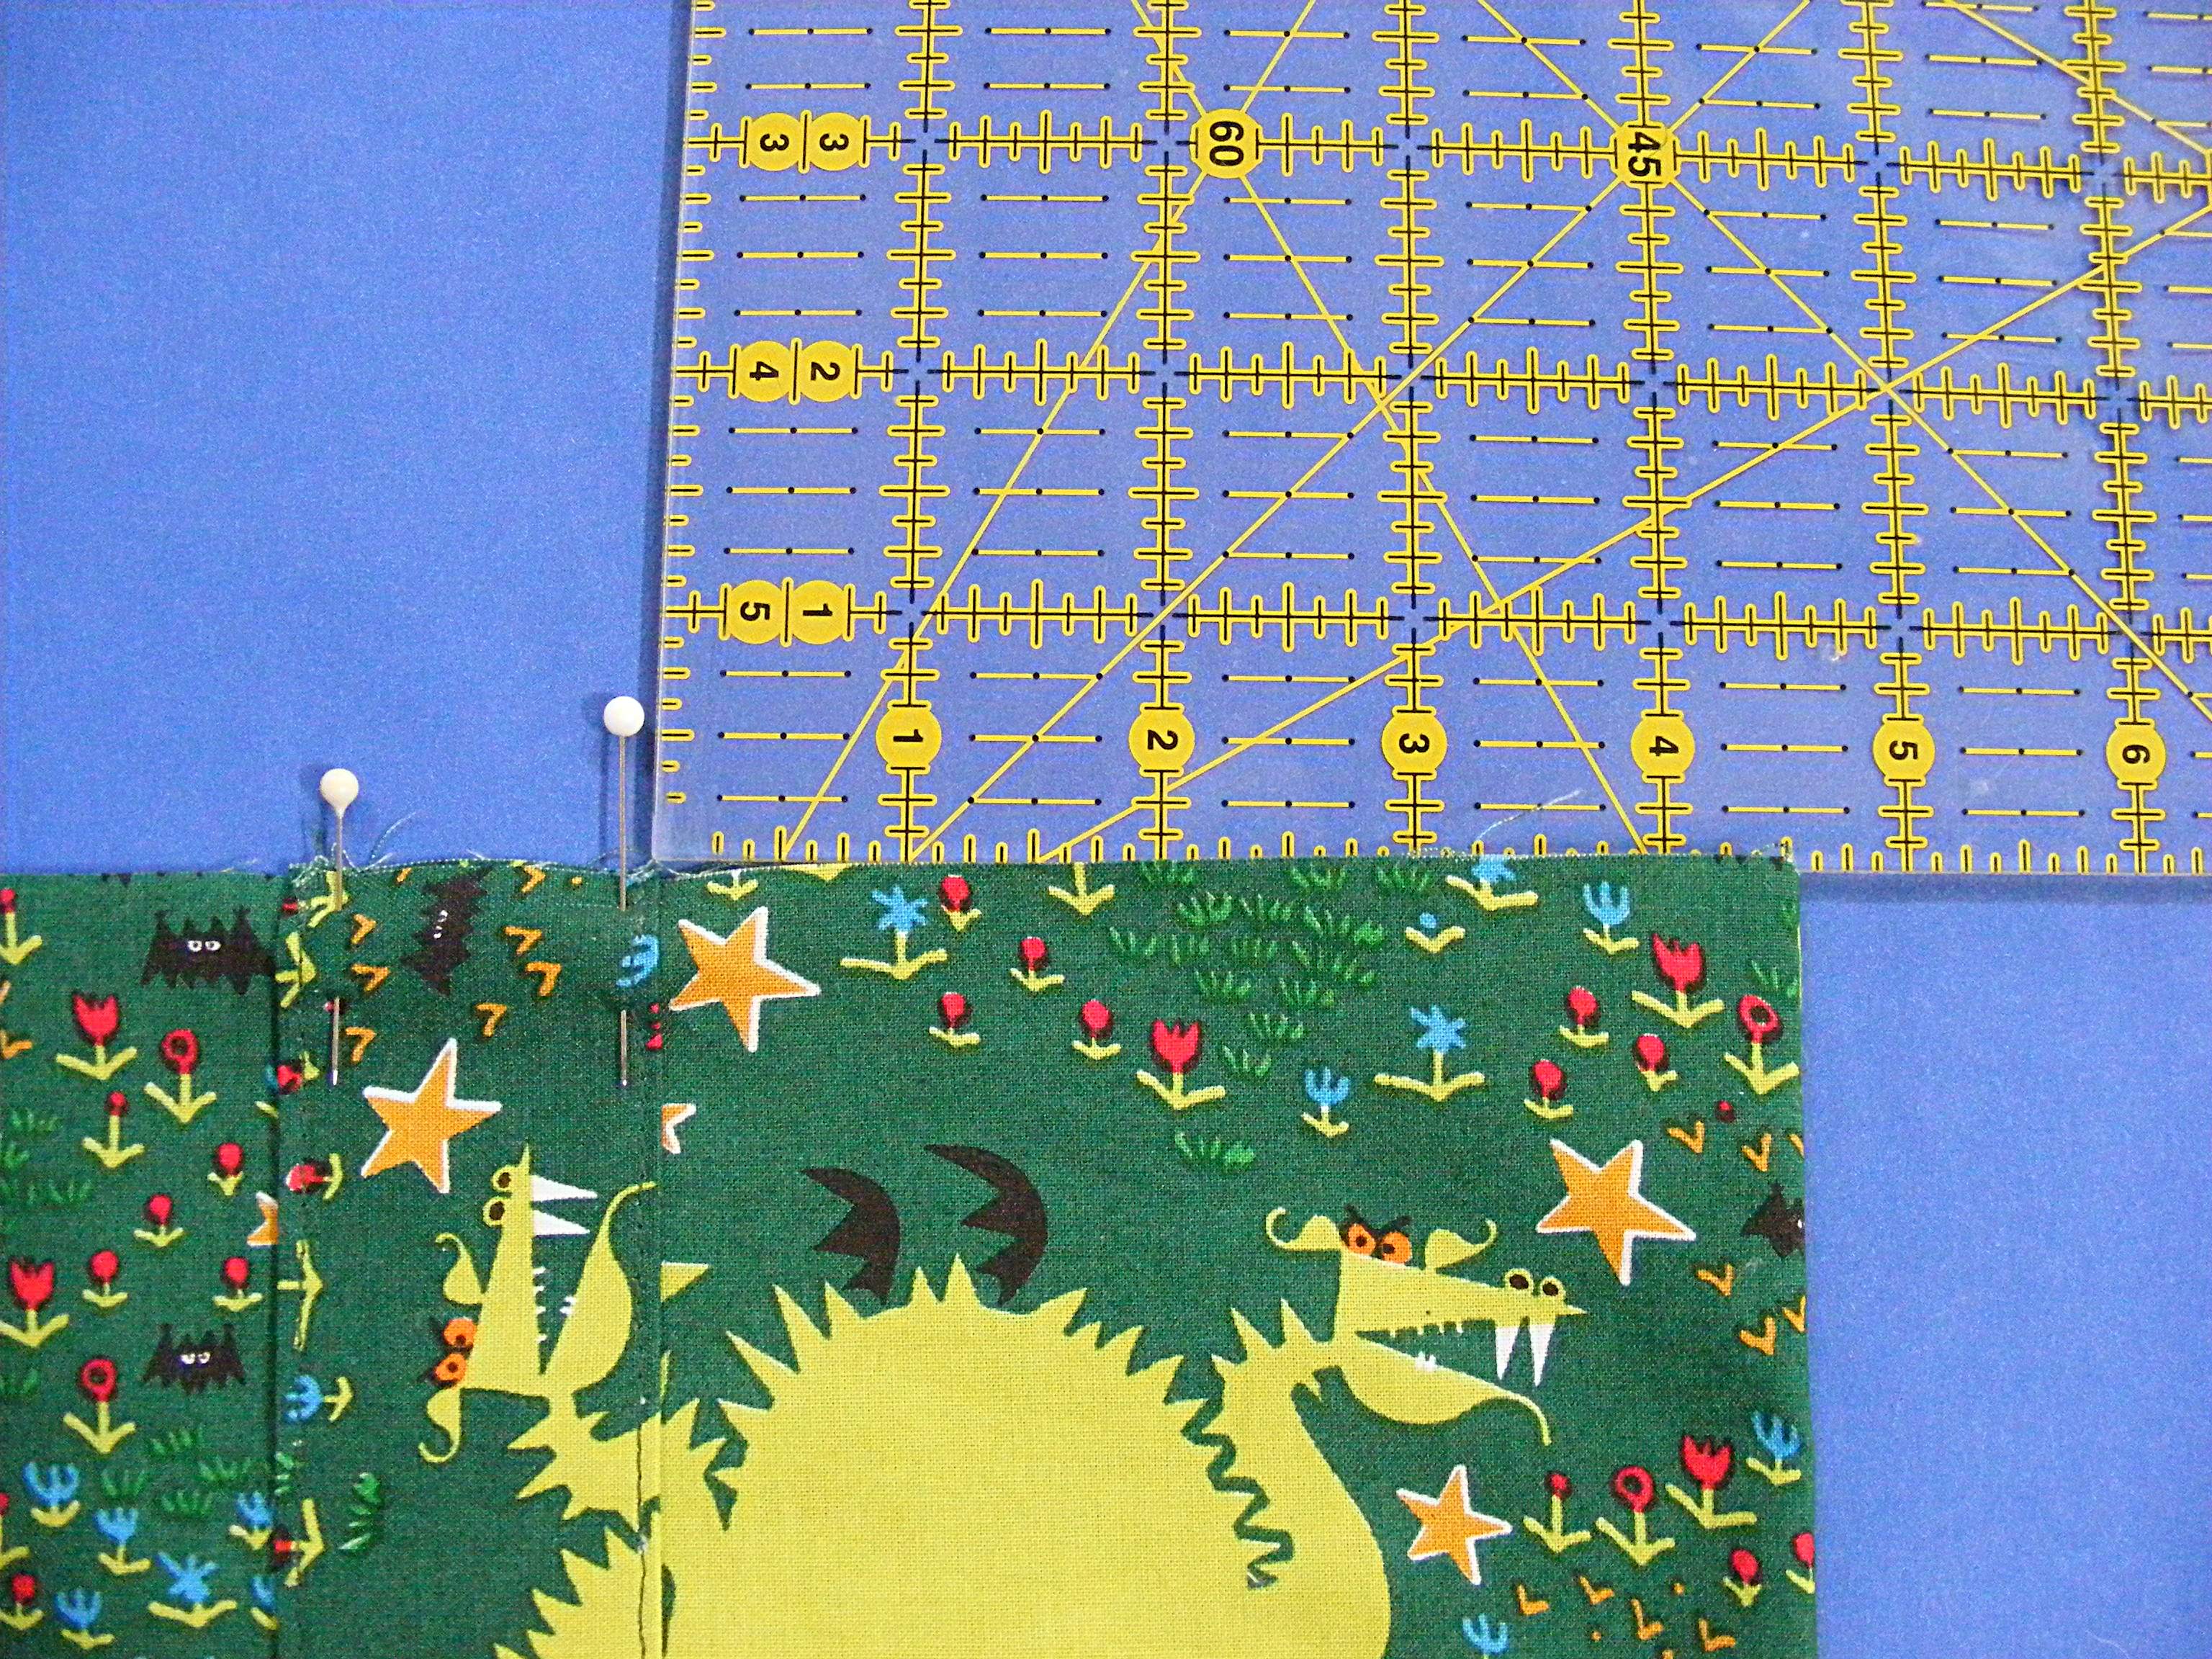
Fold the top edge of one bag piece in half and mark the halfway point with a pin. Do the same thing with the pocket.
Use a clear ruler to position the pocket 5 1/2 inches from the top raw edge of the bag. Line the 5 1/2 inch mark along the top of the bag, and make one of the vertical marks line up with the center pin on the bag. Line the center mark on the pocket up on the same line and your pocket will be perfectly centered - with no measuring or math. :-)
Detail
Here’s a closer look showing how to use the pin markers to center the pocket.
See how both the pins are lined up at the 13 inch mark?
Step 9
Stitch the pocket in place down one side, across the bottom, and up the other side. Make sure you backstitch a couple of times at the stop and start of your stitching to give extra reinforcement to the stress points at the top corners of your pocket.
Done! You’re ready to put the bag together!
Step 10
Let’s start with the outside of the bag. Pin the two main fabric squares right sides together. Using 1/4 inch seam allowance, stitch around both sides and the bottom of the bag. Repeat with the two lining pieces.
Now we’re going to box the corners of the main and lining bags so that your bag will have depth. A free pattern for a large tote bag is much more useful when the base of the bag is wide enough to hold those bulky items you need to carry.
Open out one bottom corner of the bag so that the side seam and center bottom seam line up, and the corner of the bag makes a point.
Measure down 2 1/2 inches from the tip of the stitching (NOT the tip of the fabric triangle - ignore that flap of seam allowance) and draw a line perpendicular to the side seam.
Step 12
Stitch right on the line you drew. Trim away the excess fabric.
Repeat for the other corner, and for both corners of the lining.
Step 13
Turn the main bag right side out. Leave the lining inside out.
Pin the edge of one strap to the top edge of the bag, 4 1/2 inches in from the side seam.
Repeat for the other end of the strap.
Repeat with the second strap on the other side of the bag.
Step 14
Put the main bag inside the lining, with the straps sandwiched between the two layers. Since the lining is inside out and the main bag is right side out, you should end up with the right sides together. Line up the side seams and pin the layers together around the top edge of the bag.
Step 15
Using 1/4 inch seam allowance, stitch almost all the way around the top edge of the bag. Leave the space between the two ends of one handle unstitched, so you can pull the bag through the opening. Be sure to backstitch at the beginning and end of your stitching. There will be some pressure on the edges as you pull the bag through.
Step 16
Reach into the opening and pull the main bag through. Pull through the handles, then pull the lining right side out and tuck it down into the bag. Press around the top edge, being especially careful to press the open edges evenly.
Step 17
Topstitch around the bag, about 1/8 inch from the top edge. Be sure that the folded edges of the opening you used for turning are lined up and that you catch both layers in the topstitching to hold them together. No hand stitching!
I wanted the topstitching thread to match the fabric of the main bag AND the lining, so I used green thread as my main thread and blue thread as my bobbin thread. The stitching is green on top and blue on the bottom. Neato!
Finished! One large tote bag made with a free pattern.
The handles are the perfect length for throwing over your shoulder and the bag is roomy enough to hold three big bags of chips, or a bunch of veggies from the farmers market – including lots of healthy but bulky green leafies!
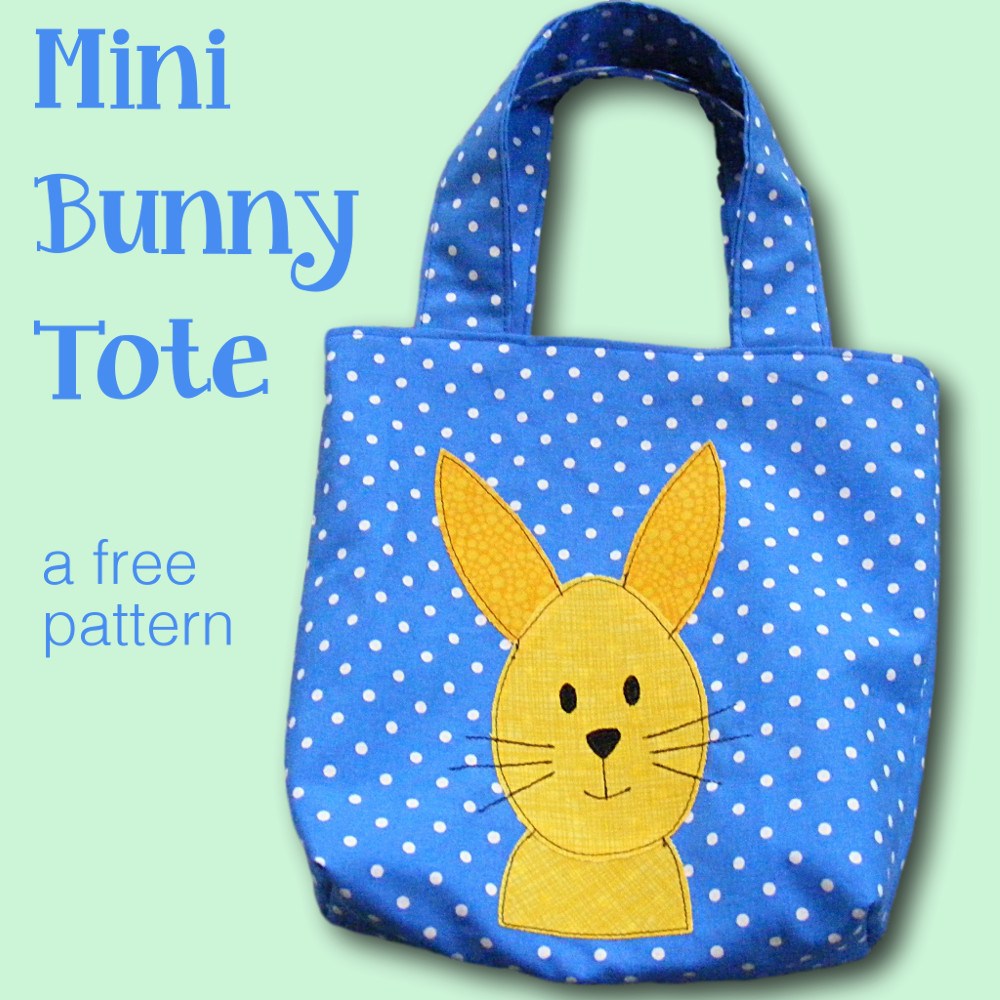
Maybe you don’t want such a large tote bag? I’ve got two more free patterns!
The Trick or Treat Tote Bag is great for trick or treating – but also for carrying library books, lunch, and more.
The Mini Tote Bag is quite a bit smaller. It’s great for small toys and snacks. When my daughter was very little we kept a few of these packed with “special” toys that we only played with on outings – like at a restaurant. One had a few trucks and cars, another had crayons and a cute notepad, another had a handful of action figures. They were great grab and go bags. 🙂
Here are several free patterns that work with my basic 10-inch applique squares – no resizing needed!
Here are several free patterns that work with just some simple resizing. This post about making coasters has info about resizing an applique pattern that can be applied to any of these projects.