I’ve really been having fun playing with English Paper Piecing (EPP) ever since I got Diane Gilleland’s All Points Patchwork and made my very first EPP project.
Every time I look at a hexie template – especially when it’s solo and surrounded by other fabric – I see an eyeball. 🙂 So when Diane asked me to participate in a Halloween EPP Blog hop I leaped at the chance.
The design is super easy. Make a bunch of hexies and then start playing around with them.
I made 96 black hexies using all the black-on-black fabrics in my scraps, and 14 green hexies, two each of all my acid green scraps.
Then I started playing around with the arrangement and joining them together.
I put the matching eyes together in pairs, and then added 1/2″ felt circles. If you make them “look” in the same direction, they’ll look like pupils to the eyes.
Every time I release a pattern I get requests for additional blocks. It’s usually just one or two people with very specific requests, but when I released the Woodland Critters pattern I got a LOT of requests for a moose block.
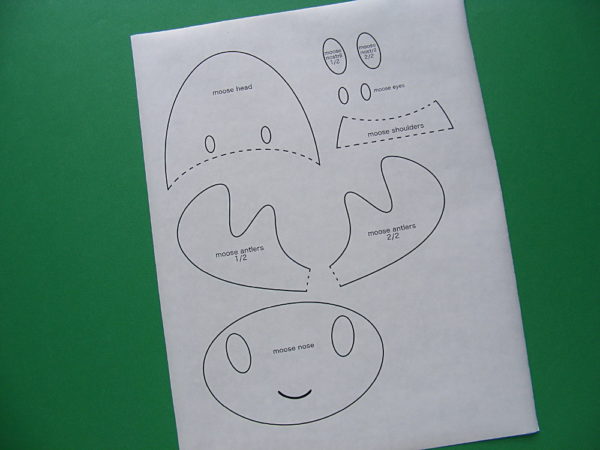
Trace the moose pattern onto the paper side of your favorite fusible adhesive. I’m head over heels in love with these printable fusible adhesive sheets because I can skip the tedious tracing and get right to the fun part– choosing fabric!
The pattern pieces have already been reversed so just trace or print them as they are.
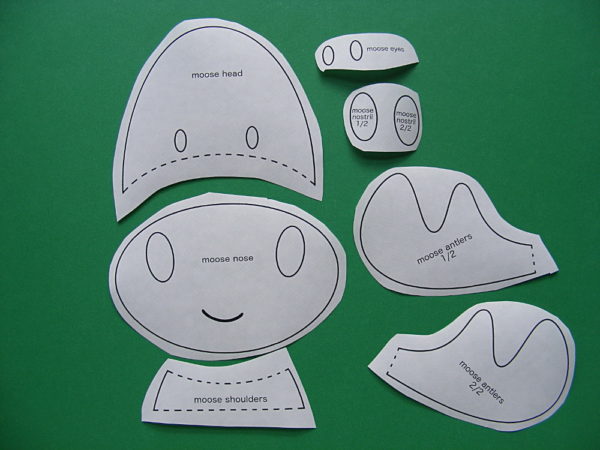
Roughly cut all the pieces out, leaving a little extra all the way around each piece.
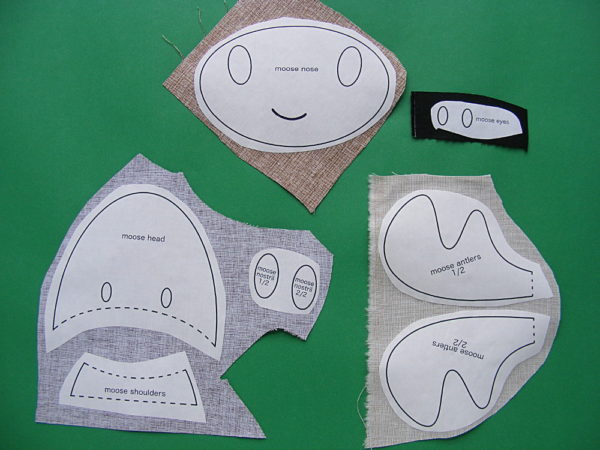
Following the manufacturer’s instructions for time and steam, fuse the pieces to the back of the fabric. (I use Heat & Bond Lite for all my quilts.)
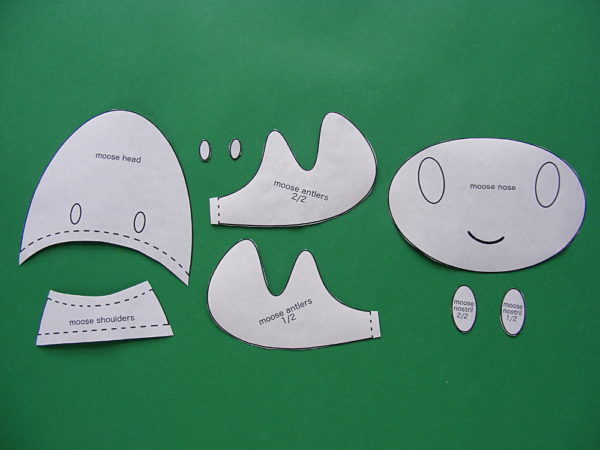
Cut each piece out neatly. Cut directly on the solid lines. Leave a little extra seam allowance (roughly 1/4”) past all the dotted lines. Those bits will tuck behind other pieces for a nice, neat finish.
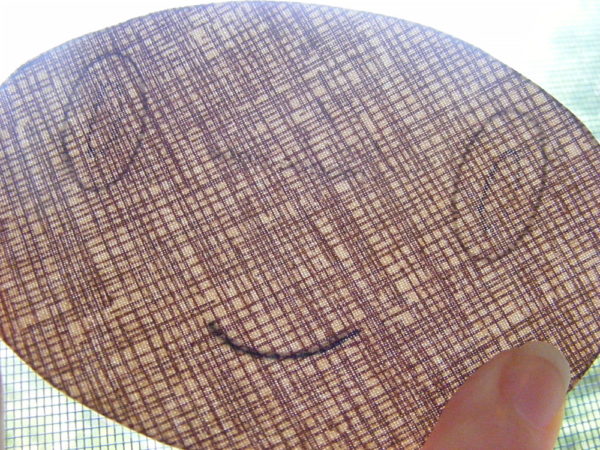
Trace the features onto the front side of the face pieces. If you hold it up to a window you’ll be able to easily see the features shining through.
I like to trace a little inside the eyes and nostrils– just so I have a rough guide where to position those pieces– and trace right over the line for the mouth. I just use a fine-tip sharpie or a pencil, nothing fancy.
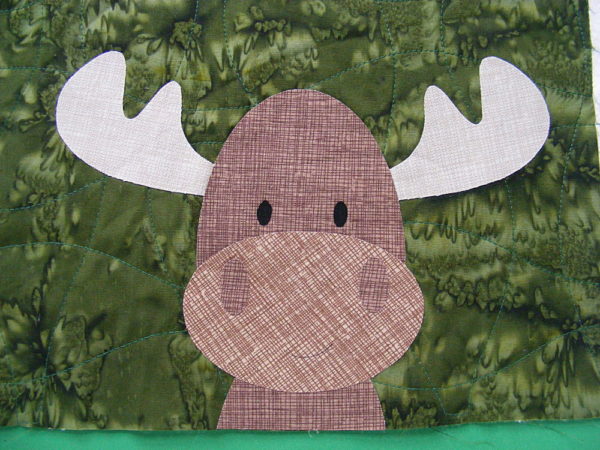
Peel off the paper backing and arrange the pieces as shown. Line the bottom of the shoulders up with the bottom edge of the block. Remember: the dotted lines show which pieces tuck behind other pieces.
(I quilted my background block to the batting before I started, so that’s what you see here. You can find more info about the “quilt as you go” (QAYG) method I use here.)
Following the manufacturer’s instructions for time and steam, fuse the pieces to the background fabric. Important note: For some
brands the fuse time and steam settings for fusing fabric to fabric are different from the time and steam setting to fuse the paper to
the fabric. Check your package.
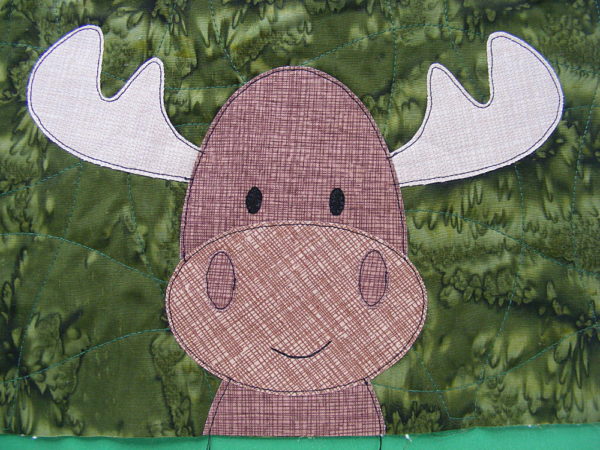
Stitch around each piece as desired.
I like to use a simple straight stitch with black thread. (I go over the mouth three times for an extra thick line.) It’s a great cartoony look that suits my designs, and it holds up very well through multiple washings. Some people prefer the look of a zigzag or blanket stitch. It’s all good!
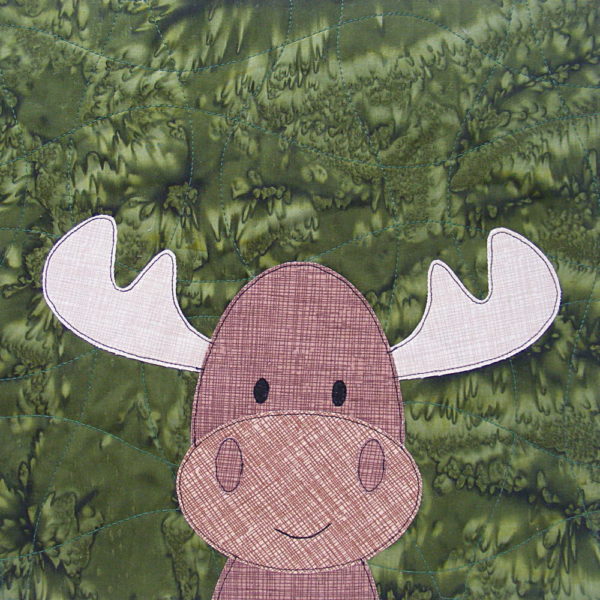
Trim the block to size if it’s for a quilt, or proceed with whatever other awesome thing you’re making.
Here it is! The very last block in the Controlled Chaos scrap quilt!
What You’ll Need
52 two-inch squares in color A (shown in purple)
48 two-inch squares in color B (shown in green)
Instructions
Use 1/4″ seam allowances for all sewing.
Press all the seams as you go. I’m pressing mine open for this quilt. I think it will make things simpler in the end.
Arrange your squares according to the diagram below.
For this block I worked in big chunks. I sewed things up in the following order. . .
Sew all your individual squares into pairs of matching colors. You should have 26 purple pairs and 24 green pairs.
Sew the purple pairs into 2 x 2 squares.
Pull out four of those purple squares. Sew two green pairs to opposite sides of each purple square. Sew the remaining green pairs into eight 1 x 4 rectangles.
Sew these rectangles to the top and bottom of your purple squares, so that there’s a green ring around each of the four purple squares.
Sew the rest of your purple squares into one 2×10 rectangle and two 2 x 4 rectangles.
Sew a 2 x 4 purple rectangle between two purple/green squares. Repeat with the last 2 x 4 purple rectangle and the last two purple/green squares
Assemble your chunks in rows and sew the long 2 x 10 purple rectangle between your other two rows.
Finished!
Well – finished with the blocks. 🙂 I still need to join them all together with sashing strips between them and then quilt the whole thing. Here’s what it’s going to look like. . .
I’ll have a tutorial showing how to do the sashing strips (there’s a little trick to that!) and then tutorials showing basic hand quilting, quilting without marking, and big stitch hand quilting. Yes – I’m going to spend the winter hand-quilting this beauty!
But all of that is going to have to wait just a little bit. I have a new and improved website that I’m really close to launching, so that’s taking a lot of my attention behind the scenes these days. It’ll be worth it! While you wait – finish all your blocks!
Remember – you don’t have to make your quilt the same size or number of blocks as my quilt. You can make fewer quilts for a crib size, or repeat some of the designs in different colors (or make up your own additions!) for a larger quilt. Mine is going to be just the right size for curling up on the couch. 🙂
Here’s block #18 in the Controlled Chaos Quilt! There are only two left after this!
What You’ll Need
64 two-inch squares in color A (shown in aqua)
36 two-inch squares in color B (shown in red)
Instructions
Use 1/4″ seam allowances for all sewing.
Press all the seams as you go. I’m pressing mine open for this quilt. I think it will make things simpler in the end.
Arrange your squares according to the diagram below.
For this block I worked in big chunks. I sewed things up in the following order. . .
Sew all your individual squares into pairs of matching colors. You should have 32 aqua pairs and 18 red pairs.
Sew the aqua pairs into large 4 x 4 squares. You’ll need four of them.
Sew the red pairs into 2 4×2 rectangles and 2 rows each 10 squares long.
Sew the long red rows together into one long rectangle 2 x 10 squares.
Sew one aqua block to one short red 2 x 4 rectangle and then to another aqua block. Repeat with the remaining aqua blocks and 2 x 4 red rectangles.
Assemble the final block by sewing an aqua/red row to the long red 2 x 10 rectangle and then to the last aqua/red row.
That’s 18 blocks done. I can’t believe we’re down to the last two!
Here’s what I calculated I’ll need to finish the quilt. I’m going to use a grey solid – I’m looking for a nice slate color. I’ll need. . .
1 1/4 yards for the sashing
5 yards for the backing
3/4 yard for the binding
I usually use Cuddle Fleece to back my quilts, but I want to hand quilt this one and I think the Cuddle Fleece will be too thick for that, so I’m going to use the same grey fabric. I’m going to big stitch quilt in a lot of different colors – it should make pretty speckling on the back and they’ll show up nicely on the solid.
I’ll be back next week with the penultimate block!
If you want to make something besides bears, you can use any of my applique patterns. Just print the pieces at 40% size. You’ll find more info about resizing a pattern here.
Here’s how to make them.
Cut two 4-inch squares of wool felt for each coaster.
If you live in a humid place where one beverage will soak through two layers of wool felt in no time, cut a 3 1/2 inch square from something waterproof for each coaster. It doesn’t matter what it looks like – it will be hidden inside the coaster. I use a shower curtain liner. 🙂
Download the pattern and print (or trace) the pieces onto freezer paper. The sheet has enough pieces for 6 coasters.
Rough cut around the pieces and fuse the freezer paper to wool felt. Cut out all the pieces. Cut right through the felt and the freezer paper – it helps you get neat cuts on all those tiny pieces.
Leave a little extra seam allowance past the dotted lines at the base of the ears – that bit will tuck under the head for a neat finish.
Peel off the freezer paper backs and assemble all the pieces (tucking the ears under the head) on one of your coaster squares. I like to swipe the backs with a little dab of fabric glue stick, but you can use pins if you don’t mind your thread snagging on them every other stitch. 🙂
Appliqué all the parts in place using whipstitch and two strands of matching thread.
Layer a plain back with the bear front, slipping a waterproof square between the layers if desired.
Here are the colors I used for my set. I used black for all the eyes and noses. I recommend shopping Benzie Design for felt. they have a HUGE selection of colors! One sheet of felt will make three coasters.
background – denim
bear – Tahitian sunset
muzzle and belly – copper
background – enchanted forest
bear – coffee
muzzle and belly – Tahitian sunset
background – vineyard
bear – copper
muzzle and belly – cobblestone
background – loden
bear – Tahitian sunset
muzzle and belly – cobblestone
background – blue snow
bear – white
muzzle – smoky marble
background – babbling brook
bear – licorice
muzzle – Tahitian sunset
My favorite is the one with the purple background. Jo’s favorite is the polar bear. Alan is still at San Diego Comic Con so he hasn’t claimed one yet. Which is your favorite?
Here are several free patterns that work with my basic 10-inch applique squares – no resizing needed!
Here are several free patterns that work with just some simple resizing. This post about making coasters has info about resizing an applique pattern that can be applied to any of these projects.
Press all the seams as you go. I’m pressing mine open for this quilt. I think it will make things simpler in the end.
Arrange your squares according to the diagram below.
For this block I worked in columns. I sewed things up in the following order. . .
Sew all your individual squares into pairs of matching colors. You should have 24 orange pairs and 26 green pairs.
Sew the orange squares into columns – each 2 blocks x 8 blocks.
Add a green pair to the top and bottom of each orange column.
Sew the remaining green pairs into 4 strips, each 10 blocks long.
Assemble the final block by alternating green columns with the columns that have the orange in them.
That’s 17 blocks done – just 3 more to go. THREE!
Did I mention just three blocks left? I’d better do the math and figure out how much fabric to order for the sashing and the back. I’ll include that info with next week’s block. 🙂
Jo wanted to make a Totoro stuffed animal for a friend from school – and she had a pretty brilliant idea of how to do it without drafting a whole new pattern.
Start with Franklin the Fat Cat! It’s one of her favorites and she’s made it a few times, so she knew it was an easy pattern to work with.
She used Cuddle Fleece in charcoal and camel for the body, plus some felt scraps in black, white, and smoky marble.
She drafted new patterns for the ears, eyes, nose and those things on his chest. (There’s a link to download those pieces at the end of this post.)
She used the tail pattern from Eddie the Teddy Bear to give him a stubby little tail.
And she gave him no feet/legs.
Want to make your own? It’s pretty easy. The only part that’s really different from Franklin (as far as construction goes) is the ears.
Jo wanted them to stand up really well, so she used Soft & Stable foam inside.
Stack a piece of foam, then one ear piece right side up, followed by one ear piece facing down. Sew up and around the top of the ear, leaving the flat bottom open for turning.
Sewing through the foam is super easy. Here’s what that piece looks like from the bottom.
Reach in between the two fleece layers to turn it right side out – the foam will end up between the two layers. Neat!
Fold the sides of the bottom of the ear in to the center and stitch it across the bottom to secure the folds.
Now it has some shape.
Repeat for the second ear and then treat them just like the cat ears in the pattern instructions.
Applique the eyes, nose and chest thingies onto the body front. Jo stuck them down with a glue stick to hold them while she sewed. Clever!
After you stitch around the edges of all the pieces, insert 9 mm safety eyes into the middle of the whites. (If you do that sooner, the shanks of the safety eyes will make it impossible to sew around the whites.)
After that, the assembly is just like Franklin. Easy peasy!
One cute Totoro stuffed animal and his maker, ready for delivery to a friend. 🙂
If you want to make your own, here’s what you’ll need. . .
Add a name, a birth date, a gift date, animal sounds – even a poem or quote!
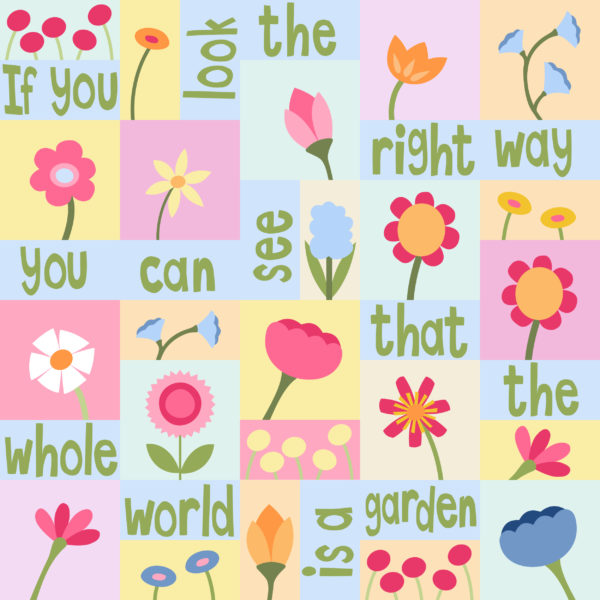
I especially love this version of the Wild Flowers pattern that adds a quote from The Secret Garden by Frances Hodgson Burnett.
Let your imagination run wild!
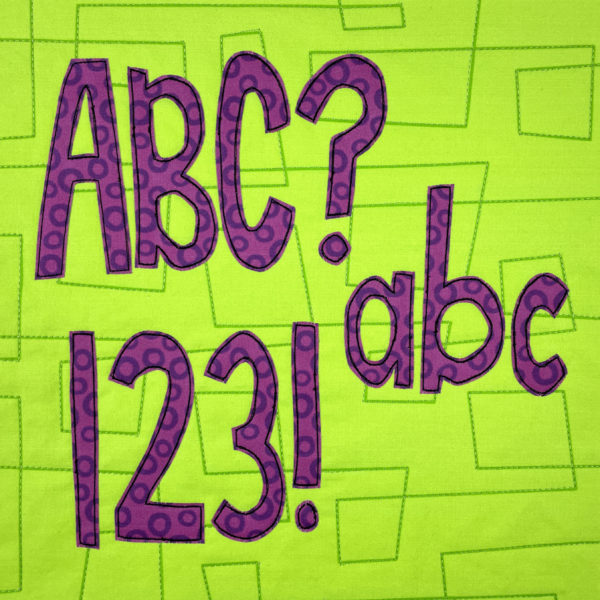
These letters are skinny-ish, allowing you to fit more letters in a standard block. They’re also very irregular so you can easily just shave a smidge off individual letters if you need to skinny them up just a touch to fit in a block and don’t want to go to the hassle of resizing them.
Also – after many requests – this alphabet includes capital letters, numbers, and some punctuation. Yay!
There’s a post here with more info about adding half-size blocks to your quilts – perfect for adding words. The nutshell version is to cut your blocks 6 x 11 inches, then trim them down to 5 1/2 x 10 1/2 inches so that when you sew them together with a quarter inch seam allowance they finish at 5 x 10 inches – exactly half the size of one of my square blocks.
If you need more than six letters, I recommend cutting a larger block. That’s what I did for cock-a-doodle-doo up in the corner of this quilt. (This sample uses an old, chunkier alphabet that I don’t use anymore – but you get the idea.)
Trace the reversed image of the letter onto the paper side of your fusible adhesive. Roughly cut around it.
Follow the manufacturer’s instructions and fuse it to the back of the fabric.
Cut it out as neatly as you can.
Peel off the paper and fuse the letter to your finished piece. Stitch around it if you like. Some adhesives require stitching – so read the label before you decide to skip it.
Use this free applique alphabet pattern to add words to your quilts, pillows, tote bags and more. Add your kids’ names to everything they own. Have fun with it!
If you like this pattern, sign up for the Shiny Happy News! Members get a weekly email with tutorials, patterns, sewing news, fun stuff and things to make you smile. 🙂